cout << "Dhafin Salman - 2308816";
RouterOS is a Linux-based operating system created by MikroTik to convert a computer or laptop device into a router. Here I will explain the process of installing and configuring RouterOS on a laptop device.
System requirements
RouterOS is fully compatible with pre-installed MikroTik hardware. It can also be run on third-party devices if it meets the following requirements:
- i386 compatible architecture
- SMP - multi-core and multi-CPU compatible
- Minimum 32MB RAM (2GB maximum supported, except on Cloud Core devices and CHR installations, where there is no maximum)
- IDE, SATA, USB and flash storage media with a minimum of 64MB space
- Network cards supported by the linux kernel (PCI and PCI-X)
Equipment and Materials
The materials and equipment that must be prepared to install and configure RouterOS are as follows:
1) First, we have to download RouterOS first on the official Mikrotik website or other alternative link.
Web Address:
https://mikrotik.com/downloadDownload link:
https://download.mikrotik.com/routeros/6.48.1/mikrotik-6.48.1.isoWinbox link:
https://mt.lv/winbox
2) A PC or Laptop device for testing.
3) Minimum 1GB flash disk for storage.
4) VirtualBox for the RouterOS installation process on a Flashdisk.
RouterOS installation process on flash disk via VirtualBox
Here's how to install RouterOS on a Flashdisk via VirtualBox:
1) First, we insert the flash disk that will be used as storage.
2) Now we open VirtualBox and create a new Virtual Machine by clicking the “New” option.
3) Then we give the new virtual machine a name, then select the storage location, OS type and OS version.
4) Then we make the RAM bigger, for free RAM because the virtual machine is only for carrying out the installation process, for the actual RAM it depends on the laptop that will be tested.
5) Then on the Hard disk menu we don't need to create one because we will use a Flash disk for the installation process.
6) After the virtual machine is created, then we click the Settings option.
7) In the system section, select Optical as the first boot.
8) Then in the Storage section, we add the RouterOS installation CD to the virtual machine.
9) We add the *iso RouterOS file by selecting the "Add" option and looking for where we save the file.
10) If it has been added, we select the ISO file.
11) Then for the USB section, we add the flash disk that has been inserted by clicking the add button on the side.
12) If the flash disk has been added, then we check the flash disk and click "OK" if all parts have been configured.
13) Now we press the “Start” option to start the installation process.
14) Wait until the RouterOS installation menu appears.
15) In this menu, we press the "a" button to select all software packages on RouterOS.
16) Then we press the "i" button to install the software package, then press the "n" button to delete the old configuration.
17) Then we select "y" to continue the RouterOS installation process and wait until the installation process is complete.
18) Once we have pressed "enter" to reboot the virtual machine or just close it straight away.
Now the RouterOS installation process in VirtualBox has been successfully carried out, now we remove the flash disk and plug it into the laptop or computer that will be tested.
Configure RouterOS on the Laptop to become an Access Point
The following is how to configure RouterOS on a laptop to become an access point router so that the laptop turns into an access point.
WARNING: The laptop or computer hard disk that is used as RouterOS must be removed because it will be formatted by the RouterOS flash disk.
Here's how to configure the Access Point Router:
1) First we insert the flash disk into the Test Laptop.
2) Turn on the laptop until the login menu appears.
3) Now we connect RouterOS to the Laptop Client to configure it.
4) If it done, we have opened Winbox.exe on the Laptop Client to configure the RouterOS Laptop.
5) Then we click refresh to look for the MAC or IP address of the connected RouterOS. If there is, it will appear at the bottom, because it has not been configured, the IP read will be 0.0.0.0.
6) Then select the Mac/IP that is read and click Connect.
7) If you have entered, we select the Wireless section.
8) We select wlan1 then click the blue tick above to activate the wlan.
9) Then we select Security Profile to add a security password for the Access Point/WiFi.
10) We click the blue Add (+) logo to add a security password. Here I give the test name for the Security Name and Authentication, we use WPA and WPA2.
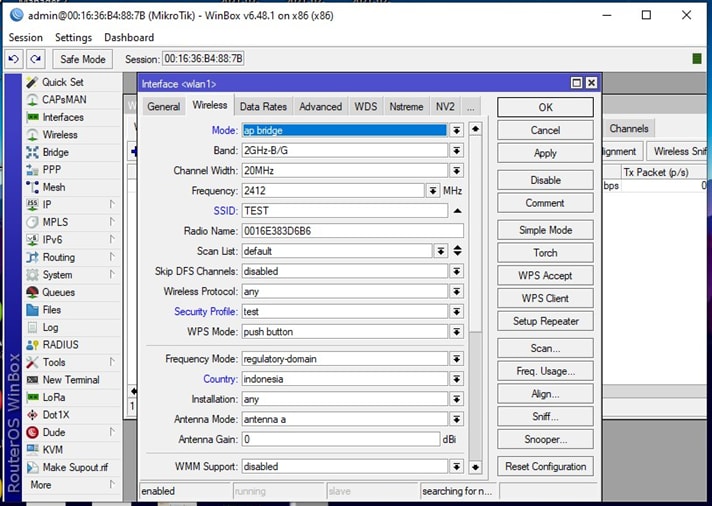
11) After that we return to WiFi interfaces, we double-click the wlan1 section to configure the WIFI SSID.
12) We set the "Wireless" section, then we select the "ap bridge" mode to activate WiFi, for example I named the SSID TEST and the Security Profile we selected the security that was created earlier.
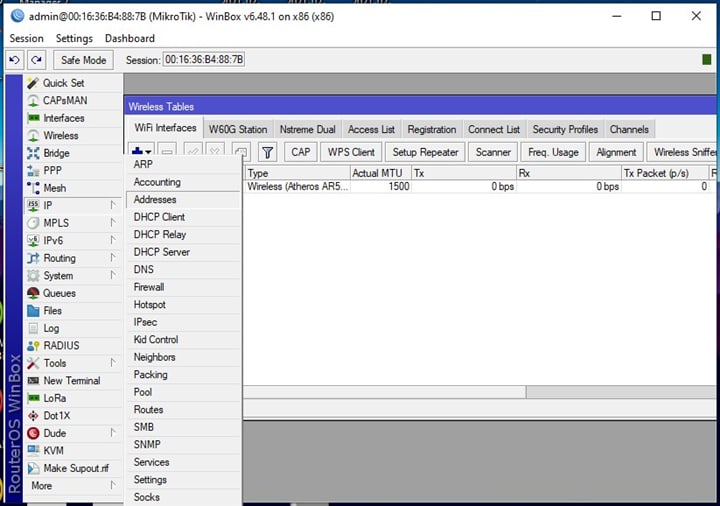
13) Now we select the IP option, then select Addresses to set the IP Address on WiFi.
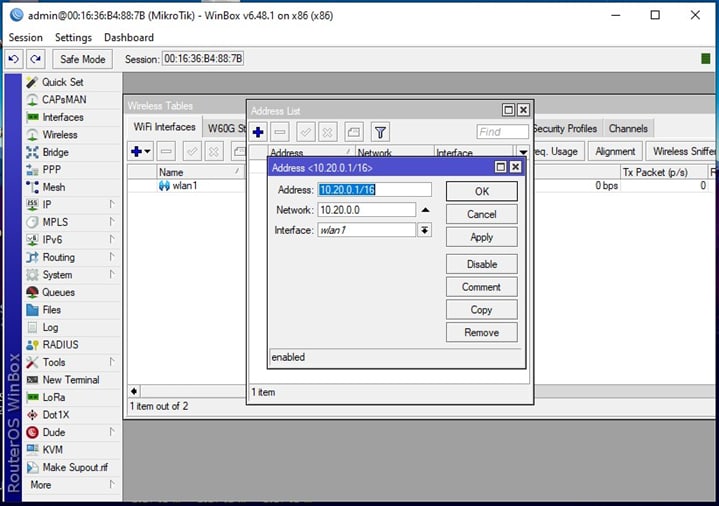
14) We add the IP by clicking the blue plus button. For example, I gave the IP 10.20.0.1/16 and the interface was wlan1. If so then click Apply then OK.
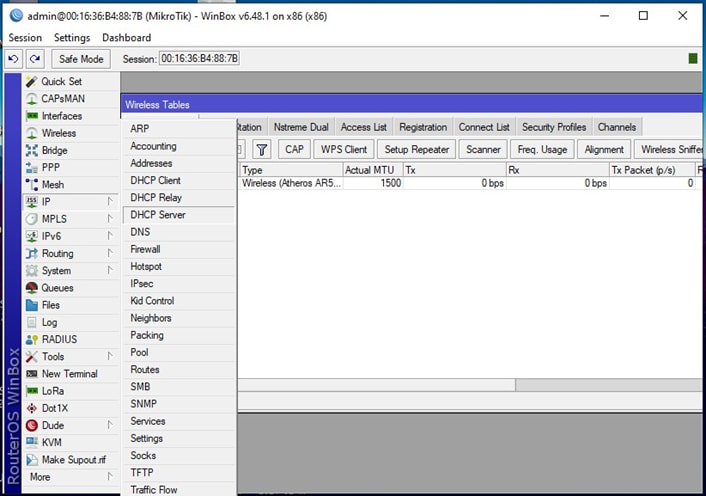
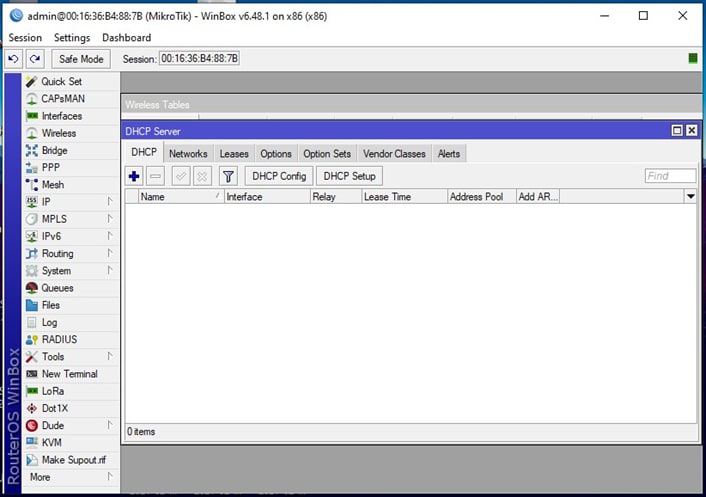
15) Next, we select the IP option again and select DHCP Server to add DHCP to the WiFi access point.
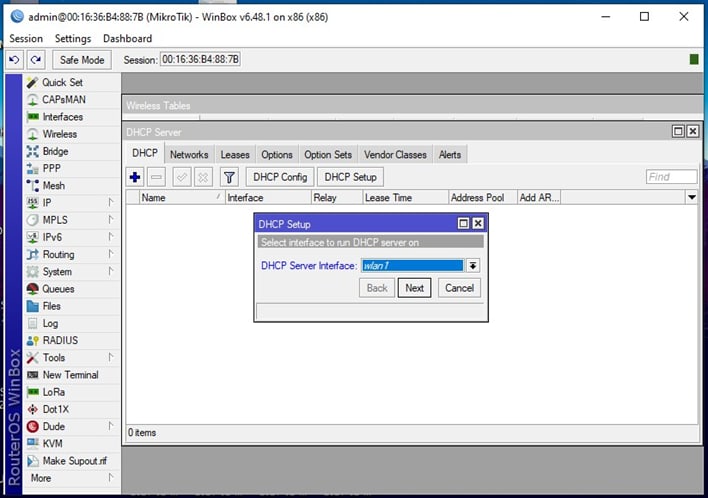
16) We select "DHCP Setup" to create DHCP.
17) First, we choose which interface we will create DHCP because we will create a WIFI access point, so we select wlan1, then we click Next.
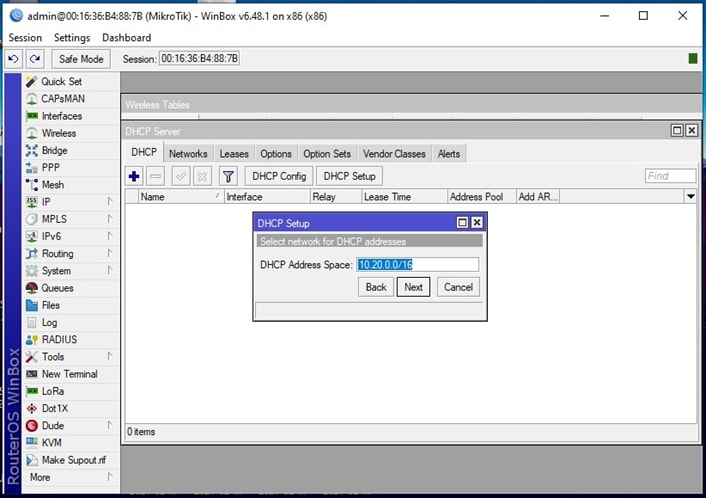
18) Then we set the IP, because we have created it before, it will automatically be read immediately, we just click Next.
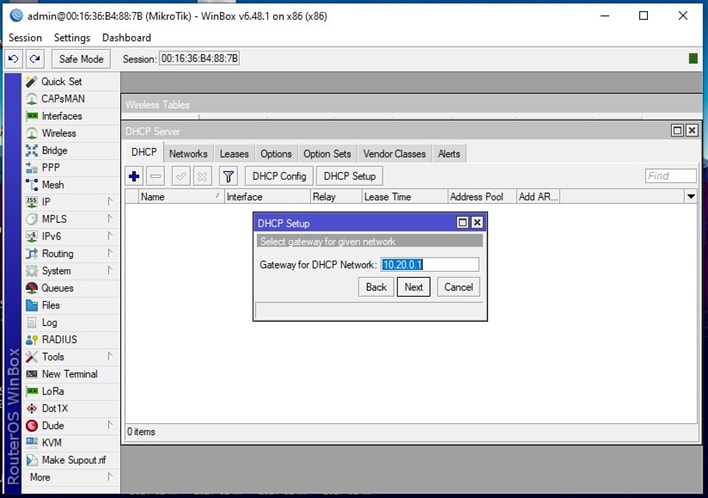
19) Then we set the Gateway IP, we just choose the default according to the IP that was created earlier. Next, we select Next.
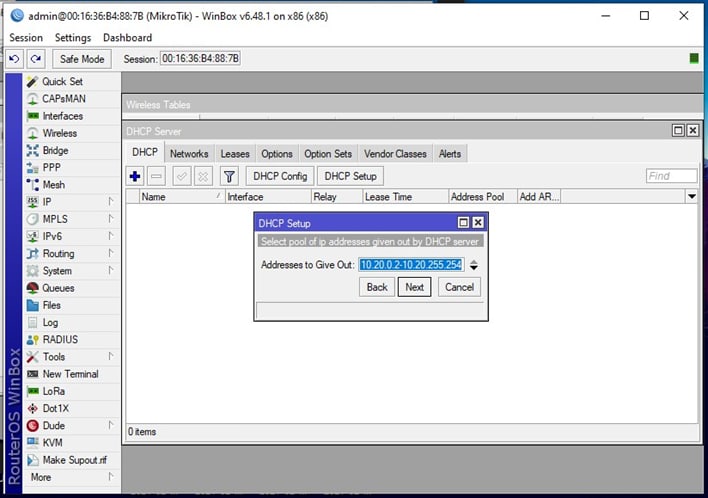
20) Then we enter the DHCP IP Range that will be given to the Client, here we just set the default according to the IP and Class that was created earlier. Next, we click Next.
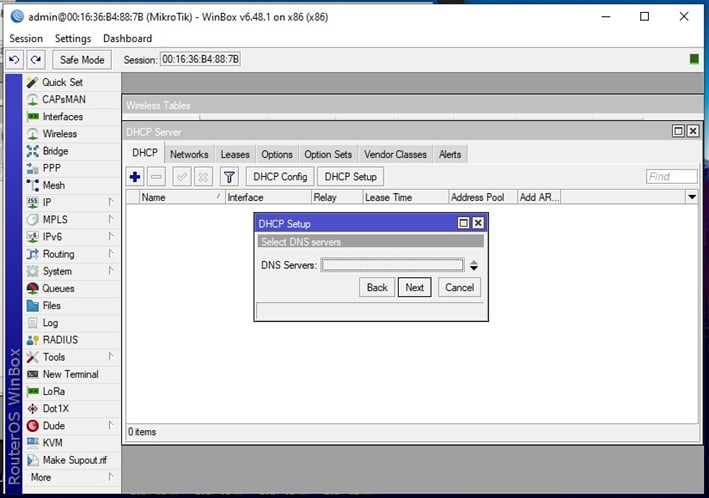
21) Then we just leave the DNS section blank because we will take the DNS from the ISP, so we just go Next.
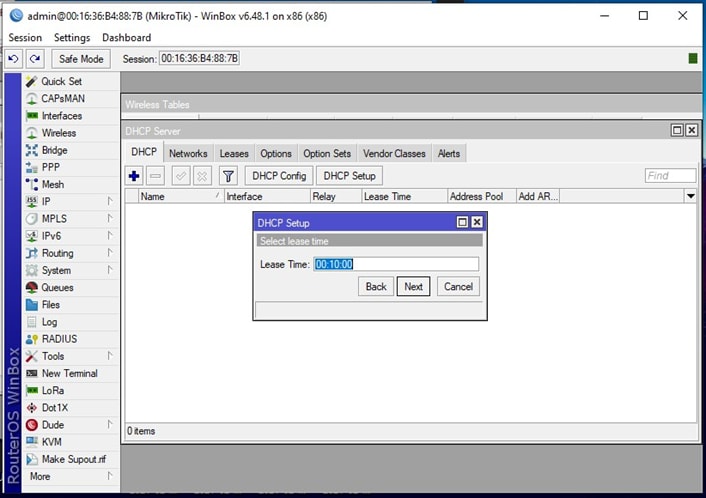
22) Now just set the default lease time, then we click Next to end the DHCP configuration.
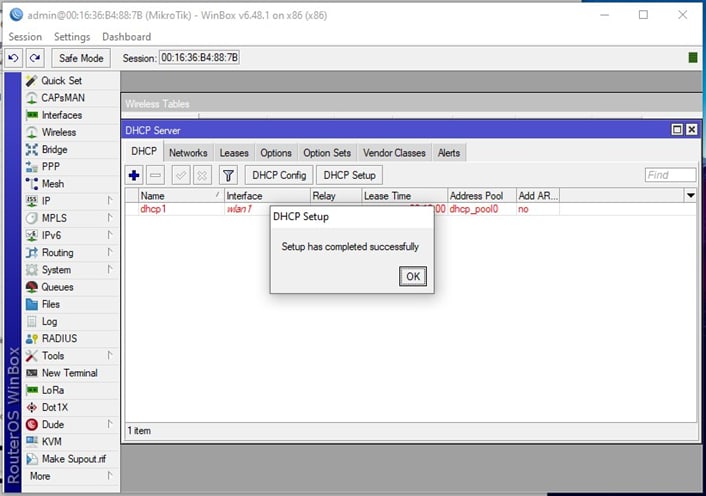
23) If DHCP is successfully created, a dialog will appear as below, we click OK to continue with the next configuration.
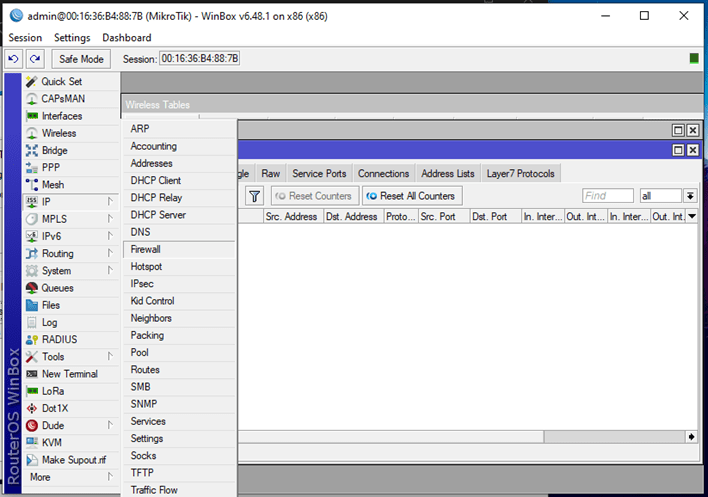
24) Next we select the IP option and select Firewall to configure Firewall Nat.
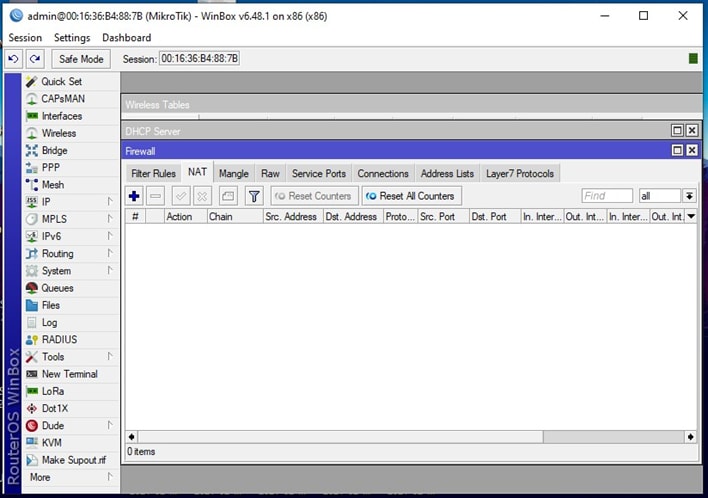
25) We select the NAT section above then click the blue plus button to add a NAT Firewall Rule.
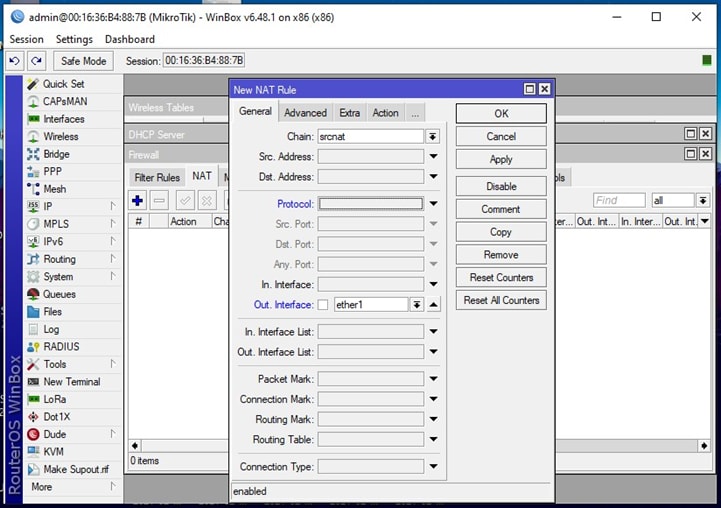
26) Click add, then we set the settings in the General section. We set the chain with "srcnat" and Out. The interface is "ether1", because ether1 will later become the ISP's path to RouterOS.
27) Then we set the Action section, we set the Action to "Masquarade" then click Apply and OK.
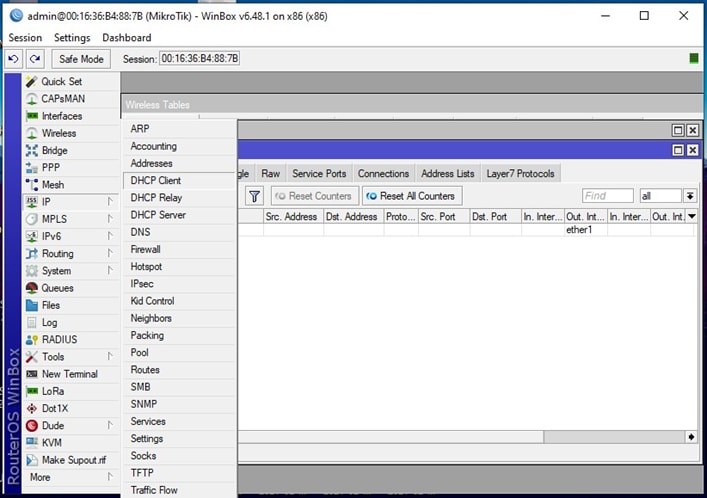
28) Next, we select the IP option again and select DHCP Client to add an IP Client from the ISP.
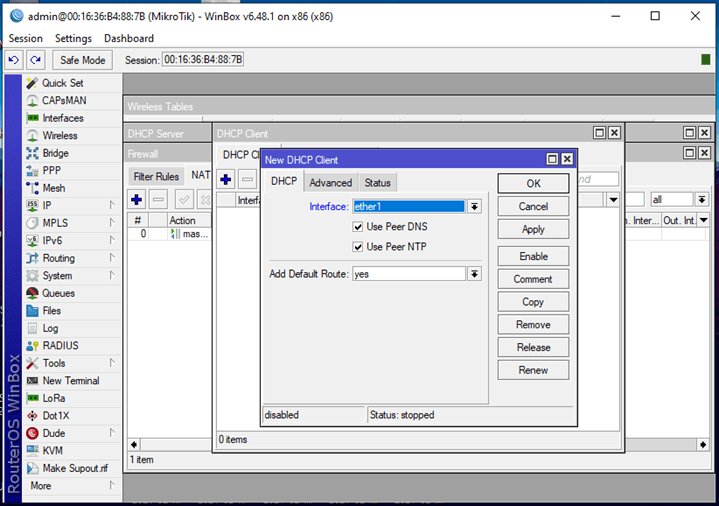
29) We add a DHCP Client by clicking the blue add button. We select the ether1 interface to receive the DHCP Client from the ISP, then we click Apply and OK.
30) If so, now we disconnect the LAN from the Laptop Client, then we connect the LAN cable from RouterOS to the ISP.
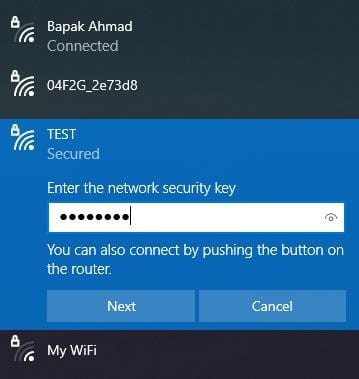
31) Now we enter the WiFi Access Point testing stage, now we look for the WiFi SSID that was created earlier then we connect it to the Laptop Client Device.
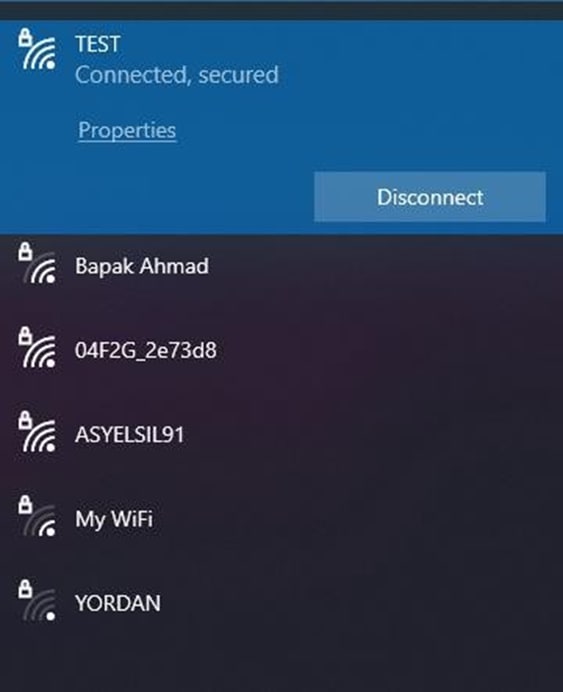
32) Then the Laptop Client is connected to RouterOS WiFi. If you look at the Connected status, the Client can now access the Internet.



Top comments (0)