cout << "Dhafin Salman - 2308816";
macOS Catalina is an operating system from Apple released in 2020. On this occasion we will discuss the installation process starting from downloading the macOS Catalina installation file to setting up the macOS installation.
General System Requirements macOS Catalina
- OS X 10.9 or later.
- Memory of 4 GB.
- 12.5 GB of available storage space (OS X El Capitan 10.11.5 or later).
- Some features require an Apple ID; conditions apply.
- Some features require a compatible Internet service provider; fees may apply.
Mac Hardware Requirements
To get details about your Mac model, click the Apple icon at the top left of your screen and select About This Mac. The following Mac models are compatible with macOS Catalina:
- MacBook (Early 2015 or later).
- MacBook Air (Mid 2012 or newer).
- MacBook Pro (Mid 2012 or newer).
- Mac mini (Late 2012 or later).
- iMac (Late 2012 or later).
- iMac Pro (Year 2017).
- Mac Pro (Late 2013 or later).
Equipment and Materials
Materials and equipment that must be prepared to install macOS Catalina:
1) First we have to download the macOS Catalina bootable file directly from Apple's Official App Store. If you don't have the App Store, we can download it via the following alternative link:
Web Address:
https://allmacworld.com/macos-catalina-10-15-7-free-download/Download link:
https://download213.xyz/MAC/macOS_Catalina_10.15.7_19H2_Multilanguage.dmg
2) A 16 GB flash disk that has been formatted "mac OS (Extended Journed)" to be used as a bootable macOS Catalina
3) Apple Computer devices of course such as Mac, iMac and MacBook
Making Bootable with Terminal
Here we will use the terminal to create a bootable macOS Catalina. Here's how to make bootable:
1) First, we open Disk Utility to format the Flashdisk, then select the Flashdisk to be formatted.
2) Then click erase and format to "mac os (Extended Journed)" and give it a name, if so click Erase.

3) A warning will appear to format the flash disk, click Erase to continue the process.

4) Now we open the terminal on the iMac or other Apple device then enter Command :
“sudo”

5) Then we look for macOS Catalina Application in Finder.

6) Then right click and select Show Package Contents.

7) Then now we select the Contents folder.

8) Then we select the Resources folder.

9) Then we look for createinstallmedia then drag it to Terminal.

10) Then we drag or drag and drop the createinstallmedia file into Terminal.

11) After that enter Command :
"--volume"

12) Then we type in the volume location or drag the flash disk volume that has been formatted to mac os (Extended Journed) into the Terminal.

13) Then enter the administrator user password to continue the bootable format process.

14) After that we type "y" to continue the formatting process and press "enter".

15) Now we wait until the process is complete. If the process is successful then a dialog will appear as below, then the bootable creation process has been successful.

macOS Catalina Installation Process
Here's how to install macOS Catalina on an iMac device:
1) First, we insert the bootable flash disk into the iMac.
2) Turn on the iMac then press the “option” button on the keyboard.

3) Then select boot macOS Catalina from the inserted flash disk.

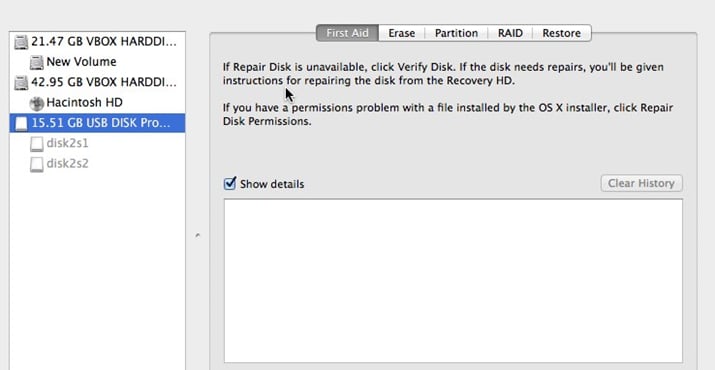
4) If you have entered the boot menu, first we format the Mac hard disk. Select the "Disk Utility" menu.

5) Next, we select the iMac internal hard disk that will be formatted.

6) Then we select Erase at the top. we name the partition/hard disk and format it to "mac os (Extended Journed)".

7) Then we click "Erase", if a dialog like the one below appears then the formatting process was successful then click done.

8) After that we close or return to the initial menu. We select "Install macOS".

9) We select continue or next.

10) Then we select agree

11) Then there will be a notification as below. We click agree to continue the process.

12) Next, we select the internal hard disk that has been formatted and named earlier to install macOS Catalina and click "Install".
13) Now wait for the installation process to complete.

14) After the installation process is complete, now we will enter the macOS setup process before use. First we set our region, after that we select continue.

15) Then options will appear as below, we leave the default by just Next or Continue.

16) Then we select the internet connection, here we will connect to the internet later after the installation process is complete then select "other network options".

17) Then we select the third option and click continue.

18) A notification will appear as below, we just click continue.

19) Then a menu will appear as below, we just leave the default and click Continue.

20) Then a menu will appear as below, we will select option 3 then click Continue.

21) Then the Apple ID login menu will appear, if we have one then log in immediately, if we don't have one then we select "sign up later" and Continue.

22) Then a notification will appear as below. Let's just click Skip.

23) Then the Terms and Conditions menu will appear as below. We select Agree to continue.

24) Options will appear as below. We click Agree to continue.

25) Now we enter the main administrator account creation menu, we create a user and password then click Continue to continue.

26) Then the Express set up menu will appear, we just leave the default and click Continue to continue.

27) Then the Analytics menu will appear as below, we just leave the default and click Continue.

28) Then the Screen Time menu will appear as below, we just leave the default and click continue.

29) Then the Siri menu will appear, here we check "Enable Ask Siri" then click Continue to continue.

30) Next, we select the language used to use the Siri feature, then we select the default language and select Continue.

31) Then we select Theme on macOS Catalina, here I select Dark so that the appearance of macOS Catalina looks better, if so, we click Continue to complete the setup.

32) We wait for the macOS Catalina setup installation process to complete.

33) Then the macOS Catalina installation process has been completed and the iMac can be used.


Top comments (0)