![Cover image for YEW Tutorial: 08 Dr. Ferris, I presume? Web Geography, injected with Rust! [P. I]](https://media2.dev.to/dynamic/image/width=1000,height=420,fit=cover,gravity=auto,format=auto/https%3A%2F%2Fdev-to-uploads.s3.amazonaws.com%2Fi%2Fxrapyk0ejozs1xro9don.jpg)
(Photo by Perfect Snacks on Unsplash)
This time we shall start to see some practical applications of what we saw so far. I'm already excited, aren't you as well?
One note of method: we could build up the final project all at once, but then we will not see much improvements, we will only see what is needed to create the final result, and maybe, something similar. Useful, but not enough.
Instead we will incrementally go over some steps to show the building blocks of our project, and we will play with them. We will take more time to build the project, but we will learn more about our tools and methodologies.
So bear with me, but these tutorials are getting lengthier and lengthier.. and I have split them up already!!!
Part 1: Cleanup the mess and start all over
We start by cleaning up the mess we did so far. However, we will do so by copying the code or forking, the project I prepared as basis for a development environment for you and for me.
https://github.com/davidedelpapa/yew-devenv
Fork it, or clone it, or download the zip and copy the files in your directory, whichever you think it more appropriate.
This is also a template project, so you could really also push the "Use this template" green button
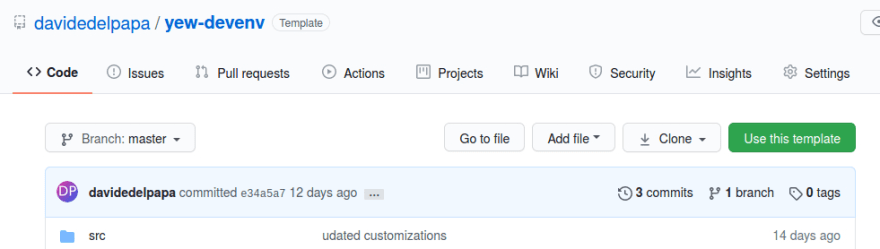
For an easy follow on, I will show the passages to fork and rename the project.
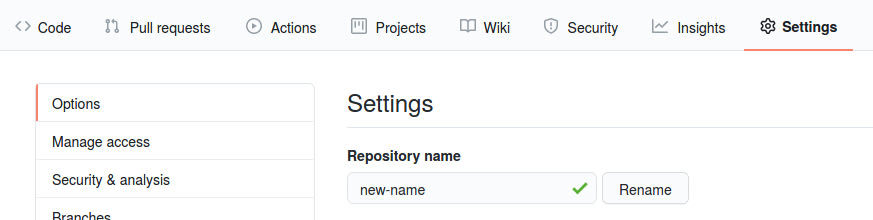
- Fork the project and rename it (or use the "Use this template" function and assign it a name). In this case I called it "yew-weather"
- Open Cargo.toml and rename the field
nametoname = "yew-weather". I left theauthorsunchanged but you should change it to your name - Open main.js and change the first line to
import init, { run_app } from "./pkg/yew_weather.js"; - Change in the same file the first line of the
mainfunction toawait init("/pkg/yew_weather_bg.wasm");
Remember: to rename a project in github the field is under the Settings tab
Now we init the whole project by:
./run
When prompted by the npm init remember to put the correct name
package name: (yew-devenv) yew-weather
version: (0.1.0)
keywords:
license: (MIT)
You should change the "repository", "author", and "homepage" inside package.json
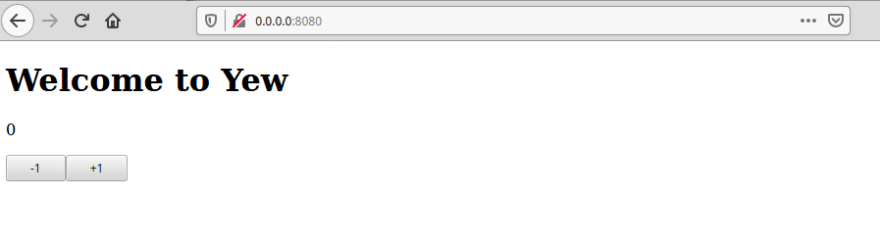
If all goes well, you should have a sample app running on http://localhost:8080/
Now we can pass to the meatiest part of the tutorial.
Part 2: Maps and weather
We will be writing an interesting app today, I hope. Let's say we want to know what's the weather like. To know this info there are many different apps for the cellphone etc, but let's say we are writing an app for a camping location. The place is by the sea, there are the usual camping amenities, but also a small deck with boats to be rent for the day, and so on. We already built a nice landing page, with some nice pics of the place and a list of amenities, you know, the usual. What is really missing is a real time map to show the winds for sailing and windsurf, because the bay might seem calm, but further on the wind can get naughty...
Would you know how to build the map? An build it using Js and Rust together? How would you go about making it?
There are actually solutions already made for us.
For the base map we will use the free services provided by Mapbox to get the base tiles. More on this later.
For the weather part, there is is an API called OpenWeatherMap, which provides a key and a free tier to try the app. The service we will use is the Weather Map, which is the free-tier way to retrieve TMS tiles.
But what are these tiles that both Mapbox and OpenWeatherMap use? Trying to summarize, when we see a map there are really two implied components: the scale of the map (which is easily understood) and the projection. You know, the world is more like a sphere than a map, so we need to project a round portion to a square image, not easy at all. In time, there have been proposed and used several different types of projection.

(Mercator projection. Source: wikimedia)
To render maps in a website, TMS, or WebTMS, or the like, all adopt one such projection, the web Mercator, created ad hoc for the purpose, that can be used for the web. It is used with some variations by Google Maps and OpenStreetMap as well.
The format takes into account a zoom level, identified with a parameter z, and then it renders the map as tiles that is, 256X256 pixel images, usually .tiff, .png, or .jpg, identified by a position x and y on a Cartesian plane. At zoom level 0 all world is shown in a single tile. At zoom level 1 this tile is divided into four, so you need 4 tiles to represent the whole world, and so on.
The problem in this way, is to reference a point in the latitude, longitude coordinates to a certain zoom level, to know to which tile it belongs. And of course, given a tile, to know from which coordinates it spans, from upper left, to bottom right.
There are several tools to help (I myself have created long time ago a small Rust library to handle the needed conversions).
For example, there is a very useful JavaScript library, leaflet.js, used to visualize tilemaps in this web tile format (called also slippy maps).
Let's solve the problem with leaflet first, and then see how we can improve over it using yew.
However, before we can display our maps, we need to modify a little our Yew project
Code to follow this tutorial
The code has been tagged with the relative tutorial and part, in yew-weather repo.
git clone https://github.com/davidedelpapa/yew-weather.git
cd yew-weather
git checkout tags/v8p2
index.html
We are actually creating a separate entry-point for Yew and leaflet, that is we will mount a map in a <div> and the wasm in another <div>.
So far we have not seen how to actually achieve that. Indeed the documentation relative to mounting are very scanty, generally speaking they all seem to be happy to mount the output of the wasm directly into the <body> of the html document... but it doesn't have to be that way We can do better.
So we start by creating two separate entry-points in the index.html
<body>
    <div id="my_map"></div>
    <div id="yewapp"></div>
</body>
Since we are here, we'll add also the needed "imports" for lealfet in the <head>
<link rel="stylesheet" href="https://unpkg.com/leaflet@1.6.0/dist/leaflet.css"
   integrity="sha512-xwE/Az9zrjBIphAcBb3F6JVqxf46+CDLwfLMHloNu6KEQCAWi6HcDUbeOfBIptF7tcCzusKFjFw2yuvEpDL9wQ=="
   crossorigin=""/>
<script src="https://unpkg.com/leaflet@1.6.0/dist/leaflet.js"
   integrity="sha512-gZwIG9x3wUXg2hdXF6+rVkLF/0Vi9U8D2Ntg4Ga5I5BZpVkVxlJWbSQtXPSiUTtC0TjtGOmxa1AJPuV0CPthew=="
   crossorigin=""></script>
<script src="/pkg/bundle.js" defer></script>
<style>
    #my_map {
       height: 400px;
    }
</style>
We added first the CSS for leaflet, then right after, the JS for it. This order is really important!
Then we add also our bundle.js
After that I added a custom style for the map <div>, through its id to set an hight. These are my settings, but if you want to give it a width, and center it, go ahead.
For the html page it's all. Let's move on to our lib.rs
src/lib.rs
I put it here in its entirety, then we will discuss the changes:
#![recursion_limit = "256"]
mod app;
mod components;
use wasm_bindgen::prelude::*;


#[wasm_bindgen(start)]
pub fn run_app() -> Result<(), JsValue> {
    let window = web_sys::window().expect("no global `window` exists");
    let document = window.document().expect("should have a document on window");
    let body = document.body().expect("document should have a body");
    let children = body.children();
    let mounting_div= children.named_item("yewapp").expect("missing element with 'yewapp' id");

    yew::App::<app::App>::new().mount(mounting_div);

    Ok(())
}
First of all we notice that we use the whole prelude of wasm_bindgen, and that the directive has changed from #[wasm_bindgen] to #[wasm_bindgen(start)].
However, the main changes we need is to walk through the DOM of the document, find the <div> we need, and implant in it our entry-point.
We do so by first selecting the browser's window (which is actually an abstraction, not the system's WM window). More references here.
We then select the document, then the body (the actual <body> tag in index.html). As you can see, we have to walk through the whole DOM tree.
The body, being an actual Html Element, has got the children() method, which we use to select our intended <div> by its id, using the named_item() method.
Once we have the selected <div>, we mount the yew::App directly to it.
What we were doing up to now, using yew::start_app, is that we were just mounting the app in the <body> of the document.
cargo.toml
Of course, we need a little upgrade to cargo.toml to get to use the above code, since the directives we used to walk the DOM are feature-gated in web_sys
[dependencies]
wasm-bindgen = "^0.2"
yew = { git = "https://github.com/yewstack/yew", features = ["web_sys"] }
yewtil = { git = "https://github.com/yewstack/yew", features = ["fetch"] }
[dependencies.web-sys]
version = "0.3.4"
features = [
  'Document',
  'Element',
  'HtmlElement',
  'HtmlCollection',
  'Node',
  'Window',
]
As you can see, we just added a [dependencies.web-sys] section underneath the other dependencies, stating all the features wee need.
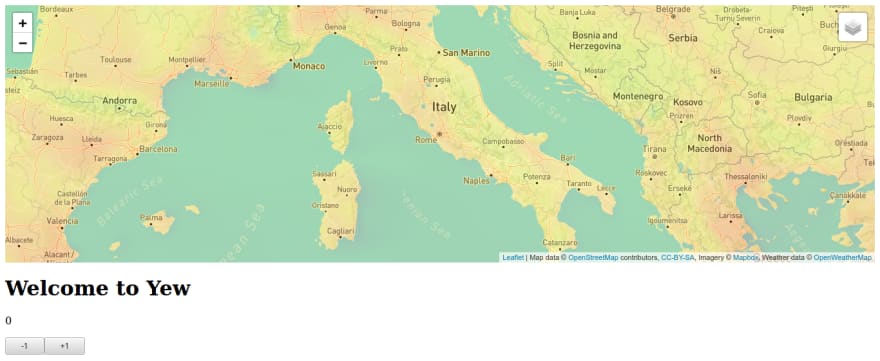
Time to run
Upon running you should see the space left for the map, and the Yew app mounted underneath it (for the screenshot, I actually reduced the <div> space).
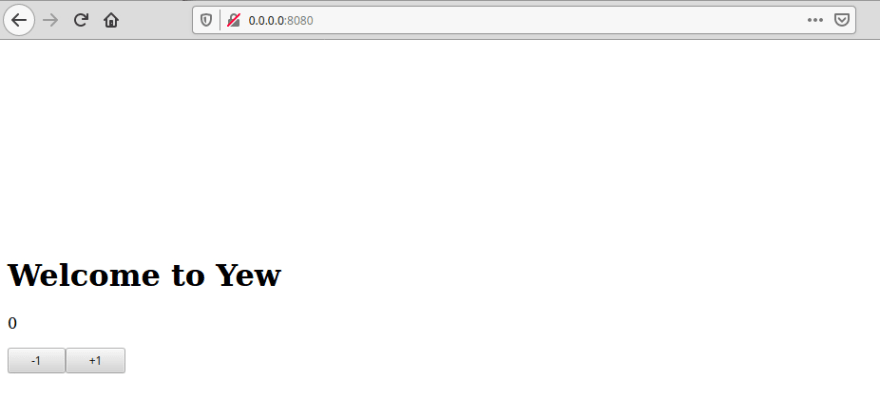
All nice and sweet. But we prepared only the space for the map: now we need to go ahead and get a map there!
Additional tools
We will need to create a .env (pron. "dot env") file to save our credentials. We will use a rollup plugin to inject the variables we will save in the dot-env file inside the JavaScript source code. This will be done injecting them into the bundle.js so that they do not need to be read again and again from the server.
If you are using webpack or other, there are several equivalent packages to achieve the same end.
We will install rollup-plugin-inject-env:
npm i rollup-plugin-inject-env
Then we will modify our rollup.config.js and add also a .env file
rollup.config.js
We just need to add the new plug-in:
import livereload from "rollup-plugin-livereload";
import injectEnv from 'rollup-plugin-inject-env';

export default {
  input: "main.js",
  output: {
    file: "pkg/bundle.js",
    format: "iife",
  },
  plugins: [
    livereload('pkg'),
    injectEnv()
  ],
};
We are set to use it
.env
Of course, we need a .env file from where to get the "secrets"
We write it at first this way:
WEATHER_KEY=XXX
BASEMAP_KEY=XXX
then, we will replace the XXX with actual keys
Credentials for the base map
Time to point our browser to Mapbox home page, and get an API key.
Registration is quite easy: there is a 'call to action' button that reads Start mapping for free.

Upon pressing it, we should see a registration form. Follow all the steps.
After confirming the email, it will redirect you to your member area.

Get to the Tokens page, and create a new Access Token (API key):
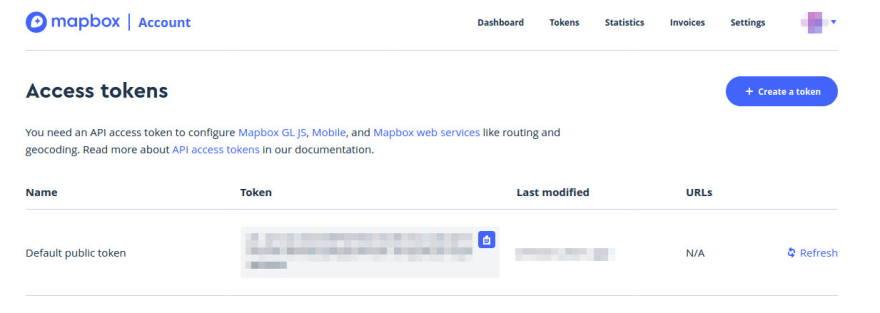
Now you can copy the access token and replace the XXX for the BASEMAP_KEY in the .env file.
Credentials for the weather map
Now for the weather map
We need to Sign in to openweathermap.org

After filling in your info, registering and confirming the email, you will be redirected for access to your member area.

From there you have to go to the API keys page, and generate a new API key (just enter a name and press the Generate button)
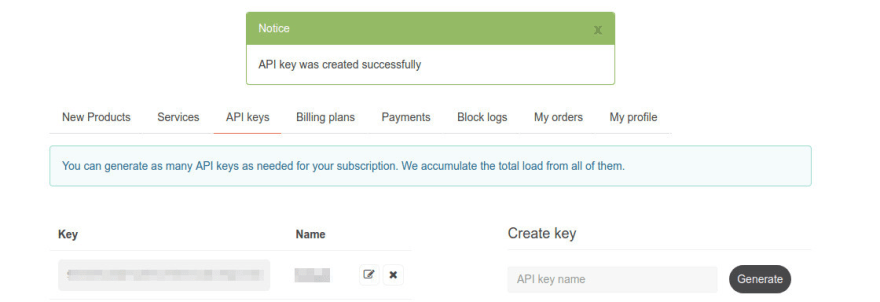
Once done, you can copy the key and and replace the XXX for the WEATHER_KEY in the .env file.
js/map.js
Now we have all we need to create a map.
I will not delve too much into the JS code needed, but you can check out the official leaflet tutorials: they are well done.
We will create a map.js in a folder called JS at the root of the project, and add to it the following code:
var basemap = L.tileLayer('https://api.mapbox.com/styles/v1/{id}/tiles/{z}/{x}/{y}?access_token={accessToken}',
{
attribution: 'Map data © <a href="https://www.openstreetmap.org/">OpenStreetMap</a> contributors, <a href="https://creativecommons.org/licenses/by-sa/2.0/">CC-BY-SA</a>, Imagery © <a href="https://www.mapbox.com/">Mapbox</a>',
maxZoom: 18,
id: 'mapbox/streets-v11',
tileSize: 512,
zoomOffset: -1,
accessToken: process.env.BASEMAP_KEY
});
var weathermap = L.tileLayer('https://tile.openweathermap.org/map/{layer}/{z}/{x}/{y}.png?appid={key}',
{
attribution: 'Weather data © <a href="openweathermap.org">OpenWeatherMap</a>',
layer: 'temp_new',
key: process.env.WEATHER_KEY
})
var mymap = L.map('my_map',
{
center: [41.9028, 12.4964],
zoom: 6,
layers: [basemap, weathermap]
});
var baseMaps = {
"Terrain": basemap
};
var overlayMaps = {
"Heat map": weathermap
};
L.control.layers(baseMaps, overlayMaps).addTo(mymap);
export var map=mymap;
As a quick guide to the code:
- We create first the two layers, the base-map, and the weather map. For that we use the
L.tileLayer()to which we pass the URL of the API (with substitution variables) and a configuration object. In the configuration object we specify how to substitute the variables in the URL. Notice that for the API keys, we use theprocess.env.KEYnotation, whereKEYis the name of the key set in the.envfile. The plug-in rollup-plugin-inject-env has injected them for us as environment variables. Each layer is then saved in its own variable. - One thing to notice: the URL of the API has many place-holder variables that the configuration object will substitute. However, there are 3 that are present in all tiled map services and that leaflet will produce for us, that is, the current zoom-level
{z}and a the tile coordinates{x}and{y}, that will be calculated from the geographic point we are watching, according to the zoom-level we are watching the map at, and how many of these tiles will be needed to fill the view of the map. Lots of math, but it is all done for us by leaflet. - The next step is to create the actual map with
L.map(), to which we pass theidof the<div>where to inject the map, and a configuration object. The location (as latitude/longitude coordinates) and zoom level are set in this configuration object, together with the variables that make up its layers (the two we already created that is). - For the layers to be correctly shown in the map, we create two objects, one representing the base maps (base maps can be switched one with the others, but only one at a time can be shown: think of them as a background), to which we assign our base-map; the other object representing the overlays of the map (many at a time can be shown: think of them as layers of added information).
- finally we add the layers objects to a
L.control.layers()object and add it to our map. - we export the map thus composed
main.js
Before we can show our maps, we need to import the js/map.js into our main.js
import init, { run_app } from "./pkg/yew_weather.js";
import "./js/map.js";

async function main() {
  await init("/pkg/yew_weather_bg.wasm");
  run_app();
}
main();
Second run
Time to reap the fruits of our labor!
The layer control is top right as default, and we can expand and choose on hover

For now there is not much to choose, but we can exclude the weather layer, which gives a hue to the image according to the temperature.
It does so because we set it to the temperature map, with the variable called layer: 'temp_new' in the configuration object of the weather layer.
All the weather maps available are shown in this page.
If you want, go ahead and substitute the layer with the name of the layer you want to show, for example layer: 'clouds_new', for the clouds overlay.
You could also duplicate the var weathermap and put another overlay, then add it to the controls object in overlays, for example, if you call it weathermap2:
var overlayMaps = {
    "Heat map": weathermap,
    "Cloud map": weathermap2
};
Just remember that the more layers you add to the map, the more calls are made to the API.
Part 3: Stir the cauldron
All we did so far was integrating some JS in our project; but really, what we do have right now is two separate things: a map using JavaScript, and a counter app, using Webassembly made with Yew. We need to mix well the two in the cauldron for Magic to happen.
Code to follow this part
git checkout tags/v8p3
What we will do in this part is to create programmatically with Rust the layers to add to the map.
There are two problems in fact with the map we have created so far:
- Since it is not zoomed in to a precise location this is not so evident, but if you just try zooming to a coordinate at zoom level 12 to 17 (which are more useful to get a whole city, or parts, down to a neighborhood), you will find that the weather map just adds a single hue to the map: that is because it does have data only at city level; also it is not very common that the temperature change much from a neighborhood to the next in the same city, isn't it? so the whole area will be painted with the same color, which is actually more disturbing than useful. At that point, a numeric info on the whole city would be more useful. By the way, down to a certain zoom the tiles from OpenWeatherMap are not shown anymore in many locations.
- We are just fetching and showing data from APIs: we have no idea so far how to manipulate, and get useful information for each of our use-case.
Luckily we have almost all the info we need from our previous tutorials, we just do not know how to apply them.
The following part will be a digression based on theory, because, even if very practical, we will just be making toys. Don't worry: you'll feel the Magic very soon!
What we will do
We willmake Rust communicate with JS through a function and the use of the Session Storage.
You heard it right, we will pass info between Rust and JavaScript through the storage we learned about in Tutorial 4 (even though in that code we used the Local, not the Session storage, but now it makes sense not to want to store permanently our data). Then from Rust we will wasm_bindgen a JS function that we will invoke to tell the map to update itself using the data we passed through the Storage.
Easy plot, isn't it?
We will use for the data, GeoJSON, a geospatial data interchange format based on JSON.
But, before we start, let's change a little the <style> in the index.html to give a width to the map and center it:
<style>
  #my_map {
    height: 400px;
    width: 400px;
    margin: 0 auto;
  }
  #yewapp {
    width: 400px;
    margin: 0 auto;
  }
</style>
Here we go, much happier, and consuming less tiles from the services :-)
We also added a style for yew, to center it along with the map.
js/map.js
map.js has changed a lot: let me first write it all down, then we will discuss it.
As a help I added lots of comments and whitespace to separate "concepts", so I hope it'll help:
var lat=process.env.LATITUDE;
var lng=process.env.LONGITUDE;
var mapbox_token = process.env.BASEMAP_KEY;
var position = [lat, lng];
var mapboxurl = 'https://api.mapbox.com/styles/v1/{id}/tiles/{z}/{x}/{y}?access_token={accessToken}';
// Mapbox streetmap
var basemap = L.tileLayer(mapboxurl,
{
attribution: 'Map data © <a href="https://www.openstreetmap.org/">OpenStreetMap</a> contributors, <a href="https://creativecommons.org/licenses/by-sa/2.0/">CC-BY-SA</a>, Imagery © <a href="https://www.mapbox.com/">Mapbox</a>',
maxZoom: 18,
id: 'mapbox/streets-v11',
tileSize: 512,
zoomOffset: -1,
accessToken: mapbox_token
});
// Mapbox satellite
var satmap = L.tileLayer(mapboxurl,
{
attribution: 'Map data © <a href="https://www.openstreetmap.org/">OpenStreetMap</a> contributors, <a href="https://creativecommons.org/licenses/by-sa/2.0/">CC-BY-SA</a>, Imagery © <a href="https://www.mapbox.com/">Mapbox</a>',
maxZoom: 18,
id: 'mapbox/satellite-v9',
tileSize: 512,
zoomOffset: -1,
accessToken: mapbox_token
});
// Display popup if popupContent property
// is present in the GeoJSON feature
function onEachFeature(feature, layer) {
if (feature.properties && feature.properties.popupContent) {
layer.bindPopup(feature.properties.popupContent);
}
}
// Get GeoJSON data from the sessionStorage
function get_data() {
var geojsonData = [];
var rawGeojsonData = sessionStorage.geojsonData;
if(rawGeojsonData || rawGeojsonData === "") {
var geojsonData = JSON.parse(rawGeojsonData);
}
return geojsonData
}
// Create a layer for GeoJSON data
function get_datalayer () {
var geojsonData = get_data();
return L.geoJSON(geojsonData, {
onEachFeature: onEachFeature
})
}
var infolayer = get_datalayer();
// The map
var mymap = L.map('my_map',
{
center: position,
zoom: 18,
layers: [basemap, satmap, infolayer]
});
// Basemaps in Layer Control
var baseMaps = {
"Satellite": satmap,
"Streets": basemap
};
// Overlay maps in Layer Control
var overlayMap = {
"Info": infolayer
};
// Layer Control
var controls = L.control.layers(baseMaps, overlayMap).addTo(mymap);
// Function to redraw the GeoJSON layer, and its control
// connected then to an event
function redrawLayer(e){
controls.removeLayer(infolayer);
mymap.removeLayer( infolayer);
infolayer = get_datalayer();
infolayer.addTo(mymap);
controls.addOverlay(infolayer, "Info");
}
mymap.on('submit', redrawLayer);
export default mymap;
The first thing we do now is to get the position, latitude and longitude coordinates, saved in the .env file (go ahead and add:
LATITUDE=42.585000
LONGITUDE=14.089444
to the .env). Since the center of the map is of interest both for JS and Rust, I think this is the best idea.
var lat=process.env.LATITUDE;
var lng=process.env.LONGITUDE;
var mapbox_token = process.env.BASEMAP_KEY;
Since we are in there, getting variables from .env, we extract also the Mapbox token in its own variable.
var position = [lat, lng];
var mapboxurl = 'https://api.mapbox.com/styles/v1/{id}/tiles/{z}/{x}/{y}?access_token={accessToken}';
We create the position as a array of [latitude, longitude], and we extract also the Mapbox url, with its variables to fill in as well. This is to make atomic changes to code.
Then we build two Mapbox layers: one for the street view, the other for the satellite view, because... why not? (OK, it's there to show you how to do it, just in case it is needed).
The two layers are almost identical (See the code), except for the names, and a substitution variable: {id}.
- for
basemapit isid: 'mapbox/streets-v11' - fr
satmapit isid: 'mapbox/satellite-v9'
Next, we create a filter function. We will apply it to style the next layer we will build.
function onEachFeature(feature, layer) {
  if (feature.properties && feature.properties.popupContent) {
      layer.bindPopup(feature.properties.popupContent);
  }
}
The function checks for the presence of the field "popupContent" in the "properties" of the feature, and attach to the representation of the feature a popup containing the content of popupContent.
By the way, features are items in GeoJSON to be represented on a map. Later on we'll see some theory on these.
Next we make a function to retrieve the GeoJSON data from the session storage, so we check is there allright, otherwise we return an empty array.
function get_data() {
  var geojsonData = [];
  var rawGeojsonData = sessionStorage.geojsonData;
  if(rawGeojsonData || rawGeojsonData === "") {
    var geojsonData = JSON.parse(rawGeojsonData);
  }
  return geojsonData
}
Remember, both operating in JS or Rust, the session storage works with strings, we have to parse the strings to JSON objects if we want to use them as such.
var geojsonData = JSON.parse(rawGeojsonData);
The line above, inside the function, does just that.
Next we prepare a function that returns a leaflet GeoJSON layer using the data we got from session storage. This function has to be invoked all the times the data in the session storage changes. In fact, we have not easy way to update the layer with GeoJSON objects, other than making diffs on the content. This is time consuming, so the best alternative is to remove each time the GeoJSON layer, parse the data in the session storage, and re-create the GeoJSON layer.
The only drawback of this method is that if we change the data in the session storage from Rust, we need to keep adding to what is there, unless we want to re-draw from the ground up. We are lucky, though: while Leaflet supports the whole GeoJSON specs, it supports also just passing arrays of features, without following too much the conventions. Thus we can just append to an array (Vec in Rust) the objects we want to draw, and transfer it in the session storage, and we are set to go.
// Create a layer for geoJSON data
function get_datalayer () {
  var geojsonData = get_data();
  return L.geoJSON(geojsonData, {
    onEachFeature: onEachFeature
  })
}
var infolayer = get_datalayer();
Notice how we style the content with our filter, scanning for needed pop-ups.
We also create right away a layer ready to be added, even if we think that the storage would be empty.
In fact there can happen that the user refreshes the page, or navigates back and forth between pages, and the data will still be present in the storage, as long as the browser window, or tab, is not closed. For a more permanent storage, we should use the local storage though.
Then we create the map, and attach to it all the layers (refer to the above code).
After this, we create two objects containing layers: one for the base maps, that can be interchanged with each other, as we have seen, the other one for the overlay; in this case we deleted the weather map (don't worry, we will use the service again), and we are left with the GeoJSON layer only.
The last function we prepare is for a hook:
function redrawLayer(e){
  controls.removeLayer(infolayer);
  mymap.removeLayer( infolayer);
  infolayer = get_datalayer();
  infolayer.addTo(mymap);
  controls.addOverlay(infolayer, "Info");
}
mymap.on('submit', redrawLayer);

export default mymap;
This function, in sequence, removes the GeoJSON data layer from the control, removes it from the map, and re-creates it from the data; after this, re-attaches it first to the map, and then to the controller.
The function will be fired by the hook we create next.
These hooks must be attached to an event, but the 'submit' event is not in the official hooks. We use this, because in this way it will not be fired unintentionally by an event in the browser (the map is attached to a div, not a form, that normally fires the submit event).
As usual we export the map.
JS/wasm_bridge.js
We will use a separate JS module for wasm_bindgen. The main reason is that it generates error to call the map.js both from JavaScript and Rust, because the map will be initialized two times. In fact calling map.jst with wasm_bindgen effectively imports again the same module from the Rust part, creating duplicates. Thus we need a separate module to store our bridge function.
The content of this module is pretty small though:
export function update_map() {
    window.mymap.fire('submit');
};
We impose to the map to fire the event submit whenever the function update_map() is called.
Notice that we call the map from the window namespace; we will export it there in the main.js file.
main.js
In main.js we import the two new modules we created:
import init, { run_app } from "./pkg/yew_weather.js";
import "./js/wasm_bridge.js";
import mymap from "./js/map.js";

async function main() {
  await init("/pkg/yew_weather_bg.wasm");
  run_app();
}

// Export the Leaflet map
window.mymap = mymap;

main();
After this, we export mymap to the window, as we said, for an easier access. (when debugging with the console is also easily accessible, which is a pro, really!)
We have finished with the JavaScript. Let's go with Rust now
Cargo.toml
We add 4 crates for this part:
serde = "1.0"
serde_json = "1.0"
rand = { version = "0.7", features = ["wasm-bindgen"] }
load-dotenv = "0.1.1"
Of course we will need to serialize and de-serialize GeoJSON, which is a form of JSON, so the first two entries were expected.
Rand is there to generate random numbers. Notice the feature wasm-bindgen. Thumbs up for this crate that made the necessary adjustments to operate in wasm conditions!
There is a crate called dotenv to work with .env in Rust. However, the intended use case for it is to load the .env file at run time. This means that the compiled wasm code will try to access the .env file in the environment of the browser. Apart from the various sandboxing restrictions, it would be useless to send over to the client, together with the wasm and js files, also the .env file. Moreover, we will need the info at compile time: if we needed them at run time, we would need to act differently, maybe taking advantages of cookies or the session storage.
For these reasons, we will use load-dotenv, a wrapper for dotenv. If I understand correctly, what it does is that it actually exposes a procedural macro to let us get the variables with std::env!, but it loads them at compile time. It works exactly the same way as rollup-plugin-inject-env does for the JS counterpart.
src/data/mod.rs
We will create a new mod to handle the data for the project, so we cretae a data/ folder in src/ and we create in it a mod.rs. In it we will expose the entities we need.
pub mod geojson;
So now we need to create a geojson.rs inside data/ to interface our programs with GeoJSON.
src/data/geojson.rs
A little premise here: there is already a crate called geojson that does absolutely what it promises.
However, I find it formative to go through the steps to replicate an interface from scratch, especially one so simple as GeoJSON. In this case also, it's necessary that we understand well the data we are dealing with, so that we can know how to produce them or manipulate them. Should the project require more serious usage of GeoJSON, we will need to use the ready-made crate.
Moreover, we will not use the whole specs: as we have seen, leaflet supports passing just an array of features to draw, with no further ceremony. Thus we will need just two GeoJSON entities: Feature and Geometry.
We'll introduce them, and explain them as we go.
use serde::{Deserialize, Serialize};
use serde_json::{Value, Map};
Since it is a schema based on JSON, we'll use serde and serde_json.
This is a Feature:
#[derive(Serialize, Deserialize, Debug, Clone)]
pub struct Feature {
    pub r#type: String,
    pub properties: Option<Value>,
    pub geometry: Option<Geometry>,
}
A GeoJSON Feature is just a JSON object, with a field called type, that is a string whose value is "Feature". Notice that we have to escape the word type which is reserved in Rust. So in code we use the r# prefix; when serializing to json, serde will automagically write the field as type instead.
A Feature can have an optional field called properties, where we can have a JSON object with whatever data attached to it, as we want: a Feature is a way to connect a geographical entity with some metadata on it, and this is done through properties.
The third field of a Feature is geometry, and stores a Geometry, the geographical entity to represent on a map.
impl Feature {
    pub fn new() -> Self {
        Feature {
            r#type: "Feature".to_string(),
            properties: None,
            geometry: None,
        }
    }
    pub fn add_property(&mut self, key: String, value: Value) {
        match &mut self.properties{
            Some(v) => { v.as_object_mut().unwrap().insert(key, value); },
            None => {
                let mut v = Map::new();
                v.insert(key, value);
                let v: Value = v.into();
                self.properties = Some(v);
                }
        };
    }
    pub fn add_geomerty(&mut self, geometry: Option<Geometry>) {
        self.geometry = geometry;
    }
}
Of course, the first thing that we impl is a new() "constructor".
Then we impl a method to add a single property (key, value) to the properties field of the Feature, and one to add a whole Geometry.
Of course we could add also the properties as en entire object, but then, this is a lightweight interface, otherwise we would have used the "official" crate geojson. In any case, each field of the struct is public, so we can always create a struct, coerce to a serde_json::Value and assign it to a Feature's property, and go our merry way.
This is a Geometry:
#[derive(Serialize, Deserialize, Debug, Clone)]
pub struct Geometry {
    pub r#type: String,
    pub coordinates: Value,
}
There are just two fields: a type, for which we escape as for the Feature, and the coordinates, which takes a JSON array, and gives the needed coordinates to build the geographic entity.
There are seven types of Geometry. but so far we will implement only a point, that has got a single array containing a longitude, a latitude, and optionally a third number with an elevation of the point
impl Geometry {
    pub fn new() -> Self {
        Geometry {
            r#type: "".to_string(),
            coordinates: Value::Null,
        }
    }
    pub fn new_point(coordinates: Value) -> Self {
        Geometry {
            r#type: "Point".to_string(),
            coordinates,
        }
    }
}
Each geometry must have it own type string, specifying the kind of Geometry it is; of course for a point, we need to mark the geometry type as "Point".
That said, we could already impl a constructor for each of the seven geometries, but for the sake of this tutorial a Point is sufficient. We will implement some others very soon.
src/lib.rs
We will pass on to see the Yew app, but first we need to add the mod data; to our src/lib.rs
mod app;
mod components;
mod data;
use wasm_bindgen::prelude::*;
All the rest did not change, we are still mounting the yew app on its own <div>.
src/app.rs
The app has undergone substantial rewrite and extension, so we will take our time to analyze it.
use crate::components::button::Button;
use crate::data::geojson::*;
use yew::prelude::*;
use yew::format::Json;
use yew::services::storage::Area;
use yew::services::StorageService;
use serde_json::Value;
use wasm_bindgen::prelude::*;
use rand::prelude::*;
use rand::rngs::ThreadRng;
use load_dotenv::load_dotenv;
Impressive list of things we need to use!
We import first the Button component, and the geojson we just created.
For Yew, besides the prelude, we need the Json format, and the imports to use the SessionStorage (both the Service and the storage area).
We need the prelude of the wasm_bindgen as well, to call the JavaScript functions. From rand we need both the prelude and the type ThreadRng.
Lastly we need also the load_dotenv, which we will use very soon:
const GEOJSON_KEY: &'static str = "geojsonData";
load_dotenv!();
In fact, we define here the key corresponding to the same one we used in the map.js to interchange our data. Then we invoke the procedural macro load_dotenv!. From now on, we can access the variables inside the .env file with env!().
Next, we bind the JS function with the FFI:
#[wasm_bindgen(module = "/js/wasm_bridge.js")]
extern "C" {
    fn update_map();
}
Notice how we specify where to find the module needed for the bind with #[wasm_bindgen(module = "/js/wasm_bridge.js")].
The Msg has not changed at all:
pub enum Msg {
    AddOne,
    RemoveOne,
}
while the struct App has increased considerably:
pub struct App {
    link: ComponentLink<Self>,
    counter: i32,
    storage: StorageService,
    geo_data: Vec<Feature>,
    position: Vec<f64>,
    rng: ThreadRng,
}
After the ComponentLink, as usual, and the counter, we add the StorageService, a Vec for the Features aptly called geo_data, which will be used to store the features before transfering to the Session Storage, the position (as a Vec of f64; we could have used a tuple as well), and the ThreadRng that will be used by rand to access the random number generator.
Now we can impl our App! We will analyze carefully the create() function first:
impl Component for App {
    type Message = Msg;
    type Properties = ();

    fn create(_: Self::Properties, link: ComponentLink<Self>) -> Self {
        // Watchout! New: Now it returns a Result
        let storage = StorageService::new(Area::Session).expect("storage was disabled by the user");
        let Json(geo_data) = storage.restore(GEOJSON_KEY);
        let geo_data = geo_data.unwrap_or_else(|_| Vec::new());
The first thing we do is to access the storage service, and restore its content to the geo_data variable, just as we learned in the tutorial 4. However, since then the things have changed, and now StorageService::new() returns a Result. If you are following the tutorial 4 you should not have any problem, since we were using there an older version of Yew. But now we are using the new one, so we need to expect or unwrap the Return.
One thing for the use of browsers' dev tools: in case of panic, Firefox shows in the console just that the unreachable has been executed (wasm way to declare a panic). Chrome's console instead unwinds it a bit, so you can understand clearly that it is indeed a panic. However, in both cases, writing something through expect does not have a clear advantage. Things have changed a little recently, and there is a way to take a peek at our expects that I might show you very soon. In any case it's a good practice to write down our expect as usual.
After this, we initialize the random generator "thread", and then we retrieve the center coordinates of the map, and we prepare them into a position:
        let rng = thread_rng();

        let lat = env!("LATITUDE","Cound not find LATITUDE in .env");
        let lng = env!("LONGITUDE", "Cound not find LONGITUDE in .env");
        let lat: f64 = str2f64(lat);
        let lng: f64 = str2f64(lng);
        // Longitude first! geoJSON and Leaflet take opposite conventions!
        let position = vec!(lng, lat);

        App {
            link: link,
            counter: 0,
            storage,
            geo_data,
            position,
            rng,
        }
    }
We use str2f64 a small function I use to convert strings to f64. I put this function at the end of the file:
fn str2f64(s: &str) -> f64 {
    s.trim()
     .parse()
     .expect("Failed parsing a String to f64")
}
This is one of the small functions to have handy as a Rust programmer, so that you remember to trim before parsing...
Before we go on, we have to notice that the GeoJSON standard interprets the first number in a position as longitude, while leaflet interprets the first as latitude. However, leaflet will interpret it correctly when importing GeoJSON.
Now we will take a look at the update() function:
    fn update(&mut self, msg: Self::Message) -> ShouldRender {
        match msg {
            Msg::AddOne => {
                self.counter += 1;

                let position: Vec<f64> = self.position.clone().into_iter()
                    .map(|x: f64| {
                        let d: f64 = self.rng.gen_range(0.00001, 0.0003);
                        if random() {
                            return x-d;
                        }
                        x+d
                    }).collect();
                let position: Value = position.into();
                let point = Geometry::new_point(position);

                let mut feat = Feature::new();
                feat.add_geomerty(Some(point));
                feat.add_property("popupContent".into(), self.counter.to_string().into());
                self.geo_data.push(feat);

                self.storage.store(GEOJSON_KEY, Json(&self.geo_data));
                update_map();
            }
            Msg::RemoveOne => {
                self.counter -= if self.counter == 0 { 0 } else { 1 };

                let _ = self.geo_data.pop();

                self.storage.store(GEOJSON_KEY, Json(&self.geo_data));
                update_map();
            }
        }
        true
    }
The first thing the Msg::AddOne does is to increase the counter, as usual.
Then we make it clone the position and modify it, creating for each of the coordinates a random coefficient d, between 0.00001 and 0.0003 (which is suitable for the zoom-level we are in now, 18).
To create a random number in a range (a, b) we use rng.gen_range(a, b). After this we use random() which is a convenience template function from the rand prelude, to generate a bool, by just slapping it after a if: if takes a bool, so random() will toss the coin for us: if true the coefficient d gets subtracted from the coordinate, otherwise its gets added.
In this way we obtain random positions nearby the map center. We coerce the new position into a JSON Value (an array, coming from a Vec), and we create a new Point with Geometry::new_point, passing to it the position just created.
We then create a new feature and pass to it as geometry the one we just created, and we add a property with key popupContent and as value a string containing the number in the counter. As we know when we will add the GeoJSON data as a layer we will style each feature with a filter that attaches to it a popup with the content taken from the value of the property popupContent, if present.
We add the feature to the Vec of features in the self.geo_data of the App structure.
We then sore the geo_data in the Session Storage, and we call the JS function to update the map.
The Msg::RemoveOne just decreases the counter, as well as calling pop() on the geo_data Vec. After this, it too synchronizes the Session Sotrage and calls a redraw of the map through the JS function.
That's it! The most is done.
We could leave all the rest as is, except for a little detail
    fn change(&mut self, _props: Self::Properties) -> ShouldRender {
        false
    }

    fn view(&self) -> Html {
        html! {
            <>
              <Button onsignal=self.link.callback(|_| Msg::RemoveOne) title="-1" />
              <Button onsignal=self.link.callback(|_| Msg::AddOne) title="+1" />
            </>
        }
    }
}
change() hasn't changed, we still need to return false.
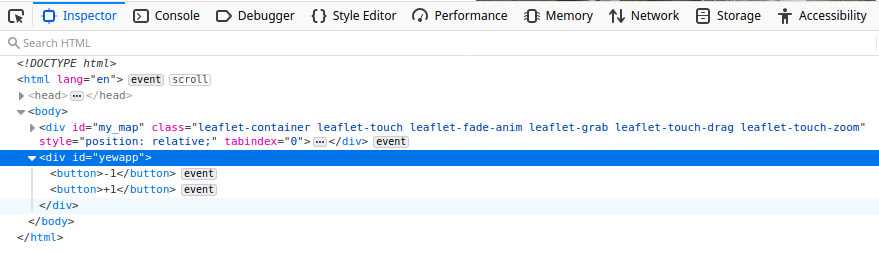
Instead we will take a look at the view() function: we took out the <h1> and wrapped the two buttons in a <> and </>. These are needed as a root for the DOM to be injected in the html, but in fact they will disappear once injected as an entity. Yet they are needed as the unique entry-point required by html!.
As you can see in this image of Firefox inspector, once you run the app, the two buttons are injected inside the <div>.
Let's roll
Upon running it and playing a little adding buttons and clicking on the positions markers:

Also moving to the sat view:

The black tile on the upper right corner is there because for the higher zoom-levels Mapobx does not have the sea tiles, so it renders them as black tiles. Zooming back we can see that the sea tiles are restored.
In the dev tools, we can see the session storage holding the GeoJSON of our data layer:

In the above image however, I excluded the data layer, just to show it is possible.
Conclusions
This is just the first part on this project, and it is already packed up with stuff.
I don't know if I should explain longer on the JavaScript part: I tried to balance the fact that we need it, with the fact that it is a series on Rust and Yew, not JS... but still I wanted to explain a little, not to throw code at you with no explanation, other than "trust me dude, it does work this way" (that is really a condescending attitude for me, a no-go).
I wanted to make a tutorial for each practical project, but writing it down I realized that it is just not possible: too many concepts, even if they are not totally new. The sheer length of this is scaring me for the proofreading already! Maybe I should have split it in three? Let me know what do you think of this format, and also how do you feel about this series, for those who are reading it: are you satisfied with the format, do you have any recommendation or request? Feedback is really appreciated.
Thank you for reading up to here, and stand ready and excited for the conclusion of this project in the next tutorial.

Top comments (9)
Davide, I've cloned your yew-deven as a template and am now trying to modify it by adding a module I've created in rust to access a database with odbc. I got the db program to work independent from yew-deven and am now dropping it into yew-deven. After making all of the needed changes to incorporate it, I run it and get two warnings: Unresolved dependencies and Missing global variable name. Since the yew-deven ran without any Warnings or Errors prior to adding the new odbc module I suspect the problem lies somewhere with my new rust module. Any thoughts?
Can you show me your Cargo.toml and the actual error?
The first thing it comes to mind is to check whether the odbc driver interface crate you are using is compatible with webassembly and to which degree
Cargo.toml (dependencies)
[dependencies]
wasm-bindgen = "^0.2"
yew = { git = "github.com/yewstack/yew", features = ["web_sys"] }
yewtil = { git = "github.com/yewstack/yew", features = ["fetch", "pure"] }
odbc = "0.17.0"
odbc-safe = "0.5.0"
env_logger = "0.7.1"
log = "0.4.0"
[dependencies.web-sys]
version = "0.3.4"
features = [
'Document',
'Element',
'HtmlElement',
'HtmlCollection',
'Node',
'Window',
]
error msgs:
Serving "./index.html"
Listening on 0.0.0.0:8080/
main.js → pkg/bundle.js...
LiveReload enabled
(!) Unresolved dependencies
rollupjs.org/guide/en/#warning-tre...
env (imported by pkg/yew_template.js)
(!) Missing global variable name
Use output.globals to specify browser global variable names corresponding to external modules
env (guessing '__wbg_star0')
created pkg/bundle.js in 190ms
thanks
In reality this is a rollup.js error. It is searching for 'env'.
Did you install rollup-plugin-inject-env?
In case the command is:
npm i rollup-plugin-inject-env
At any rate, are you using odbc and odbc-crate compiled for wasm or as a serverside API? Since odbc wraps around a C driver I do not think it will compile to wasm. In case you succeed let me know 😃
Hi Davide, Thanks for all your help. This is looking pretty hopeless so far. What I'm looking to do is have a browser based app that accesses a local SQL Server running inside a Docker image on a Mac.I was hoping to access the db directly with out going through an API. I have one I created in React but was hoping for more efficiency by accessing the db directly.
Well something can be done... Warning: it is a method prone to malicious attacks if exposed.
Here's the gist of it: you are going to access a local db with a local webpage, right? So there's less concern for protection (less in not none)
Anyways, odbc has got a SOAP interface:
docs.microsoft.com/en-us/previous-...
You might access it with the soap crate in Rust or with javascript (better solution).
It is a hacky trick, but it should work. But it takes a lot of effort. An API wrapper can be hardened for security, and you could interface it with JSON which is more universal and simple than SOAP...
Another way, which is useful if all the structure is in the same machine, is a wrapper to odbc that saves data to Redis, then to use the Redis server to exchange data with the webpage... Also lot of work, but you can prefetch and manipulate data before storing it to Redis. The advantage of having an API is that all the pieces are there, plus if tomorrow you want to interface other databases, local or remote, it's much easier to add. Also, I do not know your needs, but once you provide an interface, needs always arises to make some manipulation of data serverside before presenting it to the final user's interface...
Davide, thanks for your reply and all of your effort. I think since I already have an api built in React that connects to MS SQL db, I'll just continue to use it and get Rust to communicate with it and then send the data needed by the React frontend. Again, thanks for your efforts and knowledge.
Hey Davide, this is really helping me - please continue. I don't mind if I have to read it twice.
It's coming, it's coming... but it will be a longer article than this (I know, I should chop it more, but I wanted to stick together things that belong together). An to continue, I got tons of ideas... just the hours of the day are too few :-(