![Cover image for YEW Tutorial: It rains cats and dogs... and crabs! Rusty Meto-Geography [P. II]](https://media2.dev.to/dynamic/image/width=1000,height=420,fit=cover,gravity=auto,format=auto/https%3A%2F%2Fdev-to-uploads.s3.amazonaws.com%2Fi%2Fx4slkee3s4oit7q0der0.jpg)
(Photo by alexey demidov on Unsplash)
Second part of the geographic-meteo project begun last tutorial
Important notice
Lately there have been some problems with a new release of wasm-bindgen that clashes with gloo-events. As far as I know now it has been solved, but what we will do next is still useful. In the meanwhile, Yew has been updated too, and of course if there are substantial changes we will explore them; but for now I haven't had much time (well, the biggest thing it seems to me that we have to pass from function methods to associated function for the various services in Yew, so that we do not need to init them).
We need to keep some things fixed, at least for the time being. On the other hand, writing this tutorial is taking me several weeks, due also to some recent changes in my personal life, and my daily work, so I need a frozen dependencies tree at least in order to have the freedom of mind to concentrate on one tutorial at a time.
For this reason I will fix the Cargo.toml dependencies to the following.
[dependencies]
wasm-bindgen = "=0.2.67"
serde = { version = "1.0", features = ["derive"] }
serde_json = "1.0"
anyhow = "1.0.31"
rand = { version = "0.7", features = ["wasm-bindgen"] }
load-dotenv = "0.1.1"
yew = { git = "https://github.com/yewstack/yew", features = ["web_sys"], tag = "0.17.2" }
yewtil = { git = "https://github.com/yewstack/yew", features = ["all", "yewtil-macro"], tag = "0.17.2" }
[dependencies.web-sys]
version = "0.3.4"
features = [
  'Document',
  'Element',
  'HtmlElement',
  'HtmlCollection',
  'Node',
  'Window',
]
You will not find this from the first releases of the repo, because I've updated it rather toward the end, but it should work nonetheless.
So just follow the above, even though in the code you might find (at the beginning) other dependencies.
Recap of last tutorial
Last tutorial we saw first how to mount yew apps not on body as usual, but on a <div> we choose.
Moreover, we saw how to indirectly communicate data between the Yew app and a JS app, using the SessionStorage (valid also for the LocalStorage, just in case...) and some trigger function exposed in JS and bidden with wasm_bindgen
We saw also how to implement random numbers generation in wasm with Yew, and how to map a little specific JSON based format, GeoJSON.
In addition to the Rust part of the project, we explored a JS library used to create maps on pages, leaflet and some of its inner workings.
I know it is a lot of JavaScript, but it is nonetheless useful in front-end applications.
In this tutorial we will continue to explore leaflet, in order to understand well things, before we can pass the control over to Yew, and to compute there what is needed in Rust.
Part 1: Play with leaflet and GeoJSON
Code to follow this tutorial
The code has been tagged with the relative tutorial and part, in my yew-weather repo.
git clone https://github.com/davidedelpapa/yew-weather.git
cd yew-weather
git checkout tags/v9p1
Before going further we need some firm grasp of how to do things with leaflet and GeoJSON.
Say for example we want to draw a polygon onto the map: a client asked us to draw on the map the perimeter of the beach. Best thing we need to do is a GPS device (an app on the cellphone is more than sufficient), go on he beach, and record the positions. While we wait to do that, in order to show something to the client, the next best thing is that we start drawing on the map a best approximation of the beach boundaries. In order to do so we would need to know the locations under the cursor, and take note of them.
All we need is to bind the click event of the map to a function that shows the position of the intended point. After the hook to redraw the GeoJSON features, we can add the following hook:
// Popup with position
var popup = L.popup();
function onMapClick(e) {
    var rev_coord = [e.latlng.lng, e.latlng.lat]
    popup
        .setLatLng(e.latlng)
        .setContent("Position " + e.latlng.toString() + "<br/>GeoJSON: [" + rev_coord + "]")
        .openOn(mymap);
}
mymap.on('click', onMapClick);
The above code, creates a popup; then a function to be fired after the 'click' event on the map; finally it hooks the function to the 'click' event.
The function extrapolates from the event position (latlng) first the longitude then the latitude. It creates with them an array suitable as position for GeoJSON (reverse coords with respect to leaflet). Then the function sets the popup position to correspond to that of the 'click' event. After which, the content is set, with both the leaflet position, and the GeoJSON one; finally the popup is triggered to open on the map.

Now we can get 4 positions in GeoJSON notation (a simple square polygon).
We can transform them into a GeoJSON polygon this way: each position is an array. We put each array in a double array [[ ]], separated by commas, and we add as last a copy of the first position (we close up the polygon). In reality the array is not double: it's an array of rings, the most exterior being the perimeter, and other rings representing holes in the area of that polygon. Anyway, since we are going for a simple polygon, without holes, there's an array of one ring (1 array) of 4 position (5 arrays, the last identical with the first.)
For example:
[[
    [14.089907, 42.585606],
    [14.090406, 42.585101],
    [14.090148, 42.584915],
    [14.089644, 42.585349],
    [14.089907, 42.585606]
]]
The above is an array that can be passed as "coordinates" of a Polygon feature.
A working feature could be the following:
{
    "type": "Feature",
    "geometry": {
        "type": "Polygon",
        "coordinates": [[
            [14.089907, 42.585606],
            [14.090406, 42.585101],
            [14.090148, 42.584915],
            [14.089644, 42.585349],
            [14.089907, 42.585606]
        ]]
    },
    "properties": { "name": "Beach di Cerrano" }
}
I mapped a beach in this way. Least I be sued, there's no one private beach on that specific location: it's just for the sake of an example.
Please notice that if you have to follow strictly GeoJSON, the points have to be taken with the "right-hand rule", that is "A linear ring MUST follow the right-hand rule with respect to the area it bounds, i.e., exterior rings are counterclockwise, and holes are clockwise" (from the Polygon specs). Luckily for us, Leaflet is not strict.
If you want to check the correctness of a feature, there's an on-line GeoJSON linter that represents it also on a map. Problem is, it's VERY strict (you must follow the right hand rule, thus for ex. the above example fails)
The official way to group together features in GeoJSON is trough "FeatureCollection" (remember, leaflet will accept also an array of features, it's not strict at all).
What's the representation of a FeatureCollection you ask? I've added it to src/data/geojson.rs, let's see if you can understand it at a first glance:
#[derive(Serialize, Deserialize, Debug, Clone)]
pub struct FeatureCollection {
    pub r#type: String,
    pub features: Vec<Feature>,
}
impl FeatureCollection {
    pub fn new()-> Self {
        FeatureCollection {
            r#type: "FeatureCollection".to_string(),
            features: Vec::new(),
        }
    }
}
I guess it's easy by now. In any case, if we want to try it right away, we should put it in a .js file (mine is js/objects.geo,js) and add a variable to hold the FeatureCollection, and then export the variable, like so:
var base_features = {
    "type": "FeatureCollection",
    "features": [
        {
            "type": "Feature",
            "geometry": {
                "type": "Polygon",
                "coordinates": [[
                    [14.089907, 42.585606],
                    [14.090406, 42.585101],
                    [14.090148, 42.584915],
                    [14.089644, 42.585349],
                    [14.089907, 42.585606]
                ]]
            },
            "properties": { "name": "Beach di Cerrano" }
        }
    ]
};

export default base_features;
What about adding a a popup to show with the already used method of popupContent inside the properties?
Thus the above properties will become:
            "properties": {
                "name": "Beach di Cerrano",
                "popupContent": "<h3>Beach</h3>Hours: 8:00am - 8:00pm"
            }
In this way, if we add it to the map, the popup will show a title and also open hours. yes, we can style the content with html, because when rendered the popup content gets its own <div>.
Now it would be pretty much time to show this on the map...
First we import our features form the file (if we put them on a different file as suggested) at the beginning of JS/map.js
import base_features from "./objects.geo";
Then we create its own layer (I do not want to put it on the controls, I want it to be always displayed):
// First overlay
var first_overlay = L.geoJSON(base_features, {
  onEachFeature: onEachFeature,
  pointToLayer: pointToLayer,
});
The above code can be put right before the code to make the map. Please remember to add this layer onto the map! (Inside layers of the configuration project, like so: layers: [basemap, satmap, first_overlay, infolayer])
Another thing: our client pays us to show the map of its location, not the whole world. We really need to bind the map to a specific location.
So at this point we need to avoid panning the map too far from the center point, and to zoom it too much.
To bound the panning, we need a box of coordinates which the map can show up to, but not further than.
So we zoom back a little and get a NorthWest and a SouthEast (well, any two opposite will do, also NorthEast and southWest). Remember to take them in leaflet notation this time, not GeoJSON!
// Declare bounds
var southEast = L.latLng(42.583631, 14.092246),
    northWest = L.latLng(42.586724, 14.087289),
    mybounds = L.latLngBounds(northWest, southEast);
We made a bound out of those two positions.
Let's say, we want to block also the view at zoom levels between 15, and 18. This is how the map will look like then:
var mymap = L.map('my_map',
  {
    center: position,
    zoom: 18,
    minZoom:15,
    maxZoom: 20,
    maxBounds: mybounds,
    maxBoundsViscosity: 1.0,
    layers: [basemap, satmap, first_overlay, infolayer]
  }
);
Now there's a minimum zoom, a maximum zoom, and the bounding box.
Also there's the last layer we created. Just play with the map to see the results!
Going further. Let's say Mapbox stops at zoom level 18 to serve the tiles, but we want to go a little over that, and "stretch" the tiles, maybe zooming over the last tile as we would with images (remember, each zoomlevel is 25% more than the previous, so at most we could go over 2, max 3, levels, otherwise we start to see big pixels!).
We need to set a max "native zoom level", meaning that after that leaflet has not to ask for the tiles of the next zoom level (because there are none!), but stretch that level. This must be set to each layer that connects to a tile-server (Mapbox in this case).
var basemap = L.tileLayer(mapboxurl,
{
attribution: 'Map data © <a href="https://www.openstreetmap.org/">OpenStreetMap</a> contributors, <a href="https://creativecommons.org/licenses/by-sa/2.0/">CC-BY-SA</a>, Imagery © <a href="https://www.mapbox.com/">Mapbox</a>',
maxNativeZoom: 18,
maxZoom: 20,
id: 'mapbox/streets-v11',
tileSize: 512,
zoomOffset: -1,
accessToken: mapbox_token
});
Let's say we want to use map icons, for example a sign that shows where's the beach, a sign where's the tower, etc...
We will use a ready made plugin for leaflet for the task at hand.
There are many plugins I actually chose one for us, but you could use others, Point your browser to leaflet-mapkey-icon. This plugin uses the freely available icons at mapkeyicons.com.
Just download the repo as a .zip, unpack and copy the content of the dist/ folder to a folder in your project (I called it iconmarker).
We have to add the following lines to the index.html, right after our bundle.js import:
<script src="/pkg/bundle.js" defer></script>
<script src="iconmarker/L.Icon.Mapkey.js"></script>
<link rel="stylesheet" href="iconmarker/MapkeyIcons.css" />
Now let's see how to use it in our code. Add the following after we added the control layers:
// Marker
var mki = L.icon.mapkey({icon:"castle",color:'#725139',background:'#f2c357',size:30});
// Append to marker:
L.marker(position,{icon:mki}).addTo(mymap);
As you can see, we first creates a new object of the type L.icon.mapkey exported by the plugin.
Then we apply it to a regular marker that we add to the map.
Notice that we passed to it the position as a position, because the map is centered with the castle, and we wanted to add an icon of a castle.
It would be nice to create an icon for the beach too (in a central point with respect to the polygon of the beach) and attach the pop-ups to the new icon markers... It would be nice too to do it in an indirect way, maybe mapping the content, icon, and background color inside the properties of a Point feature, and the auto-style it when we add the layer with the automatic addition of pop-ups as seen before...
For the pop-up we use the onEachFeature. For the markers though, we need to create and add a new layer object, a marker, to a point.
For this case, leaflet treats a point differently than other features, because upon finding a Point a custom pointToLayer can be called that is used for the purpose of letting us create a marker for that point.
The code for the layer will look like the following:
// First overlay
var first_overlay = L.geoJSON(base_features, {
  onEachFeature: onEachFeature,
  pointToLayer: pointToLayer,
});
The actual function can look like this:
function pointToLayer(feature, latlng) {
    if (feature.properties && feature.properties.markerIcon) {
      [ ... missing code ...]
      var mki = L.icon.mapkey({
      icon: feature.properties.markerIcon,
      color: color,
      background: BGcolor,
      size:size
    });
    return L.marker(latlng, {icon:mki});
  }
  return L.marker(latlng);
}
The last return is optional, meaning we could, as well, not return a marker for the point, but leave it as a point.
Can you reconstruct the way I get the icon, color, background, and size from the properties of the Point features? If not present we should also set some defaults...
If you haven't the faintest idea on how t do it, take a look at the code.
This is a sample GeoJSON for a point as we are using it:
{
    "type": "Feature",
    "geometry": {
        "type": "Point",
        "coordinates": [14.090035557746889,42.58525072399882]
    },
    "properties": {
        "popupContent": "<h3>Beach</h3>Hours: 8:00am - 8:00pm",
        "markerIcon": "beach",
        "markerColor": "#3d4575",
        "markerBGColor": "#5066f2"
    }
}
Let's take a look ate the final results:

I have so far a polygon and a marker for both the castle, and the beach, and pop-ups for them both,
Quite an accomplishment, but it is all done in JavaScript.
Time to take Rust for a ride!
Rust, fetch!
Code to follow this part
git checkout tags/v9p2
Do you still remember how to fetch data from a Web API with Yew?
Let's recap:
- Explore the API: get a hold of the response representation (better the JSON ones)
- Mimic the API: we have to reproduce the exact response as Rust data (Serde, we love you!)
- Use the
Fetchservice provided by Yew
Ready.. Go!
API to explore
Do you remember the account we set up with openweathermap.org? We used it at the beginning to get tiles to give a hue to the map according to the temperature on the soil. However, the service can be used to get the weather at any location (and more!), you just need to knwow the API entrypoint. It happens that they have a unified API for weather at any location, with forecasts, available through the entrypoint https://api.openweathermap.org/data/2.5/onecall: we just need to set latitude and longitude, provide the API KEY, and some more (optional) parameters...
Let's try it in the browser at the same location as the map's center:
https://api.openweathermap.org/data/2.5/onecall?lat=42.585000&lon=14.089444&units=metric&appid=XXX
After appid we need to provide the API KEY we stored in the .env file.
The other parameter I chose is the metric system as unit (units=metric). If we leave the whole parameter out, by default it gets the imperial (US) system, so feel free to adapt, if you or your customer work with that system.
By the way, the API we are using is described at this linked location, so you can have a look at the various options available
This was the result of the above call, at the time of writing this document:
{
  "lat": 42.59,
  "lon": 14.09,
  "timezone": "Europe/Rome",
  "timezone_offset": 7200,
  "current": {
    "dt": 1594756729,
    "sunrise": 1594697919,
    "sunset": 1594751999,
    "temp": 19.75,
    "feels_like": 19.33,
    "pressure": 1014,
    "humidity": 56,
    "dew_point": 10.73,
    "uvi": 8.4,
    "clouds": 26,
    "visibility": 10000,
    "wind_speed": 0.95,
    "wind_deg": 96,
    "weather": [
      {
        "id": 802,
        "main": "Clouds",
        "description": "scattered clouds",
        "icon": "03n"
      }
    ]
  },
  "hourly": [ ... ],
  "daily": [ ... ]
}
I left out the hourly and daily results. The API has got also a minutely response, but only for some locations, namely US.
Let's mimic it in Rust
We will not go over all the details of the API, but you can find it all in the file src/data/onecall.rs
In order to use it we need, as usual, to put it in src/data/mod.rs:
pub mod geojson;
pub mod onecall;
The content of the file onecall.rs mimics the API call, for example, let's see some parts:
use serde::{Deserialize, Serialize};

#[derive(Default, Serialize, Deserialize, Debug, Clone, PartialEq)]
pub struct OneCall {
    pub lat: f64,
    pub lon: f64,
    pub timezone: String,
    pub timezone_offset: usize,
    pub current: Option<WeatherUnit>,
    pub hourly: Option<Vec<WeatherUnit>>,
    pub daily: Option<Vec<WeatherDaily>>,
    pub minutely: Option<Vec<Minutely>>,
}
As you can see, we use the ol'good serde.
Exploring the API I realized that both current and hourly use the same information structure, with lesser variations: for this reason we will use the same struct WeatherUnit to map them both; the big difference is that current just uses one such object, hourly an array of them.
One important note: we have to make current, hourly, daily, and minutely optional, and deal with them in a more verbose code later on, if we want to reuse this struct, or we need to change plans: first of all, minutely is not yet available in the current location in Italy, but it will need to be mapped in any location in the US for example; moreover, there are parameters in the API call to switch off the results of any of them, if we want to focus the call scope, and being able to transmit less data with API calls is a plus in many cases.
On the other end, making many of the data Option is a must, if the API does not have the info on them. Take a look at the WeatherUnit struct, for example:
#[derive(Default, Serialize, Deserialize, Debug, Clone, PartialEq)]
pub struct WeatherUnit{
    pub dt: Option<usize>,
    pub sunrise: Option<usize>,
    pub sunset: Option<usize>,
    pub temp: Option<f32>,
    pub feels_like: Option<f32>,
    pub pressure: Option<u32>,
    pub humidity: Option<u32>,
    pub dew_point: Option<f32>,
    pub uvi: Option<f32>,
    pub clouds: Option<f32>,
    pub visibility: Option<usize>,
    pub wind_speed: Option<f32>,
    pub wind_deg: Option<u32>,
    pub wind_gust: Option<f32>,
    pub rain: Option<VolumesInfo>,
    pub snow: Option<VolumesInfo>,
    pub weather: Vec<Option<WeatherCondition>>,
}
Everything here is optional; maybe dt, which is the current time, should not be, but anyway, better sad than sorry.
For example, both rain and snow use the VolumesInfo object, mapped in the corresponding struct:
#[derive(Default, Serialize, Deserialize, Debug, Clone, PartialEq)]
pub struct VolumesInfo{
    #[serde(rename = "1h")]
    pub r1h: f32
}
However, you can have either rain, or snow, but in a sunny day you have none of that!
Again, we will not go over all the structs, you can see them in the repo.
Time to fetch!
The most simple way to deal with this is to fetch the weather info, and print it in the console.
First things first, we need a src/fetchweather.rs. Let's see its content:
use crate::data::onecall::OneCall;
use anyhow::{anyhow, Error};
use yew::callback::Callback;
use yew::format::{Json, Nothing};
use yew::services::fetch::{FetchService, FetchTask, Request, Response};
Remember to update the Cargo.toml with the anyhow crate: we will use it, as we saw dealing with the fetch call in Yew.
Of course, we are importing the crate::data::onecall::OneCall we just crated as well.
All the rest should not come as a surprise. Please refer to tutorial 5, part 2 where we talked about the APIs and the fetch service. Of course, fell free to follow in this repo's code as well!
Next, we create a WeatherService struct to hold the API parameters:
#[derive(Default)]
pub struct WeatherService {
    lat: f64,
    lon: f64,
    unit_system: String,
    api_key: String,
}
We will init the whole thing with function parameters from a new() function, and we will use a different function, get_weather, to fetch the data.
Let's see the impl which is really straightforward:
impl WeatherService {
    pub fn new(lat: f64, lon: f64, unit_system: String, api_key: String,) -> Self {
        Self {
            lat,
            lon,
            unit_system,
            api_key,
        }
    }

    pub fn get_weather(&mut self, callback: Callback<Result<OneCall, Error>>) -> FetchTask {
        let url = format!("https://api.openweathermap.org/data/2.5/onecall?lat={lat}&lon={lon}&units={unit_system}&appid={api_key}",
            api_key=self.api_key,
            lat=self.lat,
            lon=self.lon,
            unit_system=self.unit_system
        );
        let handler = move |response: Response<Json<Result<OneCall, Error>>>| {
            let (meta, Json(data)) = response.into_parts();
            if meta.status.is_success() {
                callback.emit(data)
            } else {
                callback.emit(Err(anyhow!(
                    "{}: error getting weather data from OpenWeatherMap",
                    meta.status
                )))
            }
        };
        let request = Request::get(url.as_str()).body(Nothing).unwrap();
        FetchService::fetch(request, handler.into()).unwrap()
    }
}
As we have foreseen, the fn new() is nothing too fancy.
The fn get_weather() could seem complicated at first sight, but it is not in reality.
First, we pass to it the callback, where we want to receive and handle the data, and we return a FetchTask from it.
We use a format! for the url at the beginning that is a bit verbose, but it is straightforward; moreover this system is modular, so that if we need more/less parameters we can adapt the WeatherService struct, its new(), and this format! and we are set to go.
The handler we will pass to the FetchService::fetch is a closure with move parameters: we just need to know the response of the call. we divide it into_parts() getting a meta and a data part; the last one we will parse as Json().
We are interested in the metadata to know the status, so that we can emit() the parsed data on the callback, if the status is a success (meta.status.is_success()); else we need to emit an error, using the handy anyhow. With this the closure is over.
Before fetching we need to format the request with let request = Request::get(url.as_str()).body(Nothing).unwrap();
We can now finally return the FetchService itself, calling the ::fetch(), and passing to it the request and the handler.
Now the last thing we need is to use featchweather.rs, so we have to remember to set a
mod fetchweather;
inside lib.rs, before we can pass the ball to app.rs
What happens in app.rs stays in app.rs
We need to import OneCall, Yew's FetchTask, and just for the time being, also the ConsoleService; and of course, the WeatherService
use crate::data::onecall::OneCall;
use yew::services::{StorageService, console::ConsoleService};
use yew::services::fetch::FetchTask;
use anyhow::Error;
use crate::fetchweather::WeatherService;
At this point, the use section will look like the following:
use crate::components::button::Button;
use crate::data::geojson::*;
use crate::data::onecall::OneCall;
use yew::format::Json;
use yew::prelude::*;
use yew::services::storage::Area;
use yew::services::{StorageService, console::ConsoleService};
use yew::services::fetch::FetchTask;
use serde_json::Value;
use wasm_bindgen::prelude::*;
use rand::prelude::*;
use rand::rngs::ThreadRng;
use load_dotenv::load_dotenv;
use anyhow::Error;
use crate::fetchweather::WeatherService;

const GEOJSON_KEY: &'static str = "geojsonData";
load_dotenv!();

#[wasm_bindgen(module = "/js/wasm_bridge.js")]
extern "C" {
    fn update_map();
}
We still need the interface with JS and the handling of the GeoJSON through the StorageService.
We will have now the Msg to handle. If you remember from the various times we saw how to use the fetch service, we need a message to call, one for the state, and one for the reception.
So this is our Msg:
pub enum Msg {
    AddOne,
    RemoveOne,
    WeatherReady(Result<OneCall, Error>),
}
Yep, that's it, and it's all! One message only to handle the Ready state with a response or an error. I know you are scratching your head: how are we going to call the fetch? Don't worry, we will conjure a powerful Spirit-Code in a while...
Now, the App struct got heavier; that we cannot avoid... It's almost a 1-to-1 relation between the use we introduce, and the state we need to keep for them in the App struct.
pub struct App {
    link: ComponentLink<Self>,
    counter: i32,
    storage: StorageService,
    geo_data: Vec<Feature>,
    position: Vec<f64>,
    rng: ThreadRng,
    weather_service: WeatherService,
    callback: Callback<Result<OneCall, Error>>,
    task: Option<FetchTask>,
    weather: Option<OneCall>,
}
I guess there is a big surprise: we do not init the ConsoleService. We'll see why later on. Instead we need a state for the OneCall, aptly called weather, and one for the WeatherService, plus a Callback and a FetchTask in order to handle the fetch service.
Now, let's impl the App, and see what we can do in fn create() to init the new states:
impl Component for App {
    type Message = Msg;
    type Properties = ();

    fn create(_: Self::Properties, link: ComponentLink<Self>) -> Self {
        let storage = StorageService::new(Area::Session).expect("storage was disabled by the user");
        let Json(geo_data) = storage.restore(GEOJSON_KEY);
        let geo_data = geo_data.unwrap_or_else(|_| Vec::new());

        let rng = thread_rng();

        let lat = env!("LATITUDE","Cound not find LATITUDE in .env");
        let lng = env!("LONGITUDE", "Cound not find LONGITUDE in .env");
        let lat: f64 = str2f64(lat);
        let lng: f64 = str2f64(lng);
        let position = vec!(lng, lat);
        let weather_key=env!("WEATHER_KEY","Cound not find WEATHER_KEY in .env").to_string();
        App {
            link: link.clone(),
            counter: 0,
            storage,
            geo_data,
            position,
            rng,
            weather_service: WeatherService::new(lat, lng, "metric".to_string(), weather_key),
            callback: link.callback(Msg::WeatherReady),
            weather: None,
            task: None,
        }
    }
What is really new here is contained in just few lines:
-
let weather_key=env!("WEATHER_KEY","Cound not find WEATHER_KEY in .env").to_string();this is needed to get again the key for the Weather API. -
link: link.clone()yes, we need again thelinklater on, so we clone it here, otherwise the Borrow Checker will splatter the screen in red (and it is known sometimes to hunt the poor programmers who dare challenge it during nightmares, waiting them on Elm Street) - the last part, after
rngshould be trivial, but for one thing:
weather_service: WeatherService::new(lat, lng, "metric".to_string(), weather_key),
callback: link.callback(Msg::WeatherReady),
weather: None,
task: None,
we init the Conole, set the Options task and weather to None, and to init the WeatherService we follow closely the function interface we defined in weatherservice.rs, passing to it latitude, longitude, the metric system (remember, if you use the Imperial, go ahead and adapt the code), and the API key.
The tricky part is that for the Callback we set the only Msg we have to handle the fetch: WeatherReady.
Now for the dragon that will slayer for us the fetch service, and grill it to the bones: we will use the new fn rendered()
Let's see it in code:
    fn rendered(&mut self, first_render: bool) {
        if first_render {
            let task = self
                .weather_service
                .get_weather(self.callback.clone());
            self.task = Some(task);
        }
    }
Sweet! It gets a bool passed to it, saying if the component is rendered for the first time or not, so that we can do some actions if it is the first time, or other actions if it is not. Else we can ignore this function and not use it at all in our components.
In this case we used it to call the fetch task through get_weather() in the WeatherService we wrote inside fetchweather.rs. So that we can call the fetch task automagically the first time the component is initialized (on page load or reload), and the answer will come to us while still loading the page (or soon after, that depends on the user connection speed).
What we will do with it presently is just that we will map it to the OneCall and log it in the console. This is just for the time being, in a while we will use the data, but for now we have to check first that everything's doing fine.
So the rest is realy trivial: no change is done on the page, we will need just to handle two messages for the WeatherReady, one for the success, the other for the error:
Msg::WeatherReady(Ok(weather)) => {
    self.weather = Some(weather);
    ConsoleService::log(format!("Weather info: {:?}", self.weather).as_str());
    return false;
}
Msg::WeatherReady(Err(e)) => {
    ConsoleService::error(format!("Error: {}, while retrieving weather info", e).as_str());
    return false;
}
That is, if it is Ok, we save it in the OneCall state (that we named weather); if there's an error, we log the error.
O my! The log() and error() methods have been transformed into associated functions. This is one of the biggest news introduced in Yew 0.17. This way we do not need to init the console, and maintain a state for it.
In both cases, OK or error, we do not need to render again the page, so we return false.
Just for reference here are the missing functions in their entirety:
fn update(&mut self, msg: Self::Message) -> ShouldRender {
        match msg {
            Msg::AddOne => {
                self.counter += 1;

                let position: Vec<f64> = self.position.clone().into_iter()
                    .map(|x: f64| {
                        let d: f64 = self.rng.gen_range(0.00001, 0.0003);
                        if random() {
                            return x-d;
                        }
                        x+d
                    }).collect();
                let position: Value = position.into();
                let point = Geometry::new_point(position);

                let mut feat = Feature::new();
                feat.add_geomerty(Some(point));
                feat.add_property("popupContent".into(), self.counter.to_string().into());
                self.geo_data.push(feat);

                self.storage.store(GEOJSON_KEY, Json(&self.geo_data));
                update_map();
            }
            Msg::RemoveOne => {
                self.counter -= if self.counter == 0 { 0 } else { 1 };

                let _ = self.geo_data.pop();

                self.storage.store(GEOJSON_KEY, Json(&self.geo_data));
                update_map();
            }
            Msg::WeatherReady(Ok(weather)) => {
                self.weather = Some(weather);
                ConsoleService::log(format!("Weather info: {:?}", self.weather).as_str());
                return false;
            }
            Msg::WeatherReady(Err(e)) => {
                ConsoleService::error(format!("Error: {}, while retrieving weather info", e).as_str());
                return false;
            }
        }
        true
    }

    fn change(&mut self, _props: Self::Properties) -> ShouldRender {
        false
    }

    fn view(&self) -> Html {
        html! {
            <>
                <Button onsignal=self.link.callback(|_| Msg::RemoveOne) title="-1" />
                <Button onsignal=self.link.callback(|_| Msg::AddOne) title="+1" />
            </>
        }
    }
}

fn str2f64(s: &str) -> f64 {
    s.trim()
     .parse()
     .expect("Failed parsing a String to f64")
}
Now it is time to run our app!

It works! We have stored some weather info that we can use for our application!
For the following screenshot I have changed the API key inside the .env file in order to introduce an error:
![]()
Rember that the app needs to be re-compiled to take effect, since the .env file is read at compile time by a procedural macro.
How can we use weather info to draw maps?
Code to follow this part
git checkout tags/v9p3
Well, this question has really many answers.
One solution that we saw already is to put a overlay on our map and color it with different hues according to the heat, or cloudiness, or rain density, and so on.
Another very common way is to overlay the map with icons representing the weather info: clouds, sun, umbrellas... This is the common way the weather is presented on forecast news at the TV.
We could reproduce easlily this last one!
Grab info from OneCall and display them (p. I)
We just need to add few lines in our Msg::WeatherReady inside the impl of App, function fn update;
We'll see the code first, and analyze it later:
Msg::WeatherReady(Ok(weather)) => {
    self.weather = Some(weather.clone());
    ConsoleService::log(format!("Weather info: {:?}", self.weather).as_str());

    //Create a point near the beach
    let pos = vec!(14.08937, 42.585314);
    let point = Geometry::new_point(pos.into());
    let mut feat = Feature::new();
    feat.add_geomerty(Some(point));
    // Extract weather info
    let current_weather = weather.current.unwrap();
    let weather_condition = current_weather.weather[0].as_ref();
    let weather_description = weather_condition.unwrap().description.as_ref();
    // Add on map with an info icon
    feat.add_property("popupContent".into(), weather_description.unwrap().as_str().into());
    feat.add_property("markerIcon".into(), "information".into());
    // Pass it over the fence
    self.geo_data.insert(0, feat);
    self.storage.store(GEOJSON_KEY, Json(&self.geo_data));
    // Update the map
    update_map();
}
We are still logging the weather info, however, we need to clone it if we intend to use it later on.
self.weather = Some(weather.clone());
To do it faster, I embedded the position of a point near the beach inside the code, but you do not need to be that lazy: you can actually go ahead and store it in a variable inside the .env file and recall it here.
Anyway, we got here a vector representing the position (in GeoJSON longitude-first convention); after this we transform the vector into a GeoJSON point, then we embed it inside a new feature.
Then we pass to extract info from the OneCall data.
Remember all those Options and Vec's we introduced to handle malformed info? Well, now we need to deal with it, and in a smart way too, otherwise we have the compiler harass us using its powerful Borrow Checker.
A very Rust moment here!
Ok, back to business, we need to extract the current_weather from an Option, so we need to unwrap() things up; then we need to extrapolate the weather_condition that is, an Option inside a Vec: we get the first element ([0]), but as a reference (as_ref()), because we do not have the luxury of a Copy trait to be applied implicitly for us.
After which, we want to get the weather_description (the field description, wihch is descriptive of the weather conditions right now): to get this our quest leads us to unwrap the weather_condition from its Option, and get the description as a reference (again, no Copy trait); the description is in reality a Option-wrapped String, so in due time we will need to unwrap also the weather_description to get the contained String.
Since now we have the data we were searching for, let's add some properties to our feature. If you remember, we can transform our point into a marker, by giving it a popupContent property, with the content of the popup. Thus, we will get the description inside the popup.
To do so we add the popupContent property, but then we need to unwrap the weather_description, as said, but also transform it into a Json::Value; to do so, we need it as a str, and use into() to convert it to a Json String. Done!
Since we are here, we style our marker with a mapkeyicons icon: the info, information; to do so, we add another property to our feature, the markerIcon with the name of the mapkeyicons we chose.
Now we can add the feature inside our geo_data vector (to the first position using insert(0, feat)) to be passed through the Storage Service over to our map.
Last step to do is to update the map itself by triggering the usual wasm-js interface function update_map().
Let's run our app now:
In reality with the framework we are composing for ourselves, this change was done in a very limited amount of new lines. We can really pat ourselves on our back!
Grab info from OneCall and display them (p. II)
Code to follow this part
git checkout tags/v9p4a
Well there are few things about this app that still I'm not comfortable with.
Granted, I've shown you many things, and I could leave the rest as homework. However, I prefer if you would accompany me the extra mile here, and leave it as a rounded up app, not as a work in progress, with code full of debug devices (call to the log console), and some stupid +1 and -1 button that add random markers...
By the way the fact that the weather info marker was added as one of the markers inside the the geo_data vector means that if we press the -1 button once too many times we lose the marker.
Yeah, naughty bug indeed!
Of course, we have a 0 check on the Msg::RemoveOne, we could have the first line as such:
self.counter -= if self.counter == 1 { 0 } else { 1 };
but then we need to shift everything else, because we considered the marker system as a zero-based counter, and now it is a 1-based one, and so on...
Instead, there's a better way to employ Yew here, if you'd like to follow me these few last steps.
First of all, let's create a new file, called image.rs inside the src/components/ folder.
The following is its content:
use yew::{html, Html, Properties};
use yewtil::{Pure, PureComponent};

pub type Image = Pure<PureImage>;

#[derive(Clone, PartialEq, Properties)]
pub struct PureImage {
    pub img: String,
    pub caption: String,
}

impl PureComponent for PureImage {
    fn render(&self) -> Html {
        html! {
            <img src=&self.img alt=&self.caption />
        }
    }
}
We use the PureComponent here to accelerate the creation of a component that has to be mostly cosmetic; mostly because... well, you will see in a moment!
Next step: never forget to update the mod.rs inside src/components/:
pub mod button;
pub mod image;
We actually won't need button, and we could easily delete it: it's there to give us some yellow warnings from the compiler, just not to have only red ones all the time!
Now we need to delete references to the -1 and +1 buttons in our src/app.rs:
pub enum Msg {
    WeatherReady(Result<OneCall, Error>),
}
And of course they must go away also from the match msg inside fn update()
Finally this is the fn view():
    fn view(&self) -> Html {
        html! {
            <Image img="./img/test.jpg".to_owned() caption="".to_owned() />
        }
    }
The img parameter, that refers to a path "./img/test.jpg" must be found in that path.
Just put a small dimension JPEG file inside a newly created img/ folder, and call it test.jpg; I have left mine inside the source repo: you can go and grab it.
This will be the result of running (./run) the app:

Code to follow this part
git checkout tags/v9p4b
It is now time to use some info from the API to show weather images, instead of 404 errors!
To do so we will use the original images provided by the OpenWeatherMap OneCall API. Yes it does have icons, didn't you notice the icon field in the WeatherCondition struct? There you can find an icon name.
The actual icon is in the endpopint: http://openweathermap.org/img/wn/.png, for example http://openweathermap.org/img/wn/10d.png.
There's also a double sized image, reachable by adding @2x at the end of the icon name.
All set, we can use it right away. Just a little modification in the image.rs first.
impl PureComponent for PureImage {
    fn render(&self) -> Html {
        html! {
            <div>
                <img src=&self.img alt=&self.caption />
                <p>{ &self.caption }</p>
            </div>
        }
    }
}
As you can see from the impl, we embed the image in a <div>, and we add a <p> containing the caption.
We are adding also a small CSS framework to our project, to manage the styling of all these <div> 's.
These are then the changes to our index.html file:
<link rel="stylesheet" href="https://fonts.googleapis.com/css?family=Roboto:300,300italic,700,700italic">
<link rel="stylesheet" href="https://cdnjs.cloudflare.com/ajax/libs/normalize/8.0.1/normalize.css">
<link rel="stylesheet" href="https://cdnjs.cloudflare.com/ajax/libs/milligram/1.4.0/milligram.css">
These calls to the various CDNs have to be added before any reference to Leaflet, otherwise in some browsers the styling of Leaflet won't work well.
By the way, we are using Milligram! Go, and check that beauty of simplicity (very useful for very small styiling interventions).
The biggest changes, as usual, are in src/app.rs though.
First of all, in the use section:
use crate::data::onecall::{OneCall, WeatherDaily};
We will need a reference to the WeatherDaily struct, that is why we add it alongside OneCall from src/data/onecall.rs.
However, it is the fn view() that has got all the changes!
fn view(&self) -> Html {
    let render_icon = |daily: &WeatherDaily| {
        let daily_condition = daily.weather[0].as_ref();
        match daily_condition {
            Some(daily_condition)=> {
                let weather_description = match daily_condition.description.as_ref() {
                    Some(description) => description.to_owned(),
                    None => {
                        let ret = "".to_string();
                        ret
                    }
                };
                let weather_icon = match daily_condition.icon.as_ref() {
                    Some(icon) => format!("http://openweathermap.org/img/wn/{}.png", icon),
                    None => {
                        let ret = "".to_string();
                        ret
                    }
                };
                //ConsoleService::log(format!("Weather description: {:?}", &weather_description).as_str());
                html! {
                        <div class="column">
                            <Image img=&weather_icon caption=&weather_description />
                        </div>
                }
            },
            None => html! { <div> </div> }
        }
    };
    let weather_data=self.weather.as_ref();
    match weather_data {
        Some(weather) => {
            let daily_weather = weather.daily.as_ref().unwrap();
            html! {
                <div>
                    <div class="container">
                        <div class="row">
                            {for daily_weather.iter().take(3).map(render_icon)}
                        </div>
                    </div>
                </div>
            }
        }
        None => html! {
            <div>
                { "Loading Weather data..."}
            </div>
        }
    }
}
Lots of changes indeed! Let's proceed with order.
The first thing we have is a closure. We will talk about it later on.
Instead let's concentrate on these last lines first:
let weather_data=self.weather.as_ref();
match weather_data {
    Some(weather) => {
        let daily_weather = weather.daily.as_ref().unwrap();
        html! {
            <div>
                <div class="container">
                    <div class="row">
                        {for daily_weather.iter().take(3).map(render_icon)}
                    </div>
                </div>
            </div>
        }
    }
    None => html! {
        <div>
            { "Loading Weather data..."}
        </div>
    }
}
First we extract data from the weather prop where we saved it after the API call.
Then we match over it
Yes, you have seen me often use the unwrap() and it is a risk, we all know, but a calculated one. Here instead the expected behavior is that the first time we render the interface, the data is not yet in. So we cannot unwrap...
Why? because there is a delay due to internet speed between the first loading of the page, and the response from the API call. If we were to unwrap() the data and start to use it, we would most surely get a None, and reach the unreachable (that is a Panic, in wasm lang).
As an exercise, if you want, change those lines using an unwrap() instead of matching over the weather_data, and see what happens.
Back to our code: in the arm None we can put a message to explain that we are loading data, while on the Some() branch we put the rendering once the data is available.
Remember: both branches have to have the same data type, and the fn view() has to return a Html, that is why we are closing both arms with the html! macro.
In the Some() branch we actually use the unwrap(), in the line
let daily_weather = weather.daily.as_ref().unwrap();
because now that the data is in, we are confident enough that some data should be there. We could match again and print an error message, but this way if the data would not be in, we will just see nothing...
Of course in production we should match everything, and return empty strings if we want nothing to appear, because the behavior of the Panic is unpredictable.
Once we got the daily_weather Vec, we can iterate over it to render an icon for each day.
Actually, we will just take the first few days, because the API gives us the whole week.
In any case, we will use Milligram 's grid system to style the icons:
<div>
    <div class="container">
        <div class="row">
            {for daily_weather.iter().take(3).map(render_icon)}
        </div>
    </div>
</div>
As you can see, in the for statement we take just the first 3 elements of the vector, and we map to it the render_icon closure.
Time to explore that closure now!
let render_icon = |daily: &WeatherDaily| {
    let daily_condition = daily.weather[0].as_ref();
    match daily_condition {
        Some(daily_condition)=> {
            let weather_description = match daily_condition.description.as_ref() {
                Some(description) => description.to_owned(),
                None => {
                    let ret = "".to_string();
                    ret
                }
            };
            let weather_icon = match daily_condition.icon.as_ref() {
                Some(icon) => format!("http://openweathermap.org/img/wn/{}.png", icon),
                None => {
                    let ret = "".to_string();
                    ret
                }
            };
            //ConsoleService::log(format!("Weather description: {:?}", &weather_description).as_str());
            html! {
                    <div class="column">
                        <Image img=&weather_icon caption=&weather_description />
                    </div>
            }
        },
        None => html! { <div> </div> }
    }
};
As you can see from the first line, we need to annotate the parameter of this closure, and it is a reference to the WeatherDaily struct:
let render_icon = |daily: &WeatherDaily|
not a big suprise though, since we got it as a reference to the vector of daily weather data.
The WeatherDaily struct has some detailed data, but we are interested here in the short summary, called weather, which has an instance of WeatherCondition (in a vector).
With the following we get only the first element,
let daily_condition = daily.weather[0].as_ref();
and we match over it: if None we return an empty <div>
None => html! { <div> </div> }
If it's present instead, with Some(), we extract the description and the icon, again matching over the result, and saving an empty string in case there is nothing.
Remember that both arms have to have the same data type as return, so that if you need a string out of a as_ref() you need afterwards to use a corresponding to_owned().
The borrow checker will notice if you don't and refuse to compile...
When getting the icon you can see I formatted it right away inside the API call to retrieve the icon of the weather condition with the following:
Some(icon) => format!("http://openweathermap.org/img/wn/{}.png", icon)
that embeds the icon name inside the call, in order to retrieve it.
At this point we have the weather_icon with a URL to retrieve the icon image, and a weather_description with a descriptive text to use as caption and alt for the image)
We can simply render with the Image pure component that we just edited to have both an <img> and a caption wrapped in <p>
html! {
    <div class="column">
        <Image img=&weather_icon caption=&weather_description />
    </div>
}
It's really straightforward, once you remember to apply the borrow-checker rules, and match at least the minimum that could fail...
I left also a call to ConsoleService::log() in a comment, just to show you that I use also this trick to know if the API is fetching, for the cases when I unwittingly get a panic...
Ok, time to run:

We first get the loading message.
Then we get the actual data, and we render the icons.

Fantastic!
Let's play with GeoJSON in Rust some more!
Code to follow this part
git checkout tags/v9p4c
Well, this is all nice and well, but there is one last thing (no, I don't promise it's the end)
We have a nice GeoJSON object in js/ojects.geo.js which is exported through the var base_features, and imported in map.js
If, for some obscure reason (no I'm not a psychopath, there is a clear reason, and it will be revealed in the end), we wanted to create it in Rust and pass it over to JS ...?
Well, if we do not want to create a lot of structs by hand, but we want to parse a GeoJSON using the data structures in src/data/geojson.rs, we need to do exactly as in Javascript: we will create a String variable, containing the GeoJSON and parse it, using serde. That is why we derived all objects in geojson.rs with:
#[derive(Serialize, Deserialize, Debug, Clone)]
This is also the reason why we created a FeatureCollection type, even though Leaflet can accept a vector of features as a feature collection, without using the proper object.
Before we dive into the code, let's dust off a little Rust here: the raw string literals!; in fact we will parse a str using serde_json::from_str.
In Rust, if we have a long str we can render it easily with the following notation:
let long_str = r#"
Very
long
and
multi-line
string
literal.
It has the advantage
of allowing also " and ' at the same time
without need to reformat
our GeoJSON
or to ecape it.
Got it now?
"#;
This is very useful if we need a long &'static str. We can actually add an arbitrary number of # if the string literal contains #, and ours does because it contains some CSS colors! So we will create a src/data/geodata.rs, grab the content of base_features in js/objects.geo.js, and write them in geodata.rs as follows:
pub const BASE_FEATURES:  &'static str = r##"
{
    "type": "FeatureCollection",
    "features": [
        {
            "type": "Feature",
            "geometry": {
                "type": "Polygon",
                "coordinates": [[
                    [14.08937, 42.585112],
                    [14.08959, 42.585014],
                    [14.089478, 42.584895],
                    [14.089285, 42.584998],
                    [14.08937, 42.585112]
                ]]
            },
            "properties": { "name": "Torre di Cerrano" }
        },
        {
            "type": "Feature",
            "geometry": {
                "type": "Polygon",
                "coordinates": [[
                    [14.089907, 42.585606],
                    [14.090406, 42.585101],
                    [14.090148, 42.584915],
                    [14.089644, 42.585349],
                    [14.089907, 42.585606]
                ]]
            },
            "properties": { "name": "Beach di Cerrano" }
        },
        {
            "type": "Feature",
            "geometry": {
                "type": "Point",
                "coordinates": [14.089444, 42.585000]
            },
            "properties": {
                "popupContent": "<h3>Torre di Cerrano</h3><a href='https://it.wikipedia.org/wiki/Torre_di_Cerrano'>More</a>",
                "markerIcon": "viewtower"
            }
        },
        {
            "type": "Feature",
            "geometry": {
                "type": "Point",
                "coordinates": [14.090035557746889,42.58525072399882]
            },
            "properties": {
                "popupContent": "<h3>Beach</h3>Hours: 8:00am - 8:00pm",
                "markerIcon": "beach",
                "markerColor": "#3d4575",
                "markerBGColor": "#5066f2"
            }
        }
    ]
}
"##;
As you can see, we used the r##" --- "##; notation (with 2 #)
In JS we export the variables this way:
export default base_features;
In Rust we just need to modify the mod.rs inside src/data/:
pub mod geojson;
pub mod onecall;
pub mod geodata;
We just added the geodata, redering it pub.
Now, let's modify our src/app.rs.
First things first, we need to add some lines to the use section (I deleted also some unused imports in the code, please refer to the source):
use crate::data::geodata;
use serde_json::from_str;
After adding the above use, we need also to add a new const with a SessionStorage variable name to use as a exchange door between the Kingdom of Rust and the Realm of JavaScript:
const BASE_FEATURES_KEY: &'static str = "basefeatures";
It can be added after the GEOJSON_KEY.
Now we can change a little the fn create() to the following:
fn create(_: Self::Properties, link: ComponentLink<Self>) -> Self {
    let mut storage = StorageService::new(Area::Session).expect("storage was disabled by the user");

    let Json(geo_data) = storage.restore(GEOJSON_KEY);
    let mut geo_data = geo_data.unwrap_or_else(|_| Vec::new());

    let Json(baselayer) = storage.restore(BASE_FEATURES_KEY);
    let baselayer = baselayer.unwrap_or_else(|_| FeatureCollection::new());

    let basic_layer: Result<FeatureCollection, _> = from_str(geodata::BASE_FEATURES);
    match basic_layer {
        Ok(layer) => {
            storage.store(BASE_FEATURES_KEY, Json(&layer));
            update_map();
    },
        _ => { ConsoleService::error("Error loading the base layer"); },
    };

    let lat = env!("LATITUDE","Could not find LATITUDE in .env");
    let lng = env!("LONGITUDE", "Could not find LONGITUDE in .env");
    let lat: f64 = str2f64(lat);
    let lng: f64 = str2f64(lng);
    let position = vec!(lng, lat);
    let weather_key=env!("WEATHER_KEY","Could not find WEATHER_KEY in .env").to_string();

    App {
        link: link.clone(),
        storage,
        geo_data,
        position,
        weather_service: WeatherService::new(lat, lng, "metric".to_string(), weather_key),
        callback: link.callback(Msg::WeatherReady),
        weather: None,
        task: None,
    }
}
After the call to restore the GEOJSON_KEY, we will do the same for BASE_FEATURES_KEY.
Then we parse the string literal we created in geodata.rs:
let basic_layer: Result<FeatureCollection, _> = from_str(geodata::BASE_FEATURES);
We need to annotate the basic_layer type, because the compiler does not know to which type to parse the content of the string. In this way from_str will try to parse the data inside the FeatureCollection struct (in src/data/geojson.rs); we do not care about the error if any .
Anyway, we will match over the result. The Ok branch stores the structs as JSON inside the proper SessionStorage key,
storage.store(BASE_FEATURES_KEY, Json(&layer));
update_map();
and it updates the map too.
Well, as last thing we need to take care to properly receive the data in JS!
Let's open the js/map.js and as first thing comment out or delete the reference to js/objects.geo.js:
//import base_features from "./objects.geo";
We then need to get the first_overlay from our SessionStorage, instead than from the objects.geo.js
So the following:
// First overlay
var first_overlay = L.geoJSON(base_features, {
  onEachFeature: onEachFeature,
  pointToLayer: pointToLayer,
});
Has to be changed into the following:
// First overlay
function get_basefeatures_overlay() {
  var base_features = [];
  var rawbasefeatures = sessionStorage.basefeatures;
  if(rawbasefeatures || rawbasefeatures === "") {
    var base_features = JSON.parse(rawbasefeatures);
  }
  return base_features
}
// Create a first_overlay for base_features data
function get_overlay_layer () {
  var geojsonData = get_basefeatures_overlay();
  //console.log(geojsonData)
  return L.geoJSON(geojsonData, {
    onEachFeature: onEachFeature,
    pointToLayer: pointToLayer,
  })
}
var first_overlay = get_overlay_layer();
As we can see, function get_basefeatures_overlay() mimics the function get_data() we have used for the GeoJSON layer of information, while function get_overlay_layer()mimics function get_datalayer(). At the end of the day, they have the same code with different variables names, because they do exactly the same thing.
We could even generalize these two functions, and I advise you to do so if you have many GeoJSON layers you want to share between Rust and JavaScript, but for the purposes of this tutorial I think this is overkill.
The very last thing is to modify the function redrawLayer() because this function is triggered by our bridge function update_map() in order to update the map whenever a change is made in Rust; in fact we do not know at which point in time the wasm will store info in the SessionStorage: it may well be right after the map has been rendered, so we need to update it whenever we finish passing info on the Rust part.
function redrawLayer(e){
  controls.removeLayer(infolayer);

  mymap.removeLayer(infolayer);
  mymap.removeLayer(first_overlay);

  infolayer = get_datalayer();
  infolayer.addTo(mymap);

  first_overlay = get_overlay_layer();
  first_overlay.addTo(mymap);

  controls.addOverlay(infolayer, "Info");
}
mymap.on('submit', redrawLayer);
We just removed the first_overlay layer in addition to infolayer that we were already doing, getting the layer again with the get_overlay_layer() function, and adding it back to the map mymap (which is the only one we have in this project).
We do not add the layer first_overlay to the controls, because we have decided it to be part of the basemap; in this way it will be present both in Street and Satellite views, but it will not be possible to exclude it as we do with the infolayer.
Now if we run the app... NOTHING HAS CHANGED!
Which is good news, because it means that things are working properly.
Grab info from OneCall and display them (p. III)
Now, THIS is the end, I promise.
Code to follow this part
git checkout tags/v9p4d
For which reason did we go about parsing some JSON in Rust, which is JavaScript Object Notation, even if in the form of GeoJSON, then saving it as a string representation of JSON in the SessionStorage, then letting Leaflet parse it again? Just for the thrill of doing it in Rust? (It might be a reason, but I doubt it is a really valid one).
Well the reason is simple: once parsed we can actually put it to good use in our WASM runtime.
This is a tutorial, we are really simplifying things out (well, I'm actually showing you many useful and advanced stuff nonetheless), but in a real world app we might need to parse GeoJSON from an API; however, more importantly, we might need to do some operation on the parsed GeoJSON, or whatever other info we can grab from an API in the wild and use in our app (it has not to be just GeoJSON, it works also on raw JSON which is far more common). In fact I hope I have showed you techniques during these tutorials to apply not just in the domain of web maps, but more in general.
Anyway, long rants aside: it is time to USE the data we got! So we need to save the object we parse from src/data/geodata.rs as a state in our App.
First, we need to add the state to our App struct:
pub struct App {
    link: ComponentLink<Self>,
    storage: StorageService,
    geo_data: Vec<Feature>,
    position: Vec<f64>,
    weather_service: WeatherService,
    callback: Callback<Result<OneCall, Error>>,
    task: Option<FetchTask>,
    weather: Option<OneCall>,
    basic_layer: FeatureCollection,
}
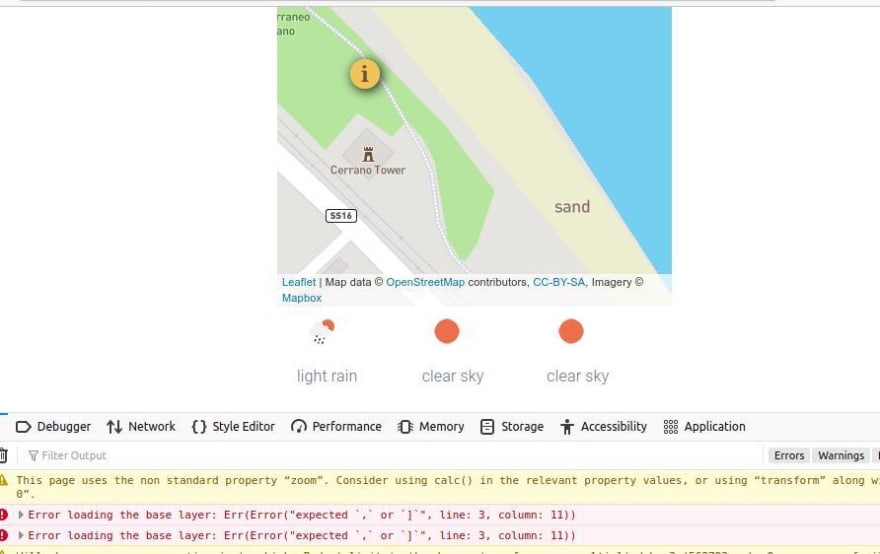
Before we took a shortcut: we ignored the error result from the parsing done by serde_json::from_str() because it is data we provided. But if we get it from the wild, we need to properly log info about why it failed.
So the following is the updated part in the fn create():
let Json(basic_layer) = storage.restore(BASE_FEATURES_KEY);
let basic_layer = basic_layer.unwrap_or_else(|_| {
    let layer: Result<FeatureCollection, _> = from_str(geodata::BASE_FEATURES);
    match layer {
        Ok(layer) => {
            storage.store(BASE_FEATURES_KEY, Json(&layer));
            update_map();
            layer
        },
        json_error => {
            ConsoleService::error(format!("Error loading the base layer: {:?}", json_error).as_str());
            FeatureCollection::new()
        },
    }
});
We fixed the restoring of the info from the session storage. Moreover, now we save back the unwrapped layer in the basic_layer variable, or, in case of error, we properly log why it failed and save a new() FeatureCollection struct.
Of course we can pass it to the App now:
App {
    link: link.clone(),
    storage,
    geo_data,
    position,
    weather_service: WeatherService::new(lat, lng, "metric".to_string(), weather_key),
    callback: link.callback(Msg::WeatherReady),
    weather: None,
    task: None,
    basic_layer
}
Before we use it, just for the sake of showing you, I have modified the content of BASE_FEATURES in src/data/geodata.rs so that the parsing might fail.
Once we run it, we have a proper message in the console:
Back to work again!
Now we need to use the data to show the weather conditions properly.
Inside fn update(), there is the nice Ok branch of the Msg::WeatherReady(Ok(weather)). We will modify it so that it will show some info based on the weather conditions.
We spot a perfect place to add the code, right before updating the app:
// Update the map
update_map();
Just above these instructions we add the following:
// extract temperature info
let current_temp = current_weather.temp;
match current_temp {
    Some(t) => {
        if t > 30.0 {
            self.basic_layer.features[1].add_property("color".into(), "#ff0000".into());
            self.basic_layer.features[1].add_property("fill".into(), "true".into());
            self.basic_layer.features[1].add_property("fillColor".into(), "#ff0000".into());
            self.basic_layer.features[1].add_property("fillOpacity".into(), "0.3".into());
            self.storage.store(BASE_FEATURES_KEY, Json(&self.basic_layer));
        }
    },
    None => ()
}
As you can see, we need to place it after extracting the weather info to create the info marker on the map. In fact, we will reuse the current_weather variable we declared before.
The temperature can be easily extracted, but it is not the only useful info there: we could easily extract as well the wind speed, the humidity, or the UVI index, all very useful data in this context.
For the purposes of this tutorial we'll just extract the current temperature through:
let current_temp = current_weather.temp;
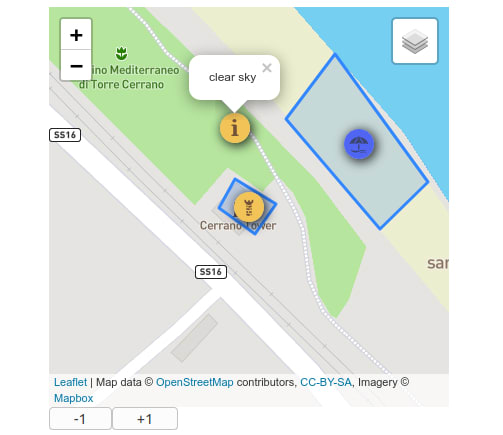
Now we need to unwrap it, or better still match it; in the Some() branch we can set a flag to check whether the temperature is over 30°C (if t > 30.0 { ... }). In that case, we will alert our users that the beach is very hot by drawing the polygon representing the beach as red.
Again, as said, we could easily extract wind speed to let the users know there is risk of getting sand in the eyes, or the UVI index to let them know how much sunscreen they need, or if it's even too dangerous to stay under the hot sun-rays. We could map each to a color or an icon...
All we need to do is to add some styling properties to the appropriate "beach" object.
For example, the following:
self.basic_layer.features[1].add_property("color".into(), "#ff0000".into());
selects the appropriate Feature in the FeatureCollection (it's under the vec fetures, at position [0]), and adds to it a property with add_property, which takes a couple of KEY, VALUE. Notice that the VALUE can be any JSON Value declared in the crate serde_json.
In this case we pass a series of strings, one of which is a bool, but it will be interpreted rightly eventually.
These are the properties we will set, with their explanation. The properties are those recognizable by Leaflet for any path, which are those inherited also by the GeoJSON polygon. Docs here.
-
color: this is the polygon path-line color -
fill: if the polygon has to be filled or not (bool) -
fillColor: in case the polygon has to be filled, this sets the fill color -
fillOpacity: in case the polygon has to be filled, this sets the fill opacity (alpha of the RGBA)
Of course as last thing we need to save the modified basic_layer inside the SessionStorage (self.storage.store(BASE_FEATURES_KEY, Json(&self.basic_layer));).
Now, we need to modify the js/map.js if we want that it draws correctly the GeoJSON layer.
We need a styling function, that we will call styleProps. The following is its content.
function styleProps(feature) {
  if (feature.properties) {
    if (feature.properties.color) {
      return {color: feature.properties.color};
    }
    if (feature.properties.fill) {
      return {fill: feature.properties.fill};
    }
    if (feature.properties.fillColor) {
      return {fillColor: feature.properties.fillColor};
    }
    if (feature.properties.fillOpacity) {
      return {fillOpacity: feature.properties.fillOpacity};
    }
  }
}
This function must be mapped repeatedly on each feature and it returns objects representing the desired style.
To call this function we need to map it on the layer creation. It is a bit like onEachFeature, but for the styling; thus it goes next to onEachFeature:
function get_overlay_layer () {
  var geojsonData = get_basefeatures_overlay();
  return L.geoJSON(geojsonData, {
    onEachFeature: onEachFeature,
    pointToLayer: pointToLayer,
    style: styleProps,
  })
}
That's it! Let's run the app now.

Now these are some nice satisfactions in a programmer's life!
Conclusions
I ended up cleaning the final code a little bit and adding an #![allow(dead_code)] to onecall.rs as well. So in the last version there shouldn't be even a least warning from the compiler!
This has been the longest tutorial so far. Next time I'll be either brefier or chop it some more than two parts.
I hope you enjoyed it and found it useful. Let me know what do you think about this, for better or for worse, so that I can have some feedback on this.
Till next time!

Latest comments (0)