
Making your websites accessible is a topic that we know is important as web developers and testers. However, it's also a topic that is often forgotten or brushed aside when you're working on your website.
I've been working as a software developer for over 16 years. Throughout my career, I haven't worked on a single project where accessibility was a priority. I've worked on thousands of tickets, stories, and bug reports. Accessibility-related work rarely crossed my desk. At best, accessibility was an afterthought, something to be done later - if ever. At worst, it was an issue that no one brought up.
I never paid much attention to making my websites accessible for people with certain limitations. That all changed recently after meeting someone who's colorblind.
Our conversation turned to the type of work that I do. I mentioned that I was a software developer, mostly focused on building web applications. He asked what type of sites I worked on, so I decided to show him on my smartphone.
He squinted his eyes, contorting his face and twisting his head a bit. It wasn't a normal reaction, so I asked if there was something he saw on the site that made him react that way. He mentioned that he really couldn't read anything on the site because he's colorblind. The color contrast between the background and text was entirely unreadable for his eyes.
This declaration was a bit of a wake-up call for me. I never met someone with color blindness before. Admittedly, I never realized how something like a combination of colors could impact someone else negatively.
After this encounter, I garnered an interest in web accessibility and how it affects others with limitations. This list of stories by the W3C Web Accessibility Initiative served as a sobering reminder that web developers and testers have the responsibility to make the web accessible to everyone.
Making the web accessible with the help of axe
As I learned more about accessibility, I realized that making your websites accessible can take plenty of work. There are plenty of guidelines to follow, such as:
- Having the proper contract between foreground and background colors.
- Ensuring images have appropriate alternative text for screen readers.
- Making sure all buttons have distinguishable text.
- Structuring lists of data appropriately.
- Adding captions to any video elements on your site.
These guidelines are a fraction of the guidelines recommended by the latest version of the Web Content Accessibility Guidelines. With all the recommendations, it isn't straightforward to know where to begin or to stay within the guidelines.
If you're interested in making your projects accessible but don't know where to begin, axe has you covered. axe is a tool that identifies the most common accessibility issues for websites.
Using axe as part of your development and testing process helps tackle most accessibility problems. It's also a great tool to begin educating yourself and your team about accessibility on the web.
Intermission: Web Content Accessibility Guidelines levels
Before continuing to talk about axe, it's worth spending some time talking about the recommended accessibility guidelines.
You may have heard about the World Wide Web Consortium before. The Consortium - also known as W3C - is the central organization that sets standards for the web. Their overall mission is to set the standards for widespread adoption, like how browsers should render HTML and CSS, for instance.
Within the W3C exists the Web Accessibility Initiative (WAI). This initiative focuses on making the web accessible to people with disabilities. Their goal is to provide recommended guidelines and other educational material to help everyone navigate the web, no matter their limitations.
The Web Accessibility Initiative maintains the Web Content Accessibility Guidelines. These guidelines are the core for setting recommendations to help make websites accessible to everyone.
The recommendations in the guidelines are divided into three levels: A, AA, and AAA. The A level is the absolute minimum level recommended by the Web Accessibility Initiative, while the AAA level is the "gold standard," covering just about everything to help those with disabilities.
While achieving AAA status on your web applications is desirable, it's a very lofty goal that requires lots of effort. For most projects, the time and effort needed to get to AAA level are impractical. Unless you need to achieve this level of compliance for your project, you should not focus on the AAA level.
For most projects, the AA level is considered an acceptable standard. This level covers major accessibility problems and takes your website far enough to make it useful to anyone with limitations.
By default, the axe accessibility tool reports violations for both the A and AA levels. If your project needs to achieve AAA status, you'll need additional tools such as SortSite.
Automating axe with TestCafe
If you want to do a quick check on your websites using axe, you can run a quick check on Google Chrome, using their handy Chrome extension.
I've used the Chrome extension for a couple of smaller projects, and I've been surprised at how many issues it's identified. It helps you find and fix many problems that you might find insignificant but can make a world of difference for someone else.
Having a Chrome extension is helpful for a quick check. However, it would help if you run these checks automatically. When you update your application, it's easy to forget to check any accessibility issues.
A convenient way to ensure accessibility problems don't creep into your project is by automating these checks. axe integrates with many existing testing tools, making it dead simple to add to your workflow.
For this article, I'll use the TestCafe testing framework as an example of how you can use axe as part of your test automation strategy. The rest of this article demonstrates how to install the axe-testcafe plugin, writing tests to check for accessibility violations, and fixing some common accessibility issues.
As a starting point, we'll use the code built in a previous Dev Tester article covering how to get started with TestCafe. If you're new to TestCafe, you can follow along with that article, or you get the source code on GitHub. These tests run against a staging site built for Airport Gap, a small project I built to help others improve their API automation testing skills.
The first step is to install the axe-testcafe plugin. The plugin requires axe-core, which is the engine that runs the accessibility checks. All you need to do to install the plugins is to run the following command in the test project directory:
npm install axe-core axe-testcafe
Once installed, you can begin using axe inside your TestCafe tests.
Let's write our first automated accessibility test using the axe-testcafe plugin. In this test, we'll run the accessibility checks on the Airport Gap homepage. We'll open the home_test.js file in the test project and modify it to add our accessibility test:
import { axeCheck, createReport } from "axe-testcafe";

import homePageModel from "./page_models/home_page_model";

fixture("Airport Gap Home Page").page(
  "https://airportgap-staging.dev-tester.com/"
);

test("Accessibility testing", async t => {
  const { error, violations } = await axeCheck(t);
  await t.expect(violations.length === 0).ok(createReport(violations));
});

test("Verify home page loads properly", async t => {
  await t.expect(homePageModel.subtitleHeader.exists).ok();
})
The first change we did to this test is to import a few functions from the axe-testcafe plugin. The axeCheck method is responsible for running the accessibility checks using the axe library and returns any violations found by axe. The createReport method is a presenter used to display any violations in your console when running the test suite.
The other change we did is adding a new test to run the accessibility checks and set the assertion that axe found no violations. axeCheck uses the TestCafe test controller object and runs the accessibility checks on the specified fixture. The violations variable stores any violations found. Finally, we run an assertion on violations - if there are no violations, the test passes. If the test fails, the checkReport function returns the violation details.
Let's run this test on the Airport Gap website (with the command npx testcafe chrome:headless home_test.js) and see what comes up:

Yikes! Even a simple page like the Airport Gap homepage can contain lots of accessibility issues.
The error message generated by the createReport function from the axe-testcafe plugin contains useful information. The red text is the accessibility guideline that failed the check. The text underneath the guideline indicates the CSS selectors where the violation occurred.
Fixing web accessibility violations reported by axe-testcafe
Admittedly, these messages are confusing upon first glance. The guidelines aren't all straightforward and require some online searching to know what to fix. Also, it's tricky to figure out which CSS selector is causing the violation as the report displays a few duplicate CSS classes.
Below, we'll cover the violations found in this test, and how to fix them, in no particular order.
Violation: Images must have alternate text
People who are visually impaired rely on screen readers to navigate the web. Screen readers take the content of a website and pass on the data through either audio or Braille. With text, it's self-explanatory - the screen reader "reads" the text directly.
With images, you need alternate text for screen readers to indicate the purpose of the image. Screen readers use the alt attribute in the image tag to describe the image.
The Airport Gap homepage has two images with missing alt attributes - the application's logo, and the Dev Tester logo. Fixing these is simple - just add the alt attribute to these images. For instance:
<!-- Accessibility check failed -->
<img src="airport_gap_logo.png">

<!-- Accessibility check passed -->
<img src="airport_gap_logo.png" alt="Airport Gap Logo">
Violation: <html> element must have a lang attribute
Once again, this violation affects people who need to use screen readers. Usually, screen readers have a setting to set the user's default language. If the person goes to a website, it checks the page. If the page doesn't specify the language it's written in, the screen reader uses its default.
As you might expect, this issue affects people who speak multiple languages. Imagine someone who speaks English and Spanish. Their screen reader software defaults to English. If they visit a website with Spanish content and the site has no language set, the screen reader proceeds to read the site's contents, assuming it's in English, making the site completely inaccessible to the person.
To fix this violation, you just need to specify the language of the page in your <html> tag. You can accomplish this by adding the lang attribute to the tag. For example, to set the default language of a web page to English, do the following:
<!-- Accessibility check failed -->
<html>
    ...
</html>

<!-- Accessibility check passed -->
<html lang="en">
    ...
</html>
If your website is in a language that uses right-to-left writing, such as Arabic or Farsi, make sure to include the dir attribute:
<html lang="ar" dir="rtl">
    ...
</html>
Violation: Heading levels should only increase by one
In web pages, we often use header tags such as <h1> and <h2> to indicate a section's heading or title. Usually, these tags are useful to visually indicate a title or importance and to help search engines determine the relevance of a page's contents.
However, screen readers use these tags differently. People who use screen readers use headers to make it easier to navigate through a page. When headers are appropriately ordered and structured, users of screen readers have less trouble traversing your website. If your headers are all over the place, it's incredibly frustrating for these users.
In this example, the violation occurred because the top of the page has an <h1> tag, and later on there's an <h3> tag - skipping an <h2> tag. To fix the issue, we just need to ensure the order of these header tags is proper:
<!-- Accessibility check failed -->
<h1>...</h1>
<h3>...</h3>

<!-- Accessibility check passed -->
<h1>...</h1>
<h2>...</h2>
Violations: Document must have one main landmark, All page content must be contained by landmarks
These two violations are related so that we can group them for their definition and fixes.
If you look at the HTML markup of a web page, you'll see a basic structure. For instance, you begin with an <html> tag. Within this tag, you'll have additional tags like <head> and <body>, each one containing more tags making up the structure of the page. On a rendered web page, we don't see this structure. The browser just handles the markup and displays its rendition.
However, the HTML structure is essential for people using screen readers. Without the proper context, people with visual limitations have difficulty knowing which section they're currently at on your page. It's simpler for them to have specified areas to navigate around since they cannot rely on visual cues.
To make it easier for screen readers to navigate around a page, we need to classify these sections in our markup. You can handle these fixes in one of two ways. We can use native HTML 5 tags such as <nav> and <main>, which screen readers detect for navigation purposes. You can also use the role attribute on any elements to identify the appropriate sections. These are known as landmark elements.
In our example, we don't have any of these landmark elements in the markup. A quick fix is to add at least the main landmark as so:
<!-- Accessibility check failed -->
<html>
    <head>...</head>
    <body>...</body>
</html>

<!-- Accessibility check passed -->
<html>
    <head>...</head>
    <body>
        <main>...</main>
    </body>
</html>

<!-- or -->
<html>
    <head>...</head>
    <body>
        <div role="main">...</div>
    </body>
</html>
This fix would make our accessibility check pass. Ideally, you would spend additional time going through your HTML to set landmark elements where appropriate.
Violation: Elements must have sufficient color contrast
As you can see in the error report from TestCafe, this check is where we experienced most issues. These violations pop up due to the color scheme used on the web page. In simple terms, it means that these violations are text elements using a color that has a low contrast against the specific background color where placed. The problem with low contrast is that those with low vision or color blindness experience difficulty reading the text, or even see it.
As opposed to the previous violations that mostly affect people who need to use screen readers, these violations can affect a larger group of people. People with poor vision may not use screen readers.
You can fix these issues in one of two ways. The easiest way is to change either the color of the background and your test to increase the contrast. The other way is by making the text larger. Changing the colors is recommended since it's easier to make increase the contrast. Making your text larger may fix the issue for some, but it doesn't necessarily deal with the problem for everyone.
The axe-testcafe plugin does not say how to fix the issue, since it's up to you to determine how to best fix them, according to your website. Essentially, you have to locate the elements, take note of the text color and the background color, and calculate the contrast between both colors. The contrast between colors must be 4.5:1 for small text, or 3:1 for large text (18pt font or bolded 14pt font).
You can use an online contrast checker such as https://contrastchecker.com/ to calculate the contrast between colors automatically. These tools also indicate whether it complies with the accessibility guidelines.
For Airport Gap, I decided to update the colors of the text. For all cases, it merely meant using a darker shade on the text to increase the contrast. It's the simplest way to tackle the issue without investing too much time in redesigning the website.
After dealing with these accessibility violations, we can re-run the test to see that our page complies with the Web Content Accessibility Guidelines at the AA level:

We should also run accessibility checks in our login test for Airport Gap. In the test project, open the login_test.js file and add the same test as we did before:
import { axeCheck, createReport } from "axe-testcafe";

import loginPageModel from "./page_models/login_page_model";

fixture("Airport Gap Login").page(
  "https://airportgap-staging.dev-tester.com/login"
);

test("Accessibility testing", async t => {
  const { error, violations } = await axeCheck(t);
  await t.expect(violations.length === 0).ok(createReport(violations));
});

test("User can log in to their account", async t => {
  await t
    .typeText(loginPageModel.emailInput, "airportgap@dev-tester.com")
    .typeText(loginPageModel.passwordInput, "airportgap123")
    .click(loginPageModel.submitButton);

  await t.expect(loginPageModel.accountHeader.exists).ok();
});
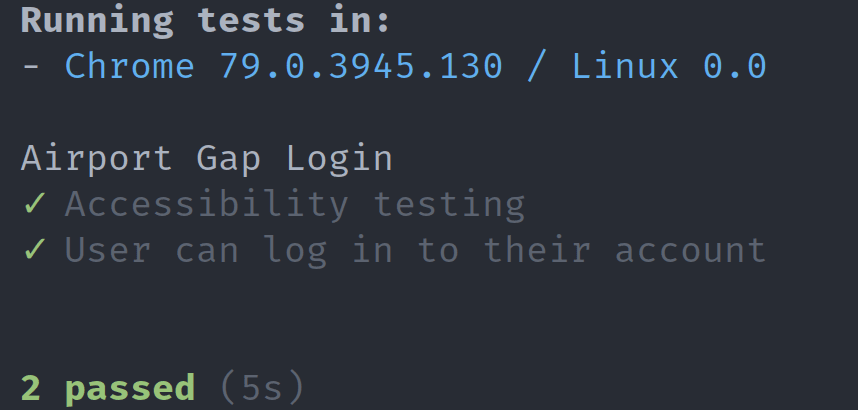
After adding the test, we can run our accessibility checks on the login page (npx testcafe chrome:headless login_test.js) to see if we have any violations:

Unsurprisingly, we have a few violations, and they're similar to the ones we corrected on the home page. In the Airport Gap application, the home page and the login page share the same layout file and have some shared CSS. There are fewer issues to tackle here since we already dealt with some of them when working on the home page violations.
By now, you know how to fix these two violations - update the specified elements, and add a missing alt attribute to the Airport Gap logo. After these minor updates, the accessibility checks happily pass:
Summary
Accessibility on the web is something that many don't need. However, for those who do need it, it can make all the difference for their online experience.
Making your websites accessible can mean plenty of work. It's easy to feel overwhelmed with the Web Content Accessibility Guidelines. But with tools like axe and TestCafe, you can detect and fix issues quickly with little extra effort. There's no excuse to automate your accessibility tests as part of your workflow.
The examples in this article are simple, yet reveal how easy it is to forget to make our websites accessible to everyone online. As web developers and testers, we all should share responsibility in making the web accessible for everyone, regardless of their limitations.
Is accessibility a high priority in your workplace? What steps do you plan to take to make your work accessible to those with limitations? Leave a comment below!

P.S. Was this article helpful to you? I'm currently writing a book that will cover much more about about the TestCafe testing framework.
With the End-to-End Testing with TestCafe book, you will learn how to use TestCafe to write robust end-to-end tests on a real web app and improve the quality of your code, boost your confidence in your work, and deliver faster with less bugs.
For more information, go to https://testingwithtestcafe.com. Sign up and stay up to date!

Top comments (0)