
In this post, you’ll learn how to use the Dapr pluggable component .NET SDK and the Supabase C# library to build a pluggable state store component that uses Supabase tables.
If you prefer watching a video instead of reading this blog post, head over to YouTube and watch this:
Dapr, the open-source, portable, event-driven runtime for building distributed applications, comes with over 100 built-in components which can be used to integrate resources across many clouds or on-premise systems. If those components are not enough, or you want to create something custom for your specific needs, you can create a pluggable component. The Dapr building block APIs that are pluggable are:
- State management
- Publish and subscribe
- Input and output bindings
Since Dapr release 1.10 there are pluggable component SDKs available that make it easier to create them.
Supabase is a popular, open-source, Firebase alternative that offers Postgres databases, authentication, Edge functions, real-time messaging and file storage. The Supabase community has released a C#/.NET library that developers can use to integrate their .NET apps with the Supabase platform. For managing Postgres databases, the library uses the postgrest-csharp library that allows developers to use strongly typed models and LINQ queries.
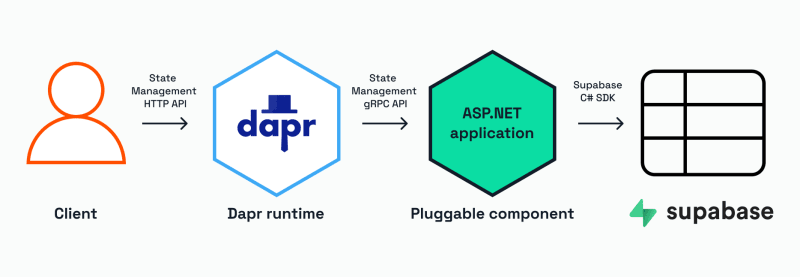
This post describes the steps required to make a proof of concept Dapr pluggable component using .NET 7 that combines both the Dapr pluggable component .NET SDK and the Supabase C# library. The result is an ASP.NET application, that is run locally, and tested by making HTTP requests to interact with the state stored in a Supabase table.
1. Prerequisites
- .NET 7 SDK
- Dapr CLI
- A Supabase account, you can sign up for free.
- Supported OS: macOS, Linux, WSL on Windows.
2. Creating the DaprPluggableSupabase .NET project
If you’re more interested in using the pluggable component instead of creating it from scratch, continue with section 3. Supabase Setup.
-
Clone this repo, open a terminal and navigate to the
srcfolder.The cloned repository already contains an ASP.NET app in the
DaprPluggableSupabasefolder that is the pluggable component. You can use this as a reference. -
Create a new .NET web project, and make sure to use a different name than
DaprPluggableSupabase(e.g.MyDaprPluggableSupabase):dotnet new web --name MyDaprPluggableSupabase -
Change to the
MyDaprPluggableSupabasefolder and add theDapr.PluggableComponents.AspNetCoreandsupabase-csharpNuGet packages:cd MyDaprPluggableSupabasedotnet add package Dapr.PluggableComponents.AspNetCoredotnet add package supabase-csharp Create a new class file in the
MyDaprPluggableSupabasefolder namedKeyValue.cs.Add the following content to this new class:
using Postgrest.Attributes;
using Postgrest.Models;

namespace DaprPluggableSupabase
{
    [Table("dapr_state_store")]
    public class KeyValue : BaseModel
    {
        [PrimaryKey("id")]
        public int Id { get; set; }

        [Column("created_at")]
        public DateTime CreatedAt { get; set; }

        [Column("key")]
        public string? Key { get; set; }

        [Column("value")]
        public string? Value { get; set; }
    }
}
The KeyValue class defines the data type that will be stored in the Supabase table. It inherits from BaseModel, which is part of the Supabase postgrest-csharp library. This library uses attributes that can be used to decorate the class and properties, which makes it easier for developers to use strongly typed models when interacting with the database table. Dapr state stores are key/value stores and Postgres databases are object-relational data stores. Since this is not a perfect match, the Dapr key/value-based state management API is mapped to this KeyValue model to fit the Postgres schema.
- Create a new class file in the
MyDaprPluggableSupabasefolder namedSupabaseStateStore.cs. - Add the following content to this new class:
using System.Text;
using Dapr.PluggableComponents.Components;
using Dapr.PluggableComponents.Components.StateStore;

namespace DaprPluggableSupabase
{
    internal sealed class SupabaseStateStore : IStateStore
    {
#nullable disable
        private Supabase.Client _supabaseClient;
#nullable enable

        private const string PROJECT_APIKEY_KEYWORD = "projectApiKey";
        private const string PROJECT_URL_KEYWORD = "projectUrl";

        public async Task DeleteAsync(StateStoreDeleteRequest request, CancellationToken cancellationToken = default)
        {
            await _supabaseClient.From<KeyValue>()
                .Where(x => x.Key == request.Key)
                .Delete(cancellationToken: cancellationToken);
        }

        public async Task<StateStoreGetResponse?> GetAsync(StateStoreGetRequest request, CancellationToken cancellationToken = default)
        {
            KeyValue? kv = await GetKV(request.Key, cancellationToken);

            if (kv != null && kv.Value != null)
            {
                var valueAsBytes = Encoding.UTF8.GetBytes(kv.Value);
                var response = new StateStoreGetResponse() { Data = valueAsBytes };
                return response;
            }

            return new StateStoreGetResponse();
        }

        public async Task InitAsync(MetadataRequest request, CancellationToken cancellationToken = default)
        {
            if (!request.Properties.TryGetValue(PROJECT_URL_KEYWORD, out string? projectUrl))
            {
                throw new InvalidOperationException($"Missing required property \"{PROJECT_URL_KEYWORD}\" in component file.");
            }

            if (!request.Properties.TryGetValue(PROJECT_APIKEY_KEYWORD, out string? projectApiKey))
            {
                throw new InvalidOperationException($"Missing required property \"{PROJECT_APIKEY_KEYWORD}\" in component file.");
            }

            _supabaseClient = new Supabase.Client(projectUrl, projectApiKey);
            await _supabaseClient.InitializeAsync();
        }

        public async Task SetAsync(StateStoreSetRequest request, CancellationToken cancellationToken = default)
        {
            var newKV = new KeyValue
            {
                Key = request.Key,
                CreatedAt = DateTime.UtcNow,
                Value = Encoding.UTF8.GetString(request.Value.Span)
            };

            KeyValue? existingKV = await GetKV(request.Key, cancellationToken);

            if (existingKV != null)
            {
                newKV.Id = existingKV.Id;
                await _supabaseClient.From<KeyValue>().Update(newKV, cancellationToken: cancellationToken);
                return;
            }
            else
            {
                await _supabaseClient.From<KeyValue>().Insert(newKV, cancellationToken: cancellationToken);
            }
        }

        private async Task<KeyValue?> GetKV(string key, CancellationToken cancellationToken)
        {
            return await _supabaseClient.From<KeyValue>()
#nullable disable
                            .Select(x => new object[] { x.Id, x.Key, x.Value })
#nullable enable
                            .Where(x => x.Key == key)
                            .Single(cancellationToken);
        }
    }
}
Notice that the class inherits from IStateStore, this is the interface that all Dapr state store components implement. The interface contains three methods that require implementing:
-
DeleteAsync, this will delete a value from the store. -
GetAsync, this will retrieve a value from the store. -
SetAsync, this will insert/update a value to the store.
All methods use the Supabase C# client to manage the data via the KeyValue model.
The IStateStore interface inherits the IPluggableComponent interface that contains only one method, InitAsync, and this method used to initialize the state store. In this case, it is used to create an instance of the Supabase.Client.
- Update the existing
Program.csfile with the following content:
using Dapr.PluggableComponents;
using DaprPluggableSupabase;

var builder = WebApplication.CreateBuilder(args);
var app = DaprPluggableComponentsApplication.Create();

app.RegisterService(
    "supabase",
    serviceBuilder =>
    {
        serviceBuilder.RegisterStateStore<SupabaseStateStore>();
    });

app.Run();
This class defines the application as a DaprPluggableComponentApplication and registers the SupabaseStateStore as a new state store that will communicate with Dapr applications via a Unix domain socket named supabase.
-
Build the application to make sure there are no compilation errors:
dotnet build
3. Supabase Setup
The pluggable component will interact with a Supabase Postgres table. This section describes how to create the table using the Supabase dashboard and where to find the project URL and API key required in the next section.
- Login to Supabase and create a new project.
-
Create a new database table with the following specifications:
- Name:
dapr_state_store - Primary Key:
id, (int8, not null) - Columns:
-
created_at(timestamptz, not null) -
key(text, not null) -
value(text, null)
-
-
RLS (Row Level Security) is disabled
Note that for production use, Row Level Security (RLS) should be enabled, and access policies should be added to the table.
Table definition:
create table public.dapr_state_store ( id bigint generated by default as identity not null, created_at timestamp with time zone not null default now(), key text not null, value text null, constraint dapr_state_store_pkey primary key (id), constraint dapr_state_store_id_key unique (id) ) tablespace pg_default; - Name:
You'll need the Supabase project URL and public API key to configure the Dapr component file in the next section. This information is found in the Supabase dashboard in the project Settings > API tab.
4. Update the Dapr pluggable Supabase component file
Dapr uses a modular design where functionality is delivered as a component. A component file contains the specification of a component, including the name, the component type, and related metadata that is specific to connecting with the underlying resource. The component file for the Supabase state store looks like this:
apiVersion: dapr.io/v1alpha1
kind: Component
metadata:
  name: pluggable-supabase
spec:
  type: state.supabase
  version: v1
  metadata:
  - name: projectUrl
    value: ""
  - name: projectApiKey
    value: ""
The value of the spec.type field, state.supabase, consists of two parts: the component type (state), and the socket name (supabase). The socket name needs to match with the socket name argument provided in the RegisterService method in the Program.cs class of section 2. A template of this component file is available in the repository, follow these steps to update the file, so it can be used locally.
- Navigate to the
resourcesfolder in this repository. -
Rename the
resources\pluggableSupabase.yml.templatefile toresources\pluggableSupabase.yml.The pluggableSupabase.yml file is added to .gitignore, so it won't be accidentally committed to source control for this demo app. For production use, the yaml files should be checked into source control and secret store references should be used, instead of plain text values.
Open the
pluggableSupabase.ymlfile and update the values forprojectUrlandprojectApiKeyobtained in the previous section.-
Save the file and copy it to the user's Dapr components folder:
~/.dapr/components.When the Dapr CLI is run, all the component files in this folder will be loaded, so the pluggable Supabase component should be available.
5. Run the DaprPluggableSupabase application
Regular Dapr components are part of the Dapr runtime and don't require additional processes to run. Pluggable components, however, are not part of the Dapr runtime and need to be run separately, which is done in this section.
The DaprPluggableSupabase project in this repo implements the Dapr state store interface and uses the Supabase C# library to access a Supabase table.
- Open a terminal and navigate to the
-
src/DaprPluggableSupabasefolder to use the included pluggable component project or -
src/MyDaprPluggableSupabasefolder to use the pluggable component project you’ve just created yourself.
-
-
Build the project:
dotnet build -
Run the project:
dotnet run
6. Run the Dapr process and test the Supabase state store
-
Open a new terminal and use the Dapr CLI to run the Dapr process
dapr run --app-id myapp --dapr-http-port 3500Expected output:
The output should contain an INFO message that the pluggable-supabase component is loaded:
INFO[0000] component loaded. name: pluggable-supabase, type: state.supabase/v1The log should end with:
ℹ️  Dapr sidecar is up and running.

✅ You're up and running! Dapr logs will appear here. -
Set a new state by making a POST request to the state management endpoint:
curl --request POST --url http://localhost:3500/v1.0/state/pluggable-supabase --header 'content-type: application/json' --data '[{"key": "key1","value": "This is stored in Supabase!"}]'Expected output:
HTTP 204 No Content -
Retrieve the new state using a GET request:
curl --request GET --url http://localhost:3500/v1.0/state/pluggable-supabase/key1Expected output:
HTTP 200 OK"This is stored in Supabase!"Or have a look at the Supabase dashboard to see the new state record in the table.
You've now successfully created and used the Dapr pluggable Supabase state store component. 🎉
Next steps
This proof of concept implementation of a pluggable component demonstrates how the Dapr pluggable component .NET SDK makes it easier for developers to create their custom components. You can use this solution as a starting point, and expand it with additional state management API features, such as entity tag (ETag), metadata, and options, as described in the specification. A requirement for using this pluggable component in a real project is to deploy it to a (managed) Kubernetes environment or use it in a self-hosted mode.
The Supabase platform offers a great variety of useful back-end features, and with the set of client libraries it’s very accessible to a diverse group of developers. Take a look at Supabase Launch Week to read about their latest feature announcements.
From my perspective, I’d like to explore further how Dapr can integrate with other Supabase features. It would also be great to see a Supabase state store as a built-in component that’s available in the Dapr runtime without the need of running the pluggable component separately. I also hope the proposed DocumentStore building block will get some traction this year, since this will pair up very nicely with Supabase and other PostgreSQL stores.
Do you have any questions or comments about this blog post or the code? Join the Dapr discord and post a message in the #pluggable-components channel. Have you made something with Dapr? Post a message in the #show-and-tell channel, we love to see your creations!

Top comments (0)