💶
The following article contains ref links. If you buy something through this link, I get a small commission for it. Your price does not change and helps me to continue running this blog. All corresponding links are marked with the emoji on the left.
Why make smart?
It makes a lot of sense to make the old analog water and gas meters smart. You can record consumption almost to the minute, understand your consumption and thus optimize it more sensibly. Especially in times of sustainability, fuel prices and/or the general scarcity of water, it is important to take a holistic approach to the topic.
⚠️
It is important to note that this variant should be legally compliant. In the case of variants with induction proximity sensors and/or reed contacts, the supplier can quickly accuse you of tampering with the watch. If a camera is used to read out the data, the argument is likely to be quite weak.
What do we need?
In general, we only need some software and hardware to begin with. The costs (per water or gas meter) are usually a maximum of €20-30, depending on where the parts are purchased.
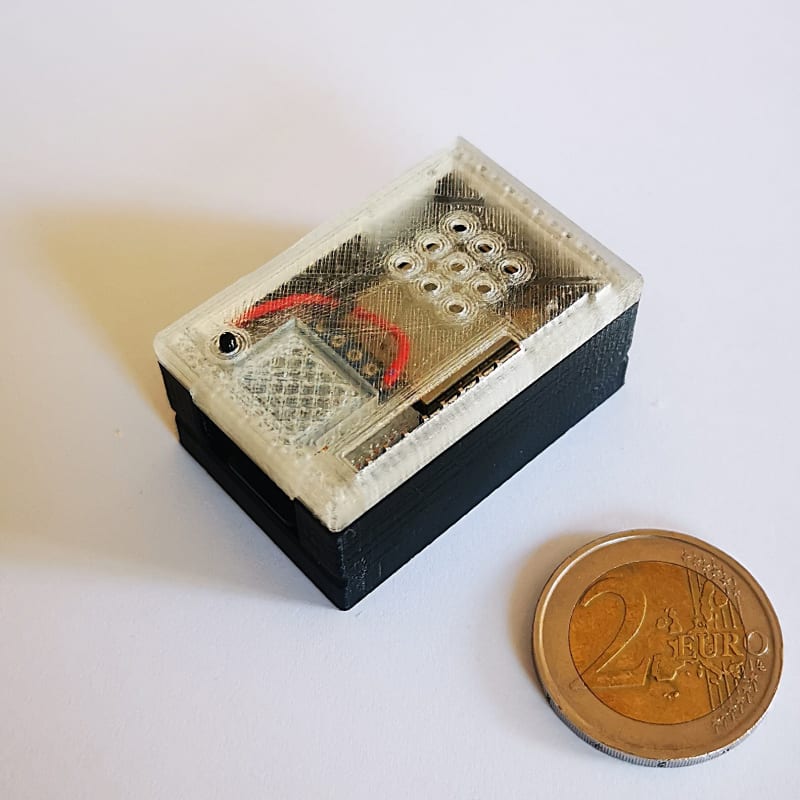
First of all, we ideally need an ESP32 with cam. This is a microcontroller with an integrated camera.

This costs just under €22.90 in a 2-pack at Amazon at the time of writing: https://amzn.to/3R0GHHJ💶, a cheap Micro SD card💶(16GB is more than enough here) and a micro USB power supply/cable for the power.
After that, we need software that can read the analogue digits via AI and then digitize them. Here is the nice tool from JomJol, namely AI-on-the-edge-device.
[
Installation - AI on the Edge Device

](https://jomjol.github.io/AI-on-the-edge-device-docs/Installation/?ref=blog.disane.dev)
The software takes a photo of the counter at a certain interval. An AI then aligns the image according to set marks and an OCR with AI then evaluates the numbers accordingly and digitizes them.
The installation
The installation is quite simple via the web installer. To do this, the microcontroller must be connected to your computer via USB and the corresponding UART driver must be installed. As a rule, the ESP32s all use the CP210x USB to UART Bridge.
💡
Make sure that you use a data USB cable and not a charging cable! Charging cables usually have no data lines and are therefore unsuitable and only cause a lot of pain by not recognizing the controller.
[
AI on the Edge Device - Webinstaller
Webinstaller
![]()
](https://jomjol.github.io/AI-on-the-edge-device/?ref=blog.disane.dev)
Alternatively, you can also use the microcontroller manually flashing.
Integrating into your own WLAN
After the microcontroller has been flashed, it sets up its own WLAN access point to which you must connect. The SSID should be AI-on-the-Edge. Then navigate to http://192.168.4.1 in the browser of your choice. Here you should now be greeted by the basic setup of the firmware.
The current release should be pulled from GitHub first, which we will need at this point so that the initial configuration ends up on the SD card. You will need a AI-on-the-edge-device __remote-setup__ *.zip
[
Releases - jomjol/AI-on-the-edge-device
Easy to use device for connecting "old" measuring units (water, power, gas, ...) to the digital world - jomjol/AI-on-the-edge-device
![]() GitHubjomjol
GitHubjomjol
](https://github.com/jomjol/AI-on-the-edge-device/releases?ref=blog.disane.dev)

This file is then uploaded to the page. It will then rattle around a bit and should then display the WLAN configuration page. You can then enter your WLAN data there.
After a reboot, the microcontroller is ready.

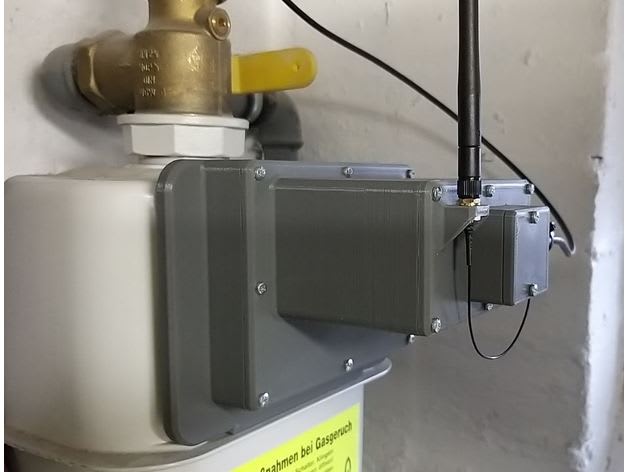
Positioning on the water or gas meter
I myself have a Pipersberg G4 RF1 c as a gas meter and a Pipersberg T30 as a water meter. I was able to find corresponding housings for both on Thingiverse. If you also have these meters installed, I can highly recommend these models:
[
ESP32-CAM-MB for Pipersberg G4 RF1 c by BerHerJohLin
Housing for an ESP32-CAM-MB to read the meter reading of a Pipersberg G4 RF1 c gas meter and send it via MQTT Software: https://github.com/jomjol/AI-on-the-edge-device The individual parts are screwed together with 3mm screws, length 20 to 25mm. The housing is held to the meter by a magnet, for which...
 Thingiverse
](https://www.thingiverse.com/thing:4820301?ref=blog.disane.dev)
[
Water meter adapter (AI-on-the-edge) by klein0r
This is an alternative mounting solution for the "AI-on-the-edge" project. https://www.youtube.com/watch?v=mDIJEyElkAU
Thingiverse

](https://www.thingiverse.com/thing:5167976?ref=blog.disane.dev)
Unfortunately, you will have to test whether they work for you.
Setting up the firmware and configuring the camera
After rebooting and connecting to your WLAN, you should find out the IP of the controller and open it in the browser. A setup dialog will then appear in which you have to configure the camera and create a few reference images for the AI.
💡
The device should now be positioned on the water and gas meter so that the camera has a clear view of it.
How to do this is as follows (in my example, I'll show you using my water meter):
Create reference image
Pay particular attention here to good, but not too stark, lighting. If there are disturbing reflections, you may have to work with polar filter foils. With my water meter there were also strong reflections, despite the darkened image and reduced flash intensity, but these were less disturbing there.
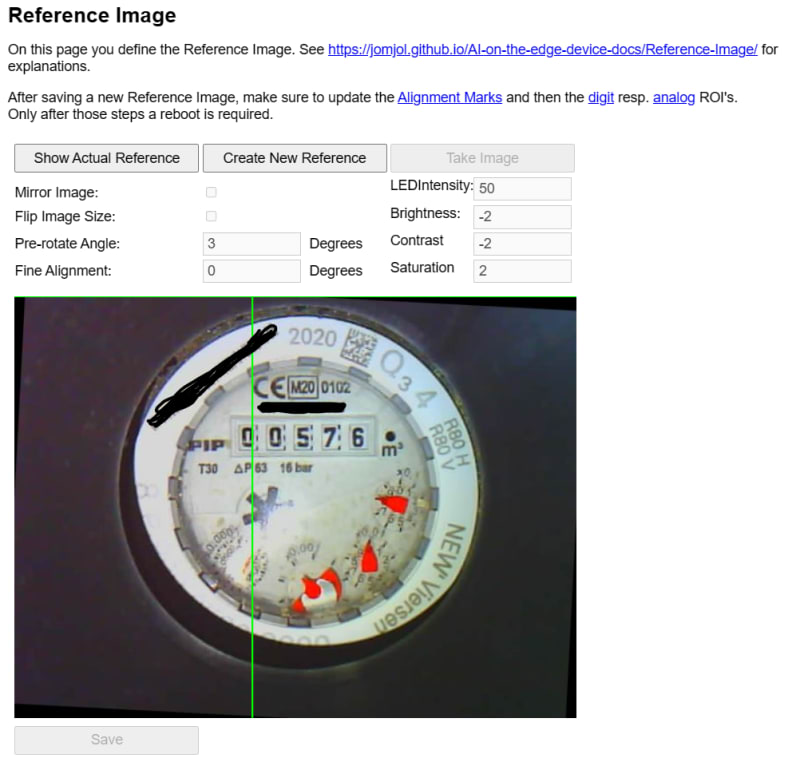
Create alignment markers
These are significant points in the image so that the AI knows how to align the excluded image. It is best to use two opposite points.

Creation of the digital ROIs (region of interest)
The ROIs are basically your numbers on the counter. These must be marked and framed accordingly for the AI. It is important that you position them well in order to achieve good results. Initially, you will have to play and test a little here.

Creation of ROIs for analog meters
Some meter types also have smaller round clocks in addition to the normal meters, which in this case can also be read in analog form. This tends to be the case with water meters, for example. How many of these you want to display as ROIs depends on how easy they are to recognize and how accurate you want your reading to be. In my case, I am satisfied if the meter reads accurately to 10l.

After this, the initial configuration is complete and the microcontroller should restart. After that, the entire setup is already complete and it now starts to photograph and digitize the meter at intervals.
The first measurements arrive
If everything went well, the first measurements should now also arrive. You can see the readings on the start page:

But that's actually only half the story. We have now digitized the data, but it would be smarter if we could send it to another system. The software offers interfaces to various systems for this purpose. These include MQTT (requires a broker) or InfluxDB 1/2. I opted for MQTT because there is also a Home Assistant Discovery here. If you have integrated your MQTT broker in Home Assistant, the device is automatically recognized and entities are created for it.
To do this, you can simply enter your MQTT data in the configuration:

❗
Always adjust the type according to the counter type to be read, otherwise the entities will be created with the wrong units and may be converted incorrectly.
If the connection to the MQTT broker works, you should now see your digitized meter in the Home Assistant:

Ideally, you can also integrate the meter(s) directly into the energy dashboard of Home Assistant and then have a very good traceability of your consumption habits:


Conclusion
With the above steps, you have now successfully digitized your analogue Stone Age meters and can now run nice evaluations in Home Assistant or Grafana (etc.) and understand and adjust your consumption behaviour.
In principle, reading an electricity meter also works in this way. If your electricity meter is already a modern measuring device, I would recommend using an infrared head for reading. This is more accurate and may also be able to read the feed-in of a solar system.
I will write another article on this in the future. Just sign up without obligation and you'll stay up to date:
Stay up to date 🔥
                <span>Subscribe</span>
                <span>


            .nc-loop-dots-4-24-icon-o{--animation-duration:0.8s}
            .nc-loop-dots-4-24-icon-o *{opacity:.4;transform:scale(.75);animation:nc-loop-dots-4-anim var(--animation-duration) infinite}
            .nc-loop-dots-4-24-icon-o :nth-child(1){transform-origin:4px 12px;animation-delay:-.3s;animation-delay:calc(var(--animation-duration)/-2.666)}
            .nc-loop-dots-4-24-icon-o :nth-child(2){transform-origin:12px 12px;animation-delay:-.15s;animation-delay:calc(var(--animation-duration)/-5.333)}
            .nc-loop-dots-4-24-icon-o :nth-child(3){transform-origin:20px 12px}
            @keyframes nc-loop-dots-4-anim{0%,100%{opacity:.4;transform:scale(.75)}50%{opacity:1;transform:scale(1)}}


</span>


            Email sent! Check your inbox to complete your signup.
Life as a dev, father, gamer and tech enthusiast

Top comments (0)