
Ok so symfony created a new mime component to create emails, and a new mailer component to send those. Let's bundle them up and see what we end up with!
If you prefer to skip to the end, just install the bundle we made and enjoy!
Why?
Why we started this. We made a lot of symfony apps and in every app we started a new mail system, awesome they were. But after the third or fourth we knew the basics. But as is in every project we forgot to make a bundle and kept copy pasting the data missing stuff or re-create the methods over and over again. Se lets make a bundle that can be used and re-used.
This will be a setup for the core data of the bundle, so code.
History
So first up, a bit of history in my words. So probably none is true, but i like it. The guys (guys as in plural men and women of course) from symfony used a old package swiftmailer, so they ended up maintaining it. This could be cleaner and nicer, so they made that with the mime component, decoupling the sending in the mailer component. In the way making the components they set it up in a way to make it fancier and add magic. Awesome, now lets get into the code.
Setup
This article will talk about the setup, opinionated and the way we would set things up. We will have ideas and opinions. And if you differ from those, you will hopefully learn a thing or two to get you on your own way.
But the basic setup is:
- make it easy to set up emails in your symfony application.
- make use of a database, so you can manage and your clients can tinker.
- generate emails using the Inlining CSS Styles and Inky Email Templating Language.
- add a way to test and see what we are actually doing
Let's go
You can install the bundle by just installing it in your symfony application. This will setup everything you need to start emailing.
composer require disjfa/mail-bundle
In the basic setup you can just add your own email, An email should have a name, subject and content. You do need one .env variable named DISJFA_MAIL_FROM for the from email address.
Create an email
So now you need to create your own email. There is an interface for that! If you implement the interface the system will auto register the email so you are done. Lets check it.
<?php
namespace Disjfa\MailBundle\Mail;

interface MailInterface
{
    public function getName();
    public function getSubject();
    public function getContent();
}
So your class will look something like this.
<?php

namespace ...;

use Disjfa\MailBundle\Mail\MailInterface;

class ExampleMail implements MailInterface
{
    public function getName(): string
    {
        return 'app.example';
    }

    public function getSubject(): string
    {
        return 'subject';
    }

    public function getContent(): string
    {
        return 'content';
    }
}
This will just generate an email with the subject subject and the content content. You can just extend the class and autowire a twig environment into that to make life easier or a translator. Example in the example folder.
This will generate the default email when sent.
The original email must have curly braces which will parsed and used for parameters. So in the subject and the content it should look like.
This is the email {{ email }}
When you do create a template using twig, please note that you cannot add twig tags directly. So escape them!
This is the email {{ '{{' }} email {{ '}}' }}
This will be read and checked for parameters. Only parameters made in the original content will be remembered in the system. For now we can also not implement fancy things like loops and extra stuff. The idea is to pre render data which you want to use and set those up as 'simple' parameters.
Designing emails
So there is a thing called Foundation for Emails. Those guys made a thing for making hard email structures easy to set up. So there is a twig extension for that. Also somebody mage a way to inline css styling so we can make styling emails a bit easier on the eye. So there is a twig extension for that.
So they made live wonderful for people that do not like emails. If you create an email that looks like this:
<!-- a simplified example of the Inky syntax -->
<container>
    <row>
        <columns>This is the email {{ email }}.</columns>
    </row>
</container>
It will be rendered and generated into something like this:
garbage of table and data structure, what will look awesome in email clients!
The last item we did not render, it will be generated. We will let you check that in the console.
Cool, email setup. Send them.
Next up, it is up to you to send the emails. You have to tell your application to send an email wich you names. But we have made that simple. Lets check that out.
<?php

use Disjfa\MailBundle\Mail\MailFactory;
use Disjfa\MailBundle\Mail\MailService;

function myFunction(MailFactory $mailFactory, MailService $mailService)
{
    $mail = $mailFactory->findByName('app.example');
    $mailService->send($mail, [
         'param1' => 'value',
         'param2' => 'value',
    ], 'info@example.com');
}
And done, add this in a function you use and inject the correct data to send them. You can place this wherever. You can even setup the mailer to start sending the emails async.
Checking the emails
For checking the emails there is a command!
bin/console disjfa:mail:preview-mail
This will result in a question, and list all the emails found in the application.
Please select an email
  [0] disjfa_mail.example
  [1] ... your email setup
Next up, what to do?
What to do?
  [0] preview
  [1] preview raw
  [2] send email
Preview will just dump the base html. Preview raw will ask for all the parameters in the email and render it out dumping a pile of garbage of table and data structure, which should look awesome in an email application. The last will also ask for an email address and it will send out a test.
Nice! Now you can make, create and test the emails.
Edit them
So now we have setup the emails, are able to make new email templates to use in your app. Now you just want to tweak them, they are never right for everyone. And anyone has their own opinion. So lets just edit them.
You can add the routes in a config/routes/disjfa_mail.yaml file.
disjfa_mail:
    resource: '@DisjfaMailBundle/Controller/'
    type: annotation
    prefix: '/admin'
In this example the routes are annotated and mapped to the /admin folder, just as an example. This should end up in your application. So now you can open up the location. As an example on a localhost.
https://localhost:8000/admin/mail-template
Here is an overview of all emails in the system again! Cool. Here you can edit or preview them. If you edit one of them there will be subject and content edit area. And from the original html all the parameters are rendered and added as reference for your new template. Check it out in action.
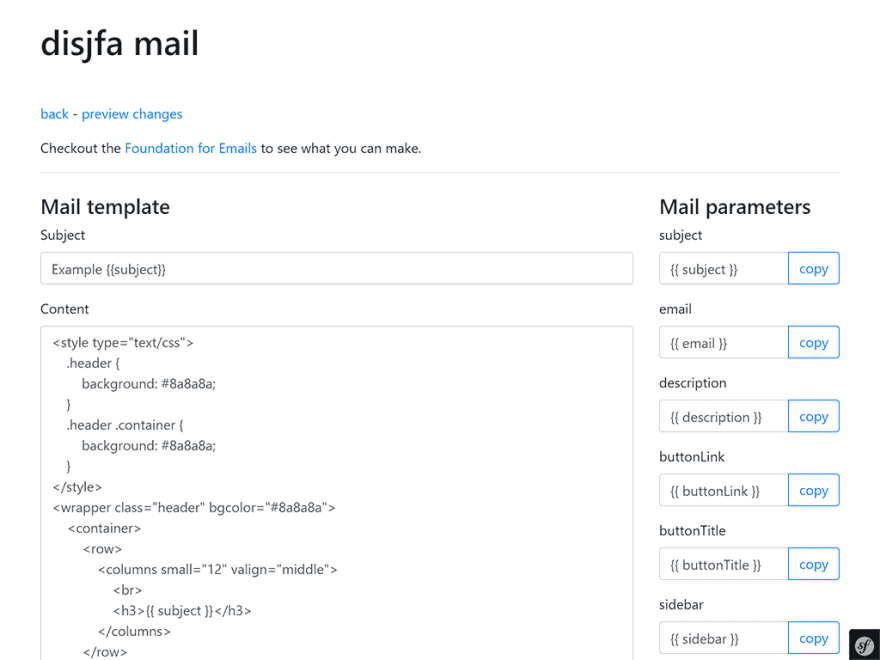
As for the templates
For the template. There is just a basic layout adding some bootstrap and there is some clipboardjs added so it can be used. If you want to add the templates in your own you can just override the existing layout.html.twig. You can just add your own in templates/bundles/DisjfaMailBundle/layout.html.twig, just keep in mind to add the blocks needed.
The same is for the base email, but in this path templates/bundles/DisjfaMailBundle/mail/email.html.twig. Again, keep in mind the original blocks to implement. But here you can also just add your logo and other data you want to add.
Cool, now what?
Now what? You can add your own and add custom emails in your applications. Send them as you like! Lets check what to do.
- Create a class implementing
MailInterface. - Add some templates as needed.
- Add some translations as needed.
- Create a place in your application to send the emails.
And done. You just created your first email and you did not even need to know much html to get them sending. It sounded like a lot, but in the end it was easy.
Now get on your way and create some awesome emails, and don't forget to send them!
Photo by Mathyas Kurmann on Unsplash

Top comments (0)