
Ever dreamt of loading Chrome extensions in your capybara integration tests' windows ? Here are the steps:
Get the extension
- Browse
chrome://extensions - Locate the extension and its ID
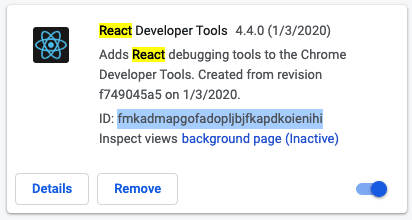
-
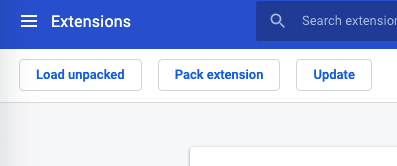
Click on the "Pack extension" button at the top left of the window.
- Either use your terminal and find the extension folder using its ID. If you're on OSX it should be something like this:
/Users/<your_user>/Library/ApplicationSupport/Google/Chrome/Default/Extensions/<extension_ID>. Once you're in this folder, get the full path to the extension's version. Here's mine right now:/Users/my_user/Library/ApplicationSupport/Google/Chrome/Default/Extensions/fmkadmapgofadopljbjfkapdkoienihi/4.4.0_0Paste that path into the Extension root directory field. - Or if you have enabled visibility of hidden files in your folder, simply browse to the extension's folder through the Finder.
- Either use your terminal and find the extension folder using its ID. If you're on OSX it should be something like this:
Click on "Pack extension"
Voilà! You should have a modal letting you know the extension was packed successfully, along with its path, which you could use tomvit to your Rails project.
Configure Rails
Assuming that you have the capybara and selenium-webdriver gems.
- Move the
.crxextension to your rails project - Wherever you instantiate your Capybara Selenium driver, simply add the extension to the options passed to the driver!
options = Selenium::WebDriver::Chrome::Options.new

unless ENV['CI']
  options.add_extension(
    Rails.root.join('test', 'browser_extensions', 'react_devtools_chrome.crx')
  )
end

Capybara.register_driver :chrome do |app|
  Capybara::Selenium::Driver.new(app, browser: :chrome, options: options)
end
That should have done the trick! The next time you launch an integration test in Chrome the extension should be available 🚀

Top comments (0)