First of all disable SELinux on your CentOS 7. You can do it by editing /etc/sysconfig/selinux
vim /etc/sysconfig/selinux
You should see this:
# This file controls the state of SELinux on the system.
# SELINUX= can take one of these three values:
#     enforcing - SELinux security policy is enforced.
#     permissive - SELinux prints warnings instead of enforcing.
#     disabled - No SELinux policy is loaded.
SELINUX=enforcing
# SELINUXTYPE= can take one of three values:
#     targeted - Targeted processes are protected,
#     minimum - Modification of targeted policy. Only selected processes are protected.
#     mls - Multi Level Security protection.
SELINUXTYPE=targeted
Change enforcing to disabled
# This file controls the state of SELinux on the system.
# SELINUX= can take one of these three values:
#     enforcing - SELinux security policy is enforced.
#     permissive - SELinux prints warnings instead of enforcing.
#     disabled - No SELinux policy is loaded.
SELINUX=disabled
# SELINUXTYPE= can take one of three values:
#     targeted - Targeted processes are protected,
#     minimum - Modification of targeted policy. Only selected processes are protected.
#     mls - Multi Level Security protection.
SELINUXTYPE=targeted
And restart your server with:
init 6
# or
reboot
# or
shutdown -r now
# or
systemctl reboot
OpenVPN Access Server installation
# updating system packages
yum -y install epel-release
yum -y update

# installing ufw to control firewall settings
yum -y install ufw
systemctl enable --now ufw.service

# allowing ports for OpenVPN Access Server and for OpenVPN itself
ufw allow 943 # Admin panel for OpenVPN
ufw allow 1194 # OpenVPN
ufw reload

# installing OpenVPN Access Server package
yum -y install https://as-repository.openvpn.net/as-repo-centos7.rpm
yum -y install openvpn-as

# before setting up your OpenVPN Access Server you should add password
# for user to be able to login into admin panel
passwd openvpn
Now you can go to [insert_ip_of_your_server]:943/admin
Log in with username "openvpn" and password that you've set earlier

Click "Agree"

Go to sidebar and find "CONFIGURATION / Network Settings"

Insert IP of your OpenVPN server in "Hostname or IP Address:"

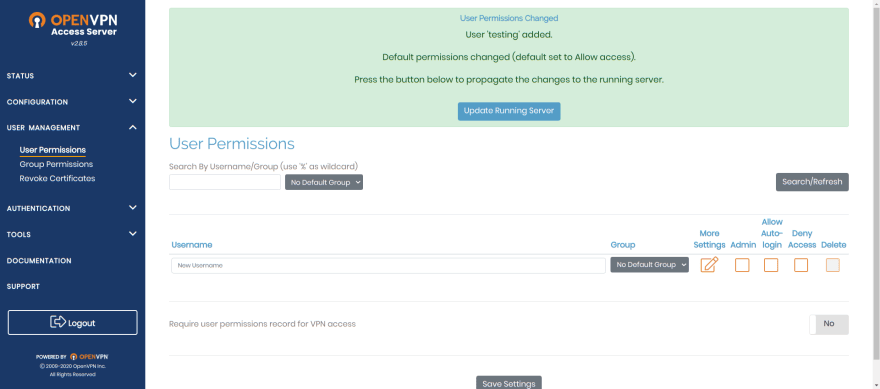
Go to sidebar again and find "USER MANAGEMENT / User Permissions".
Enter username for new user inside input with placeholder "New Username". If you click on "More Settings" you could set password for new user.
Also click on checkbox "Allow Auto-login", it's annoying to always type password when you need to connect to VPN.

Click on "Update Running Server" so new user could be used.

Now you can go to [insert_ip_of_your_server]:943/ and log in with credentials for user that you've just created.
You could make accounts for your friends and give them username and password and they could use your VPN server.

Here you could download "user-locked profile" or "autologin profile". I'm using "autologin profile" all the time because it's simpler.

After you downloaded client.ovpn you could run it and test your VPN connection. But before you should install OpenVPN on your device.
They have a page with install links for all systems, go to OpenVPN Connect Download Page and choose what you need.
sudo openvpn --config ~/Downloads/client.ovpn

# and now in another terminal check your ip
curl ipinfo.io
From here you can use your VPN server and manage users using OpenVPN Access Server, but to provide easy access to admin panel so you don't need to remember your IP, we can make vpn.[your_domain.tld] to proxy pass on your OpenVPN Access Server admin panel.
Setup domain with nginx and letsencrypt
You need to have another server and A record for vpn.[your_domain.tld] that point to that server.
On this server do the following:
# installing nginx, certbot and plugin for certbot to work with nginx
yum install -y nginx certbot python2-certbot-nginx

# enabling nginx on system boot and starting it
systemctl enable --now nginx.service

# creating conf file for nginx
touch /etc/nginx/conf.d/vpn.[your_domain.tld].conf
vim /etc/nginx/conf.d/vpn.[your_domain.tld].conf
# /etc/nginx/conf.d/vpn.[your_domain.tld].conf
server {
        server_name vpn.[your_domain.tld];

        location / {
                proxy_pass  https://[your_openvpn_server_ip]:943/;
        }
}
# after saving new conf file you should check if there's
# any errors and reload nginx
nginx -t
nginx -s reload

# running certbot so it could install SSL certificates for your domain
# before doing this be sure that you have A record for vpn.[your_domain.tld]
# that matches your server ip address
certbot --nginx -d vpn.[your_domain.tld]
And now you should be able to open vpn.[your_domain.tld]


Top comments (0)