
This is the eleventh of a new series of posts on ASP .NET Core 3.1 for 2020. In this series, we’ll cover 26 topics over a span of 26 weeks from January through June 2020, titled ASP .NET Core A-Z! To differentiate from the 2019 series, the 2020 series will mostly focus on a growing single codebase (NetLearner!) instead of new unrelated code snippets week.
Previous post:
NetLearner on GitHub :
- Repository: https://github.com/shahedc/NetLearnerApp
- v0.11-alpha release: https://github.com/shahedc/NetLearnerApp/releases/tag/v0.11-alpha
In this Article:
- K is for Key Vault for ASP .NET Core Web Apps
- Setting up Key Vault in Azure
- Retrieving Key Vault Secrets
- Managed Service Identity
- References
K is for Key Vault for ASP .NET Core 3.1 Web Apps
In my 2018 blog series, we covered the use of User Secrets for your ASP .NET Core web application projects. This is useful for storing secret values locally during development. However, we need a cloud-based scalable solution when deploying web apps to Azure. This article will cover Azure Key Vault as a way to store and retrieve sensitive information in Azure and access them in your web application.
You will need an Azure subscription to create and use your own Key Vault and App Service.

Setting up Key Vault in Azure
Before you can use Key Vault in the cloud, you will have to set it up in Azure for your use. This can be done in various ways:
- Azure Portal : log in to the Azure Portal in a web browser.
- Azure CLI : use Azure CLI commands on your development machine.
- Visual Studio : use the VS IDE on your development machine.
To use the *Azure Portal: * create a new resource, search for Key Vault, click Create and then follow the onscreen instructions. Enter/select values for the following for the key vault:
- Subscription: select the desired Azure subscription
- Resource Group: select a resource group or create a new one
- Name: alphanumeric, dashes allowed, cannot start with number
- Region: select the desired region
- Pricing Tier: select the appropriate pricing tier (Standard, Premium)
- Soft Delete: enable/disable
- Retention Period: enter retention period (in days)
- Purge protection: enable/disable

If you need help with the Azure Portal, check out the official docs at:
- Set and retrieve a secret from Key Vault using Azure portal: https://docs.microsoft.com/en-us/azure/key-vault/quick-create-portal
To use the *Azure CLI: * authenticate yourself, run the appropriate commands to create a key vault, add keys/secrets/certificates and then authorize an application to use your keys/secrets.
To create a new key vault, run “ az keyvault create ” followed by a name, resource group and location, e.g.
**az keyvault create** --name "MyKeyVault" --resource-group "MyRG" --location "East US"
To add a new secret, run “ az keyvault secret set “, followed by the vault name, a secret name and the secret’s value, e.g.
**az keyvault secret set** --vault-name "MyKeyVault" --name "MySecretName" --value "MySecretValue"
If you need help with the Azure CLI, check out the official docs at:
- Manage Azure Key Vault using CLI: https://docs.microsoft.com/en-us/azure/key-vault/key-vault-manage-with-cli2
To use Visual Studio , right-click your project in Solution Explorer, click Add | Connected Service, select “Secure Secrets with Azure Key Vault” and follow the onscreen instructions.
If you need help with Visual Studio, check out the official docs at:
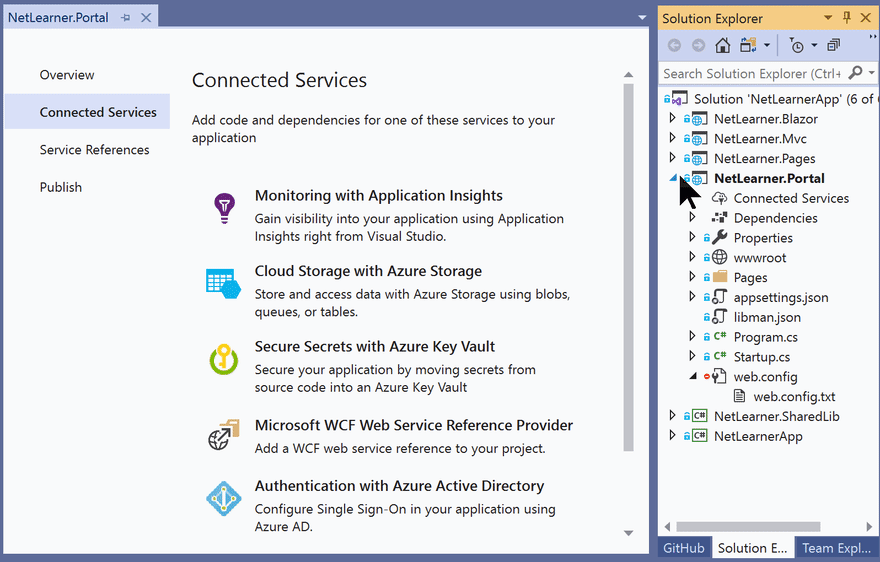
- Add Key Vault support to your ASP.NET project using Visual Studio: https://docs.microsoft.com/en-us/azure/key-vault/vs-key-vault-add-connected-service
Once created, the Key Vault and its secret names (and values) can be browsed in the Azure Portal, as seen in the screenshots below:

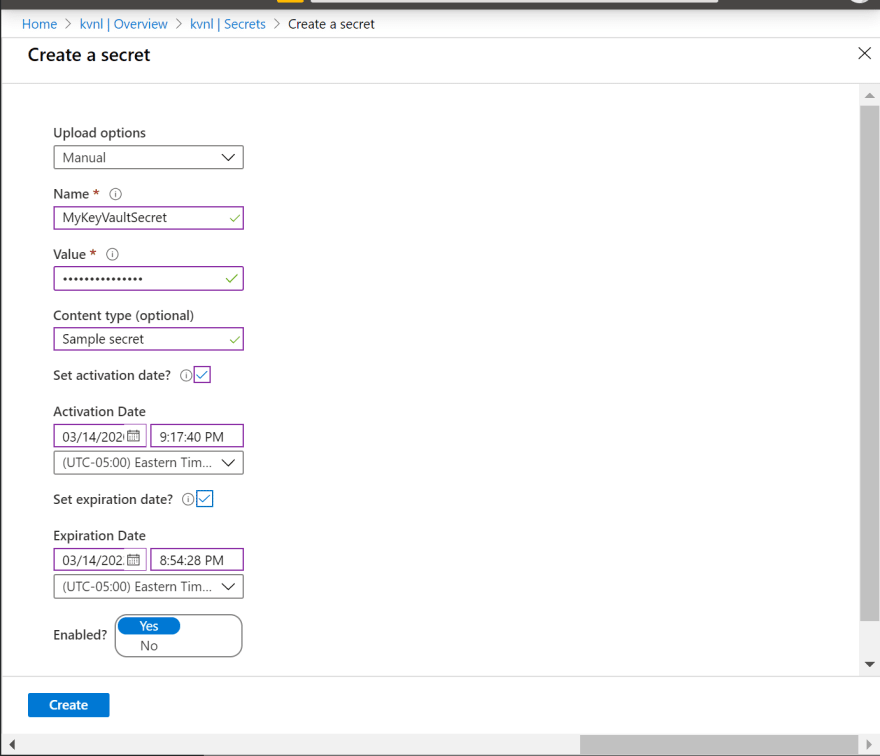
NOTE : If you create a secret named “Category1–MySecret”, this syntax specifies a category “Category1” that contains a secret “MySecret.”
Retrieving Key Vault Secrets
Before you deploy your application to Azure, you can still access the Key Vault using Visual Studio during development. This is accomplished by using your Visual Studio sign-in identity. Even if you have multiple levels of configuration to retrieve a secret value, the app will use the config sources in the following order:
- first, check the Key Vault.
- if Key Vault not found, check secrets.json file
- finally, check the appsettings.json file.
There are a few areas in your code you need to update, in order to use your Key Vault:
- Install the nuget packages AppAuthentication, KeyVault and AzureKeyVault NuGet libraries.
- Microsoft.Azure.Services.AppAuthentication
- Microsoft.Azure.KeyVault
- Microsoft.Extensions.Configuration.AzureKeyVault
- Update Program.cs to configure your application to use Key Vault
- Inject an IConfiguration object into your controller (MVC) or page model (Razor Pages, shown below)
- Access specific secrets using the IConfiguration object, e.g. _configuration[“MySecret”]
Below is an example of Program.cs using the WebHostBuilder’s ConfigureAppConfiguration () method to configure Key Vault. The keyVaultEndpoint is the fully-qualified domain name of your Key Vault that you created in Azure.
...using Microsoft.Azure. **KeyVault** ;using Microsoft.Azure.Services. **AppAuthentication** ;using Microsoft.Extensions.Configuration;using Microsoft.Extensions.Configuration. **AzureKeyVault** ;

...public static IHostBuilder **CreateHostBuilder** (string[] args) => Host. **CreateDefaultBuilder** (args) . **ConfigureAppConfiguration** ((ctx, builder) => { var **keyVaultEndpoint** = **GetKeyVaultEndpoint** (); if (!string.IsNullOrEmpty(keyVaultEndpoint)) { var azureServiceTokenProvider = new AzureServiceTokenProvider(); var keyVaultClient = new KeyVaultClient( new KeyVaultClient.AuthenticationCallback( azureServiceTokenProvider.KeyVaultTokenCallback)); builder.AddAzureKeyVault( keyVaultEndpoint, keyVaultClient, new DefaultKeyVaultSecretManager()); } } ).ConfigureWebHostDefaults(webBuilder => { webBuilder.UseStartup<Startup>(); }); private static string **GetKeyVaultEndpoint** () => "https://< **VAULT\_NAME** >.vault.azure.net/";
NOTE : Please note that usage of Web Host Builder in ASP .NET Core 2.x has been replaced by the GenericHost Builder in .NET Core 3.x.
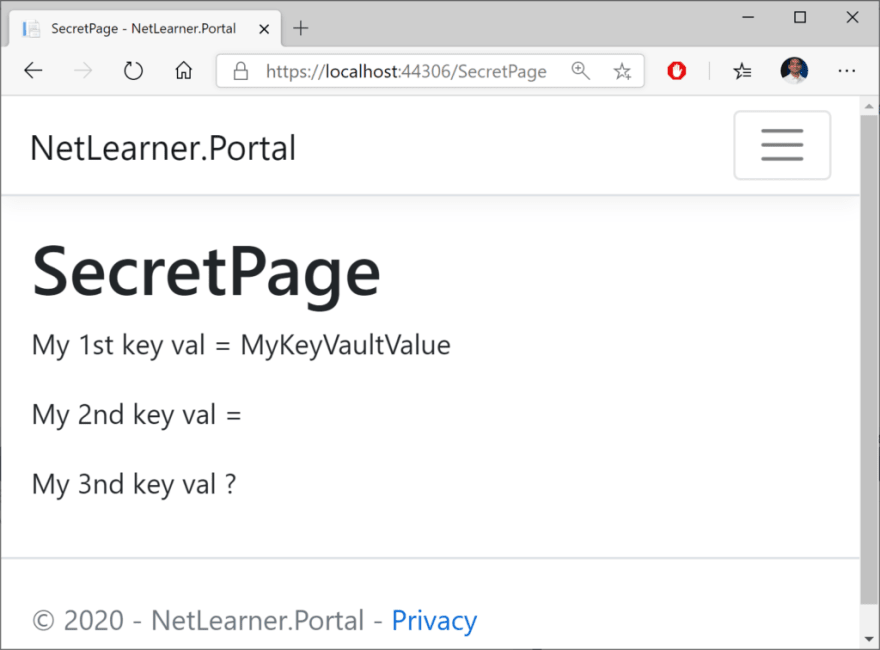
Below is an example of of a Page Model for a Razor Page, e.g. SecretPage.cshtml.cs in the sample app
...using Microsoft.Extensions. **Configuration** ;

public class **SecretPageModel** : PageModel{ public IConfiguration **\_configuration** { get; set; } public string Message1 { get; set; } public string Message2 { get; set; } public string Message3 { get; set; } public **SecretPageModel** (IConfiguration configuration) { **\_configuration** = configuration; } public void OnGet() { Message1 = "My 1st key val = " + **\_configuration** [" **MyKeyVaultSecret**"]; Message2 = "My 2nd key val = " + **\_configuration** [" **AnotherVaultSecret**"]; Message3 = "My 3nd key val ? " + **\_configuration["NonExistentSecret"];** }}
In the above code, the configuration object is injected into the Page Model’s SecretPageModel()_. _The values are retrieved from the collection in the OnGet () method and assigned to string properties. In the code below, the string properties are accessed from the model class in the corresponding Razor Page, SecretPage.cshtml.
@ **page** @ **model** KeyVaultSample.Pages. **SecretPageModel**...<p> @Model. **Message1** </p> <p> @Model. **Message2** </p> <p> @Model. **Message3** </p>
Finally, viewing the page allows you to navigate to the Secret Page to view the secret values. Note that I’ve only created 2 secret values before deploying this instance, so the 3rd value remains blank (but without generating any errors).
Managed Service Identity
There are multiple ways to deploy your ASP .NET Core web app to Azure, including Visual Studio, Azure CLI or a CI/CD pipeline integrated with your source control system. If you need help deploying to Azure App Service, check out the following article from this blog series:
- Deploying ASP .NET Core to Azure App Service: https://wakeupandcode.com/deploying-asp-net-core-to-azure-app-service/
You can set up your Managed Service Identity in various ways:
- Azure Portal : log in to the Azure Portal and add your app
- Azure CLI : use Azure CLI commands to set up MSI
- Visual Studio : use the VS IDE while publishing
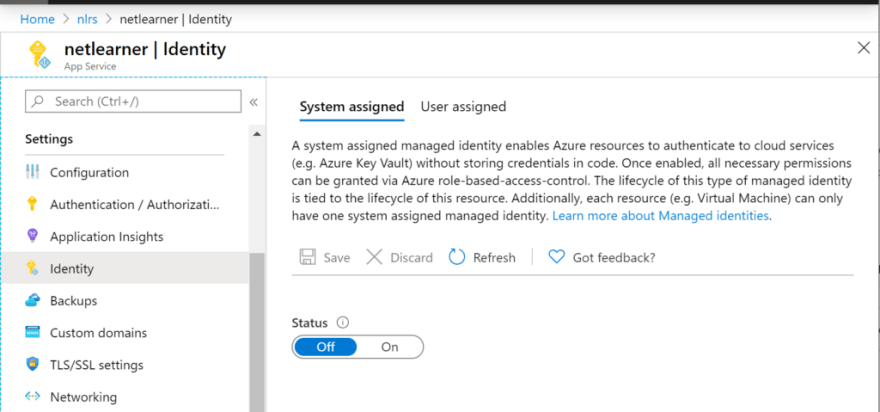
Once you’ve created your App Service (even before deploying your Web App to it), you can use the Azure Portal to add your app using Managed Service Identity. In the screenshots below, I’ve added my sample app in addition to my own user access.
- In the _ Access Policies _ section of the Key Vault , you may add one or more access policies.
- In the _ Identity section of the App Service , you may update the System-Assigned setting to “On” and make a note of the Object ID, which is defined as a “_Unique identifier assigned to this resource, when it’s registered with Azure Active Directory“

To use the Azure CLI to authorize an application to access (or “get”) a key vault, run “ az keyvault set-policy “, followed by the vault name, the App ID and specific permissions. This is equivalent to enabling the Managed Service Identity for your Web App in the Azure Portal.
**az keyvault set-policy** --name "MyKeyVault" --spn <APP\_ID> --secret-permissions get
To use Visual Studio to use your key vault after deployment, take a look at the Publish screen when deploying via Visual Studio. You’ll notice that there is an option to Add Dependencies, including Azure Key Vault. After you’ve added and enabled Key Vault for your application, the option will change to say “Configure” and “Manage Key Vault”.


After adding via Visual Studio during the Publish process, your Publish Profile (profile – Web Deploy.pubxml) and Launch Settings profiles (launchSettings.json) should contain the fully qualified domain name for your Key Vault in Azure. You should not include these files in your source control system.
References
- Azure Key Vault Developer’s Guide: https://docs.microsoft.com/en-us/azure/key-vault/key-vault-developers-guide
- Add Key Vault support to your ASP.NET project using Visual Studio: https://docs.microsoft.com/en-us/azure/key-vault/vs-key-vault-add-connected-service
- Key Vault Configuration Provider Sample App: https://github.com/dotnet/AspNetCore.Docs/tree/master/aspnetcore/security/key-vault-configuration/samples/3.x/SampleApp
- Getting Started with Azure Key Vault with .NET Core: https://azure.microsoft.com/en-us/resources/samples/key-vault-dotnet-core-quickstart/
- Azure Key Vault configuration provider in ASP.NET Core: https://docs.microsoft.com/en-us/aspnet/core/security/key-vault-configuration
- slide-decks/Protecting App Secrets.pptx: https://github.com/scottaddie/slide-decks/blob/master/Protecting%20App%20Secrets.pptx
- Set and retrieve a secret from Azure Key Vault by using a node web app – Azure Key Vault: https://docs.microsoft.com/en-us/azure/key-vault/quick-create-net
- Azure Key Vault managed storage account – CLI: https://docs.microsoft.com/en-us/azure/key-vault/key-vault-ovw-storage-keys
- Service-to-service authentication to Azure Key Vault using .NET: https://docs.microsoft.com/en-us/azure/key-vault/service-to-service-authentication
- Managed identities for Azure resources: https://docs.microsoft.com/en-us/azure/active-directory/managed-identities-azure-resources/overview

Top comments (0)