Introduction
In our previous tutorial, we built a simple Ballerina microservice that returns a JSON array of Todo list items. There, we did everything manually from building the project, generating a Docker image, and pushing it to Azure Container Registry and deploying it into Azure Kubernetes Service.
Although that provided you with a simple starter project, you need a production-grade continuous integration (CI) and continuous deployment (CD) pipelines to make the shipping of developer changes to produce more reliable, repeatable, and frequent.
In the scope of this tutorial, we are going to build a continuous integration pipeline with Azure Pipelines to automate the build and verification process for the TodoService we've implemented in the previous tutorial. During the tutorial, you will:
- Create a project and a pipeline in Azure Pipelines.
- Connect a GitHub repo to the pipeline
- Create a private container registry in Azure Container Registry (ACR) to store the TodoService Docker image
- Create an Azure AD service principal to authenticate the pipeline against ACR
- Create a Docker registry service connection to connect the pipeline to ACR
- Code the pipeline to build the TodoService project, generate a Docker image and push it to ACR
If you have missed the first part of the series, you can find it here.
Prerequisites
- A GitHub account, where you can create a repository. If you don't have one, you can create one for free.
An Azure DevOps organization. If you don't have one, you can create one for free.
An Azure account. If you don't have one, you can create one for free.
Installation of Docker and Azure CLI in your local workstation.
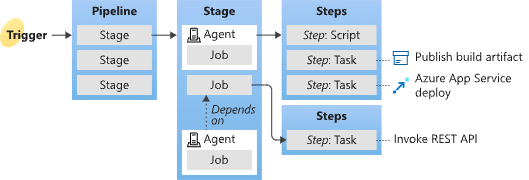
Azure Pipelines basics - pipelines, stages, agents, jobs, and tasks
Azure Pipelines is a cloud service that you can use to automatically build and test your code project and make it available to other users. It works with just about any language or project type.
Azure Pipelines combines continuous integration (CI) and continuous delivery (CD) to constantly and consistently test and build your code and ship it to any target.
In order to complete the tutorial, you need a fair knowledge about the key concepts of Azure Pipelines. Especially with build stages, build agents, and various pipeline tasks that'll be used throughout the tutorial.
I suggest you visit the official Azure pipelines documentation that covers the basic concepts before we dive deeper.
1. Get the code
Fork the following repository that contains our initial TodoService implementation.
https://github.com/dunithd/ballerina-on-aks/
2. Sign in to Azure Pipelines and create a project
Sign in to Azure Pipelines. After you sign in, your browser goes to https://dev.azure.com/my-organization-name and displays your Azure DevOps dashboard.
Within your selected organization, create a project. If you don't have any projects in your organization, you see a Create a project to get started screen. Otherwise, select the Create Project button in the upper-right corner of the dashboard.
2.1 Connect and select repository
- Navigate to your project.
- Go to Pipelines, and then select New Pipeline.
- Walkthrough the steps of the wizard by first selecting GitHub as the location of your source code.
- You might be redirected to GitHub to sign in. If so, enter your GitHub credentials.
- When the list of repositories appears, select the repository you just forked above.
- You might be redirected to GitHub to install the Azure Pipelines app. If so, select Approve and install.
- Select Starter pipeline. In the Review tab, replace the contents of azure-pipelines.yml with the following snippet -
trigger:
- master

resources:
- repo: self

variables:
  vmImageName: 'ubuntu-latest'

stages:
  - stage: Build
    displayName: Build stage
    jobs:
    - job: Build
      displayName: Build
      pool:
        vmImage: $(vmImageName)
      steps:
      - script: |
          wget https://dist.ballerina.io/downloads/1.2.7/ballerina-1.2.7.zip
          unzip -d /opt ballerina-1.2.7.zip
          /opt/ballerina-1.2.7/bin/ballerina build todo_service.bal
        displayName: 'Download and install Ballerina SDK'
- Select Save and run, after which you're prompted for a commit message as Azure Pipelines adds the azure-pipelines.yml file to your repository. After editing the message, select Save and run again to see the pipeline in action.
The above pipeline definition starts with a trigge expression that tells the pipeline to run when something has been committed to the master branch of your GitHub repository fork. There's only one stage defined here with one job and one step. The script step executes the given bash commands to fetch and unzip the Ballerina distribution into the build agent which has the latest version of Ubuntu as specified in the variable vmImageName. The last bash command builds the local TodoService project with the ballerina command. That'll produce a Dockerfile and corresponding Kubernetes artifacts.
For the sake of simplicity, I'm directly downloading the Ballerina distribution into the build agent and running the build from there. But Azure pipeline provides an option to execute a job within a container image of your choice, enabling you to use a standard Ballerina Docker image for the build job.
Once the build job completes, you should see an output similar to this.

Now we have a Dockerfile for the project which needs to be built with Docker to produce a container image and subsequently push it to an Azure Container Registry(ACR) instance. Let's do that with the Docker task in a later section.
Before that, we need to configure the Azure environment.
3. Setup the Azure environment
In this section, you'll configure your Azure environment to create a resource group and an ACR instance using the Azure CLI tool. If you have already performed these steps in the Part 1, you can skip this section.
3.1 Install Azure CLI tool
I’ll be executing almost all the commands related to Azure configurations with Azure CLI. If you haven’t installed it already in your local machine, see this guide to get it done. Note that you need to have Azure CLI version 2.0.53 or later to complete this tutorial. You can verify the version by running az — version command.
3.2 Create a resource group
Once installed locally, the Azure CLI tool can be accessed with az command. Type the following command in a terminal to log in with your Azure account credentials.
az login
Once you are successfully logged in to your Azure account, let’s create a resource group.
An Azure resource group is a logical group in which Azure resources are deployed and managed. When you create a resource group, you are asked to specify a location. This location is where resource group metadata is stored.
The following example creates a resource group named myResourceGroup in the eastus location.
az group create --name myResourceGroup --location eastus
You’ll get an output like below when your resource group created successfully.
{
   "id":"/subscriptions/<guid>/resourceGroups/myResourceGroup",
   "location":"eastus",
   "managedBy":null,
   "name":"myResourceGroup",
   "properties":{
      "provisioningState":"Succeeded"
   },
   "tags":null
}
3.3 Create an Azure Container Registry(ACR) instance
Azure Container Registry (ACR) is a private registry for container images. A private container registry lets you securely build and deploy your applications and custom code. Let's create an ACR instance so that once we build the TodoService Docker image, it can be pushed there.
The following command creates a container registry named dunithd and attaches it to the resource group that I have created previously. Note that the name dunithd is just a name given by me. You may choose your own.
az acr create --resource-group myResourceGroup --name dunithd --sku Basic
The registry name must be unique within Azure and contain 5–50 alphanumeric characters. The Basic SKU is a cost-optimized entry point for development purposes that provides a balance of storage and throughput.
Once created, you can refer to your container registry as <your_name>.azurecr.io. In my case, it is dunithd.azurecr.io.
Note: I chose Azure Container Registry (ACR) for this tutorial since it is well integrated with the Azure ecosystem. But Azure pipelines support a wide variety of container registries including Docker Hub, Google Container Registry (GCR), or any Docker-based registry.
4: Create a Service Principal to authenticate with ACR
In the previous tutorial, you manually built the container image and pushed it to ACR with Azure CLI. But when building a fully automated build pipeline, that has to be done unattended. Hence, the pipeline we are building here should be given necessary access permission to log in to ACR and push the built image.
There are several ways to authenticate with an Azure container registry, each of which is applicable to one or more registry usage scenarios. One option is to log in with az acr login where it provides an interactive shell for developers and testers to push and pull images. Also, another recommended option is to use an Azure AD service principal to perform unattended push/pull operations from CI/CD pipelines. For more information on all available options, please refer to this link.
4.1 Why we need a service principal?
Azure AD service principals provide access to Azure resources within your subscription. You can think of a service principal as a user identity for a service, where "service" is any application, service, or platform that needs to access the resources. You can configure a service principal with access rights scoped only to those resources you specify. Then, configure your application or service to use the service principal's credentials to access those resources. A good example would be creating a service principal for continuous integration systems like Azure DevOps or Jenkins to push/pull images from the container registry. That way, the pipelines are granted minimal and necessary privileges, but nothing more.
In the context of this tutorial, you'll use a service principal to provide container image docker push and pull access to your container registry.
4.2 Create a service principal
To create a service principal with access to your container registry, run the following script in the Azure CLI. The script is formatted for the Bash shell.
Before running the script, update the ACR_NAME variable with the name of your container registry. The SERVICE_PRINCIPAL_NAME value must be unique within your Azure Active Directory tenant. If you receive an "'http://acr-service-principal' already exists." error, specify a different name for the service principal.
Notice that I've provided acrpush as the --role as it grants me both push and pull access to the registry. For more information on RBAC, please refer to this.
After you run the script, take note of the service principal's ID and password. These credentials will be used by the Docker service connection in the next section.
#!/bin/bash

# Modify for your environment.
# ACR_NAME: The name of your Azure Container Registry
# SERVICE_PRINCIPAL_NAME: Must be unique within your AD tenant
ACR_NAME=dunithd
SERVICE_PRINCIPAL_NAME=acr-service-principal

# Obtain the full registry ID for subsequent command args
ACR_REGISTRY_ID=$(az acr show --name $ACR_NAME --query id --output tsv)

# Create the service principal with rights scoped to the registry.
# Default permissions are for docker pull access. Modify the '--role'
# argument value as desired:
# acrpull:     pull only
# acrpush:     push and pull
# owner:       push, pull, and assign roles
SP_PASSWD=$(az ad sp create-for-rbac --name http://$SERVICE_PRINCIPAL_NAME --scopes $ACR_REGISTRY_ID --role acrpush --query password --output tsv)
SP_APP_ID=$(az ad sp show --id http://$SERVICE_PRINCIPAL_NAME --query appId --output tsv)

# Output the service principal's credentials; use these in your services and
# applications to authenticate to the container registry.
echo "Service principal ID: $SP_APP_ID"
echo "Service principal password: $SP_PASSWD"
5: Create a Docker Registry service connection to ACR
In Azure DevOps, a Service Connection defines a connection to an external system. For example, you may need to connect to your Microsoft Azure subscription, to a different build server or file server, to an online continuous integration environment, or to services you install on remote computers.
A service connection eliminates the need for hard coding external system credentials in your pipeline YAML itself. Instead, Azure DevOps allows you to configure connection details in the portal UI and refer to that from the pipeline at a later stage by using its name.
Let's create a service connection to the ACR we created earlier. Then use service principal credentials as the username and password.
- In Azure DevOps, open the Service connections page from the project settings page.
- Choose + New service connection and select the type Docker Registry.
- Fill in the parameters for the service connection. Use the service principal ID (
$SP_APP_ID) as the Docker ID and service principal password (SP_PASSWD) as the Docker Password. I gave acr-service-connection as the connection name. - Choose OK to create the connection. Use the following as a reference.

We'll be using this service connection in the next section.
6: Build and push the project with Docker task
This is the final section in the tutorial where we build the checked out TodoService inside the build agent to produce a container image and push it to ACR with the credentials configured in the previous sections. The build stage uses the Docker task to build and push the image to the container registry.
Replace the content of your pipeline YAML with the following.
trigger:
- master

resources:
- repo: self

variables:
  dockerRegistryServiceConnection: 'acr-service-connection'
  imageRepository: 'todo-service'
  dockerfilePath: '**/Dockerfile'
  tag: 'latest'
  vmImageName: 'ubuntu-latest'

stages:
  - stage: Build
    displayName: Build stage
    jobs:
    - job: Build
      displayName: Build
      pool:
        vmImage: $(vmImageName)
      steps:
      - script: wget https://dist.ballerina.io/downloads/1.2.7/ballerina-1.2.7.zip
      - script: unzip -d /opt ballerina-1.2.7.zip
      - script: /opt/ballerina-1.2.7/bin/ballerina build todo_service.bal
      - script: mv docker/Dockerfile .
      - task: Docker@2
        displayName: Build and push the image to Azure container registry
        inputs:
          command: buildAndPush
          repository: $(imageRepository)
          dockerfile: $(dockerfilePath)
          containerRegistry: $(dockerRegistryServiceConnection)
          tags: |
            $(tag)
Select Save and run to commit the new changes into your repository. That will trigger a new build for the pipeline. As your pipeline runs, select the build job to watch your pipeline in action.
If everything goes well, you should see something similar to this in the pipeline build results.

7. Verify the pipeline execution
Congratulations! You've just completed building a build pipeline for the TodoService project. Now let's verify whether it works as we expected.
To verify, clone the forked GitHub repo into your local workstation and make any change to the todo_service.bal file. Then push the changes back to your fork to trigger a build in the Azure pipeline. That build will checkout the latest source code from the master branch of your fork, build it, and push the built container to your ACR instance.
Login to your ACR instance with the following command to see the newly built container. Make sure to replace the name accordingly.
az acr login --name dunithd
To list the images, type.
az acr repository list --name dunithd --output table
------------
todo-service
If you got the above result, you are done!
8. Clean up resources
Once you are done with the tutorial, you may want to delete the resources in your Azure account. Use the following command for that.
az group delete --name myResourceGroup --yes --no-wait
What's next?
In this tutorial, we built a continuous integration pipeline with Azure DevOps to automate the build process for a Ballerina microservice.
Surely, this is more than enough to carry out production-grade build tasks. But There can be a couple of tweaks that can be done to the pipeline such as adding tasks for unit testing and vulnerability scanning etc.
We will not stop it from here. There's a Continuous Deployment part that has to be considered as well. That is, the build pipeline should be altered to deploy the container image to an Azure Kubernetes Service (AKS) environment automatically, run tests there, and promote till the production environment.
Let's explore that in the next post...

Top comments (0)