
In a previous post, we showed you how to build and publish a Web Component.
Now it’s time to see how to use a top feature of Web Components:
Custom components and widgets build on the Web Component standards will work across modern browsers, and they can be used with any JavaScript library or framework that works with HTML.
In this post, we’ll look at how Web Components can be integrated into a React application.
Vonage API Account
To complete this tutorial, you will need a Vonage API account. If you don’t have one already, you can sign up today and start building with free credit. Once you have an account, you can find your API Key and API Secret at the top of the Vonage API Dashboard.
This tutorial also uses a virtual phone number. To purchase one, go to Numbers > Buy Numbers and search for one that meets your needs.
Web Components
First, let’s take a look at the Web Components that will be used in the application.
We have the keypad component from the previous post and a contacts list component. The contacts list can save and load the names and phone numbers of people called from the browser’s local storage. The Web Component can also emit the phone number of a contact to the application as a custom event when clicked.
There is also a Material Web Component dialog that will display after a call has ended if the number isn’t already in the contacts, so it can be saved.
Issues
To see what hurdles we may run into while using these Web Components in a React application, we will reference Custom Elements Everywhere.
They have taken on the noble responsibility of “Making sure frameworks and custom elements can be BFFs  ”.
”.
This is accomplished by taking frameworks/libraries and running them through various tests and report on the findings on how well they integrate with Web Components.
So how does React stack up? As of the publishing date of this post, here are the results:
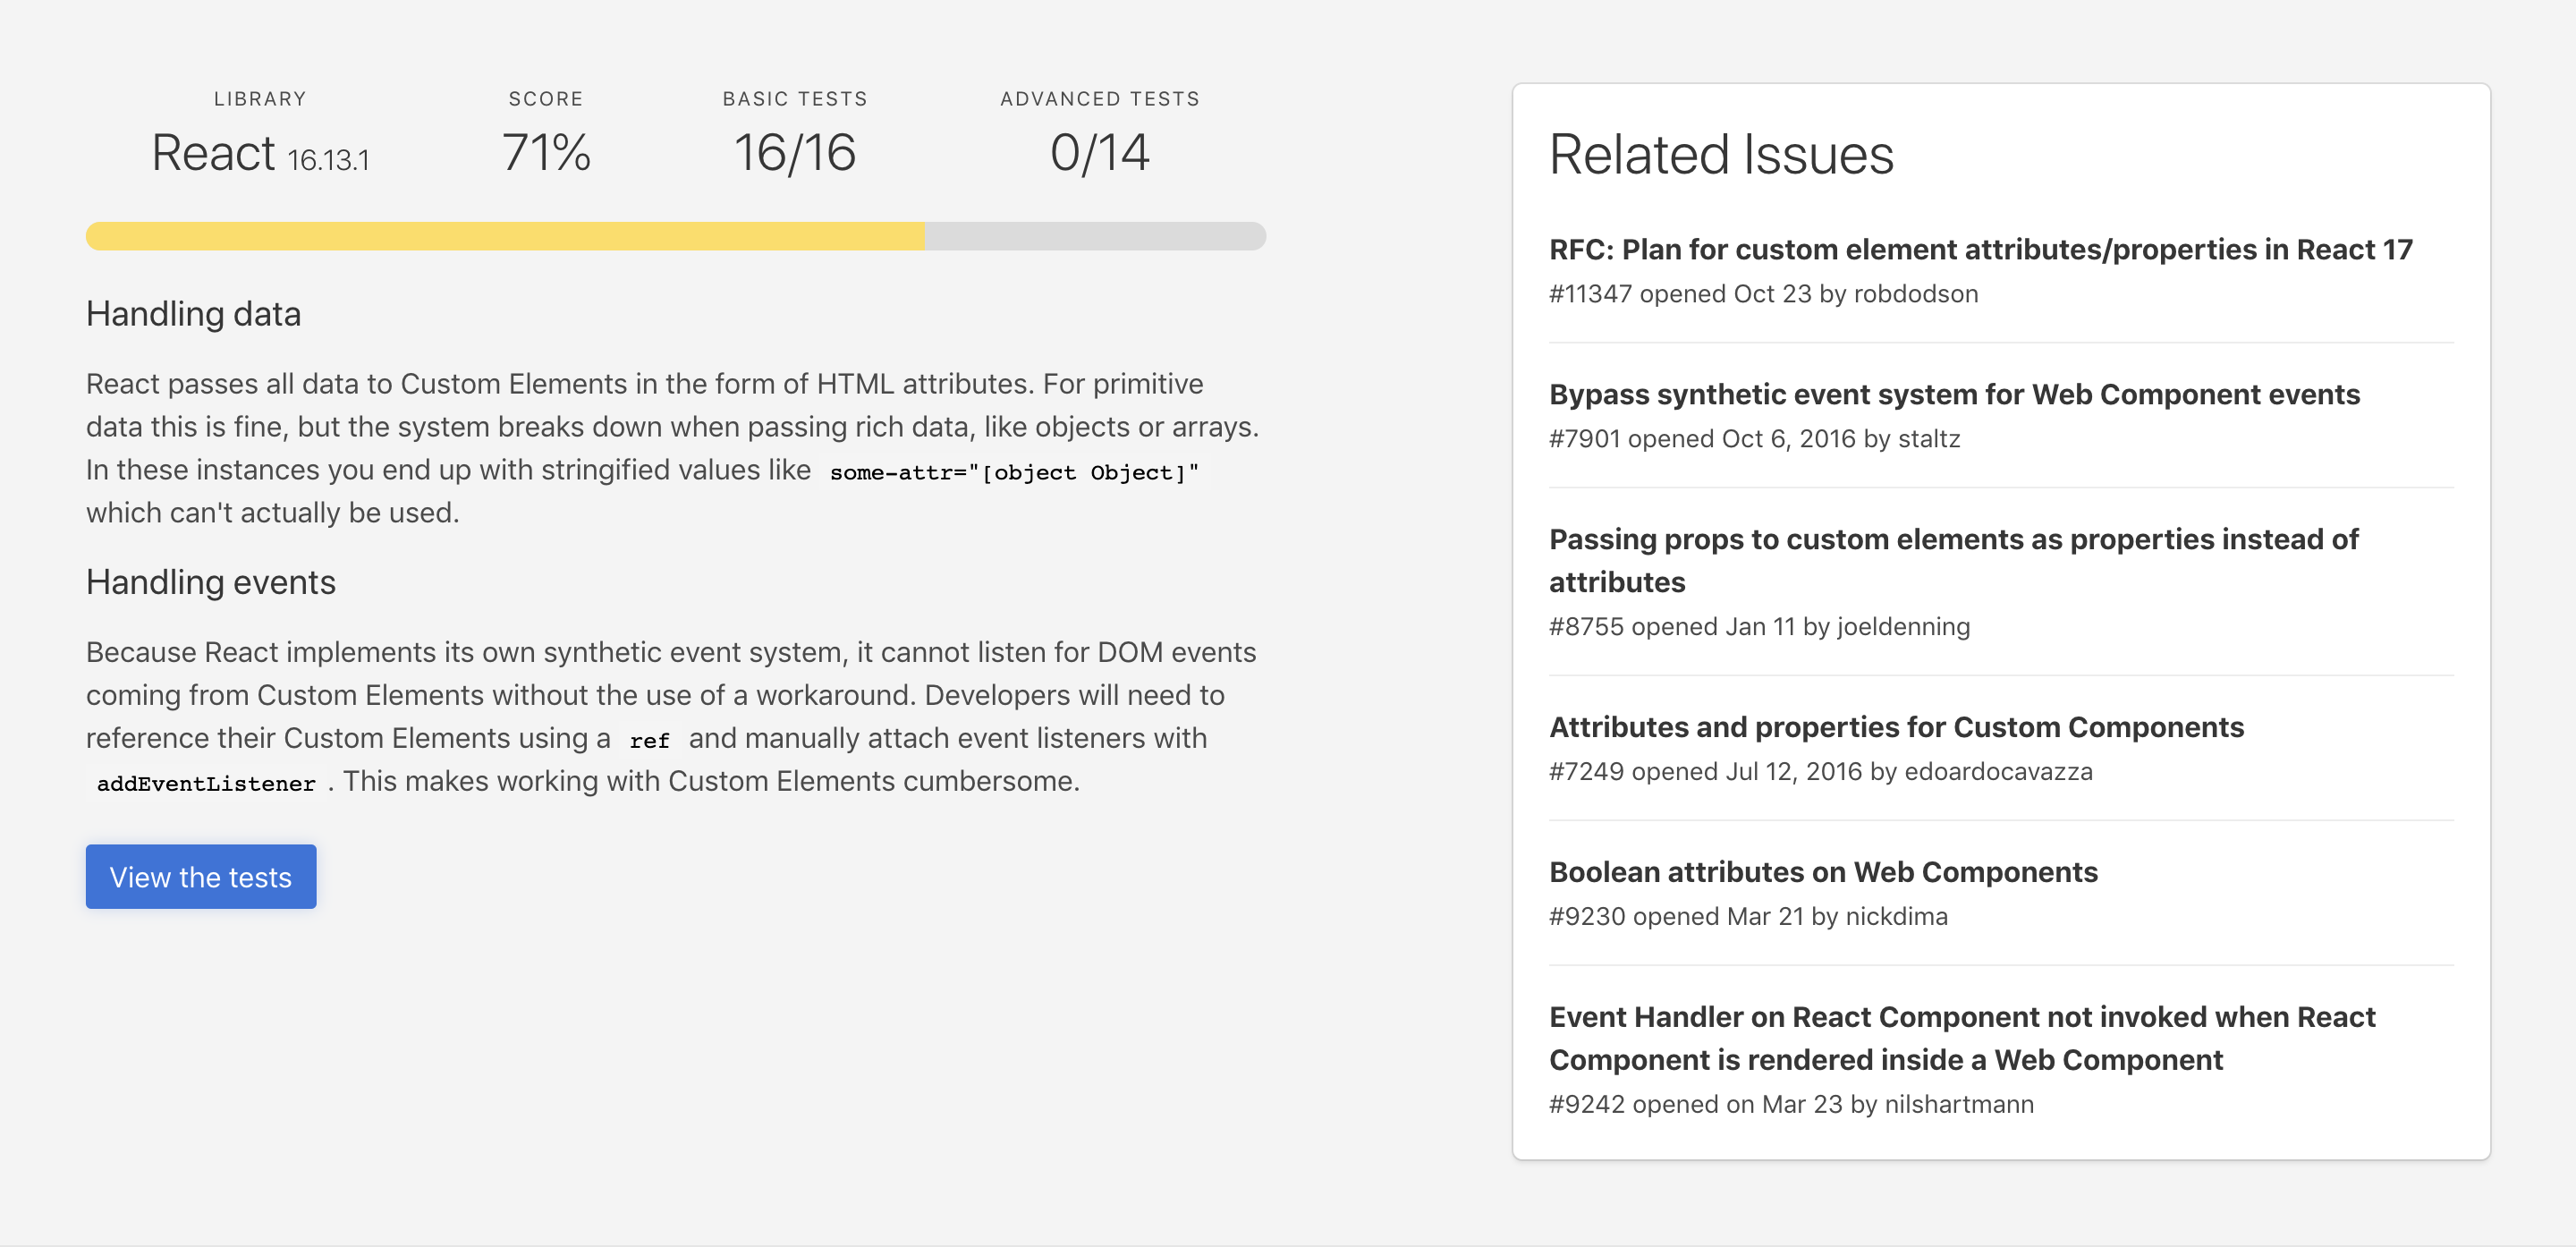
Not looking great, but we can make it work. Let’s take a look at some of the issues.
One way to pass data to your Web Component is through properties:
<dwanes-keypad actionText="Call" cancelText="Hang up"></dwanes-keypad>
When this is done in a React Application, the data is stringified. So passing arrays (ie [1,2,3,4]) will turn to “1,2,3,4” and objects (ie {“key1″:value1,”key2”:value2}) will become the dreaded “[object Object]”.
Another issue is how React handles events.
React has its SyntheticEvent instance that is a wrapper around a browser’s native event. Custom Elements Everywhere’s findings show that React’s SyntheticEvent “cannot listen for DOM events coming from Custom Elements”. They also provide a solution that we will be looking at next.
Solutions
Now that we know what’s in store for us, let’s work on overcoming these issues.
The plan is to create a basic React “App” component and then place our Web Components inside.
There are two ways to write components in a React application—as a Class or Function.
Previously, needing to use “State” in your component was a determining factor if you would use a Class Component over Function Component.
Then in React 16.8, Hooks were introduced. “They let you use state and other React features without writing a class.”
So to be as thorough as possible in this post, we’ll include Web Components in React applications that are created using Class Components and Function Components with Hooks.
As with any time Web Components are used, they must be included in the project. You can either install them or link to them from a CDN. (This was covered in the previous post.)
For this integration, we’ll be pulling from a CDN.
In the <head> tag of public\index.html file in the sample code, you will find:
<!-- Web Component polyfill --> <script src="https://unpkg.com/@webcomponents/webcomponentsjs@latest/webcomponents-loader.js"></script> <!-- Load the Web Components --> <script type="module" src="https://unpkg.com/@material/mwc-dialog@canary/mwc-dialog?module"></script> <script type="module" src="https://unpkg.com/@dwane-vonage/dwanes-keypad@latest/dwanes-keypad.js?module"></script> <script type="module" src="https://unpkg.com/@dwane-vonage/dwanes-contacts@latest/dwanes-contacts.js?module"></script>
Class Component
You can find the sample code in this Glitch project.
Note: I remixed the Glitch React Starter Template.
Handling events
To be able to handle the events coming from a Web Component, we first must get a reference to it so that React knows it exists and can add an event listener. In the src\App.js render function, you will find some ref tags:
<main> <section> <dwanes-keypad actionText="Call" cancelText="Hang up" ref="keypad"></dwanes-keypad> <div id="status">{this.state.callStatus}</div> </section> <dwanes-contacts ref="contacts"></dwanes-contacts> </main> <mwc-dialog id="dialog" heading="Contacts" ref="dialog"> <p>Save <span id="number-to-save">{this.state.numberToSave}</span> to contacts?</p> <mwc-textfield id="text-field" minlength="3" maxlength="64" placeholder="First name" dialogInitialFocus required ref="firstName"> </mwc-textfield> <mwc-button id="primary-action-button" slot="primaryAction" onClick={this.handleSaveContact}> Confirm </mwc-button> <mwc-button slot="secondaryAction" dialogAction="close"> Cancel </mwc-button> </mwc-dialog>
The ref tags let React know to pay attention to these elements.
In the componentDidMount() in src\App.js, the event listeners are added to the element references we just set up. Here’s the code:
this.refs.contacts.addEventListener('contacts-loaded', (event) => { contacts = event.detail.contacts; console.log('contacts-loaded: ', contacts); }); this.refs.contacts.addEventListener('contact-selected', (event) => { this.refs.keypad.setDigits(event.detail.contact.phone); }); this.refs.keypad.addEventListener('action-ended', () => { this.setState({callStatus: "Call has ended."}); const contactFound = contacts.find(contact => contact.phone === this.state.numberToSave); if (contactFound){ console.log('Number already in contacts') } else { this.refs.dialog.show(); } }); this.refs.keypad.addEventListener('digits-sent', event => { if (event.detail.digits !== ""){ this.refs.keypad.createAction(); this.setState({callStatus: "Call is being made", numberToSave:event.detail.digits}); } else { this.setState({callStatus: "Please enter a phone number."}); } }); this.refs.keypad.addEventListener("digit-added", event => { console.log('digit-added: ', event.detail.digit); });
Handling data
For our keypad component, we are passing strings into the properties, so nothing special needs to be done with that data in React.
When saving the contact after a call, the data is an object:
{name:this.refs.firstName.value, phone:this.state.numberToSave}
This is passed into a method in the contacts list Web Component:
this.refs.contacts.saveContact({name:this.refs.firstName.value, phone:this.state.numberToSave});
If the contacts list component was not using the object to manipulate the data and save to Local Storage, we could pass the object like:
this.refs.contacts.contactProp = {name:this.refs.firstName.value, phone:this.state.numberToSave};
The same applies to arrays.
Important note! The API used to get the reference to the Web Components is considered legacy and is “likely to be removed in one of the future releases.” The documentation has more info and offers alternatives.
Let’s show one of the alternatives mentioned.
If you are using React 16.3 or later, here’s the Glitch Project sample code using React.createRef().
Pretty much the same idea, just more syntax. You create the reference with React.createRef() in the constructor:
this.contacts = React.createRef();
Attach it to the Web Component in the render:
<dwanes-contacts ref={this.contacts}></dwanes-contacts>
Add an event listener in componentDidMount():
this.contacts.current.addEventListener('contact-selected', (event) => { this.keypad.current.setDigits(event.detail.contact.phone); });
Call a Web Component’s method:
this.contacts.current.saveContact({name:this.firstName.current.value, phone:this.state.numberToSave});
Pass “rich” data to the Web Component:
this.contacts.current.contactProp = {name:this.firstName.current.value, phone:this.state.numberToSave}; this.contacts.current.arrayProp = [value1, value2, value3];
Function Component With Hooks
Now for the newest way, as of React 16.8, that can be used to create a Web Component reference.
A lot of the heavy lifting is handled with Hooks. Whether it’s handling state, side effects, or DOM references, there is probably a Hook you can use.
If not, you can create a custom Hook.
In this case, one of the Hooks we will be using is useRef.
This will look a lot like the React.createRef() example.
You can find the Function Component with Hooks sample code in this Glitch project.
Handling events
First, we need to initialize the references for each Web Component. That is done with this code:
const keypad = useRef(null); const dialog = useRef(null); const contactsEl = useRef(null); const firstName = useRef(null);
null is the initial value for the reference.
Then in the return section, we attach the references to the Web Components with the ref={referenceName}.
Here’s the code:
<main> <section> <dwanes-keypad actionText="Call" cancelText="Hang up" ref={keypad}></dwanes-keypad> <div id="status">{callStatus}</div> </section> <dwanes-contacts ref={contactsEl}></dwanes-contacts> </main> <mwc-dialog id="dialog" heading="Contacts" ref={dialog}> <p>Save <span id="number-to-save">{numberToSave}</span> to contacts?</p> <mwc-textfield id="text-field" minlength="3" maxlength="64" placeholder="First name" dialogInitialFocus required ref={firstName}> </mwc-textfield> <mwc-button id="primary-action-button" slot="primaryAction" onClick={handleSaveContact}> Confirm </mwc-button> <mwc-button slot="secondaryAction" dialogAction="close"> Cancel </mwc-button> </mwc-dialog>
Now let’s add our event listeners.
For this, we will wrap them in a useEffect Hook:
useEffect(()=> { contactsEl.current.addEventListener('contacts-loaded', handleContactsLoaded); contactsEl.current.addEventListener('contact-selected', handleContactSelected); keypad.current.addEventListener('digit-added', handleDigitAdded); keypad.current.addEventListener('digits-sent', handleDigitsSent); keypad.current.addEventListener('action-ended', handleActionEnded); return () => { contactsEl.current.removeEventListener('contacts-loaded', handleContactsLoaded); contactsEl.current.removeEventListener('contact-selected', handleContactSelected); keypad.current.removeEventListener('digit-added', handleDigitAdded); keypad.current.removeEventListener('digits-sent', handleDigitsSent); keypad.current.removeEventListener('action-ended', handleActionEnded); }; });
Handling data
As mentioned before, this will look very similar to the React.createRef() sample code.
Using a Web Component’s method to send data:
contactsEl.current.saveContact({name:firstName.current.value, phone:numberToSave});
To pass “rich” data to the Web Component:
contactsEl.current.contactProp = {name:this.firstName.current.value, phone:this.state.numberToSave}; contactsEl.current.arrayProp = [value1, value2, value3];
Make A Call
We’ve got our Web Components all hooked up, why not make a call with our React application?
The steps below are a modified version and a quick overview of our making an in-app voice call tutorial to use our Web Components.
You can refer to that for more in-depth detail.
To get it working will require:
- A Vonage Developer account
- The Nexmo CLI
- A GitHub account
Step 1: Remix this Glitch project.
This will not only set up the React application with the Web Components but also install the Nexmo Client SDK that will be used to make the phone call.
Step 2: Install the Nexmo CLI tool.
In your terminal, type:
npm install nexmo-cli@beta -g
Get your Vonage Developer API Key and API Secret from your dashboard.
Run the following command in a terminal, while replacing api_key and api_secret with your own:
nexmo setup api\_key api\_secret
Step 3: Create an NCCO.
Make sure you are logged into GitHub and then go to https://gist.github.com .
Enter ncco.json into “Filename including extension”.
Copy and paste the following JSON object into the gist:
[{ "action": "talk", "text": "Please wait while we connect you." }, { "action": "connect", "endpoint": [ { "type": "phone", "number": "PHONE\_NUMBER" }] } ]
Replace PHONE_NUMBER with your phone number. Nexmo numbers are in E.164 format, “+” and “-” are not valid. Make sure you specify your country code when entering your number, for example, US: 14155550100 and UK: 447700900001.
Click the Create secret gist button.
Click the Raw button.
Take note of the URL shown in your browser, you will be using it in the next step.
Step 4: Create a Nexmo Application
Create your project directory if you have not already done so.
mkdir web-components-react
Change into the project directory.
cd web-components-react
Create a Nexmo application by copying and pasting the command below into terminal:
Make sure to change the value of
--voice-answer-urlargument by replacingGIST-URLwith the gist URL from the previous step.
nexmo app:create "App to Phone Tutorial" --capabilities=voice --keyfile=private.key --voice-event-url=https://example.com/ --voice-answer-url=GIST-URL
A file named .nexmo-app is created in your project directory and contains the newly created Nexmo Application ID and the private key. A private key file named private.key is also created.
Please make a note of the Application ID as you’ll need it in the future.
Step 5: Create a User
Create a user named Alice with the following command using the Nexmo CLI:
nexmo user:create name="Alice"
This will return a user ID similar to the following:
User created: USR-aaaaaaaa-bbbb-cccc-dddd-0123456789ab
Step 6: Generate a JWT
Generate a JWT using the Nexmo CLI by running the following command but remember to replace the APP_ID variable with your own value:
nexmo jwt:generate ./private.key exp=$(($(date +%s)+21600)) acl='{"paths":{"/\*/users/\*\*":{},"/\*/conversations/\*\*":{},"/\*/sessions/\*\*":{},"/\*/devices/\*\*":{},"/\*/image/\*\*":{},"/\*/media/\*\*":{},"/\*/applications/\*\*":{},"/\*/push/\*\*":{},"/\*/knocking/\*\*":{}}}' sub=Alice application\_id=APP\_ID
The generated JWT will be valid for the next 6 hours.
Copy and paste the JWT into the src/App.js Glitch project file where it says “PASTE ALICE JWT HERE”.
Step 7: Call yourself!
Dial your number on the keypad and press CALL.
If everything worked correctly, your phone should receive a call. Once the call ends, the dialog box should pop up asking if you would like to save the number.
Note: Since the NCCO is hardcoded with your phone number, regardless of whatever was typed with the keypad, your number would be called. To dynamically generate the NCCO, that will need to be done on the back end.
Well, that’s it! We have now used Web Components in a React application.
Did it work? Was it cool?
As with anything in coding, there are multiple ways of doing things.
Another way, I have found in the React and Stencil JS documentation is to wrap your Web Components in React Components.
Have you done it that way or maybe another way? Would really like to hear about it or any other comments and questions in our Community Slack Channel.
The post Using Web Components in a React Application appeared first on Vonage Developer Blog.

Top comments (0)