This post was originally published on Smart Checklist for Jira blog
The success of a project depends on communication between the dev team and the customer or the stakeholder. The team needs to know how the product or feature is expected to work – this is specifically what the Acceptance Criteria in User Stories in Jira explains.
The more detailed description the customer is able to provide about their business needs, the fewer questions the team will ask after work starts. Yes, the team needs to understand all requirements clearly – no question about that. Without this seemingly obvious aspect, things can become rather challenging.
Let’s take the following case:
The client (owner of a clothing store) wants to add a Search to their homepage so that users can search for clothes categories. They want a clear interface with filters that show all categories in the form of a dropdown. Two weeks fly by and instead of super-fast filters that show all categories, the client gets a Search where users need to type in everything manually. This also works, but the user experience will suffer.
What is the Acceptance Criteria?
As stated above, when a feature is built by a dev team, it must meet a certain set of rules to satisfy the user and the customer. This set is what we call Acceptance Criteria. Ultimately, the goal of the Acceptance Criteria is to ensure that the team knows what to build before work starts. Additionally, Acceptance Criteria helps to verify automated tests of the User Story. A typical example of Acceptance Criteria in a User Story list would be:
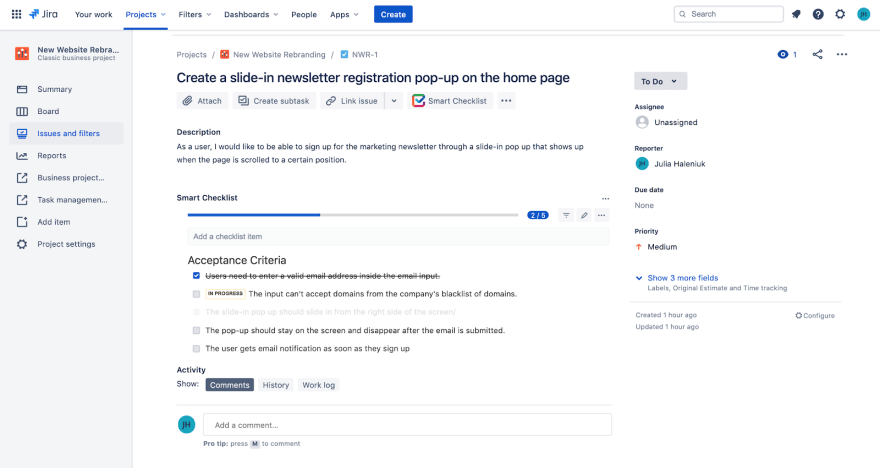
User story: As a user, I want to sign up for a marketing newsletter to receive emails about the latest offers.
Acceptance criteria:
- The user can sign up for a newsletter in a few places: the homepage footer, the slide-in pop-up, and a modal on the product page when shopping.
- The user can only sign up with a valid email.
- There should be an Email Input on both, the slide-in pop-up and modal so that users can leave their email addresses.
- After the user leaves their email, they will get a confirmation email
So to put it simply, a user will not accept the functionality if they can’t leave their email to sign up for a newsletter. They wouldn’t know if they signed up correctly without a confirmation email sent to them afterward.
Acceptance Criteria vs. Definition of Done
As long as the Definition of Done and Acceptance Criteria are both present in the scrum development process, they should not be confused. They are not interchangeable. An example of a Definition of Done would be:
- Code checked
- Code review passed
- Functional tests passed
- Product Owner acceptance
So what are the differences?
The main difference between the two is that the Definition of Done applies to all User Stories in the backlog, while Acceptance Criteria is unique for individual Stories. While Acceptance Criteria explains how things will work, the Definition of Done is a list of items that have to be “checked” by the team before shipping a product, a release, or even the slightest feature.
Also, the two serve a different purpose. The goal of DoD is to ensure the highest quality of the product, whereas the Acceptance Criteria serves as a guide for the team to let them know how the user will interact with the product as well as when the Story is eventually completed.
How to manage Acceptance Criteria with Smart Checklist
If you’re wondering where to add Acceptance Criteria in Jira, we’ve got you covered. There are a few ways to do this. Some prefer to include it in the Description text area as a simple list, which isn’t the most perfect solution. Smart Checklist for Jira makes it so easy to manage Acceptance Criteria in Jira, without the need to squeeze it inside the task’s description.
All it takes is just a few clicks to download and install Smart Checklist. You will then see the tab to the right side of each of your existing User Stories and every next Story that you create.
Adding Acceptance Criteria in Jira
Once installed, Click Open Smart Checklist to start adding the Acceptance Criteria list for the Story.

The great thing is that Smart Checklist gives you a little bit of flexibility – you can add items to the list one by one or open the Fullscreen Editor to edit the entire list at once. Click the Pen icon to open the Editor.
Now, you can use this Formatting Guide to perfectly style your list, as it supports Markdown features where:
- Means “To Do”
- Means “Done”
[~] Means “In Progress”
[x] Means “Cancelled”
[#] Is the List Header
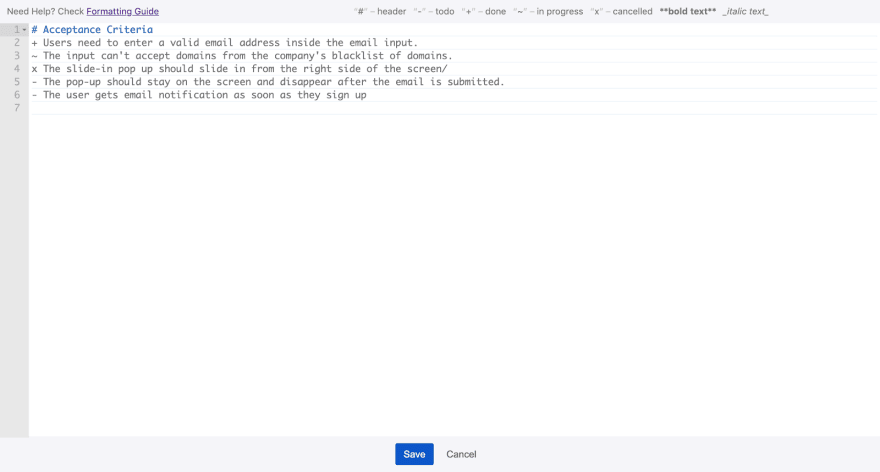
Once you’re done, hit Save. The entire list will appear to the right side of the User Story. The list will appear at the center, under the User Story’s description by default. You can move it to the right if you prefer at any time.
Key Takeaways
At the end of the day, all the reasons behind adding Acceptance Criteria to your User Stories are unbeatable. That is because a well-written, clear acceptance criteria list saves you and your team from some unexpected issues on the day of release (or after it). On top of it all, it guarantees that everyone, stakeholders, clients, devs, and the users are happy with how the product works.

Top comments (0)