
One of the most powerful features of Dynoscale’s Heroku autoscaling is the ability to configure it to meet the needs of your app without needing to write complex code. This tutorial will show you how to make advanced use of Dynoscale’s Heroku autoscaling to meet the needs of your app’s unique performance requirements. It will also show you how to enable the highest levels of autoscaling for your app with just a few configuration steps.
This post covers advanced Heroku autoscaling topics that build upon a prior post covering the basics.
Tuning Web Request Queuing
For a great end-user experience on your website, lowering backend latency is crucial. Amazon discovered ten years ago that every 100ms of latency cost them 1% in sales. Google discovered that adding 0.5 seconds to the generation time of a search page reduced traffic by 20%. We can match the correct thresholds for your traffic to reduce queue time by spending a few minutes examining the Web Dyno Activity report. Your users and customers will be able to load a page of your site faster if the queue time is reduced.
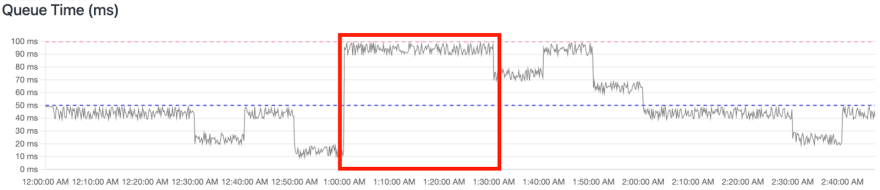 Navigate to the Web Dyno Activity report. Dynoscale sets your web upscale and downscale thresholds to 100 and 50 milliseconds, respectively, by default. These are useful settings, but it's possible that your application has a unique traffic pattern, in which case different thresholds would improve your autoscaling. Take the case above: the queue time was high from 1:00 AM to 1:30 AM, however the auto upscale was not triggered. This means that queries in the p95 category experienced roughly 100 milliseconds of additional backend request time due to queue time.
 In this case, I recommend lowering the upscale threshold to 90ms and monitoring to see if auto scaling performance improves. Keep in mind not to overfit your thresholds based on a specific scenario. This frequently results in completely unanticipated behavior outside of the specific scenario.
Cost cutting during known periods of lower traffic
Imagine a scenario where your application provides a service for business users who mostly use it during weekdays. On weekends, your application receives significantly less traffic and you would like to run one web dyno instead of two during this period to cut costs.
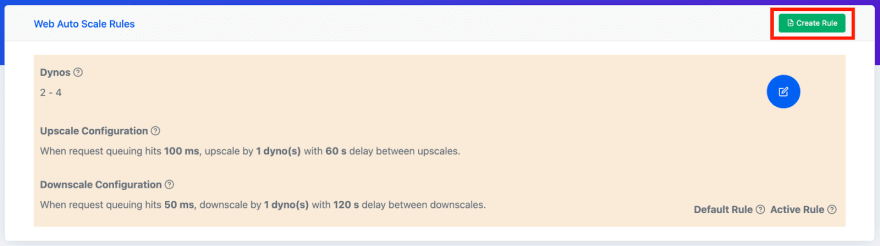 Navigate to Web Dyno Auto Scaling Page and create a new rule.
 In the new rule set the lower dyno bound to one and match the upper bound to the default rule’s. Set the Start At and End At to "12:00:00 AM" and "11:59:59 PM", respectively, and the Day of Week to "Weekend". Click Save to commit the rule and downscale to one dyno on weekends.
Preparing for a period of planned higher traffic
Consider a scenario in which your app's marketing team is about to launch a major campaign at 10 a.m. the next day (a Tuesday). You need to increase the dyno ranges to four and eight for a twelve-hour period to ensure the application can manage the increased traffic.
 In advance of the campaign, navigate to Web Dyno Auto Scaling Page and create a new rule.
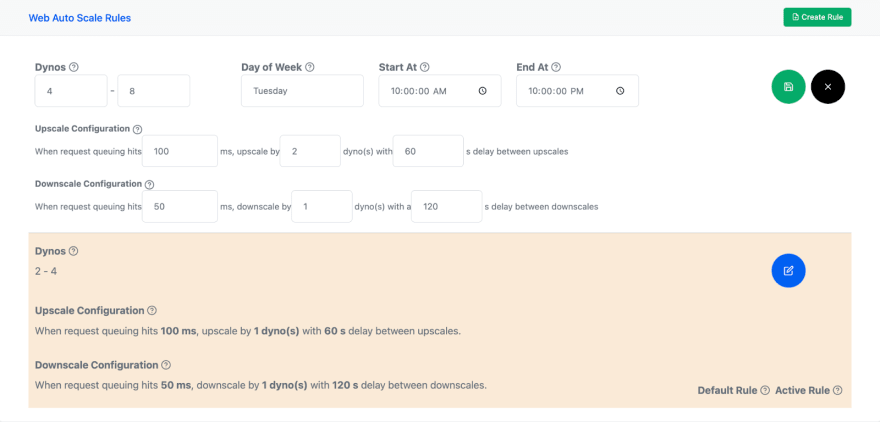 In the new rule set the lower dyno bound to four and the upper bound to eight. Next, set the Day of Week to "Tuesday" and the Start At and End At to "10:00:00 AM" and "10:00:00 PM" respectively. Click Save to create the new rule.
Once the campaign has run its course, delete this new auto scaling rule.
Optimizing for cost savings over traffic demand
When analyzing the Web Dyno Activity report, it may become clear that small bursts of traffic are driving your application to auto scale up. However, the traffic drops off soon, and you end up running extra dynos. Reducing the upscale dyno increment and the downscale cooldown time would be beneficial.
The scale up increment is two, and the downscale cool down is one hundred and twenty seconds in this situation.
 Navigate to Web Dyno Auto Scaling Page and edit the active rule.
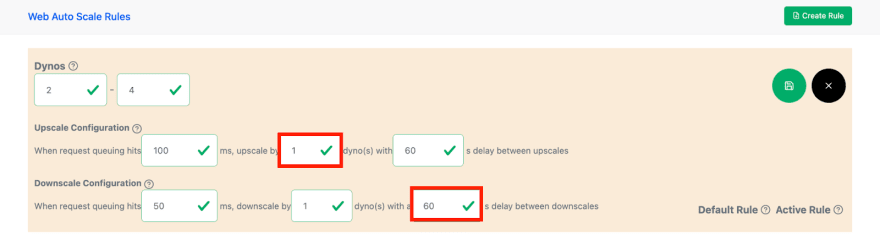 Reduce the upscale increment from two to one and the downscale cooldown to sixty seconds. Click Save to commit the rule and cut costs.
Optimizing for traffic demand over cost savings
When checking the Web Dyno Activity report, it may be obvious that heavy loads are driving your service to auto scale up, but scaling up to meet demand can take a long time. Users of your application will encounter increased queue time and a worse experience during this scaling up phase. Increasing the upscale dyno increment and reducing the upscale cooldown time would be useful.
The scale up increment is two, and the autoscale cool down is sixty seconds in this instance.
 Navigate to Web Dyno Auto Scaling Page and edit the active rule.
 Increase the upscale increment from two to four and decrease the upscale cooldown to thirty seconds. Click Save to commit the rule and improve request queue time.
Conclusion
The flexibility to tailor Dynoscale's Heroku autoscaling to fit your app's needs without having to write sophisticated code is one of its most powerful features. This tutorial showed you how to use Dynoscale's Heroku autoscaling in a more complex way to fulfill the performance requirements of your app. It also demonstrated how to adjust just a few configuration settings to enable the maximum capabilities of autoscaling for your app.

Latest comments (0)