
We all use shortcuts to get our job done faster, from copying and pasting code to using snippets or more recently github copilot and chatGPT. The downside to these is that they are limited in scope and they are not flexible enough to handle all the different ways we work with code. In this post I'll show you a specific kind of code generators that can help you, not only to get things done faster, but also to help you on-board new members to a project, standardize the boring parts and even help you writing tests.
What is a code generator?
There isn't a formal definition of what a code generator is, and if we just think of them as the name implies, it means that it can be anything that generates code automatically like a compiler.
To clear things up, I'll narrow down the definition to "a tool that generates code based on a template or context and some user input".
I like to classify code generators into three categories:
- Project generators
- Module generators
- Snippet generators
This is my classification, I'm sure there are other ways to classify them, so if you have an opinion on this, please let me know.
The Project generators are the ones that create a new project from scratch, like create-react-app, yeoman, etc. These are great for getting started with a new project, but you use them once and forget them for the rest of the project.
The Snippet generators are the ones that generate a small piece of code, like a component, a function, etc. Some examples of these are the snippets in your IDE, Github copilot and chatGPT. The limitation of these is that they affect a single file or a small piece of code.
The Module generators are the ones that help you to add features to an existing project, both creating new files and injecting code into existing ones. You can share them with your team, they help you to standardize the code and promote good practices.
These are the ones that I'll be focusing on in this post and whenever I mention a code generator from now on, I'll be referring to this category.
When to use a code generator?
In short, any time that you find yourself doing the same thing over and over.
At the beginning of a project it can be anything like creating a new component or creating a new endpoint in your API (you'll find a great example at the end).
Later on, when you've written a large system, you'll find out that a majority of the time you spend creating new features is not actually writing the code, but copying and pasting code from other parts of the system and connecting them to a small subset of modules. This is a great opportunity to use a code generator and automate this process.
What can I use?
This depends on the Tech Stack you are using, if you are lucky you might be using Laravel or Angular which already have their own integrated solution.

But for the rest of us, there are a few options:
Both of these are great, but since Plop is heavy on the JS side, I'll be focusing on Hygen.
Hygen the most "code agnostic" of the two, and to give you an example, you just need to learn the following syntax to start templating with variables:
<%= name %>
And that's it, you can use it in any language, and you can even use it to generate files that are not code, like markdown or json (I use it to generate my blog posts).
Before we deep dive into code, let's see some concepts that will help us to understand and organize our generators: prompts, templates and injectors.
Prompts
The prompts are the questions that the generator will ask you to get the information it needs for the templates and injectors to work. This is the "variables", context and anything that changes each time you create a new something.
Some examples of prompts could be the name of your component, the url of an endpoint, the pages a component will be used in, etc.
I love food analogies, so let's imagine that we have a pizza place and we want to have a standardized way to create new types of pizzas. In this analogy, the prompts would be "What's the name of the pizza?", "What are the ingredients?", "What's the price of the pizza?", etc.
Templates
The templates are the files that we create and that will be basically copied and pasted replacing the variables with the user input wherever we indicate it with the syntax we saw before. In templates we add the repetitive code, like imports, basic structure of a component, empty functions and so on.
In the pizza place analogy, the templates would be a file with an skeleton of the recipe, the list of ingredients and the steps to make the pizza that repeat for every pizza. But after that's done we will still need to add details like the quantity of each ingredient and the other parts of the recipe that are specific to each pizza.
Injectors
The injectors are like templates, both copy their contents to another file. The difference is that injectors do it into an existing file using a regex rule to find the place where the content should go. These are great for connecting the files that we created with the templates, because one of the most time consuming tasks in a project is to remember or find all the places where you need to import a newly created module.
Once again, on the pizza place analogy, we have a new pizza recipe but there isn't still a way for our costumers to ask for it. The injector would take the information of our original prompt and inject the new pizza into the menu, adding it's description and price.
And just like that we "automated" the process of creating a new pizza 🍕.
Setup hygen
To add hygen to a project that already has a package.json file and follow the examples, you can run:
npm install --save-dev hygen
But if your project doesn't have a package.json file because it isn't a node project, you can follow the instructions on the hygen website to install it.
If you follow along, you'll end up with a working example and some needed practice to get used to the syntax.
Simple example
We are going to create the simplest prompt, template and injector to get used to the syntax.
The first thing you need to do is to create a folder called _templates in the root of your project. This is where we will store all our generators. Inside this folder we will create a folder called new and inside of it another one called hello.
You should end up with a folder structure like this:
_templates/new/hello
Prompt
Now inside the hello folder we will create a file called prompt.js and add the following code:
// _templates/new/hello/prompt.js
module.exports = [
  {
    type: "input",
    name: "username",
    message: "What's your name?",
  },
];
As you might guess, we are asking for the user's name and storing it in a variable called username.
Template
Now we will create a file called template.ejs.t and add the following code:
---
to: hello/<%= username %>.js
---

console.log("Hello <%= username %>!")
This looks a bit more complicated but don't worry, we will break it down.
The first part, the code between the '---' is called the "front matter" and it's used to configure the generator. We can add pairs of keys and values while also use the templating language (<%= something %>) to replace the values with the prompt's values.
This will create a file inside a folder called 'hello' with the name of the user and adding the '.js' extension at the end.
The second part, after the second '---' is the actual template. This is the code that will be copied and pasted into the new file. Since we can also use the same templating language, we are basically creating a console.log with the user's name.
Injector
Before creating the injector let's create a file called index.js and add the following code:
// hygen--inject-hello
This is just a comment that let's us know where we can inject code.
And now create a file called injector.js inside the _templates/new/hello folder and add the following code:
---
inject: true
to: index.js
after: // hygen--inject-hello
---
import './hello/<%= username %>'
This is the injector, it's basically the same as the template but we are adding the inject property and the after key to indicate where we want to inject the code. In this case we want to inject it after the comment we created before. The code is importing the file we created with the template.
Running the generator
Now that we have everything set up, we can run the generator by adding this command inside the package.json file:
"scripts": {
  // any other scripts you have
  "new:hello": "hygen new hello"
}
And then run:
npm run new:hello
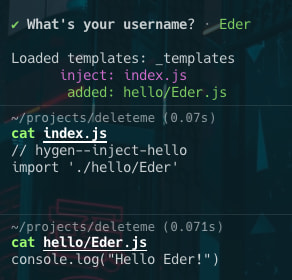
If everything went well, you should see the prompt asking for your name, then the new file will be created and the injector will add the import to the index.js file.
Real world example
For a more "real world" usage of this library and workflow, I made a repository with a simple Node server that serves both an API and static pages. You can clone it and try out one of the two generators commands:
npm run new:page
npm run new:api
You'll notice that the prompts are a bit more complex and there's some logic to add or not parts of code into a file. The generators also create multiple files like tests, styles, scripts and so on.
Conclusion
Code Generators can improve the quality and speed of a team's work. It might seem like more work at first, but once that you get the hang of it and get used to create generators quickly, you will see how much time you save in the long run.
If you want to learn more about Hygen read their documentation, also to learn more about the prompts options you can check Enquirer which is what Hygen uses under the hood.
Also a "talk" version of this post is available on YouTube, if you speak Spanish I recommend the original audio version.

Top comments (0)