As I went into learning React in phase 2 of my coding bootcamp, after just learning JavaScript in phase 1, I realized how much easier it could make my life. I was so excited to learn React but it came with its ups and downs. For me, the hardest concept to grasp was props and state. I had the hardest time figuring out where to put state! In the beginning I found that I would have to lift state very often. That would result in me getting confused within my code, not knowing which way was up or which way was down.

Don’t worry though! I will give you all the tips and tricks that helped me in figuring out how to use state and especially where to put it! Hopefully it will prevent you from making similar mistakes that I kept making. 😊
Quick reminder of props:
Before we get into state, it's important to understand what props are:
Props stand for properties and is a keyword used in React. These props pass the data between the different components [1].
A component in simpler terms is a function and a prop is an argument that is passed into that function. There are two key things to remember about props: that they only get passed down from a parent to a child component and that the data that is being passed down can’t be changed by the child. Here is an example of using props:
/components/App
import Home from "./Home";
// pass this data down as props to the child component
import user from "../data/user";
function App() {
return (
    <div>
      <Home name = {user.name} />
    </div>
  )}
export default App;

/components/Home
function Home(props) {
  return (
    <div id="home">
      <h1>{props.name} is a Web Developer</h1>
    </div>
  )}
export default Home;
//=> Cindy is a Web Developer
In this example, we are importing data from an object (user) and passing down a prop of name to the child component (Home) from the parent component (App). Now in Home, we can access the name being passed down by the use of the curly braces and dot notation: {props.name}. As you can see here the name being passed down from user is Cindy, there is no way to change this other than going into the object user and manually changing it. If the data is something that you want to change, well that's where the state hook comes in to save the day!
What is a useState hook?
You might be thinking to yourself, what is a hook? Well, React says that:
A hook is a special function that lets you “hook into” React features. For example, useState is a hook that lets you add React state to function components [2]. Awesome, what is state exactly? Well state is data that is in your component, that is similar to a prop, but is expected to change over time. AKA users interacting with the DOM, for example a like button or a form submit. State is really helpful because it provides us a way of updating our data within our component. The way a state hook works is that
useState returns an array with 2 variables: a reference variable to the current value of state and a setter function for setting/updating state. An important tidbit about setter functions is that it triggers a re-render of the page every time state is changed! This is why state is so great in comparison to vanilla JavaScript, it automatically re-renders only when it needs to based on if state is changed.I know this can be a little confusing, especially if you are mostly a visual learner like me, so let's look at some basic steps of how to use state!
First step is to import
useState:import { useState } from "react";
Second is to create your new state variable, let’s create a like button:
const [likes, setLikes] = useState(0);
Next use your state, we want a button to display the increasing likes:
function LikeButton(){
  const [likes, setLikes] = useState(0);
  return(
  <div>
    <button>{likes}</button>
  </div>
  )
}
Lastly, we want to set the state to update the number of likes every time the button is clicked:
function LikeButton(){
  const [likes, setLikes] = useState(0);
  return(
  <div>
    <button onClick={() => setLikes(likes + 1)}>{likes}</button>
  </div>
  )
}
And that's it! Now we have a like button that will show the amount of times it's been clicked!
When do you need State?
React give us three great questions to review when you’re wondering whether or not you need to create state:
- Is it passed down from a parent via props? If so, you might not need state.
- Does it remain unchanged over time? If so, you might not need state.
- Can you compute it based on any other existing state or props in your component? If so, you might not need state [3].
Tip💡: what I did when learning was write these on a sticky note and put it on my monitor so that I could easily refer back to it!
What is Lifting State?
I mentioned lifting state earlier and how when I was learning about useState I found myself having to lift state often. That is because I would put state in the wrong place! Lifting state is moving state to the closest common ancestor of the components that need it. In simpler terms, it is moving state up to its parent component. Note: if there isn’t a good parent component, you can always make one!
Where should State live?
Lifting state as a beginner can be confusing, so knowing where state should live is important! A lot of my instructors were teaching us in the beginning to make or draw out the hierarchy of the components to help with understanding which components are parents, siblings, or children of each other. Knowing this information is great for determining where state should go. After a lot of time being stubborn and thinking I could just visualize the hierarchy in my head, I’m here to tell you that my instructors were… that’s correct, you guessed it… they were right! So after getting confused with where state should live multiple times, I eventually tried physically drawing out the components hierarchy and just like that ... CLICK!
I hope that all of you have that click moment too! So here are a few different tips and tricks for visualizing the components and deciding where state should live!
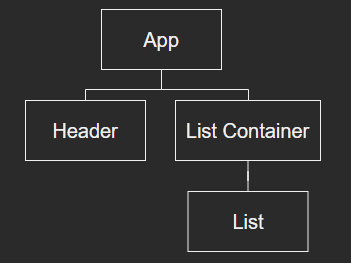
You could try simply writing/typing out a component hierarchy like this:
    App
      |- Header
      |- List Container
          |- List
Or my personal favorite, drawing out a diagram like this:
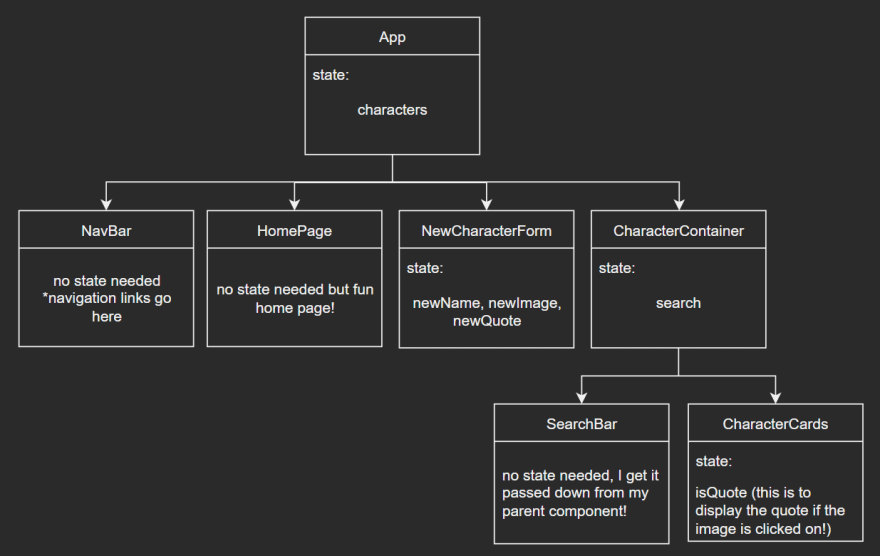
Or if you’re working on a larger project where there are a lot of components, you can use a program to help you create a diagram where you can continually add to it. This option is great because you can also add where you are putting your state in each component in your diagram as you go and keep going back to add to it as you expand your project, like this:
Here are some helpful programs that I found for creating diagrams: draw.io, Figma, LucidChart, and miro. Note: in the above diagrams I used draw.io!
Conclusion:
I hope this helped clear up any confusion about how useState works and where to put state. For more resources here's a YouTube video and React link that I found helpful! Happy coding!🧑💻
Resources:
[1] “REACT PROPS: Different examples to implement react props,” EDUCBA, 12-Jul-2021. [Online].
[2] “Using the State Hook,” React. [Online].
[3]“Thinking in react,” React. [Online].


Top comments (0)