title: DevOps Nuggets:Automating ECS Service Scaling Outside Business Hours with AWS Lambda and…
published: false
date: 2025-02-24 15:57:49 UTC
tags: lambda,devops,automation,aws
--
DevOps Nuggets: Automating ECS Service Scaling Outside Business Hours with AWS Lambda and EventBridge
Scenario : Managing ECS services efficiently can significantly reduce costs and optimize resource usage — especially if your applications only need to run during business hours. In this blog post, we’ll walk through how to automatically stop your ECS services at 7 PM and restart them at 7 AM using AWS Lambda and EventBridge. This serverless solution minimizes manual intervention and helps you save on unnecessary compute costs.
Architecture
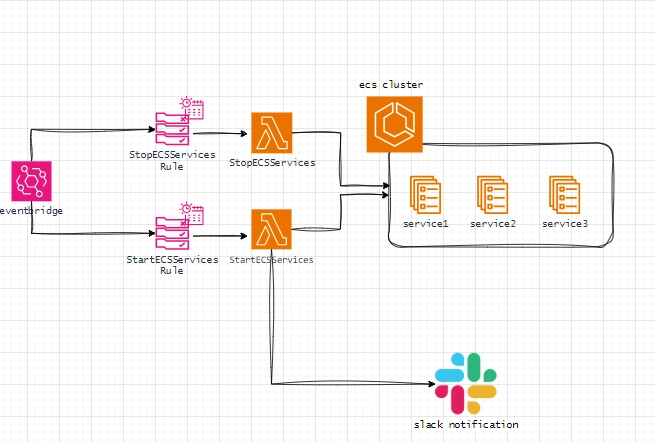
Overview
The solution leverages two AWS Lambda functions to update your ECS service desired counts:
- Stop Function: Scales services down to zero at 7 PM.
- Start Function: Scales services back up at 7 AM.
Amazon EventBridge triggers these functions on a schedule based on cron expressions. Together, these tools create a cost-effective and automated approach to managing your services.
Prerequisites
Before you begin, ensure you have:
- An AWS Account: With permissions to create Lambda functions, EventBridge rules, and IAM roles.
- An ECS Cluster and Services: Pre-configured with the services you wish to manage.
- AWS CLI or AWS Management Console Access: For creating and configuring the required resources.
- A Slack Workspace: With permissions to add an Incoming Webhook.
Step 1: Create an IAM Role for Lambda
Your Lambda functions need the proper permissions to update ECS services and write logs to CloudWatch. Create an IAM role with a policy similar to this:
{
  "Version": "2012-10-17",
  "Statement": [
    {
      "Sid": "ECSUpdatePermissions",
      "Effect": "Allow",
      "Action": [
        "ecs:UpdateService",
        "ecs:DescribeServices"
      ],
      "Resource": "*"
    },
    {
      "Sid": "CloudWatchLogs",
      "Effect": "Allow",
      "Action": [
        "logs:CreateLogGroup",
        "logs:CreateLogStream",
        "logs:PutLogEvents"
      ],
      "Resource": "*"
    }
  ]
}
How to Create the Role:
1. Open the IAM console.
- Create a new role and select AWS Lambda as the trusted entity.
- Attach the policy above (or combine it with existing policies as needed).
Step 2: Create the Lambda Functions
You will create two Lambda functions — one to stop services and another to start them.
Lambda Function to Stop ECS Services
import os
import json
import boto3
import requests

ecs_client = boto3.client('ecs')
SLACK_WEBHOOK_URL = os.environ.get('SLACK_WEBHOOK_URL')

def notify_slack(message):
    payload = {"text": message}
    try:
        requests.post(SLACK_WEBHOOK_URL, data=json.dumps(payload),
                      headers={'Content-Type': 'application/json'})
    except Exception as e:
        print(f"Slack notification failed: {str(e)}")

def lambda_handler(event, context):
    cluster_name = "your-cluster-name" # Replace with your ECS cluster name
    service_names = ["service-1", "service-2"] # List your ECS service names

    for service in service_names:
        ecs_client.update_service(
            cluster=cluster_name,
            service=service,
            desiredCount=0 # Scale down to zero
        )
    notify_slack("ECS Services have been stopped at 7 PM.")
    return {"status": "ECS Services Stopped"}
Steps to Configure:
1. Go to the AWS Lambda console and create a new function (e.g., StopECSServices).
- Choose “Author from scratch” and select Python as the runtime.
- Assign the IAM role created in Step 1.
- Paste the code above into the inline editor.
- Save and test the function using a test event.
Lambda Function to Start ECS Services
import os
import json
import boto3
import requests

ecs_client = boto3.client('ecs')
SLACK_WEBHOOK_URL = os.environ.get('SLACK_WEBHOOK_URL')

def notify_slack(message):
    payload = {"text": message}
    try:
        requests.post(SLACK_WEBHOOK_URL, data=json.dumps(payload),
                      headers={'Content-Type': 'application/json'})
    except Exception as e:
        print(f"Slack notification failed: {str(e)}")

def lambda_handler(event, context):
    cluster_name = "your-cluster-name" # Replace with your ECS cluster name
    service_names = ["service-1", "service-2"] # List your ECS service names

    for service in service_names:
        ecs_client.update_service(
            cluster=cluster_name,
            service=service,
            desiredCount=0 # Scale down to zero
        )
    notify_slack("ECS Services have been stopped at 7 PM.")
    return {"status": "ECS Services Stopped"}
Steps to Configure:
1. Create another Lambda function (e.g., StartECSServices) using similar steps as above.
- Select Python as the runtime and assign the same IAM role.
- Paste the above code into the function editor.
- Save and test the function to ensure that it correctly scales your services up.
Step 3: Set Up EventBridge Rules
Next, set up two EventBridge rules to trigger your Lambda functions on a schedule.
Creating the Stop Services Rule
Schedule Expression:
- Use a cron expression to trigger at 7 PM (UTC): cron(0 19 * * ? *) (Adjust the cron expression if your business hours are in a different time zone.)
Steps:
- Open the Amazon EventBridge console.
- Create a new rule (e.g., StopECSServicesRule).
- Choose “Schedule” as the rule type and enter the cron expression.
- Under “Select targets,” choose “Lambda function” and select your StopECSServices function.
- Save the rule.
Creating the Start Services Rule
Schedule Expression:
- For 7 AM (UTC): cron(0 7 * * ? *) (Again, adjust based on your local time zone.)
Steps:
1. Create another EventBridge rule (e.g., StartECSServicesRule).
- Set the schedule using the cron expression provided.
- Choose “Lambda function” as the target and select your StartECSServices function. 4.Save the rule.
Testing and Verification
After setting everything up, verify that the automation works correctly:
- Manual Testing: Invoke each Lambda function manually from the console to ensure they update the ECS service configurations appropriately.
- CloudWatch Logs: Monitor the logs for each Lambda function to catch any errors or issues during execution.
- ECS Service Monitoring: Confirm that your ECS services scale down at 7 PM and scale up at 7 AM as per the schedule.
Additional Considerations
- Time Zone Adjustments: EventBridge cron expressions default to UTC. Make sure to convert your local business hours accordingly.
- Error Handling: Enhance the Lambda functions with additional error handling to ensure robust operation, especially if there are intermittent API issues.
- Security Best Practices: Follow the principle of least privilege when setting up IAM roles — grant only the permissions needed for ECS service updates and logging.
- Parameterization: For scalability, consider storing configuration details (like cluster names and service names) in environment variables or AWS Systems Manager Parameter Store.
Conclusion
By combining AWS Lambda with EventBridge — and now enhanced with Slack notifications — you can effectively automate the scaling of your ECS services outside of business hours. This serverless solution not only reduces costs but also ensures that your applications run only when needed, while keeping you informed of every action.
With the detailed steps above — from setting up IAM roles to integrating Slack notifications — you now have a comprehensive guide to implementing a robust automation strategy for your ECS cluster. If you have any questions or run into issues, feel free to leave a comment. Happy automating!
Thanks for reading!!!!!👨🏿💻🚀☁️😎
Happy Clouding!!!
You can follow me on LinkedIn
Thank you for being a part of the community
Before you go:
- Be sure to clap and follow the writer ️👏 ️️
- Follow us: X | LinkedIn | YouTube | Newsletter | Podcast | Differ
- Check out CoFeed, the smart way to stay up-to-date with the latest in tech 🧪
- Start your own free AI-powered blog on Differ 🚀
- Join our content creators community on Discord 🧑🏻💻
- For more content, visit plainenglish.io + stackademic.com

Top comments (0)