
Passwordless authentication using a blockchain wallet strengthens application security by eliminating risky password management practices. It also improves user experience by eliminating the need for passwords. This tutorial teaches you how to implement a one-click, cryptographically secure login flow using MetaMask, with all user data stored in a Fauna database.
Pre-requisites:
- Some familiarity with MetaMask wallet
- Familiarity with React.js/Next.js
Solution overview
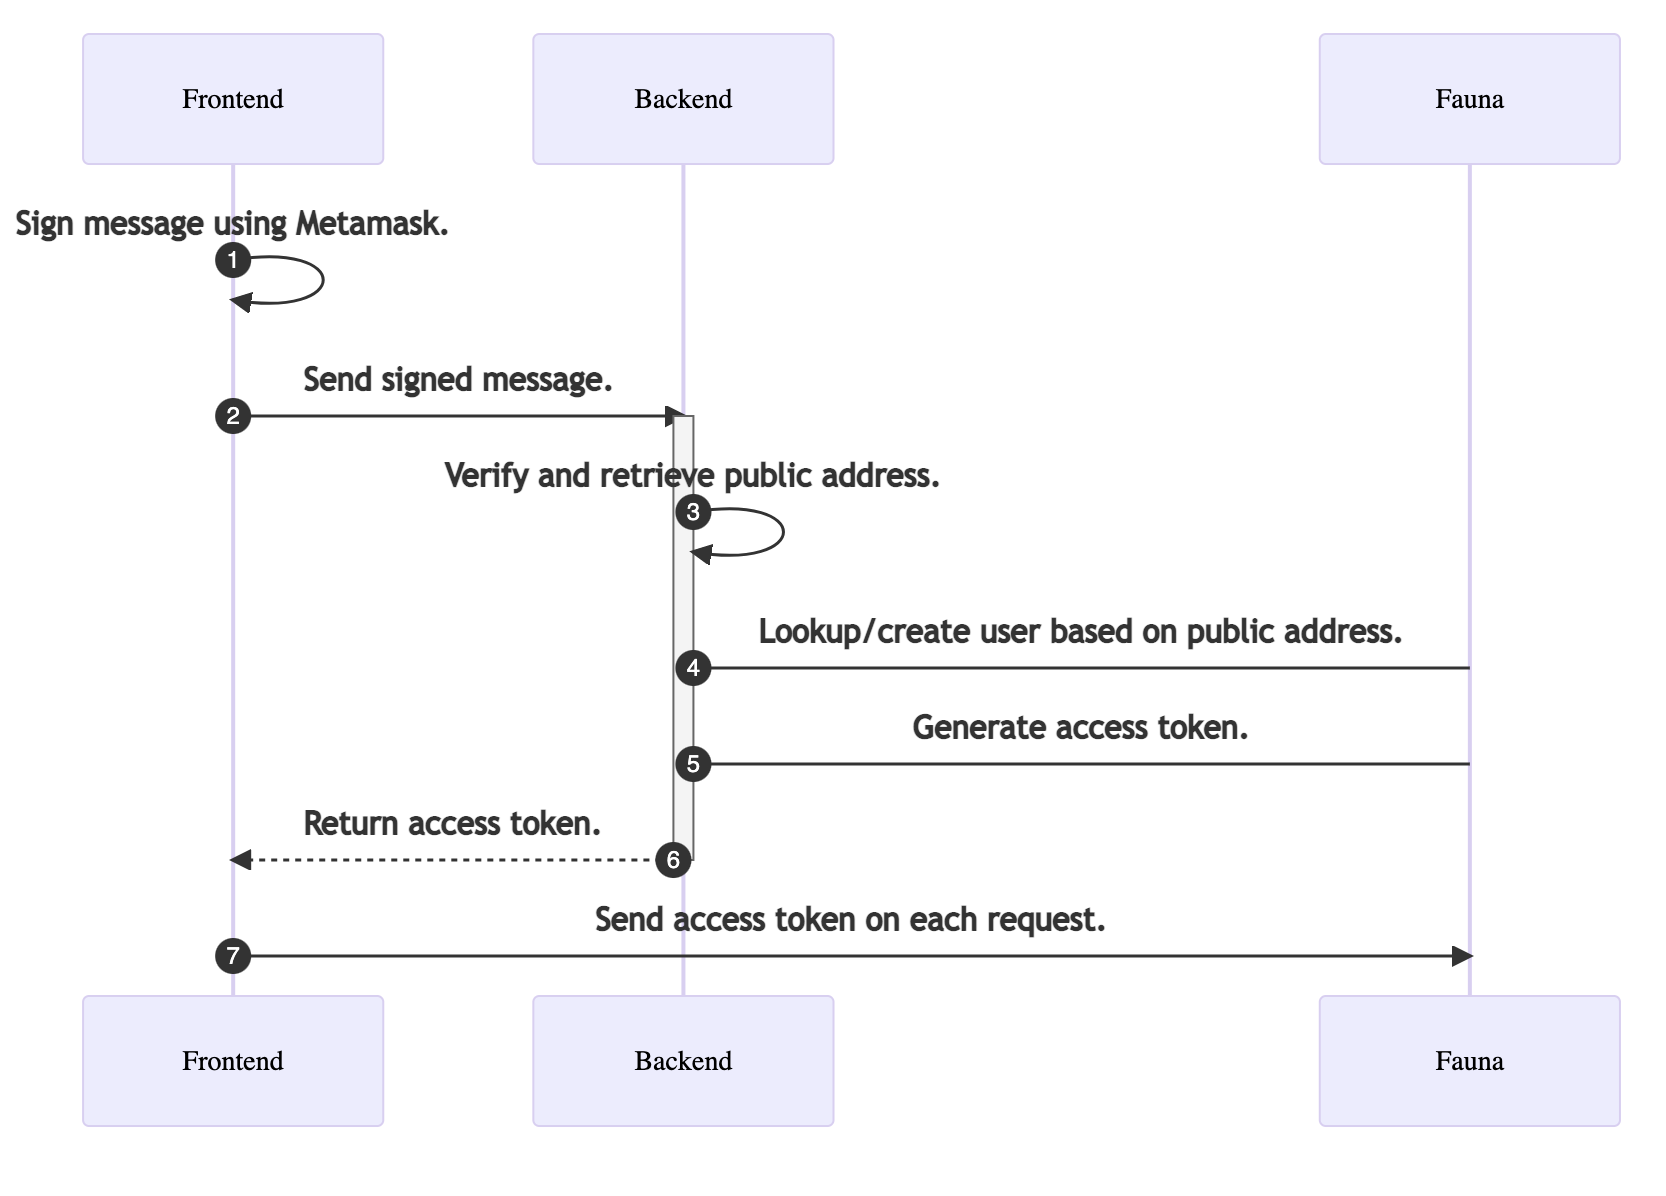
The following is a complete overview of the authentication steps.
- The front-end app generates a signature (signed message) using the web3 library and MetaMask wallet.
- The signed message is sent to the backend, in this case, a serverless function.
- The backend code verifies and retrieves the wallet’s public address.
- The backend tries to find a user in Fauna based on the public address. If the user does not exist, it creates a new user.
- The backend app then generates an access token from Fauna based on the user’s id.
- The backend returns the access token to the front end.
- The front end uses the access token to interact with other resources in Fauna.
The following sequence diagram can help you better understand the flow.
Create a new application
To get started, create a new Next.js application from the example template by running the following command.
npx create-next-app \
  --example https://github.com/fauna-labs/nextjs-metamask-auth \
  --use-npm
Next, make sure you have the MetaMask wallet plugin installed in your browser.
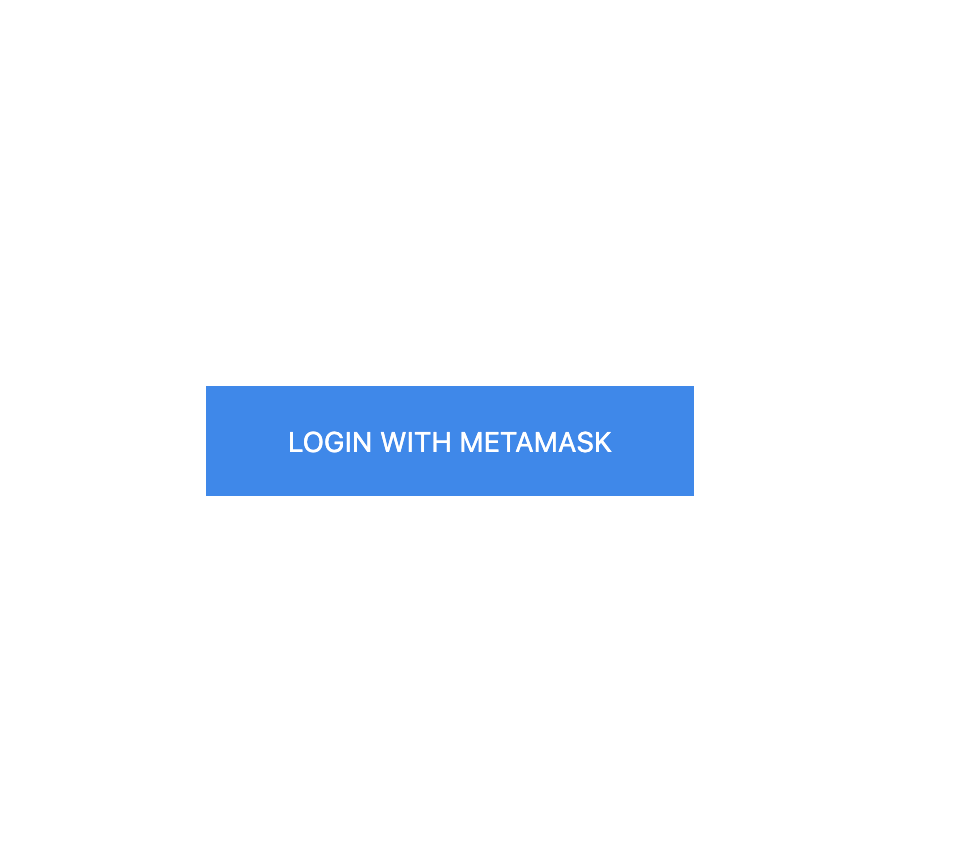
The example app gives you a template to start with, so you don’t have to write everything from scratch. Open the pages/index file and notice that in the code, there is a button with the label login with MetaMask. When a user selects this button, the login function runs.
// pages/index.js
...

export default function Home() {

  ...

  const login = async () => {
    const web3 = new Web3(window.ethereum);
    try {
      const accounts = await window.ethereum.send(
        "eth_requestAccounts"
      )
      console.log('accounts', accounts.result[0]);
      const address = accounts.result[0];
      const signed_msg = await Web3Token.sign(msg => web3.eth.personal.sign(msg, address), '1h');
      const response = await fetch('api/user', {
        method: 'POST',
        body: JSON.stringify({
          signed_msg
        }),
      });

      if(response.status !== 200) {
        console.log('API Error/Invalid Fauna Secret')
        return;
      }

      const { token } = await response.json();
      const one_hour = new Date(new Date().getTime() +  3600 * 1000) // sign token for 1 hour
      Cookies.set('fauna-auth', token, { expires: one_hour })
      setLoggedin(true)
    } catch (error) {
      alert('Please Install MetaMask Wallet')
      return;
    }
  }

  return (
    <>
    ...
      <button
        className="uk-button uk-button-primary uk-button-large"
        onClick={login}
      >
        Login with MetaMask
      </button>
    ...
    </>
  )
}
The login function starts by instantiating a new Web3 instance. You can get all the accounts associated with the wallet by calling the following function.
window.ethereum.send("eth_requestAccounts")
You then get the public address from the account and use the public address to generate a signed message using the Web3Token.sign function. Signer messages are unique to each MetaMask account. Using a signer message, you can recover the signing account’s public address. To learn more, visit the web3 documentation .
You send this signer message to your backend with an API call. The backend decodes this message and retrieves the wallet’s public address from it. The backend then searches for a user with that public address in the database and returns the user.
Configuring the backend
In this tutorial, the backend is a serverless function that lives in the pages/api directory of your Next.js application. When you deploy your Next.js application to Vercel , the functions in the directory become a serverless function.
You can also use other alternatives for your backend, such as an AWS lambda function, a traditional express server, or a Netlify function. The code should be similar.
Open up the pages/api/user.js file. The handler function runs when you make an API call from your front-end to the API endpoint. Review the code for the handler function.
// pages/api/user.js
...

export default async function handler(req, res) {
  const {signed_msg} = JSON.parse(req.body);
  const { address, body } = await Web3Token.verify(signed_msg);

  console.log('Public Address Retrieved', address);

  try {
    // Find user
    ...
  } catch (error) {
    // If user not found in database create a new user
    ...
  }

}

...
In the previous code block, you retrieve the signed message from the request body. You then decode the public address from the signed message. At this point, the database is not configured. However, you can see the retrieved public address in your backend log when you run the application.
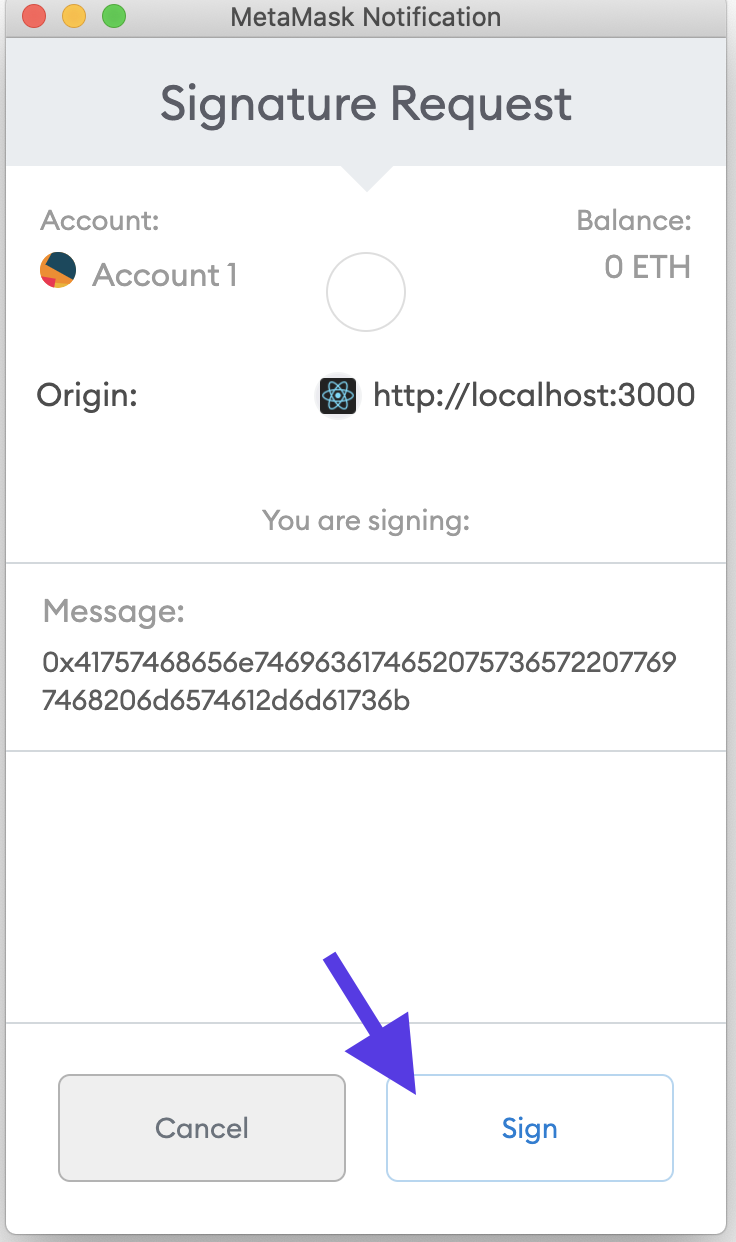
Run the application with npm run dev. Navigate to localhost:3000 and choose the Login With MetaMask button.
Select your account and choose Sign when prompted by your browser.
Observe the logs in your terminal. Notice the public address is retrieved.
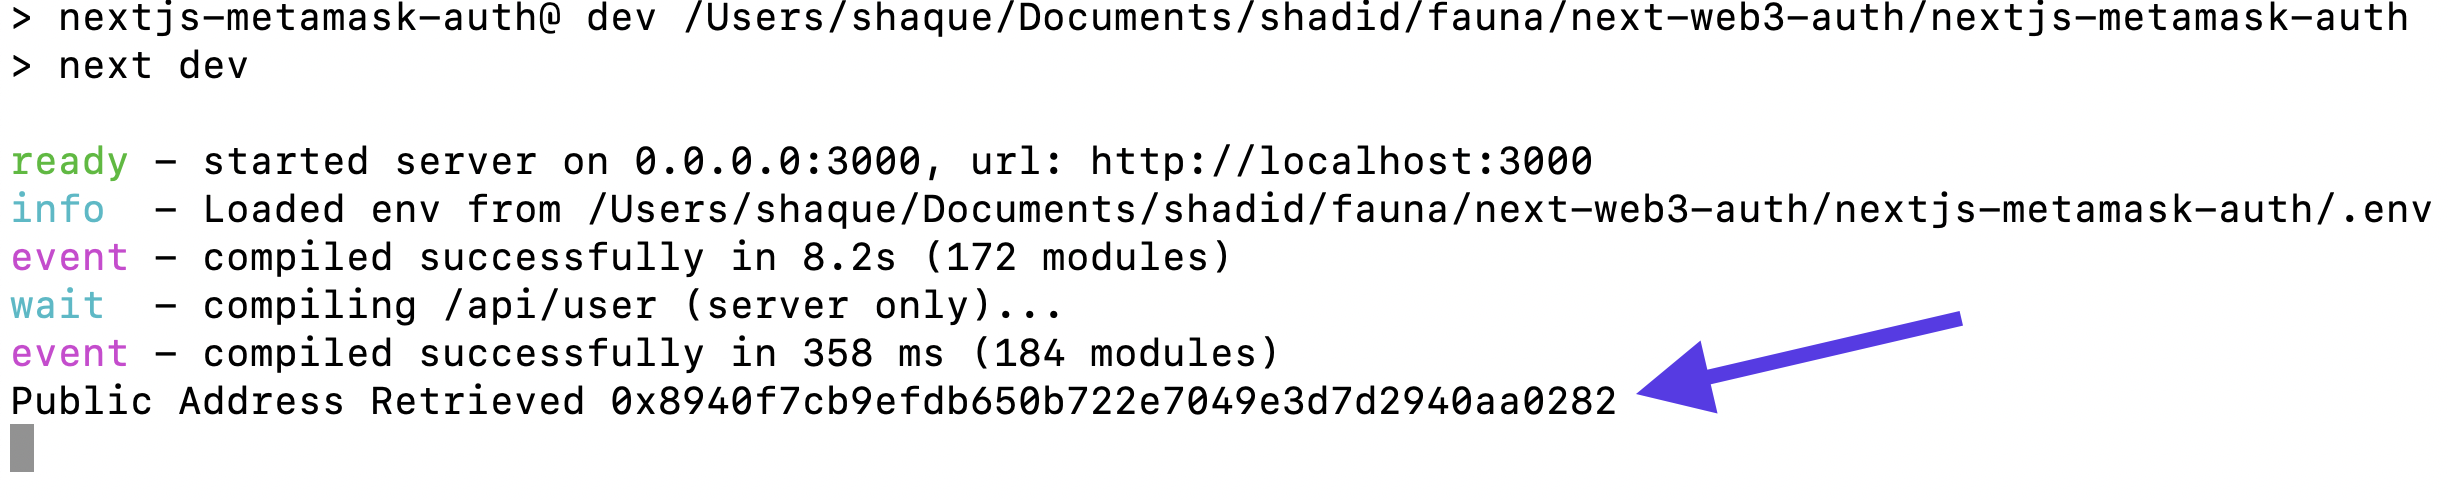
A wallet’s public address is unique to each user and it is safe to share the wallet's public address with others, making it appropriate to store in the database and use as a unique identifier for a user.
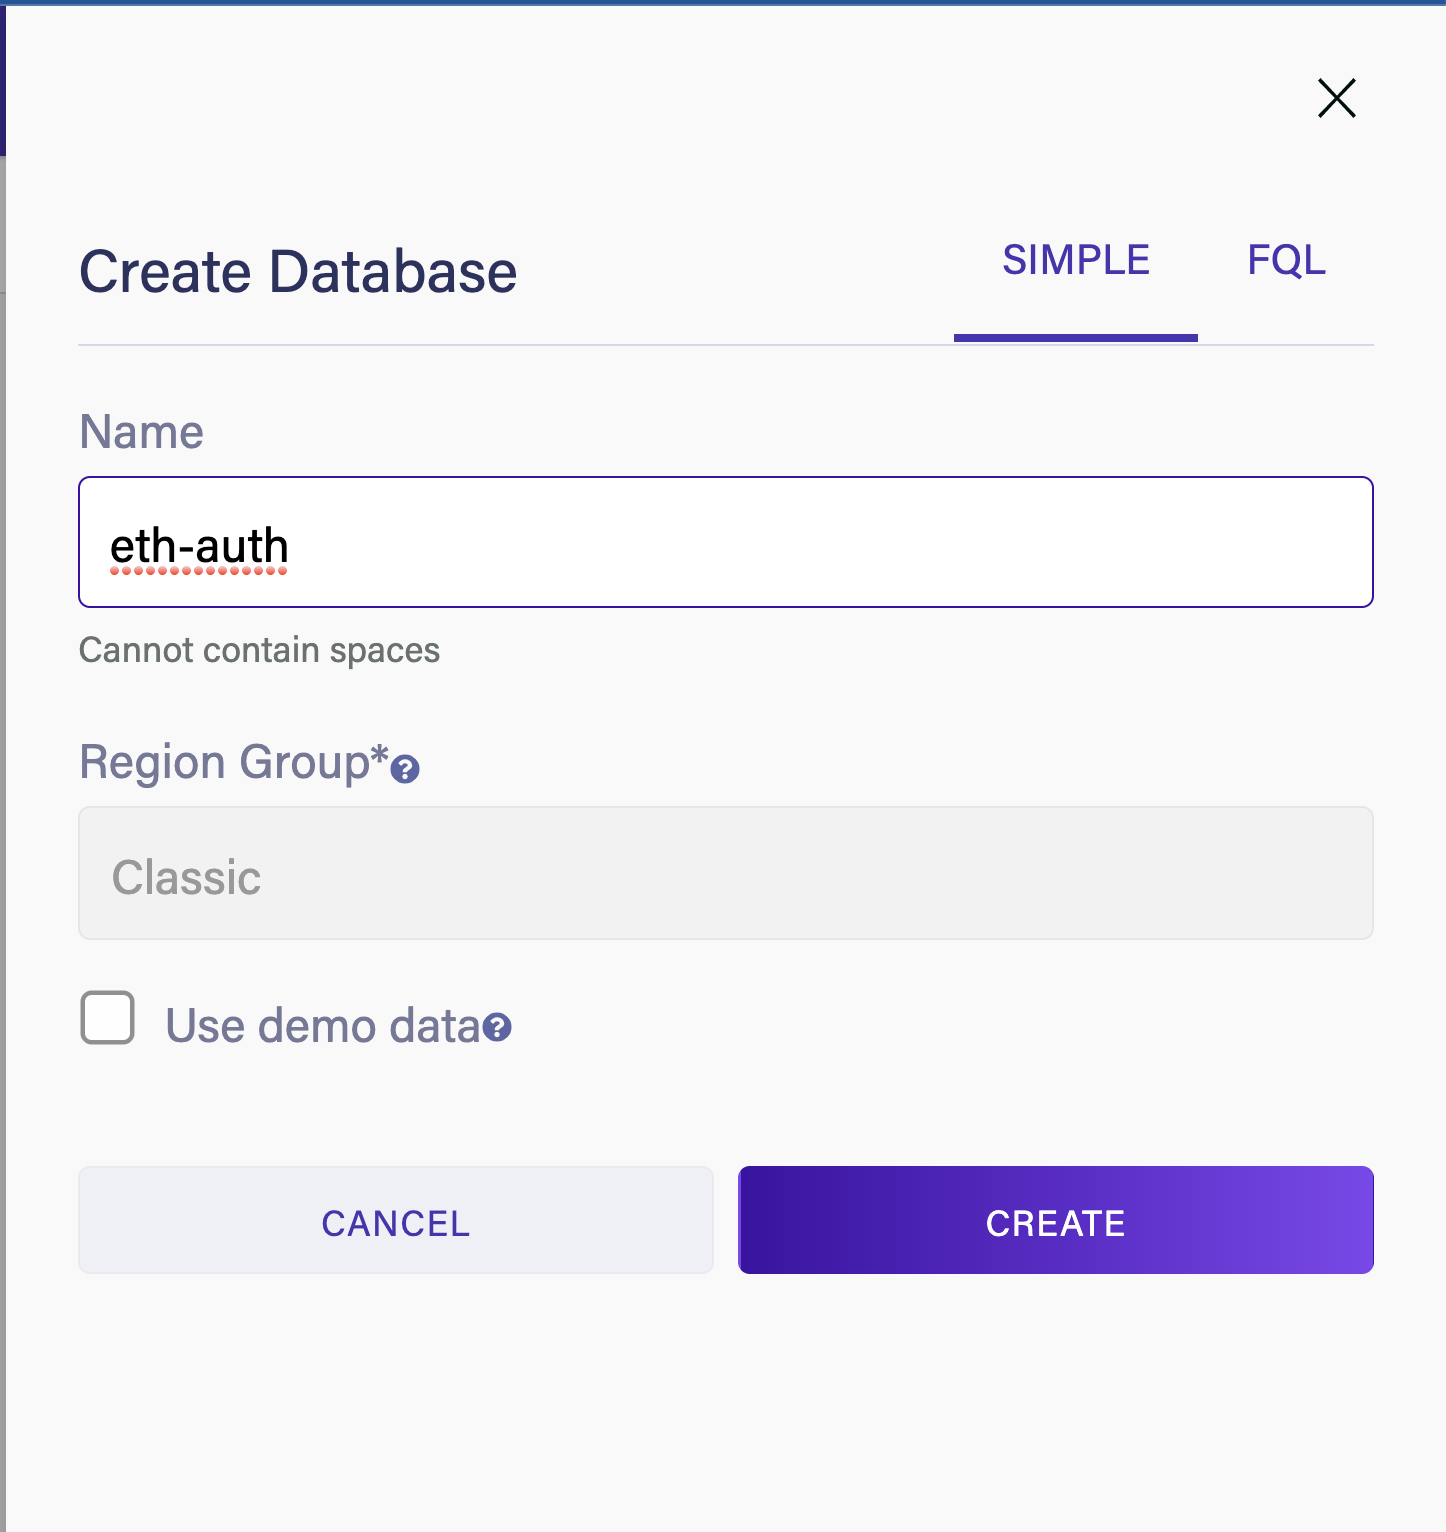
Configure a database in Fauna
Navigate to Fauna in your browser and create a new database. Give your database a name, and choose the /Classic/ Region Group for this demo application.
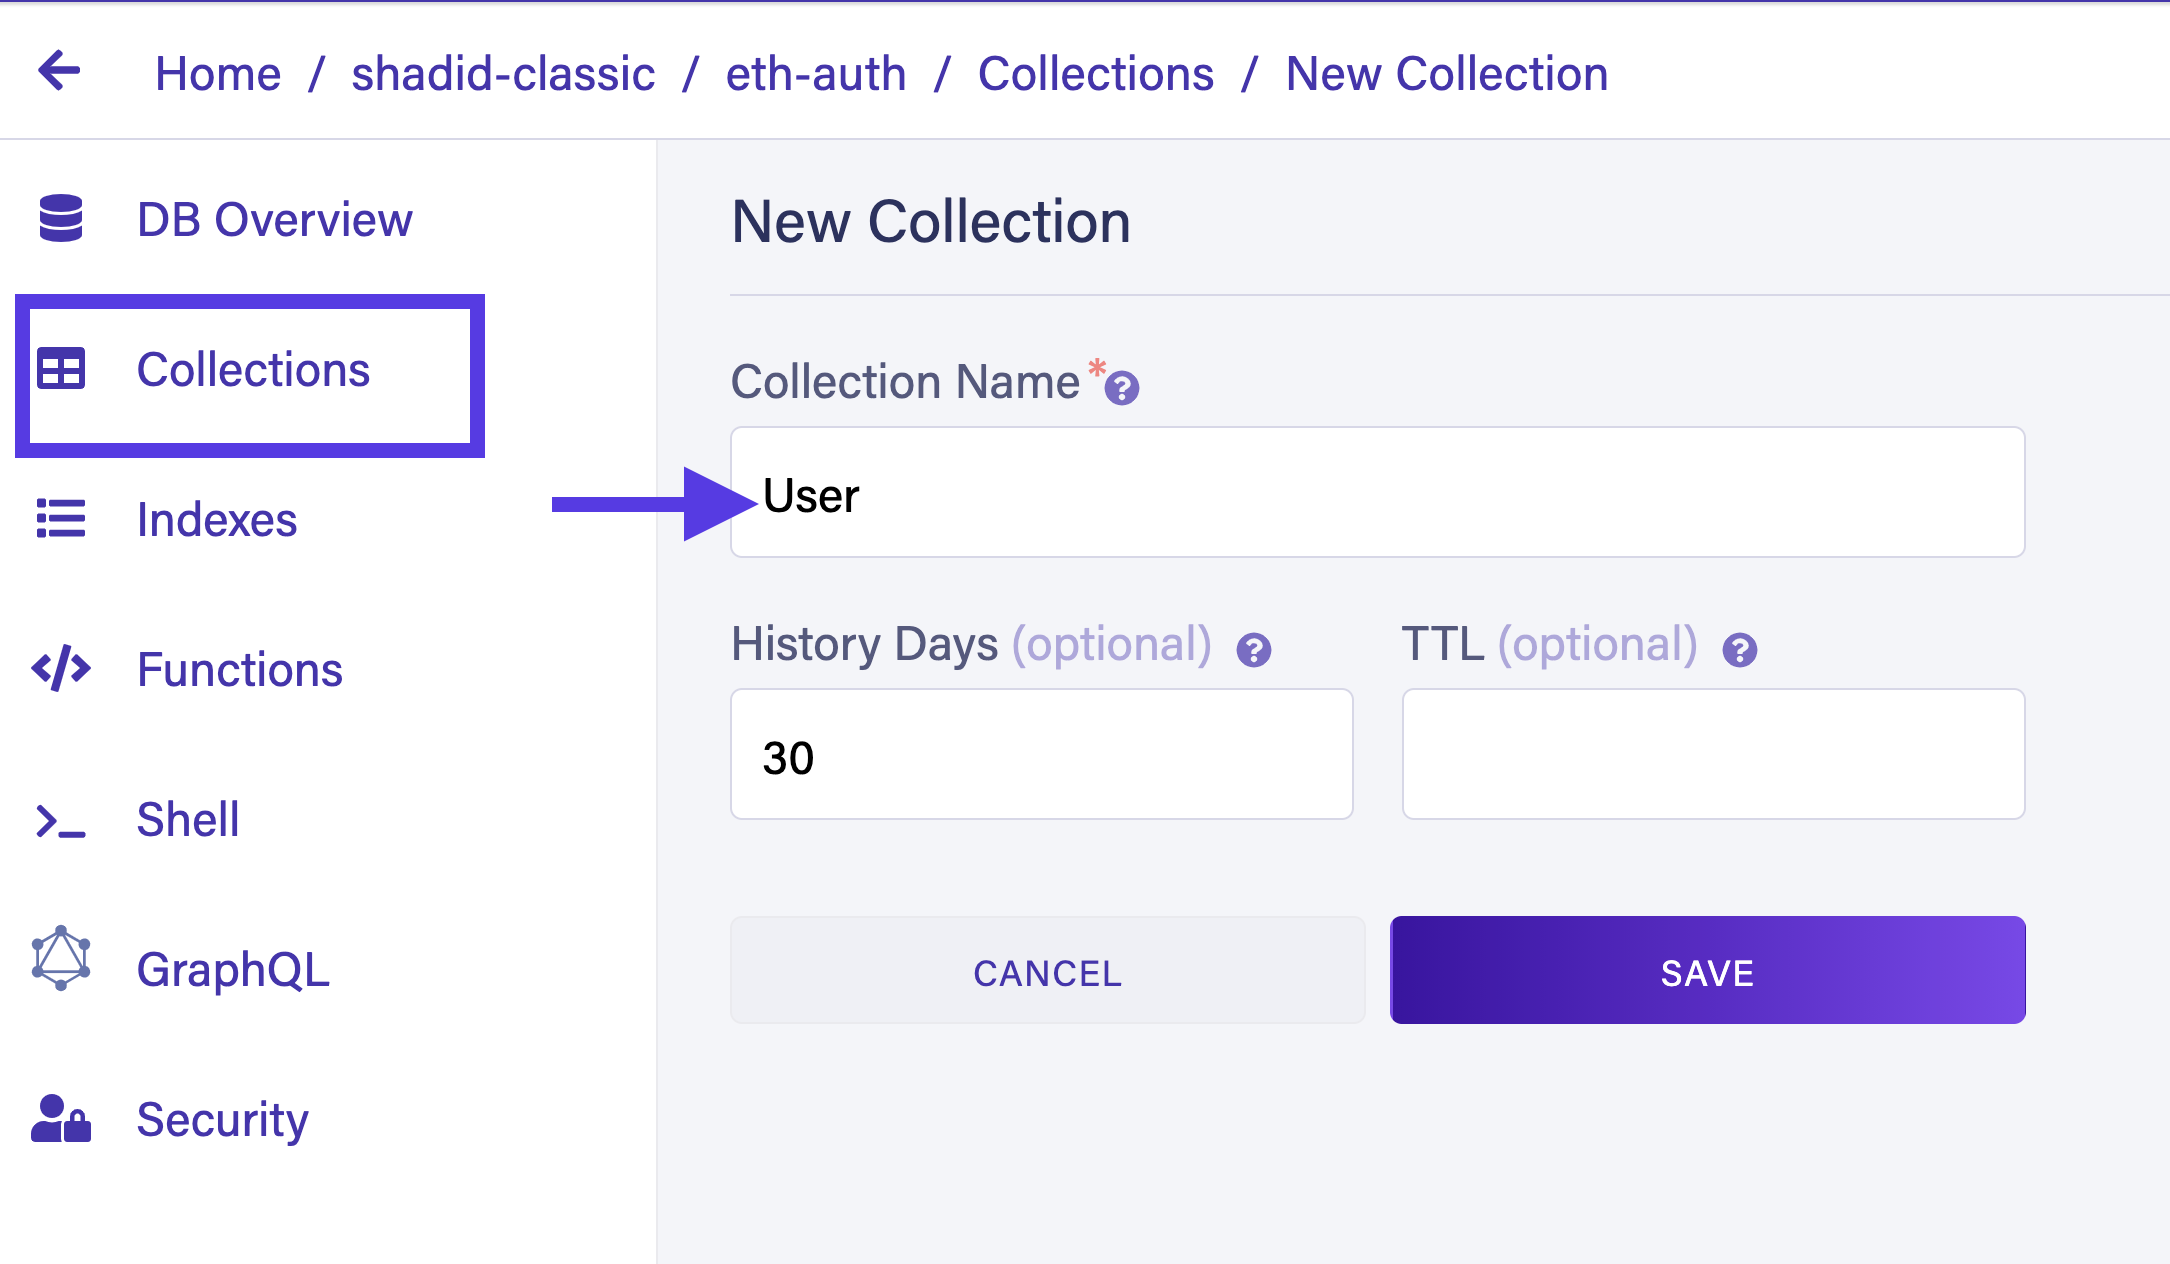
Choose New Collection to create a new collection called User.
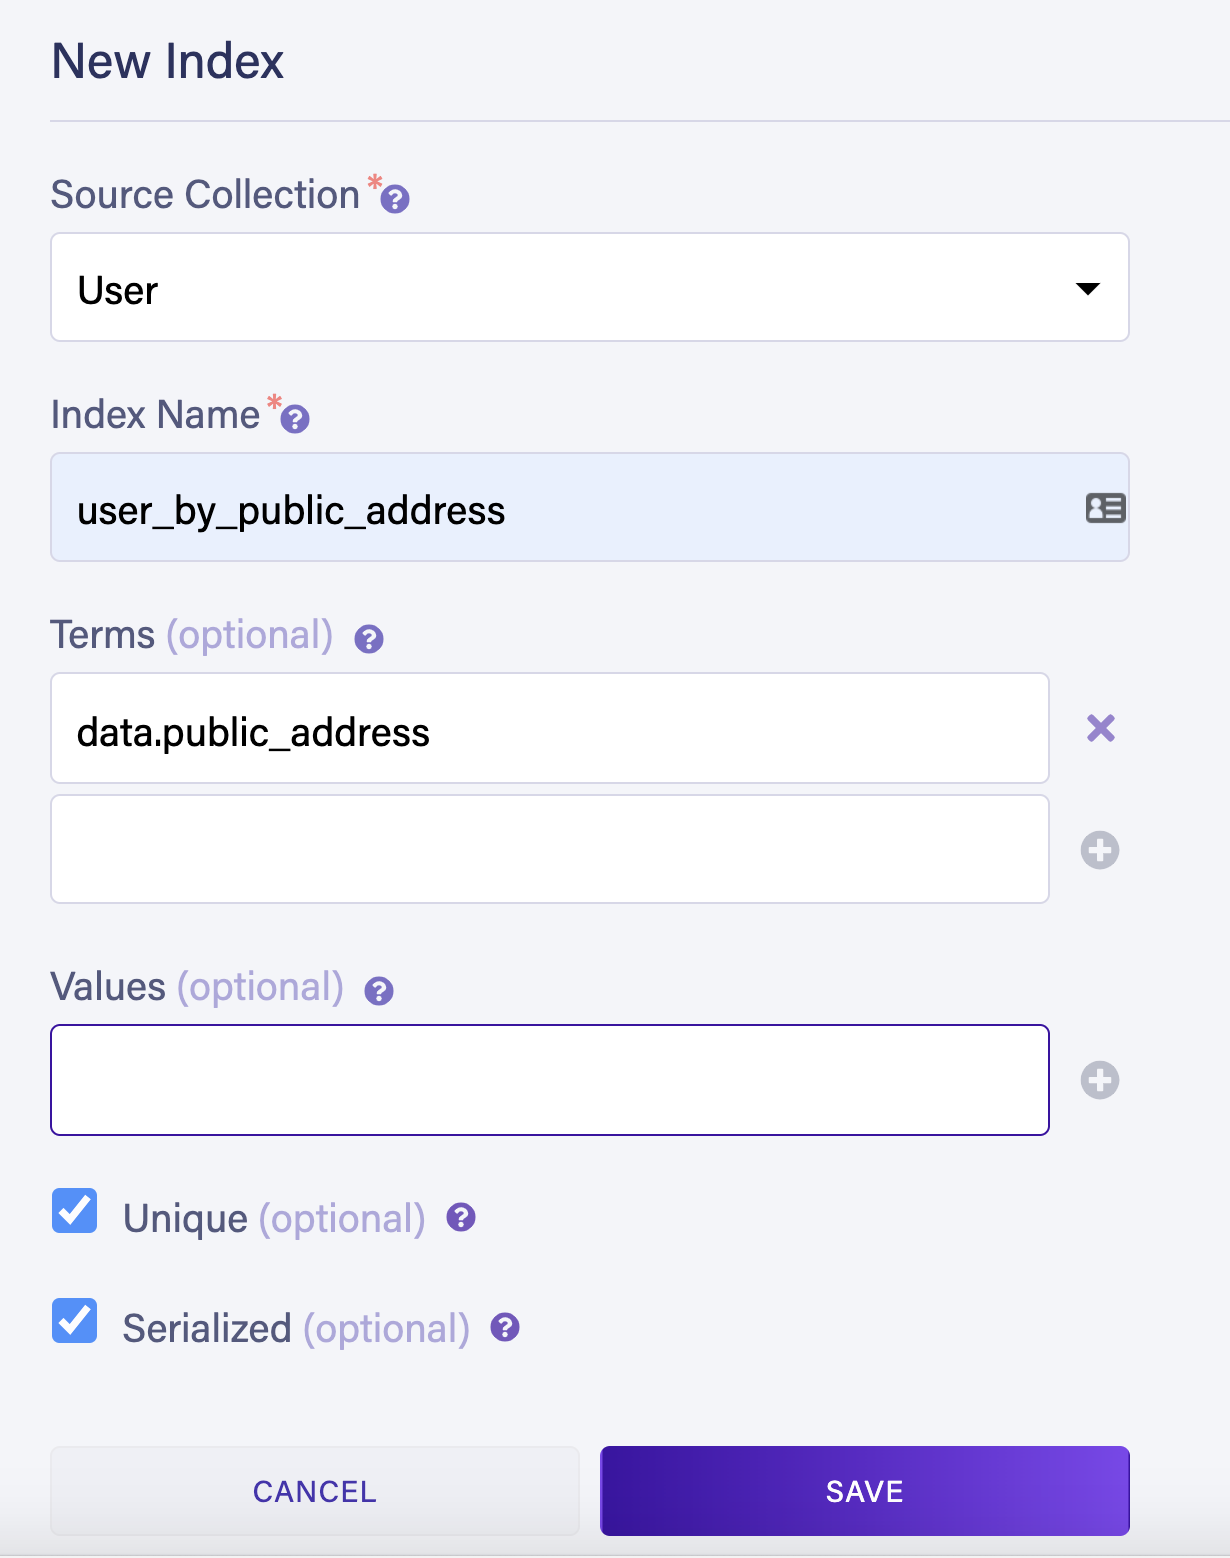
Next, create an index to find users by their wallet’s public address. Navigate to Indexes > New Index, select User as your source collection, and name your index user_by_public_address. In the terms field, specify data.public_address. Select the Unique option to ensure each user has their own unique public address and choose Save to create the index.
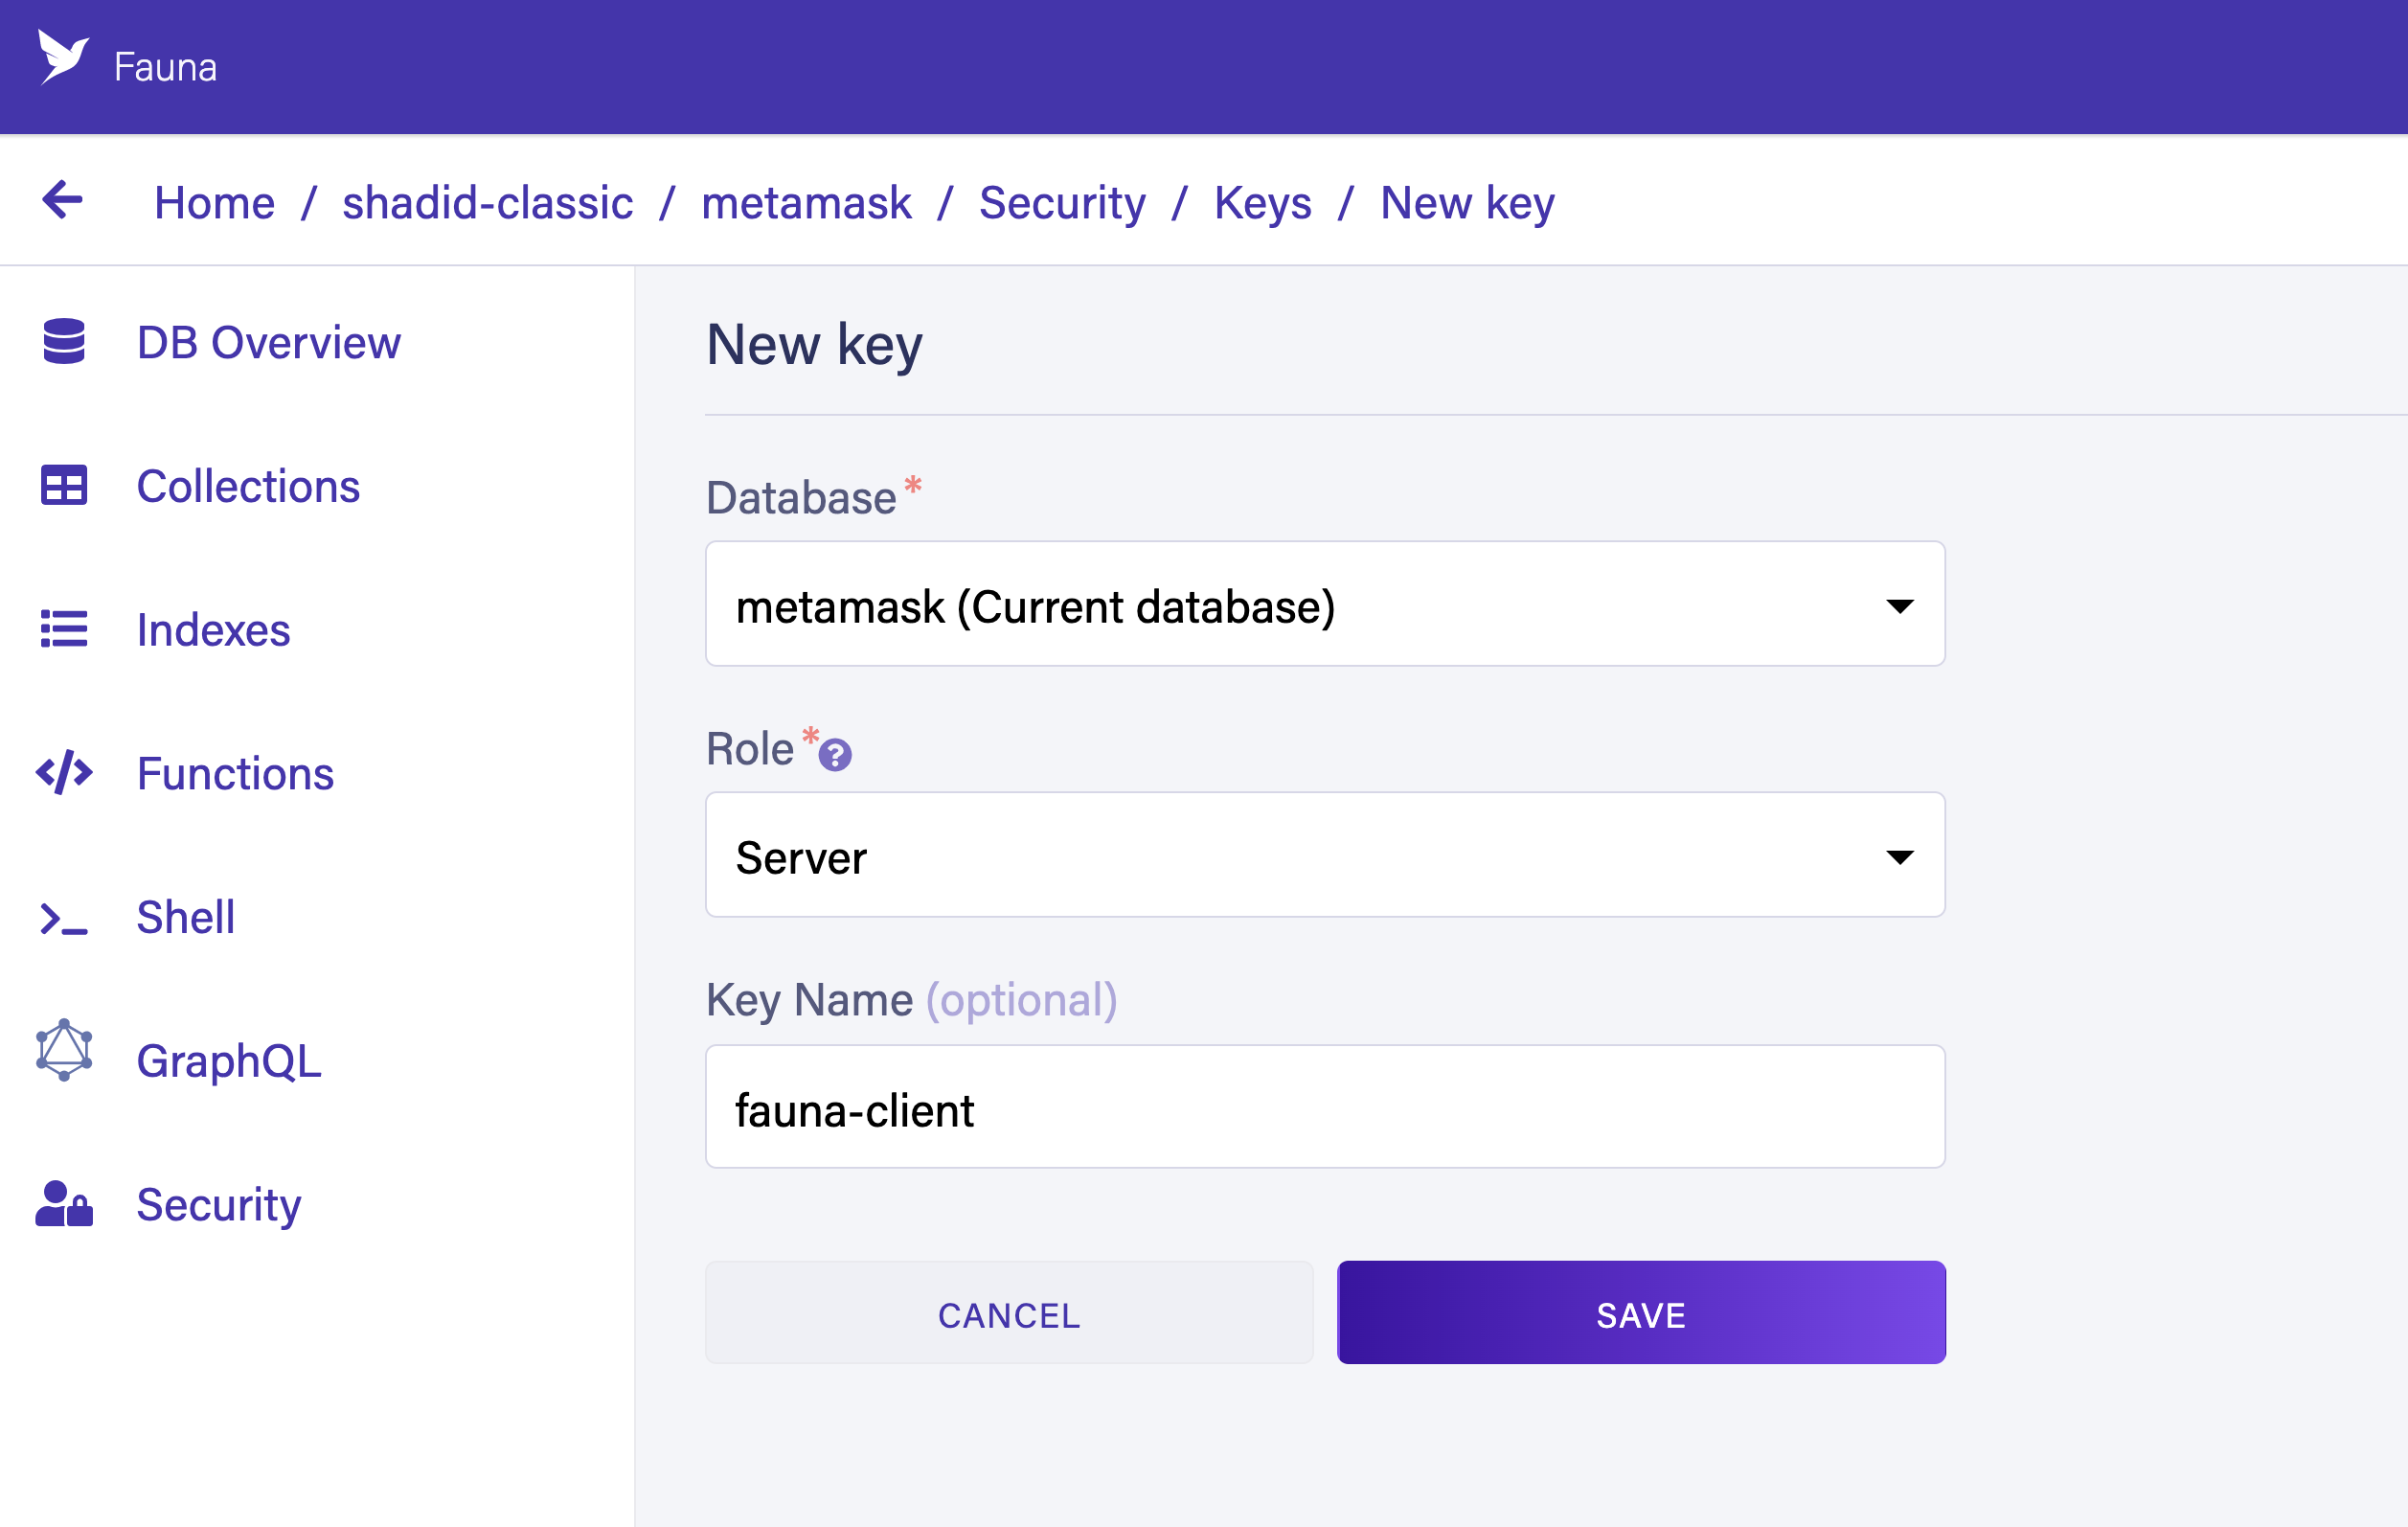
Next, generate a new server key in Fauna. Navigate to S*ecurity > Keys > New Key*. Ensure that you select Server in the Role dropdown. Give your key a name and choose Save. The backend uses this secret key to find users and generate access tokens.
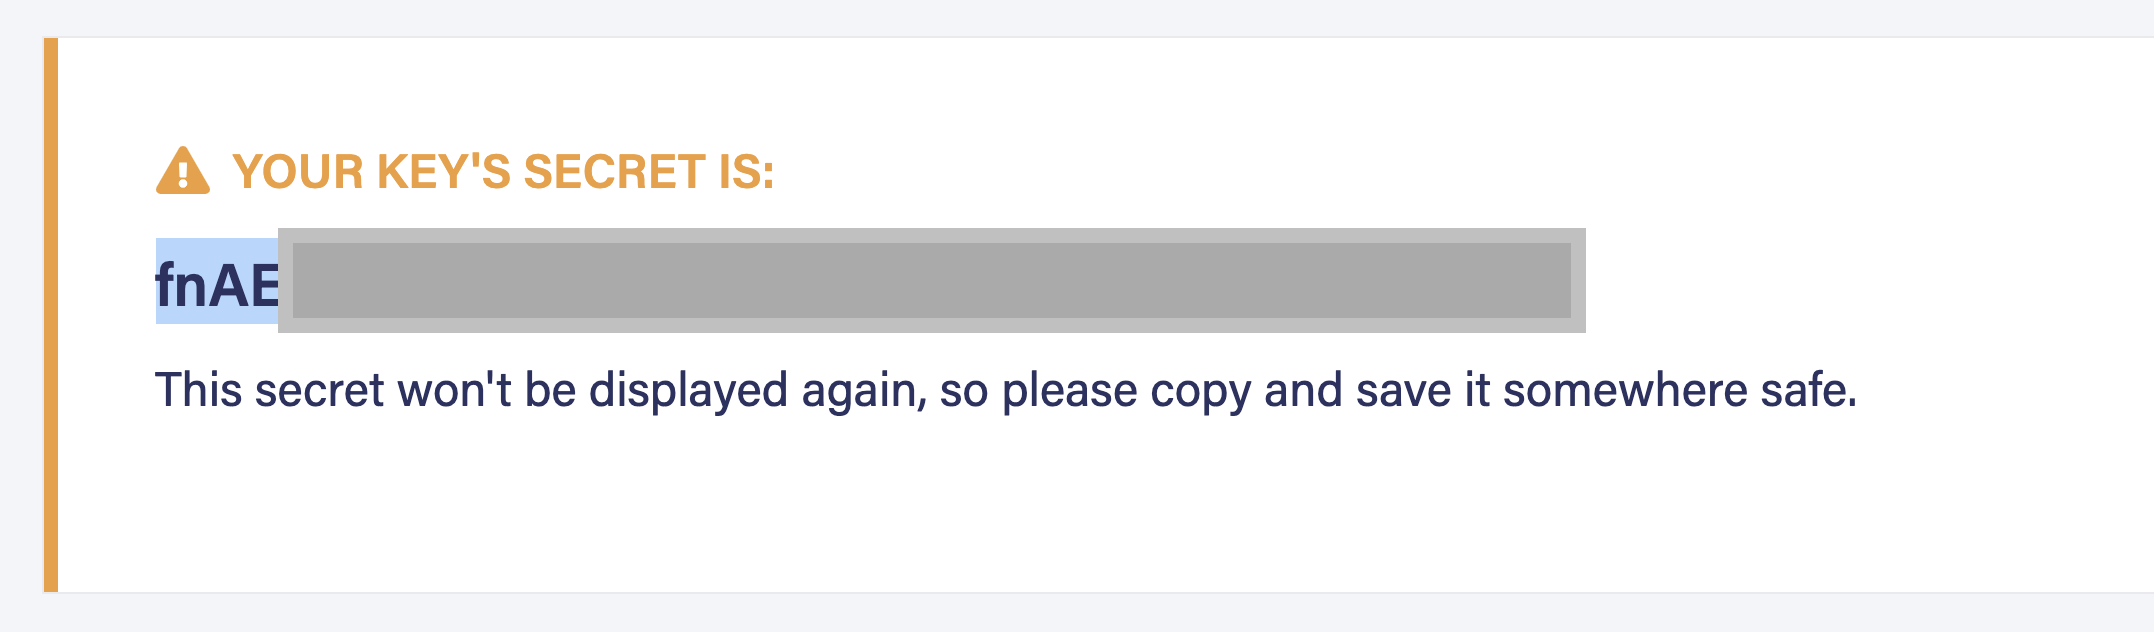
Copy the generated key to save as a new environment variable in your Next.js application. Create a file .env.local at the root of your project. The secret from .env.local is used for local development. Add the following code to your .env.local file. Replace fnAxxx.... with your generated secret.
FAUNA_SECRET=fnAxxx....
ℹ️ This file is added to your .gitignore by default. Be careful not to commit this file to your repository or expose the contents of this file!
📘 When you deploy your application to Vercel you add the production environment variables in Vercel. Follow this documentation to add your environment variable in Vercel.
Navigate back to pages/api/user.js file and review the code.
// pages/api/user.js
...
export default async function handler(req, res) {
  ...
  try {
    // Find user
    const user = await serverClient.query(
      Get(
        Match(Index('user_by_public_address'), address)
      )
    )
    const accessToken = await createAccessToken(user.ref.id, 3600);
    res.status(200).json({ token: accessToken.secret });

  } catch (error) {
    // If user not found in database create a new user
    ...
  }

}

// Generate an access Token For Fauna
const createAccessToken = (ref, ttl) => {
  return serverClient.query(
    Create(Tokens(), {
      instance: Ref(Collection("User"), ref),
      data: {
        type: "access"
      },
      ttl: TimeAdd(Now(), ttl, "seconds"),
    })
  );
};
First, you try to find a user in the database using the Get and Match functions from the Fauna JavaScript driver to search the user_by_public_address index. If a user is found, you use the user reference and generate a new access token for that user by calling the createAccessToken function.
This access token is then sent back to the frontend. As long as the access token is valid (not expired), the user remains authenticated to the front end. In the frontend, you use this access token to interact with other Fauna resources.
To learn more about how authentication tokens work in Fauna follow this article .
In the catch block of your login function, you check whether the user was not in the database. The following code block demonstrates this.
// pages/api/user.js

export default async function handler(req, res) {
  const {signed_msg} = JSON.parse(req.body);
  const { address, body } = await Web3Token.verify(signed_msg);
  console.log('Public Address Retrieved', address);

  try {
    // Find user
    ...
  } catch (error) {
    // If user not found in database create a new user
    if(error.name === 'NotFound') {
      const newUser = await registerUser(address)
      const accessToken = await createAccessToken(newUser.ref.id, 3600);
      return res.status(200).json({ token: accessToken.secret });
    }

    // authentication error
    if (error.name === 'Unauthorized') {
      return res.status(401).json({ message: 'Invalid Fauna Secret or Token' });
    }
  }
}

// Registers a new User in FaunaDB
const registerUser = (public_address) => {
  return serverClient.query(
      Create(
        Collection('User'),
        { data: { public_address } },
      )
  );
};
If the user is not in the database, you register a new user. The registerUser function registers a new user based on the wallet’s public address. Once the user is registered, you generate the access token for that user using the user reference and createAccessToken function.
Encapsulating logic with user-defined functions (UDFs)
You can also accomplish this logic in a single transaction in Fauna using a user-defined function (UDF). The following code snippet is an example.
Query(
  Lambda(
    ["public_address", "ttl"],
    Let(
      {
        user_set: Match(Index("user_by_public_address"), Var("public_address")),
        user: If(
          Exists(Var("user_set")),
          Get(Var("user_set")),
          Create(Collection("User"), {
            data: { public_address: Var("public_address") }
          })
        ),
        token: Create(Tokens(), {
          instance: Select(["ref"], Var("user")),
          data: { type: "access" },
          ttl: TimeAdd(Now(), Var("ttl"), "seconds")
        })
      },
      { user: Var("user"), access_token: Var("token") }
    )
  )
)
Restart the application and run it again with the npm run dev command. Navigate to localhost:3000 in your browser.
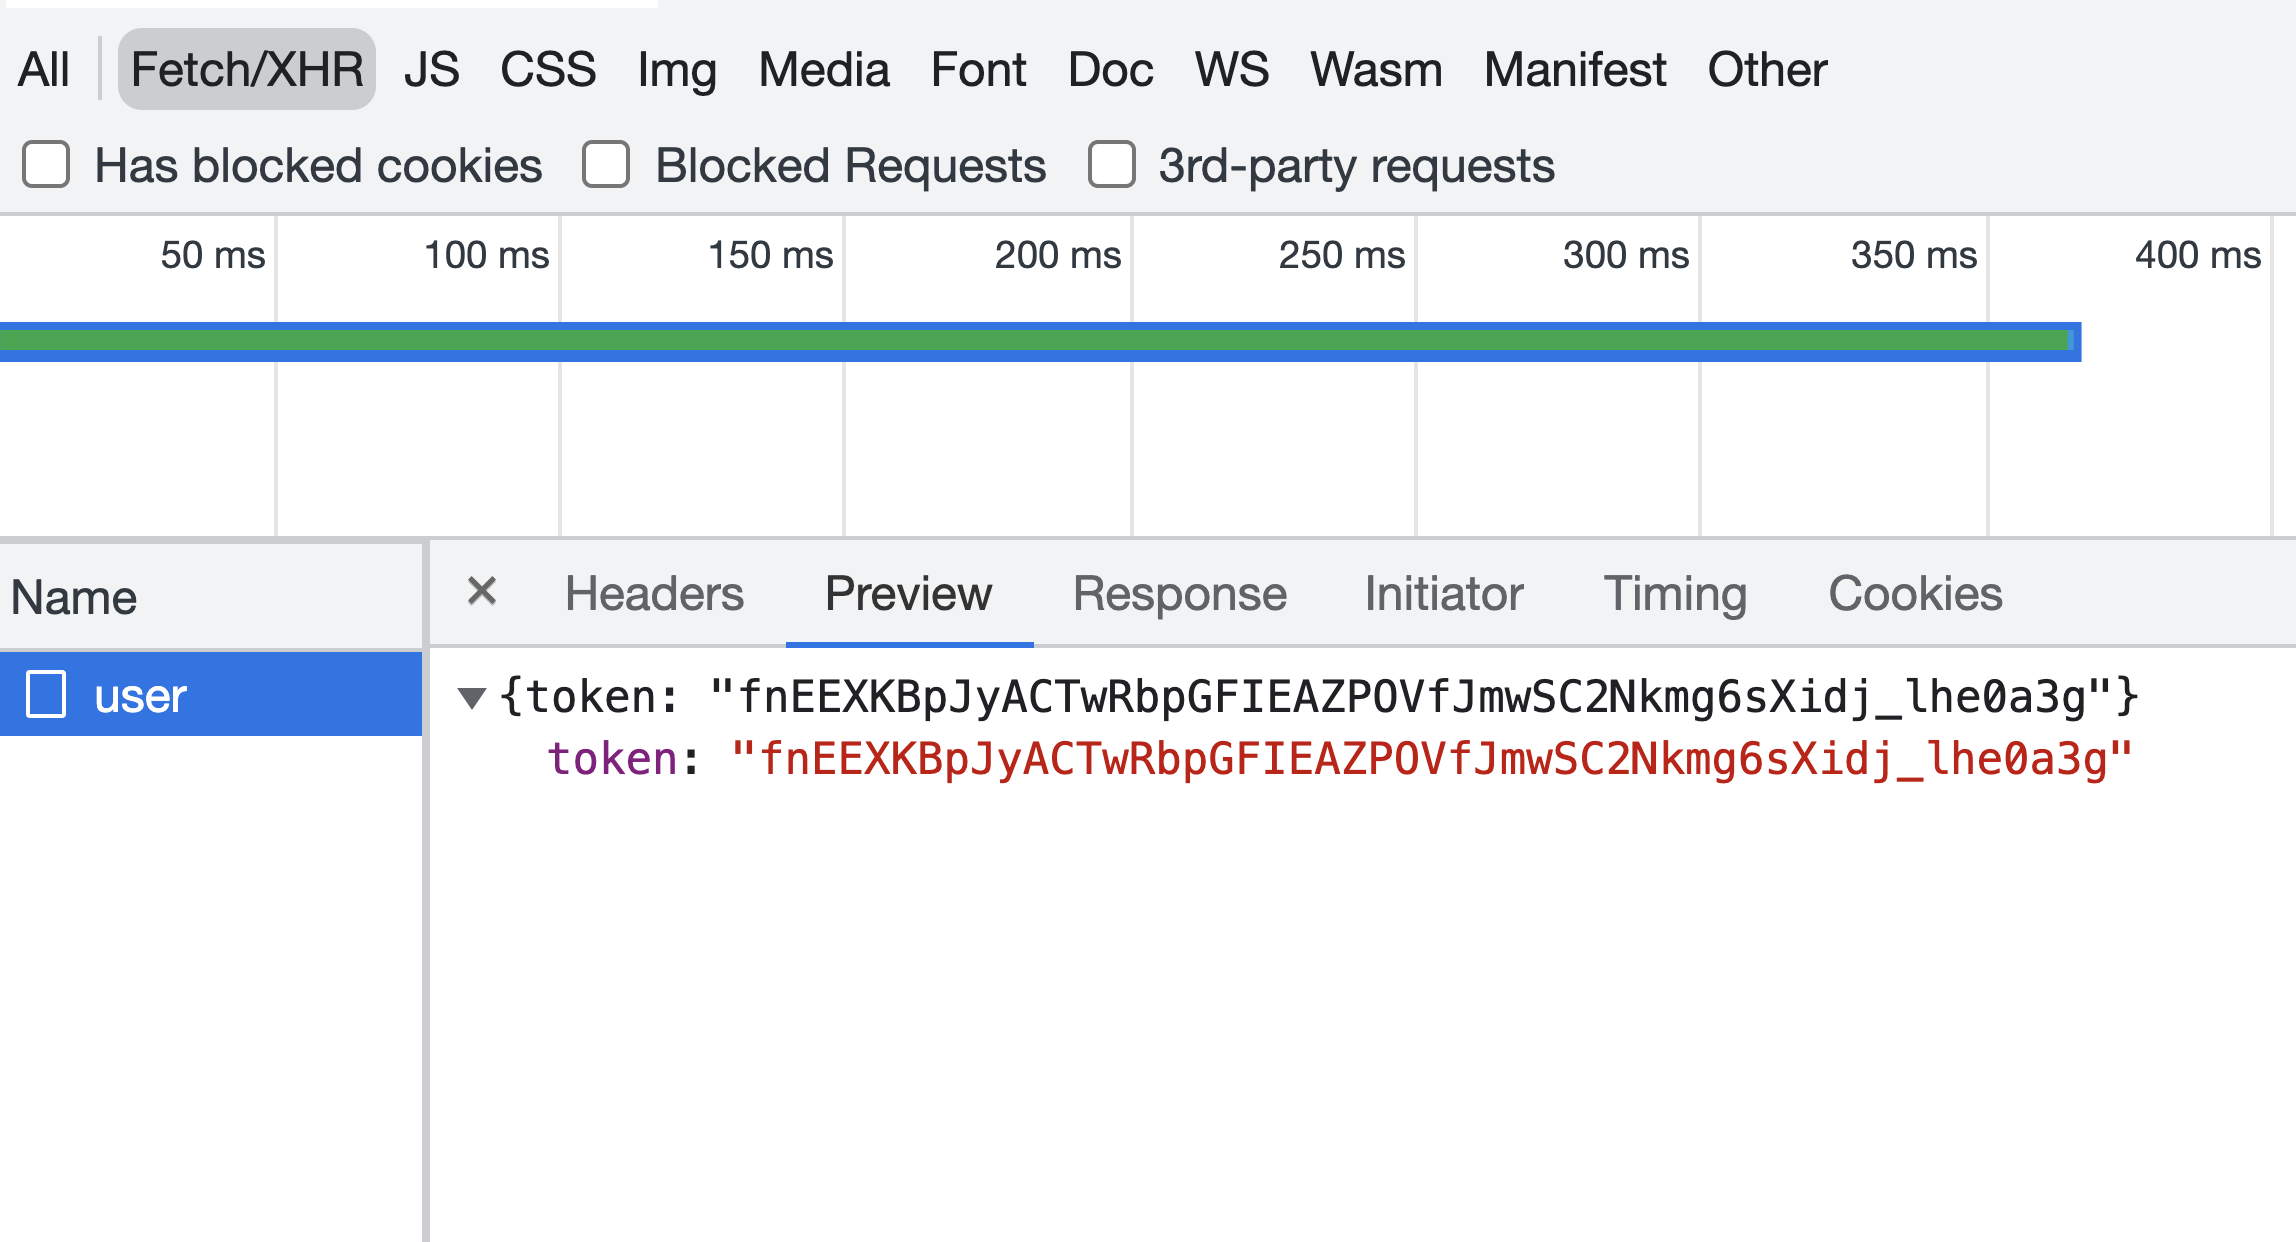
Open the Network tab in your browser’s developer tools. Notice the backend now returns a token. You save this token in your local storage or cookies and use the token to interact with Fauna resources directly from your frontend application.
Open the pages/index.js file and review the login function in the following code snippet.
// pages/index.js
...
const login = async () => {
    const web3 = new Web3(window.ethereum);
    try {
      const accounts = await window.ethereum.send(
        "eth_requestAccounts"
      )
      console.log('accounts', accounts.result[0]);
      const address = accounts.result[0];
      const signed_msg = await Web3Token.sign(msg => web3.eth.personal.sign(msg, address), '1h');
      const response = await fetch('api/user', {
        method: 'POST',
        body: JSON.stringify({
          signed_msg
        }),
      });

      if(response.status !== 200) {
        return;
      }

      const { token } = await response.json();
      const one_hour = new Date(new Date().getTime() +  3600 * 1000) // sign token for 1 hour
      Cookies.set('fauna-auth', token, { expires: one_hour })
      setLoggedin(true)
    } catch (error) {
      alert('Please Install MetaMask Wallet')
      return;
    }
}
When you successfully receive a token, you store the token in your browser cookies. You also set the login state to true. A Query Data button and Logout button appear on the screen when the component is in the logged-in state.
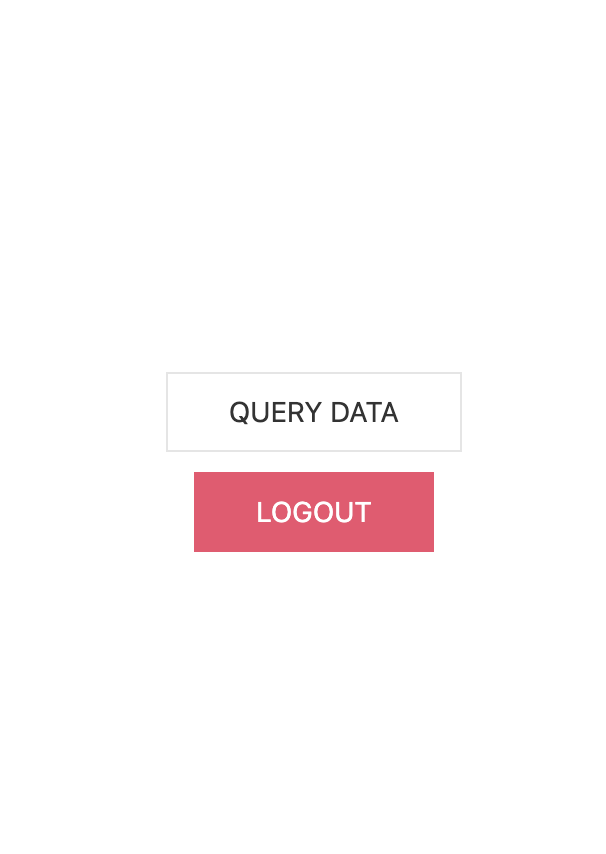
When you select the Query Data button, it will query a collection in Fauna using the access token. In the starter code when the Query Data button is selected it tries to query a collection called Movie from your Fauna database. Because this resource doesn’t exist in your database yet, you receive an error.
Query Fauna resources
To fix this error, return to the Fauna dashboard and choose Collections > New Collection. Create a new collection called Movie then add some movies to your collection by running the following command in the Fauna shell.
Map(
  [
    {title: "The Hateful Eight", director: "Quentin Tarantino", release: "December 25, 2015"},
    {title: "Once Upon a Time in Hollywood", director: "Quentin Tarantino", release: "July 26, 2019"},
    {title: "Reservoir Dogs", director: "Quentin Tarantino", release: "Jan 21, 1992"}
  ],
  Lambda(
    "movie",
    Create(Collection("Movie"), { data: Var("movie") })
  )
)
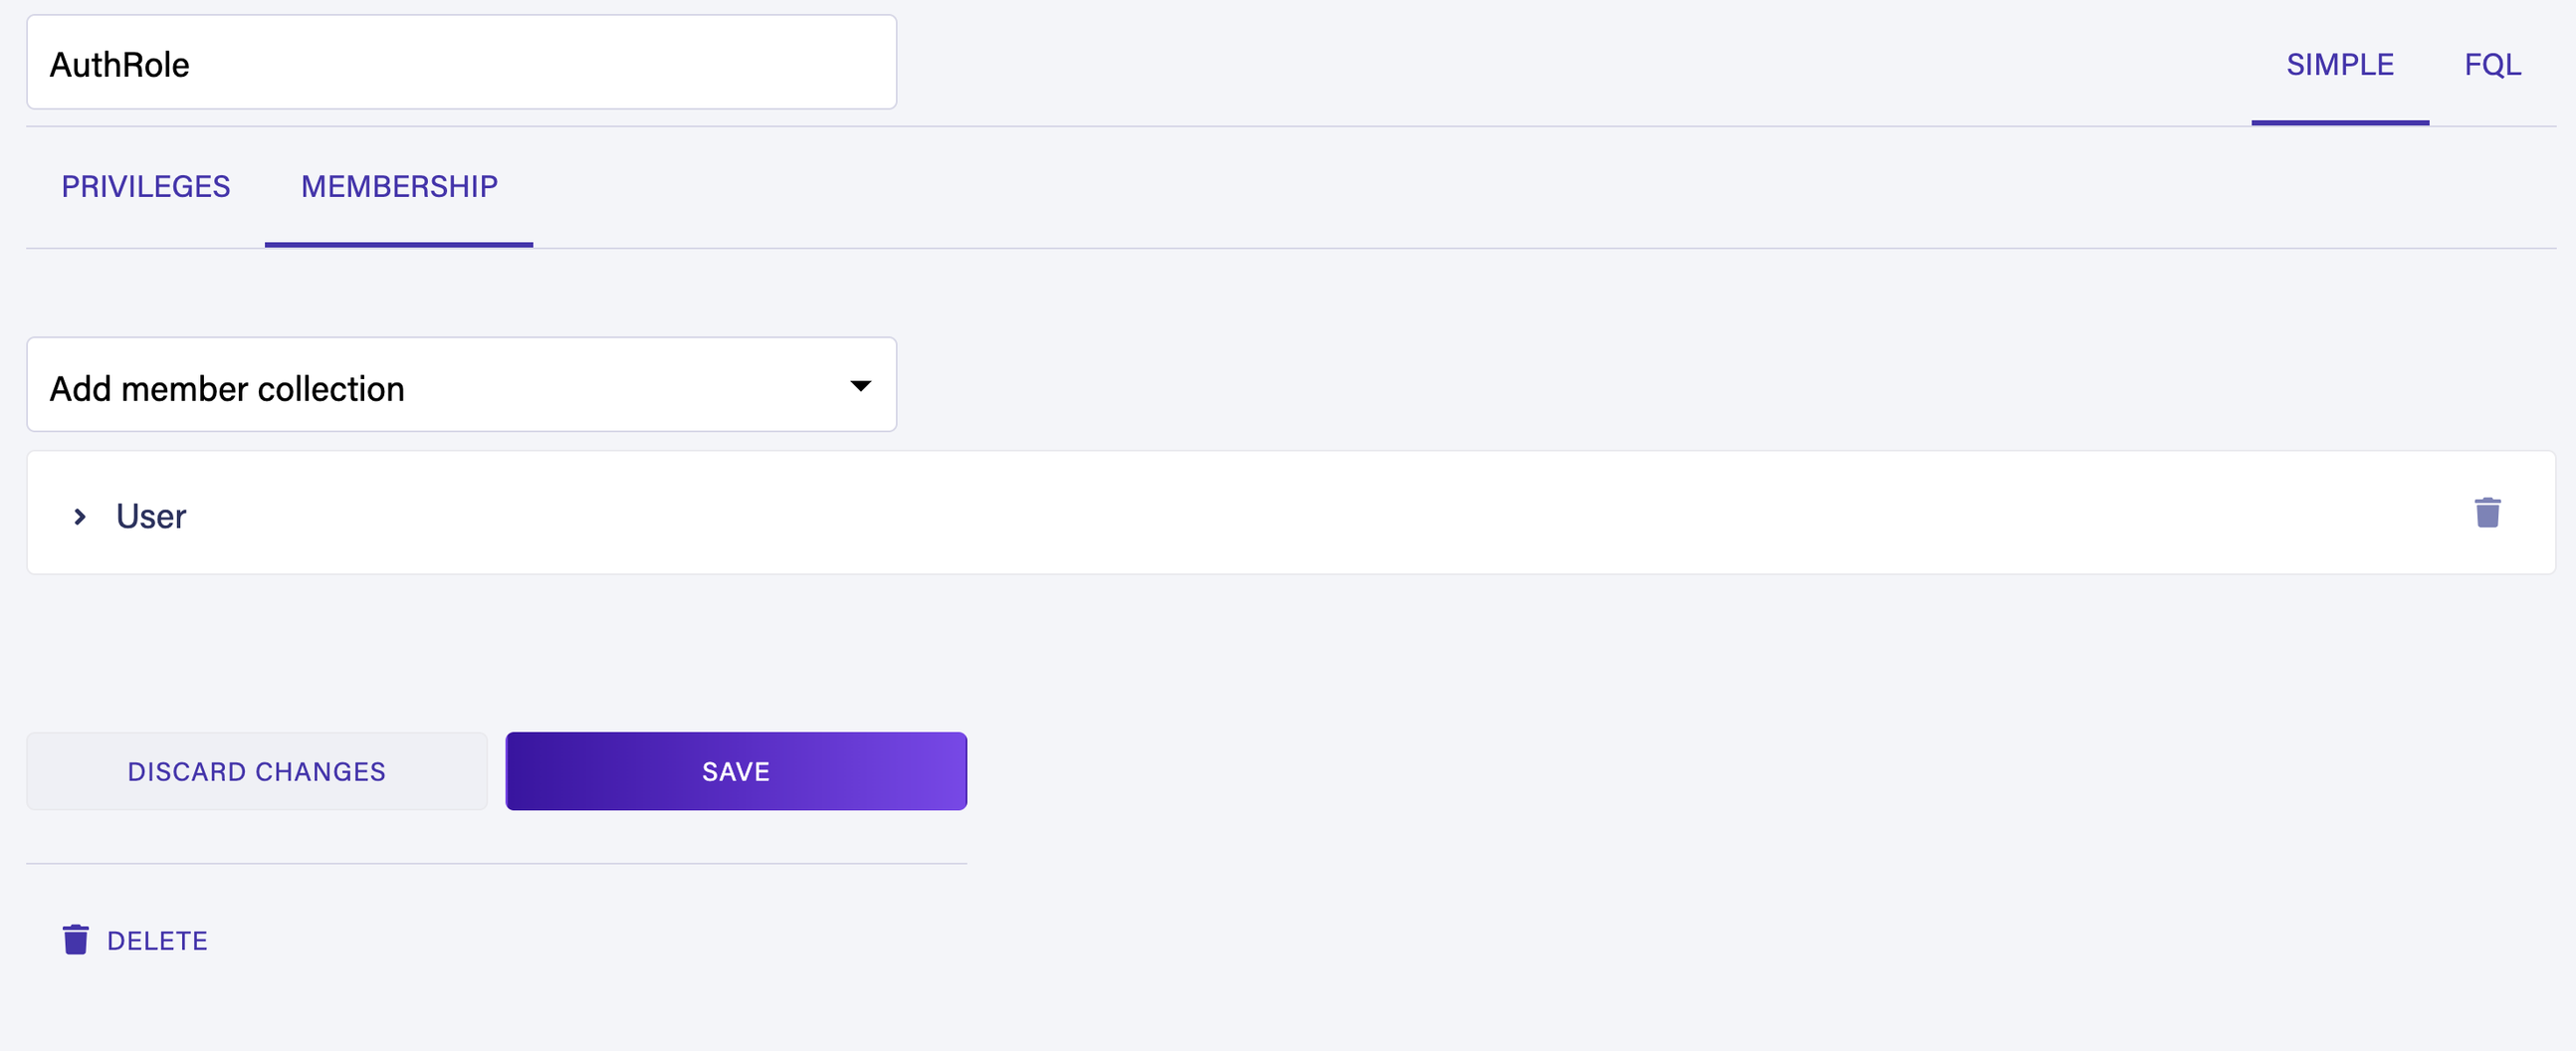
You need to define a new Security Role to allow logged-in users to query this collection using the access key you generate for them. Navigate to Security > Roles > New Role. Create a new role called AuthRole. In the Privilege tab add Movie collection to your role and provide Read and Create permissions.
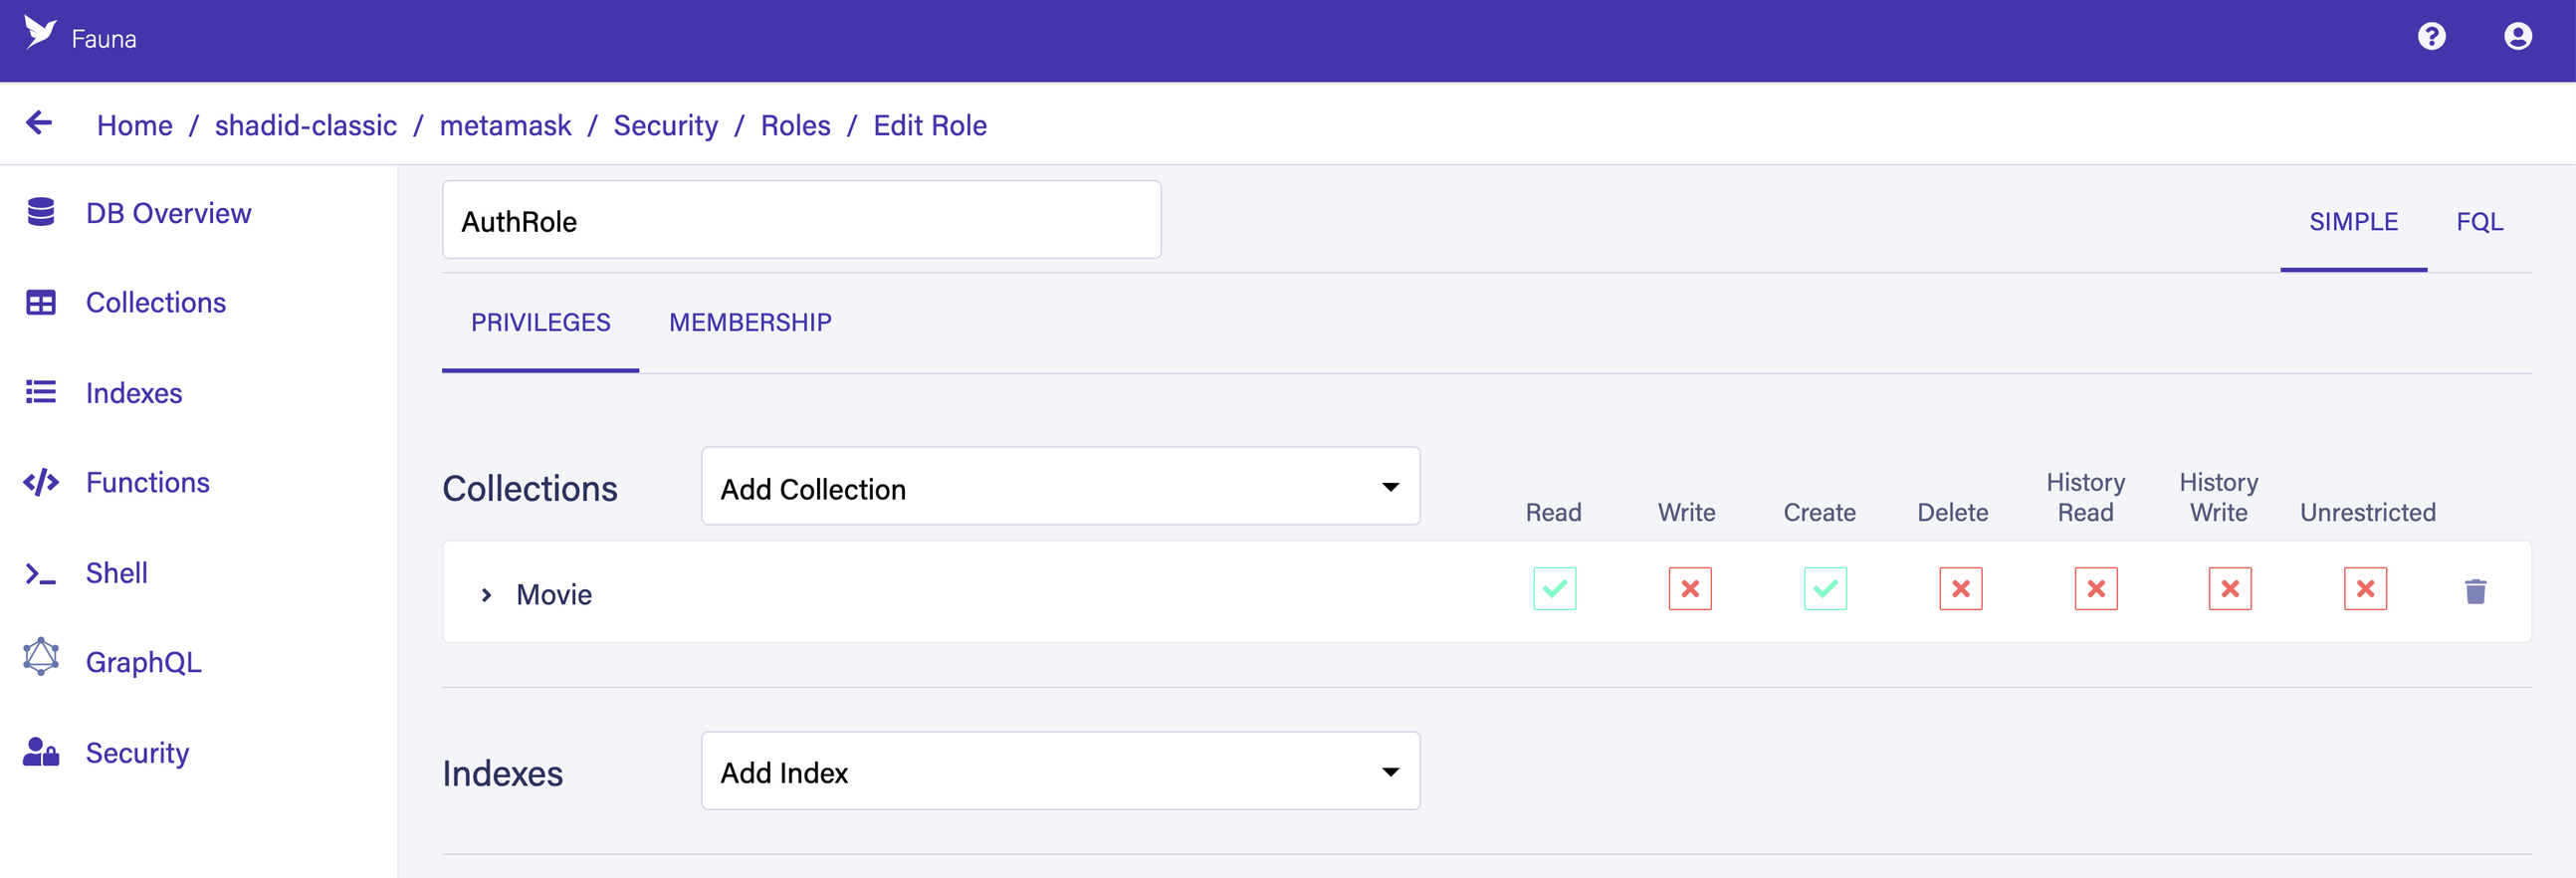
Navigate to the Membership tab, add the User collection as a member collection, and choose Save to create the role. Now any token created by a member of the User collection has Read and Create permissions on documents in the Movie collection.
Review the queryData function in the following code. Notice that it retrieves the access token from browser cookies and queries the Movie collection using the access token.
// pages/index.js
const queryData = async () => {
const authToken = Cookies.get('fauna-auth');
const faunaClient = new faunadb.Client({ secret: authToken });
const movies = await faunaClient.query(
Map(
Paginate(Documents(Collection('Movie'))),
Lambda(x => Get(x))
)
)
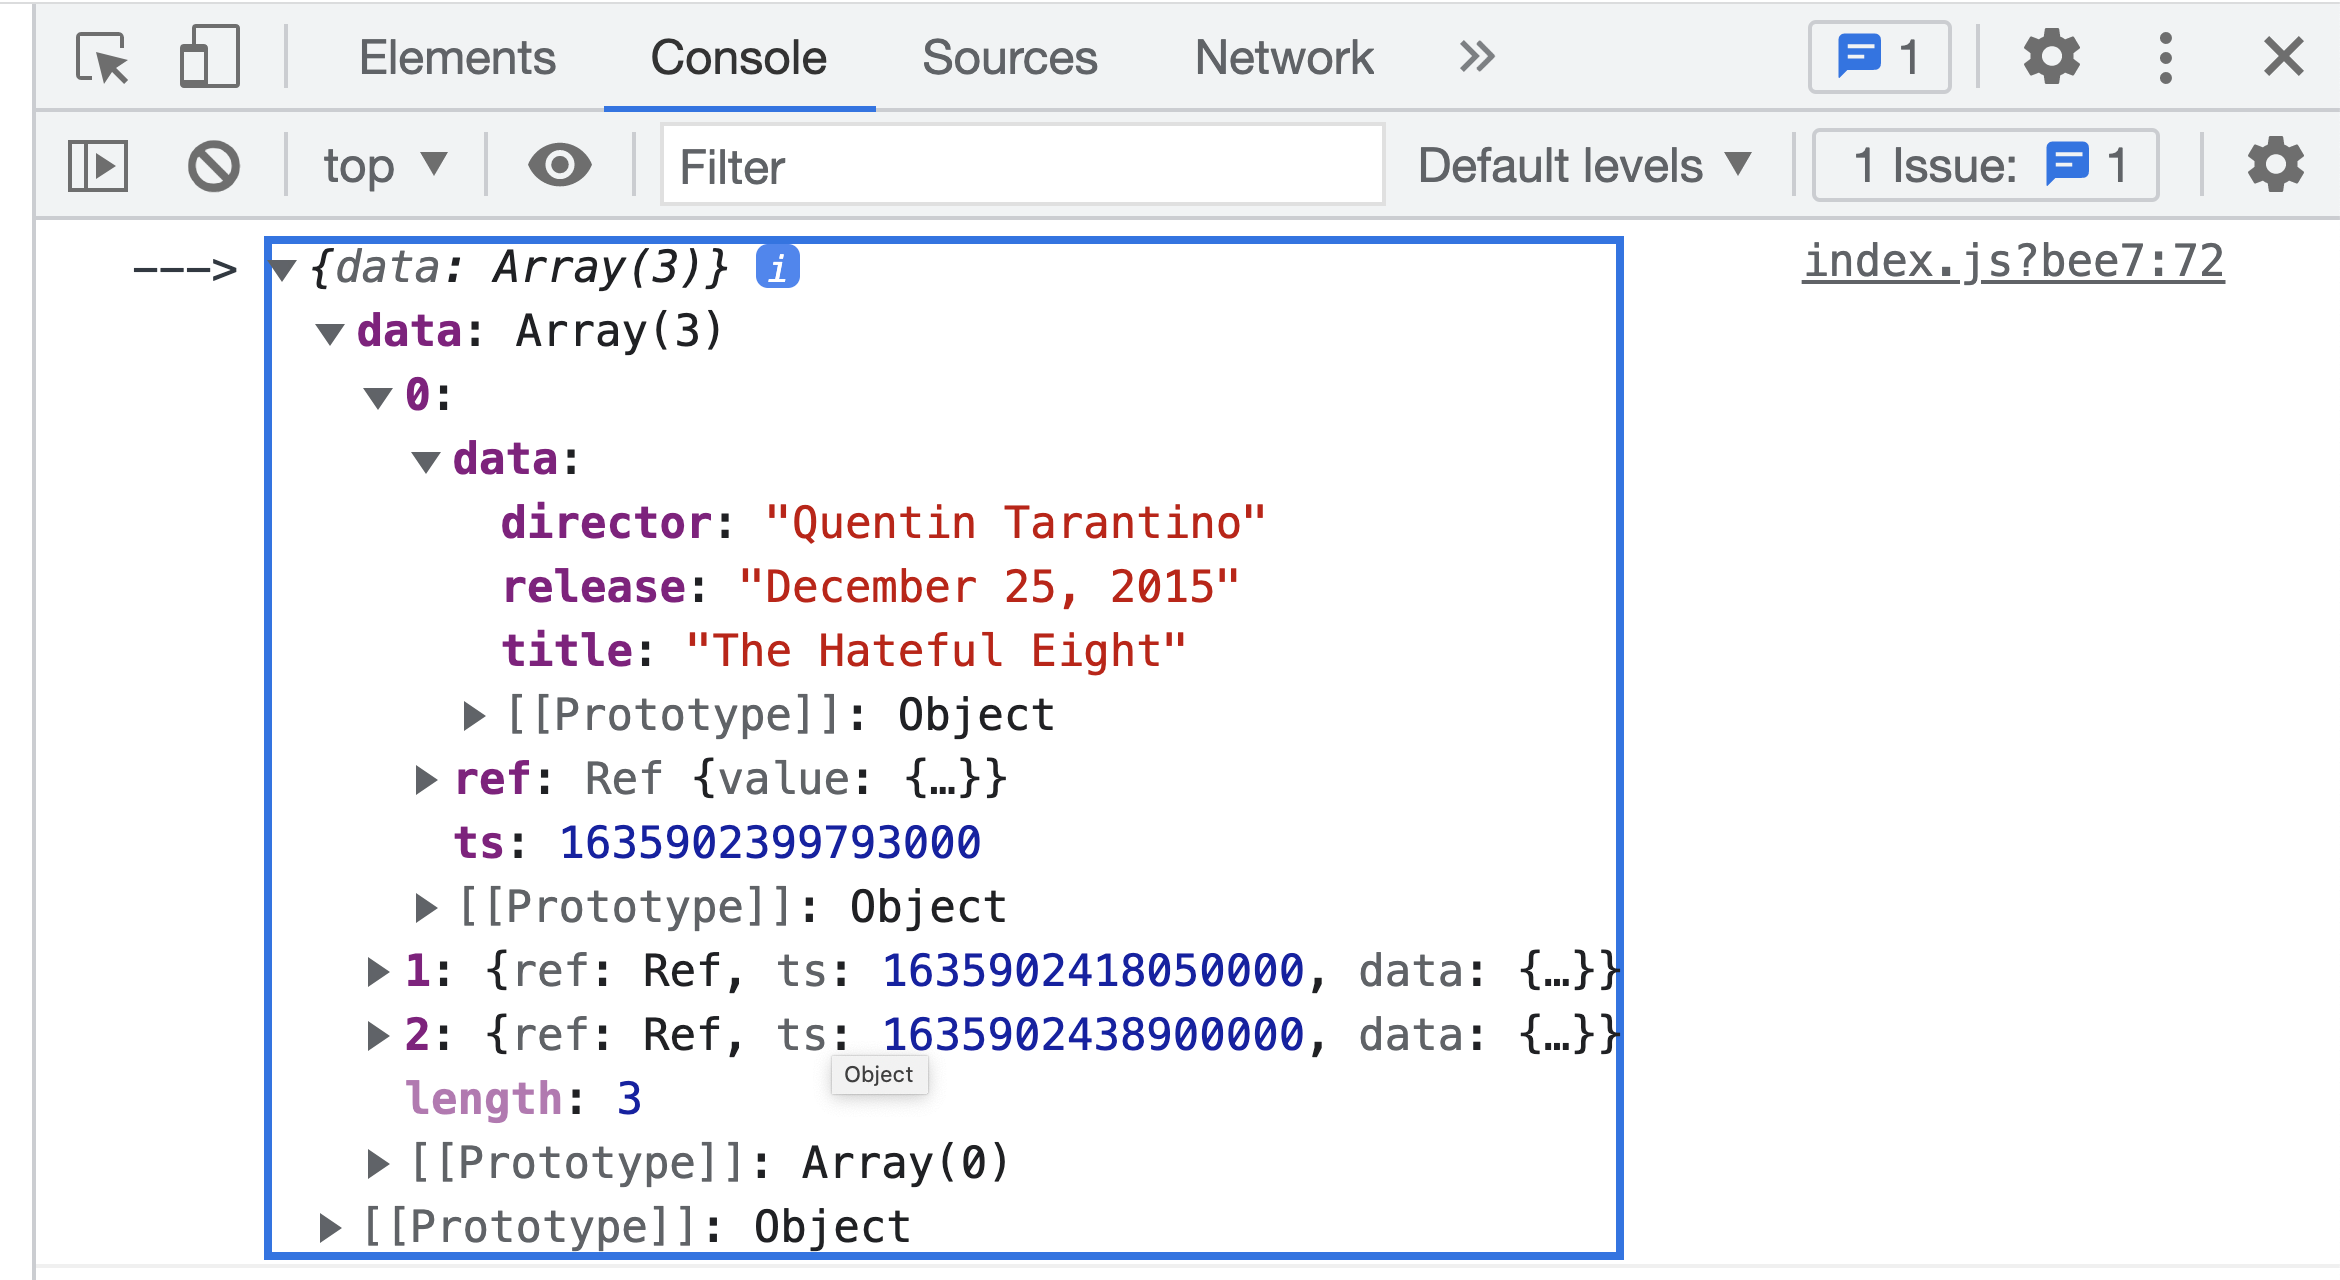
console.log('--->', movies);
}
You get something similar to the following response in your browser console when an authenticated user selects the Query Data button.
The following is the complete final code for the pages/index.js file.
// pages/index.js

import Head from 'next/head'
import { useEffect, useState } from 'react'
import Cookies from 'js-cookie'
import Web3 from 'web3';
import Web3Token from 'web3-token';
import styles from '../styles/Home.module.css'
import faunadb, {
  Get,
  Paginate,
  Documents,
  Collection,
  Lambda,
  Map
} from 'faunadb';

export default function Home() {

  const [isLoggedin, setLoggedin] = useState(false);

  useEffect(() => {
    const authToken = Cookies.get('fauna-auth');
    if(authToken) {
      setLoggedin(true)
    }
  }, []);

  const login = async () => {
    const web3 = new Web3(window.ethereum);
    try {
      const accounts = await window.ethereum.send(
        "eth_requestAccounts"
      )
      console.log('accounts', accounts.result[0]);
      const address = accounts.result[0];
      const signed_msg = await Web3Token.sign(msg => web3.eth.personal.sign(msg, address), '1h');
      const response = await fetch('api/user', {
        method: 'POST',
        body: JSON.stringify({
          signed_msg
        }),
      });

      if(response.status !== 200) {
        return;
      }

      const { token } = await response.json();
      const one_hour = new Date(new Date().getTime() +  3600 * 1000) // sign token for 1 hour
      Cookies.set('fauna-auth', token, { expires: one_hour })
      setLoggedin(true)
    } catch (error) {
      alert('Please Install MetaMask Wallet')
      return;
    }
  }

  const logout = () => {
    Cookies.remove('fauna-auth')
    setLoggedin(false)
  }

  const queryData = async () => {
    const authToken = Cookies.get('fauna-auth');
    const faunaClient = new faunadb.Client({ secret: authToken });
    const movies = await faunaClient.query(
      Map(
        Paginate(Documents(Collection('Movie'))),
        Lambda(x => Get(x))
      )
    )
    console.log('--->', movies);
  }

  return (
    <>
    <Head>
      <title>My page title</title>
      <meta name="viewport" content="initial-scale=1.0, width=device-width" />
      <link rel="stylesheet" href="https://cdn.jsdelivr.net/npm/uikit@3.9.2/dist/css/uikit.min.css" />
    </Head>
    <div className={styles.container}>
      <main className={styles.main}>
        {isLoggedin ? (
          <>
            <button
              className="uk-button uk-button-default"
              style={{ marginBottom: '10px' }}
              onClick={queryData}
            >
              Query Data
            </button>
            <button className="uk-button uk-button-danger" onClick={logout}>Logout</button>
          </>
        ) :
        <button className="uk-button uk-button-primary uk-button-large" onClick={login}>Login with MetaMask</button>
        }
      </main>
    </div>
    </>
  )
}
Logging out users
You log out users by removing the access token from the cookie store in your application. The following code snippet is executed when a user selects the Logout button.
// pages/index.js
...
const logout = () => {
    Cookies.remove('fauna-auth')
    setLoggedin(false)
}
Conclusion
You can now build an application with Fauna that authenticates users securely with MetaMask, creates access tokens, and provides limited access to your application’s backend resources.
Where to go from here
If you are interested in more Fauna authentication-related content, follow the Authentication tag in the Fauna blog. If you are new to Fauna and would like to learn how Fauna leverages attribute-based access control (ABAC) to provide granular access to users, follow this tutorial. If you have any feedback, please let us know in the Fauna Forums .

Top comments (1)
🔧 Areon Network presents an incredible opportunity for coders! Participate in our Hackathon with a $500K prize pool. Unleash your coding genius at hackathon.areon.network and shape the future! 🚀💡 #InnovationUnleashed #AreonHackathon