Webhooks are useful if you want to extend the system functionality or integrate quickly with other apps that fit your business process. You can enable or disable webhooks at any time without any effort.
Now, you can easily define webhooks with Flotiq.
Check out our examples and use them in your projects or treat them as a signpost for your work:
- Trigger a Gatsby preview when site content was changed.
- Trigger a Gatsby production build when a
Build productionbutton was clicked. - Trigger a Netlify build when a
Build sitebutton was clicked. - Send a RocketChat notification when the contact form was submitted.
- Trigger AWS Lambda serverless function when entry is changed.
Note
If you are new in webhooks, read the Flotiq Webhooksintroduction first.
1. Trigger a Gatsby preview when site content was changed
Prerequisites: We assume, that you have Product Content Type Definition in Flotiq.
In the Gatsby Cloud dashboard:
Go to your site settings.
In the General -> Webhook menu find a Preview webhook URL:

In the Flotiq dashboard:
- Go to the
Webhookspage and clickAdd new webhook. - Name the webhook (e.g.
Gatsby Preview) and paste obtainedPreviewURL as a webhookURL. - As a trigger, choose
Create,UpdateandDeleteactions on theProductand save the webhook:
Check the result
After the Create, Update, Delete action on the Product, Gatsby Cloud Preview will be triggered automatically.

2. Trigger a Gatsby production build when a Build production button was clicked
Prerequisites: We assume, that you have Product Content Type Definition in Flotiq.
In the Gatsby Cloud dashboard:
- Go to your site settings.
- In the
General->Webhookmenu find aBuildswebhook URL:
In the Flotiq dashboard:
- Go to the
Webhookspage and clickAdd new webhook. - Name the webhook (e.g.
Gatsby Build Production) and paste obtainedBuildsURL as a webhookURL. - As a trigger, choose
Customaction on theProductand save the webhook:
Check the result
Now, the Gatsby Build Production webhook button will be available in the Edit Product form.

After clicking the Gatsby Build Production button in Flotiq, the Gatsby Production build will be triggered:

3. Trigger a Netlify build when a Build site button was clicked
Prerequisites: We assume, that you have Product Content Type Definition in Flotiq.
In the Netlify dashboard:
- Go to your site settings.
- In the menu
Build & Deploy->Continuous Deploymentfind sectionBuild hooks. - Add a new build hook (the name is up to you).
- Click
Save, and copy your custom hook URL (likehttps://api.netlify.com/build_hooks/xxxxxx):
In the Flotiq dashboard:
- Go to the
Webhookspage and clickAdd new webhook. - Name the webhook (e.g.
Build Site) and paste obtained URL as a webhookURL. - As a trigger, choose
Customaction on theProductand save the webhook:
Check the result
Now, the Build Site webhook button will be available in the Edit Product form:

After clicking the Build Site button in Flotiq, the Netlify build will be triggered:

Note
Choosing actionsCreate,Update,Delete, the build will be triggered automatically. The buttonBuild Siteis visible only when you choose aCustomtrigger.
4. Send a RocketChat notification when the contact form was submitted.
Prerequisites: We assume, that you have Contact Form Content Type Definition in Flotiq with the message attribute.
In the RocketChat dashboard:
- Go to the
Administration->Integrations. - Click
Add newintegration. Fill the form with the following values:

Make sure to check
Script enabledand paste the code that transforms Flotiq Payload to required by RocketChat form (more in the RocketChat docs):
class Script {
  process_incoming_request({ request }) {
    return {
      content: {
        text: `New message: ${request.content.payload.message}`, // assuming your CTD have `message` field
       }
    };
  }
}
- Save webhook and copy your Webhook URL.
In the Flotiq dashboard:
- Go to the
Webhookspage and clickAdd newwebhook. - Name the webhook (e.g.
Chat Notification) and paste obtainedWebhook URLas a webhookURL. - As a trigger, choose
Createaction on theContact formand save the webhook:
Note
As the next step, we recommend creating the Contact Form with Flotiq Forms. It is an easy-to-use form generator, that adds customer input directly to your Content Objects.
Check the result
After the Create action on the Contact form (or submitting Contact Form based on Flotiq Forms) the RocketChat notification will be triggered:

5. Trigger AWS Lambda serverless function when entry is changed
To integrate Flotiq Webhooks and AWS Lambda follow the steps below:
- Set up AWS Lambda to receive HTTP requests. We prepared a simple AWS Lambda webhook example code for you.
Copy the
endpointURL that represents your service, returned byserverless deploycommand:

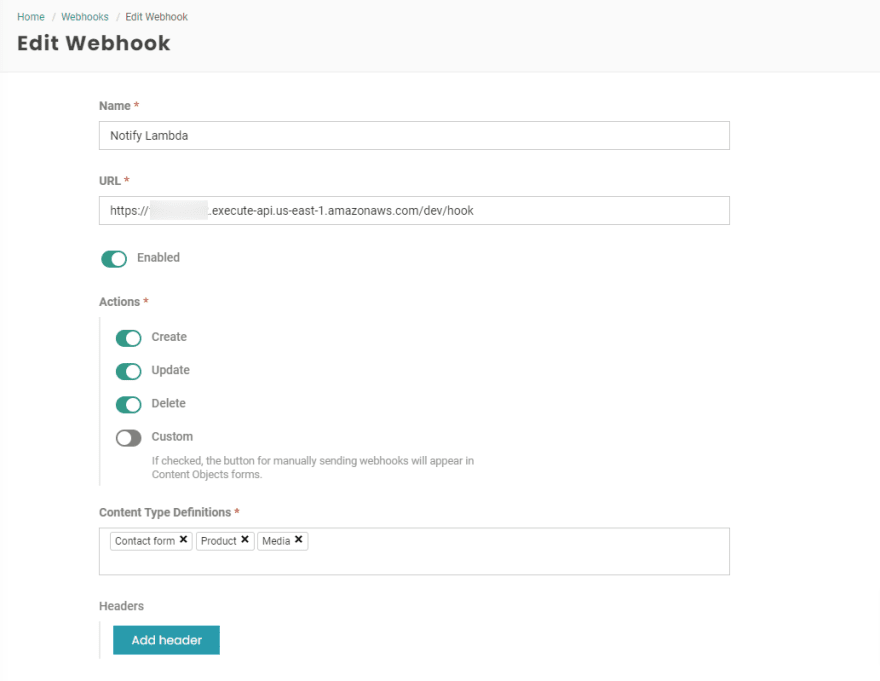
In the Flotiq dashboard go to the
Webhookspage and clickAdd newwebhookName the webhook (e.g.
Notify AWS Lambda) and paste obtainedendpointURL as a webhookURL.As a trigger, choose
Create,UpdateandDeleteaction on the multiple Content Types:
Check the result
After any action on the Content Objects, you will be able to see logs in the AWS Lambda CloudWatch. Now you can use the received payload to implement your own business logic.
Notes
This is a simple example without authentication. You can add it by yourself or set up API keys using AWS. that allows you to track the API Keys usage, throttle the requests or use a quota for your applications.

Top comments (0)