This post was originally published in my personal site.
At this point I think I don't have to explain the importance of testing your applications. Automated tests allow you to catch bugs while still developing and avoid getting a call at 2am because your application is not working as expected.
It's all about confidence. When shipping new code, you want that confidence. You want to know that your application will work just fine. Of course you can't know, but if you have a bunch of great tests, you will be a lot more confident.
Yes, you need to invest time writing tests. But in the long run, it will save you a lot of time and will avoid you a lot of headaches.
But can you have too many tests?
Nobody argues that testing applications is a waste of time anymore. But we still have this problem of writing too many tests. It's a big challenge to understand what should be tested, and also how to test it in order to get as much confidence as possible.
A while back, Guillermo Rauch tweeted this:
 Guillermo Rauch@rauchg
 Write tests. Not too many. Mostly integration.16:43 PM - 10 Dec 2016
185
513
Many times we hear that our tests should cover 100% of our code. And that's simply not always a good idea. There is always a point that is the turning point. Once you get that X% of coverage, the new tests you write are not really helping. The number is different for every project, but it's never as high as 100%.
When you go over that point, you start spending time testing things that really don't need to be tested. You test things that have no logic at all. You have one line of code that is uncovered and you write awful tests, usually involving implementation details, just to get that 100% coverage.
You may not see the issue right away, but as you start to have more and more tests like that, it becomes hard to mantain them and ultimately slow the whole team down. The important thing to have in mind here is that you should write tests to have more confidence that your application is working fine. And these kind of tests doesn't help to increase that confidence at all.
Ok, and why integration tests?
The three most common types of tests are: unit, integration and end to end.
Unit tests are faster to write and of course, cheaper. But they also don't give you a lot of confidence. It's fine testing if component A renders correctly, but if you don't also test it together with B and C, you won't have much confidence in your application.
End to end tests give you a lot of confidence, because you are testing everything. But they also take a lot of time to write, and are of course the most expensive option.
Integration tests are the perfect balance. You test how your components work together, but mock some things (for example, HTTP requests) so it doesn't take you a lot of time to write them. And they give you a lot of confidence as well. Once you start testing your components this way, you'll see that you may not need a lot of your unit tests at all.
This is why it's a great idea to spend most of your time writing integration tests.
This doesn't mean that you should only write this kind of tests.
This also doesn't mean that unit and end to end tests are useless.
It just means that it's intelligent to spend most of your time writing integration tests, because they provide you with a great balance on the trade-offs between confidence and effort.
A quick note on mocking
When you write integration tests, you want to mock as less as possible. Mocking stuff reduces the confidence in that test. So just keep that in mind.
Have you heard of React Testing Library?
React Testing Library is by far the best and most popular testing library available for React right now.
Its creator, Kent C. Dodds, wrote it with this in mind:
"The more your tests resemble the way your software is used, the more confidence they can give you."
He's also a big advocate of integration tests, so let's use this library to write one!
First we need an application
I wrote a small app that consists of two pages. In the home page, you can write a postId. The Submit button is disabled until you write something.
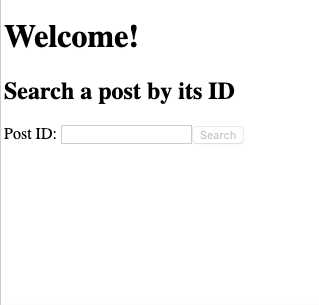
Once you write a postId and press the Submit button, you navigate to a second page, /post/:postId.
When you land on this page, you will first see a Loading... message:

An HTTP request is fired to the JSON Placeholder API using the provided postId, and once the data is received, the post is displayed. This page also has a link to go back to the Home page.

Here is the full code:
import React from "react";
import { BrowserRouter as Router, Route, Link, Switch } from "react-router-dom";
import { fetchPost } from "./api";

export default function App2() {
  return (
    <Router>
      <Switch>
        <Route exact path="/" component={Home} />
        <Route exact path="/post/:postId" component={Post} />
      </Switch>
    </Router>
  );
}

function Home({ history }) {
  const [postId, setPostId] = React.useState("");
  return (
    <div>
      <h1>Welcome!</h1>
      <h2>Search for a post by its ID</h2>

      <label htmlFor="postId">Post ID: </label>
      <input
        id="postId"
        value={postId}
        onChange={e => setPostId(e.target.value)}
      />
      <button
        disabled={!postId}
        onClick={() => history.push(`/post/${postId}`)}
      >
        Submit
      </button>
    </div>
  );
}

function Post({ match }) {
  const { postId } = match.params;
  const [post, setPost] = React.useState();
  React.useEffect(() => {
    (async function fetch() {
      setPost(await fetchPost(postId));
    })();
  }, [postId]);
  return (
    <div>
      <h1>Post {postId}</h1>
      {!post ? (
        <p>Loading...</p>
      ) : (
        <>
          <h2>{post.title}</h2>
          <p>{post.body}</p>
        </>
      )}
      <Link to="/">Back to Home</Link>
    </div>
  );
}
And this is the api.js file:
export const fetchPost = async postId => {
  const response = await fetch(
    `https://jsonplaceholder.typicode.com/posts/${postId}`
  );
  return response.json();
};
You can play with the application in this code sandbox.
Now we're ready for the test!
I won't write about configurations in this post. I'm assuming you have Jest and React Testing Library set up and you're ready to write your test.
I will write each step without repeating any code, and then at the end I'll leave the complete test snippet for you to check.
Let's start with a few imports. Of course we need to import React first, and we also need render and screen from React Testing Library:
import React from "react";
import { render, screen } from "@testing-library/react";
render allows us to render our component in order to start testing it, and screen provides us with all the queries we need to get elements.
We now need to create our test:
test("Can search for a post using its ID", async () => {});
We import our App component and call the render function.
import App from "../app";

test("Can search for a post using its ID", async () => {
  render(<App />);
});
Great! Our test should be passing. Now we can start using screen to check if our component is displaying what it should.
The Home page
We're in the Home page, so we should see a Welcome message. As this is is text, we can use getByText query. We get that element and then wrap it in an expect statement, expecting that it exists in the document.
expect(screen.getByText(/welcome/i)).toBeInTheDocument();
It's always a good idea to use regular expressions for your text content, and ignore cases. First, your users doesn't care about text cases. And second, if it's a phrase, you may slightly change your words in the future, but you'll always keep a few important ones. Your test should be looking for them, as they will always be there.
Let's see an example of that. In our home page we have an h2 element that says Search for a post by its ID. We could totally do this, and it would work:
expect(screen.getByText("Search for a post by its ID")).toBeInTheDocument();
But what if the next week we change that phrase to Here you can search for a post. The only thing you need is its ID? Of course, now our test would be broken! A better way to write this statement would be this one:
expect(screen.getByText(/search.*post.*id/i)).toBeInTheDocument();
That's perfect! We know that we have three important words that will always be there (search, post and id). With this statement, the test wouldn't break if we changed our phrase as we said before.
The last thing we need to check in our Home page is the Submit button, which should be there but be disabled.
expect(screen.getByText(/submit/i)).toBeDisabled();
Searching for a post
Our Home page is rendering correctly and has all the user needs to search for a post. We need to simulate the user typing in our input field, and React Testing Library has our backs.
We need to import the user-event module:
import user from "@testing-library/user-event";
But before we can simulate the user typing in the input field, we need to get that element. A good practice when testing forms is to get elements by their label. This way we can also check if the label and the input field are associated correctly, which is important for accessibility.
So let's use the getByLabelText query to get that input:
screen.getByLabelText(/post id/i);
And now we are ready to simulate the user typing in it, using the user-event module:
user.type(screen.getByLabelText(/post id/i), "1");
Great! To finish the user interaction, we need to click the Submit button, which we expect to be enabled now.
const submitButton = screen.getByText(/submit/i);
expect(submitButton).toBeEnabled();
user.click(submitButton);
Landing on the Post page
Now that we clicked the submit button, we should navigate to the Post page. The first thing we should see there is a Loading... message, so let's get that.
screen.getByText(/loading/i);
But if you write that, you'll see that the test won't pass:
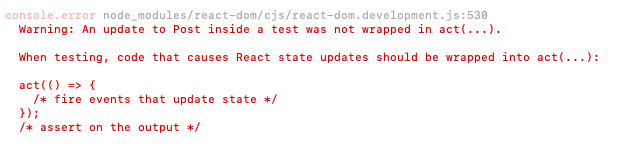
When this happens, we need to use find* queries, along with await. The test will then wait until the loading message shows up.
await screen.findByText(/loading/i);
Perfect! Now the test is passing.
Mocking HTTP requests
The next thing that happens in our application is that an HTTP request is fired to the API to get the post details. We don't want to fire an actual request in our test, so we need to mock it.
First of all, right after our imports, let's mock the api module using jest:
jest.mock("../api");
And now we can import the module as a mocked version of it:
import { fetchPost as mockFetchPost } from "../api";
In our test, let's create a mock post, the object that our fake request will return when resolved:
const mockPost = {
  id: "1",
  title: "Post Title",
  body: "Post Body",
};
And then instruct our mock function to return that object when called:
mockFetchPost.mockResolvedValueOnce(mockPost);
We can also make a small enhancement to use this mock post object when we simulate the user typing in the input field:
user.type(screen.getByLabelText(/post id/i), mockPost.id);
Perfect! Everything is set up and we can now continue with our test.
Wrapping up our test
First of all we should check that our mock function is called, and that it's called just once:
expect(mockFetchPost).toHaveBeenCalledTimes(1);
And also that it is called with the mock post id we defined:
expect(mockFetchPost).toHaveBeenCalledWith(mockPost.id);
Now let's check that the actual post information is displayed on the screen for the user:
expect(screen.getByText(mockPost.title)).toBeInTheDocument();
expect(screen.getByText(mockPost.body)).toBeInTheDocument();
The only thing left to test is the link back home. First we click it:
user.click(screen.getByText(/back.*home/i));
And then we should be in the Home page:
await screen.findByText(/welcome/i);
We're done! This is the complete test:
import React from "react";
import { render, screen } from "@testing-library/react";
import user from "@testing-library/user-event";
import { fetchPost as mockFetchPost } from "../api";
import App from "../app";

jest.mock("../api");

test("Can search for a post using its ID", async () => {
  const mockPost = {
    id: "1",
    title: "Post Title",
    body: "Post Body",
  };
  mockFetchPost.mockResolvedValueOnce(mockPost);
  render(<App />);

  expect(screen.getByText(/submit/i)).toBeDisabled();
  expect(screen.getByText(/welcome/i)).toBeInTheDocument();
  expect(screen.getByText(/search.*post.*id/i)).toBeInTheDocument();

  user.type(screen.getByLabelText(/post id/i), mockPost.id);
  const submitButton = screen.getByText(/submit/i);
  expect(submitButton).toBeEnabled();
  user.click(submitButton);

  await screen.findByText(/loading/i);
  expect(mockFetchPost).toHaveBeenCalledWith(mockPost.id);
  expect(mockFetchPost).toHaveBeenCalledTimes(1);
  expect(screen.getByText(mockPost.title)).toBeInTheDocument();
  expect(screen.getByText(mockPost.body)).toBeInTheDocument();

  user.click(screen.getByText(/back.*home/i));
  await screen.findByText(/welcome/i);
});
That's it!
We tested the happy path of searching for a post, navigating to a different page, waiting for it to load, seeing the post information on the screen and navigating back to the home page. It was easy, wasn't it?
Of course there are more things to test, even in this small application. I hope this was useful and that you start writing a lot of long, integration tests for your applications.

Latest comments (2)
Thank you @francodalessio .. this made tests look less than a herculean task it's imagined to be
I didn't know that we can chain multiple
expectanduser eventsin a singletestfunction.I usually wrap each
itindescribe.