This guide intends to provide a distilled, reasonable, secure and yet simple setup for auto-unsealing Vault on Kubernetes with Azure Key Vault. While I believe the official Hashicorp's guide brings a considerable amount of extra information on how to set up Vault with Terraform, it may not reflect a typical scenario for Vault usage. If you already have an up and running Kubernetes cluster and want to continue to use Helm to install and manage Vault for keeping your application's secrets, this guide is for you.
Prerequisites (with the versions used in this tutorial):
Docker (Engine 19.03.13)
Minikube (1.13.1)
Helm (3.2.1)
Kubectl (matching kubernetes version)
Azure subscription
First, let's start by setting up all required Azure services. On your subscription, create an instance of Azure Key Vault with all default settings:
From this instance you should note down the Subscription ID and your Directory ID, which will be necessary later.
Next, we have to register an App, so that the Service Principal can work as our access layer to the Azure Key Vault. You can do so by going to App Registration:
Now that we have a Service Principal, note its Application (client) ID:
On this Service Principal, we need to create a client secret under Certifications & Secrets:
It's extremely important that you copy the value and save it for later since this is not retrievable after you close the window.
After this is set, switch back to your Azure Key Vault and under IAM add a new Role Assignment as Key Vault Contributor for your Service Principal:
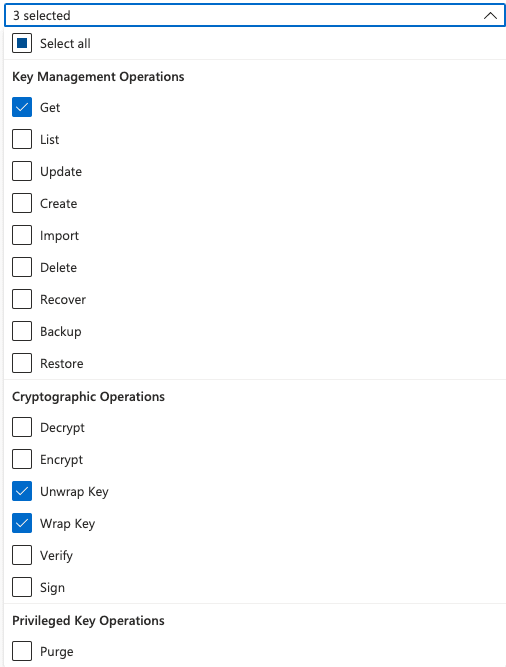
Once your Service Principal is assigned to the Azure Key Vault, we need to provide specific access permissions to it. Vault needs Get permissions at key level and Unwrap Key and Wrap Key at Cryptographic level, so under access policy, create a new one with those selected:
Select your Service Principal in the list:
After you click on "Add", don't forget to save the configuration. (I missed this step and it took me a while to figure out why my Vault complained it had no read permissions).
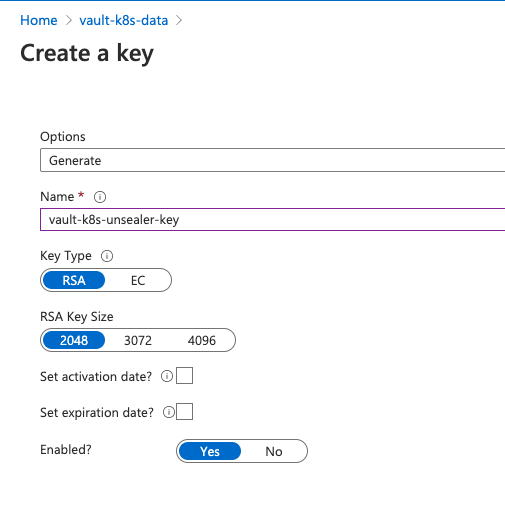
The last step at Azure portal is to create a key on Key Vault, which will be your unsealing key for Vault:
At this point, you finished all the needed configuration on Azure and are left with some important information that will allow your Vault to communicate and auto-unseal. To set it up, what we will do is to create a values.yaml file for Helm, based on Vault's official helm chart. In our scenario, to have a good trade-off between security, availability and ease of configuration we are going to bootstrap Vault with 2 replicas in a Raft mode as the storage type. Where Raft consensus algorithm supports High Availability and ensures data replication across replicas. The data is stored encrypted in a Kubernetes persistent volume. It's important to highlight that since our Kubernetes setup aims a local Minikube instance, we need to clean up the pod affinity configuration, otherwise the second instance will not start up due to an IP conflict in a single-node environment. If you're configuring this on a multi-node setup, simply remove the "affinity" tag from your values.yaml. You can use the following yaml file and just replace it with your Azure information:
server:
  affinity: "" #important: set affinity empty if you're using a single-node cluster, like Minikube
  ha:
    enabled: true
    replicas: 2
    raft:
      enabled: true
      config: |
        ui = true
        listener "tcp" {
          tls_disable = 1
          address = "[::]:8200"
          cluster_address = "[::]:8201"
        }
        seal "azurekeyvault" {
          tenant_id       = "246dd7ab-f96c-4efb-<last_part_hidden"
          client_id       = "defdac63-6f29-4670-<last_part_hidden"
          client_secret   = "3qT0C1YfnHa_9~kqQf.<last_part_hidden"
          vault_name      = "vault-k8s-data"
          key_name        = "vault-k8s-unsealer-key"
          subscription_id = "f982b9f7-4c2b-4c4c-<last_part_hidden>"
        }

        storage "raft" {
          path = "/vault/data"
        }
        service_registration "kubernetes" {}
  dataStorage:
    enabled: true
    size: 500Mi
What took me a bit of time to figure out is that whatever is given under "config" totally replaces the default configuration from the helm chart. Meaning that besides the "azurekeyvault" config, we need to keep the rest of the configuration existing on values.yaml from the Helm chart repository.
Since you probably noted down all values along the way, it should be quite straightforward to figure out the correct mapping for "azurekeyvault" fields:
tenant_id: Key Vault's Directory ID
client_id: Service Principal's Application ID
client_secret: Service Principal's generated secret (the one that is not retrievable. Hope you saved it!)
vault_name: Name of Azure Key Vault instance
key_name: Name of generated key on Azure Key Vault
subscription_id: ID of the Azure Subscription
With all that filled out, all you need to do is to set up your Vault. Let's assume you are doing a local configuration (not on AKS, which shouldn't differ in terms of Vault commands). First, initialise Minikube:
~/code/demos/vault > minikube start --memory 4096 --cpus 2 --disk-size 10g --kubernetes-version v1.18.8
  😄  minikube v1.13.1 on Darwin 10.15.6
  ❗  Both driver=docker and vm-driver=virtualbox have been set.
  Since vm-driver is deprecated, minikube will default to  driver=docker.
  If vm-driver is set in the global config, please run "minikube config unset vm-driver" to resolve this warning.
  ✨  Using the docker driver based on user configuration
  👍  Starting control plane node minikube in cluster minikube
  🔥  Creating docker container (CPUs=2, Memory=4096MB) ...
  🐳  Preparing Kubernetes v1.18.8 on Docker 19.03.8 ...
  🔎  Verifying Kubernetes components...
  🌟  Enabled addons: default-storageclass, storage-provisioner
  🏄  Done! kubectl is now configured to use "minikube" by default
Then add the Hashicorp's repository to your helm repos:
~/code/demos/vault > helm repo add hashicorp https://helm.releases.hashicorp.com
"hashicorp" has been added to your repositories
Next, install the Vault Helm chart with your values.yaml as input:
~/code/demos/vault > helm install vault hashicorp/vault -f values.yaml

  NAME: vault
  LAST DEPLOYED: Sun Oct 18 14:17:45 2020
  NAMESPACE: default
  STATUS: deployed
  REVISION: 1
  TEST SUITE: None
  NOTES:
    Thank you for installing HashiCorp Vault!
  Now that you have deployed Vault, you should look over the docs on  using
  Vault with Kubernetes available here:
  https://www.vaultproject.io/docs/
  Your release is named vault. To learn more about the release, try:
  $ helm status vault
  $ helm get vault
At this point, you should have two replicas of your Vault plus the agent injector pod for communication with your applications. Note that neither of your vault pods are "ready":
~/code/demos/vault > kubectl get pods
NAME                                    READY   STATUS    RESTARTS
vault-0                                 0/1     Running   0
vault-1                                 0/1     Running   0
vault-agent-injector-857cdd9594-b9rdh   1/1     Running   0
This happens because Vault will only try to fetch the unseal key once initialised. But if you check the pods logs, you see that the AzurePublicCloud configuration is in fact enabled:
~/code/demos/vault > kubectl logs -f vault-0
==> Vault server configuration:
Azure Environment: AzurePublicCloud
          Azure Key Name: vault-k8s-unsealer-key
        Azure Vault Name: vault-k8s-data
             Api Address: http://172.18.0.4:8200
                     Cgo: disabled
         Cluster Address: https://vault-0.vault-internal:8201
              Go Version: go1.14.7
              Listener 1: tcp (addr: "[::]:8200", cluster address: "[::]:8201", max_request_duration: "1m30s", max_request_size: "33554432", tls: "disabled")
               Log Level: info
                   Mlock: supported: true, enabled: false
           Recovery Mode: false
                 Storage: raft (HA available)
                 Version: Vault v1.5.2
             Version Sha: 685fdfa60d607bca069c09d2d52b6958a7a2febd
2020-10-18T12:17:58.020Z [INFO]  proxy environment: http_proxy= https_proxy= no_proxy=
2020-10-18T12:18:01.355Z [INFO]  core: stored unseal keys supported, attempting fetch
2020-10-18T12:18:01.356Z [WARN]  failed to unseal core: error="stored unseal keys are supported, but none were found"
==> Vault server started! Log data will stream in below:
2020-10-18T12:18:02.334Z [INFO]  core.autoseal: seal configuration missing, but cannot check old path as core is sealed: seal_type=recovery
Just init your Vault instance directly on pod vault-0 (and keep your generated keys):
~/code/demos/vault > kubectl exec -it vault-0 vault operator init
Recovery Key 1: FKjt5wkzN5bUBIuR52KrPP1c2Il/f7RZdn5E+ipfNF8s
Recovery Key 2: FCzUyduESPyavh6QtqWZpdnUDKa3bEEpBHbX3NgTrCiU
Recovery Key 3: Tf7FVEpj5tdJLqQqNw/Jt0OytRI5FAZYig/yafSVz3Xg
Recovery Key 4: duLpa/6IozTOR0mkO7sp0CwmnI+1DsC6d2+oZG/A1CIZ
Recovery Key 5: pyVFs/rRFEk9rSn57Ru+KeuAQzW6eurl3j0/pS/JRpXD
Initial Root Token: s.d0LAlSnAerb4a7d6ibkfxrZy
Success! Vault is initialized
Recovery key initialized with 5 key shares and a key threshold of 3. Please
securely distribute the key shares printed above.
Now, for the first time, we see the Vault unsealer in action:
~/code/demos/vault > kubectl get pods
NAME                                    READY   STATUS    RESTARTS
vault-0                                 1/1     Running   0
vault-1                                 0/1     Running   0
vault-agent-injector-857cdd9594-b9rdh   1/1     Running   0
Pod vault-0 has been initialised and came up unsealed, meaning that we configured everything correctly.
However, our replica vault-1 is still not ready. This one will be a follower pod of the leader vault-0. In order to make vault-0 visible, we need to login using our root token (be aware of not overusing and sharing the root token on production):
~/code/demos/vault > kubectl exec -it vault-0 -- vault login s.d0LAlSnAerb4a7d6ibkfxrZy
Success! You are now authenticated. The token information displayed below
is already stored in the token helper. You do NOT need to run "vault login"
again. Future Vault requests will automatically use this token.
Key                  Value
---                  -----
token                s.d0LAlSnAerb4a7d6ibkfxrZy
token_accessor       hJEFibLTbUP4sgA8X4tMBqZ8
token_duration       ∞
token_renewable      false
token_policies       ["root"]
identity_policies    []
policies             ["root"]
Next, we join vault-1 in the cluster:
~/code/demos/vault > kubectl exec -it vault-1 -- vault operator raft join http://vault-0.vault-internal:8200
Key       Value
---       -----
Joined    true
a kubectl get pods shows now that all pods are ready:
~/code/demos/vault > kubectl get pods
NAME                                    READY   STATUS    RESTARTS
vault-0                                 1/1     Running   0
vault-1                                 1/1     Running   0
vault-agent-injector-857cdd9594-b9rdh   1/1     Running   0
Finally, to prove that our goal has been achieved, if you delete one of the pods the new pod starts up unsealed just like the others:
~/code/demos/vault > kubectl delete pod vault-0
pod "vault-0" deleted
~/code/demos/vault > kubectl get pods
NAME                                    READY   STATUS    RESTARTS
vault-0                                 1/1     Running   0
vault-1                                 1/1     Running   0
vault-agent-injector-857cdd9594-b9rdh   1/1     Running   0
I hope this article made it easier to understand how the unsealer setup works for Hashicorp Vault and Azure. In a following article, I will show how to use Azure as storage backend instead of Raft and how to inject Vault secrets directly into Kubernetes pods via an ephemeral side-car container. Stay tuned!
Thanks to Felipe de Almeida who helped along the way.
(cover photo by Jason Pofahl (@jasonpofahlphotography) on Unsplash)
References:
https://learn.hashicorp.com/tutorials/vault/autounseal-azure-keyvault
https://github.com/hashicorp/vault-helm


Oldest comments (3)
hello. can you help with this error during starting pod vault-0:
Error parsing Seal configuration: error fetching Azure Key Vault wrapper key information: azure.BearerAuthorizer#WithAuthorization: Failed to refresh the Token for request to myvault.vault.azure.net/keys/vault... StatusCode=404 -- Original Error: adal: Refresh request failed. Status Code = '404'. Response body:
Hi... It looks like your key no Azure is not found. Make sure you are referring to the correct azure key vault and respective key. Looks like your vault is named “myvault” and your key is “vault-k8s-cod-unsealer-key”. Is this correct?
yes its correct. i got this error when i used file storage. But then i tried to use storage "raft" with the same keyvault and key and got same result like in this article, but after initing the vault, it didn't unseal automatically, only with hand.
first log was:
[INFO] core: seal configuration missing, not initialized
after vault operator init:
pastebin.pl/view/1719294d
and my vault status was:
k exec -it vault-0 vault status
Key Value
Seal Type shamir
Initialized true
Sealed true
Total Shares 5
Threshold 3
Unseal Progress 0/3
Unseal Nonce n/a
Version 1.4.2
HA Enabled true
command terminated with exit code 2