A bit of context
Remix is a very cool React-based framework that makes the final jump back from the browser to the server. After starting with SPAs that fully ran in the browser, Next.js got the idea of rendering React components in the server, reducing the initial load time and improving crawlability.
Remix takes this a step further: while Next.js cannot render dynamic content on the server, Remix can. As a user, this means even faster loadings times for any kind of dynamic content, and as a developer, you don't need to think about server-side vs client-side components. You just write React code, and it works.
Deploying Remix
Let's create a Remix project, build it, and see what we get.
npx create-remix@latest remix-aws-tutorial -y
cd remix-aws-tutorial
npm run build
The build directory now has the following content:
  ├── client
  │   ├── assets
  │   │   ├── _index-B17S9f7F.js
  │   │   ├── components-BAmE7OwT.js
  │   │   ├── entry.client-jPehgn16.js
  │   │   ├── jsx-runtime-56DGgGmo.js
  │   │   ├── manifest-3ad53534.js
  │   │   └── root-LChrk_Sm.js
  │   └── favicon.ico
  └── server
      └── index.js
The server directory contains a single file with all the server code. It is capable of understanding everything about an HTTP request, loading the right data, and sending an HTML document back to the client.
The client directory contains all the static assets that the client needs to load after receiving the initial HTML response.
In order to deploy our Remix application, we can start to understand what we're going to need:
- Something to host and serve the static assets
- A way to run the server
- A way to send HTTP requests to the server and transmit the responses to the client
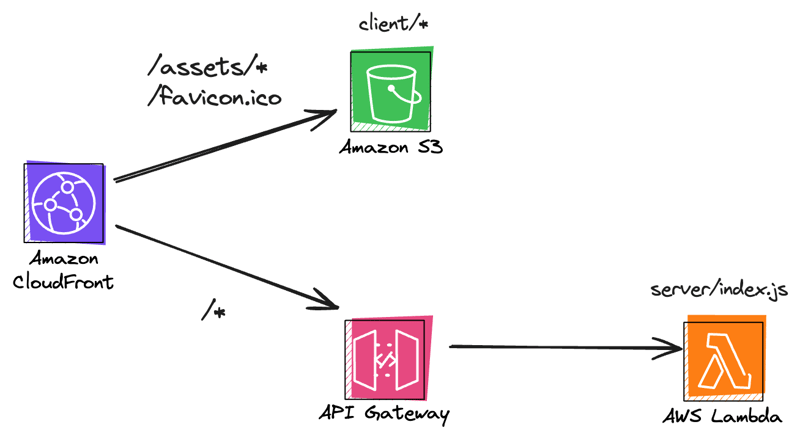
Understanding the architecture
Fortunately for us, our requirements map neatly to a simple serverless architecture hosted on AWS.
- S3 is a great service for hosting and serving static assets
- Lambda functions can run our server code
- API Gateway handles HTTP requests and can forward them to Lambda
- CloudFront can map between S3 and API Gateway, and provides caching and other CDN features
Visually, the architecture we're going to implement looks like this:
Creating a working server bundle
When Remix is built, it creates a single index.js file that contains all the server code, with a handler using the Fetch API, which is not directly compatible with the payload format of API Gateway.
In order to make it compatible, we need an adapter. There is an officially maintained adapter that is compatible with API Gateway HTTP, called @remix-run/architect. Let's install it.
npm install @remix-run/architect
Now, let's create a server.ts file that will be the entry point for the server.
import { createRequestHandler } from '@remix-run/architect';
import * as build from './build/server/index.js';

export const handler  = createRequestHandler({
  build,
});
Additionally, API Gateway forwards the stage name inside the request path, so we need to update the adapter code to remove the stage name before calling the remix handler. We're going to assume that the stage name is "dev", but you can change it to whatever you want. We also need to install aws-lambda types for the handler signature:
npm install -D aws-lambda
Update server.ts to remove the stage name at runtime:
import { createRequestHandler } from '@remix-run/architect';
import * as build from './build/server/index.js';
import { APIGatewayProxyHandlerV2 } from 'aws-lambda';

const requestHandler = createRequestHandler({
  build,
});

export const handler = (...args: Parameters<APIGatewayProxyHandlerV2>) => {
  const [apiGatewayEvent, ...rest] = args;
  apiGatewayEvent.rawPath = apiGatewayEvent.rawPath.replace(/^\/dev/, '');
  apiGatewayEvent.requestContext.http.path = apiGatewayEvent.requestContext.http.path.replace(/^\/dev/, '');

  return requestHandler(apiGatewayEvent, ...rest);
};
We are now ready to bundle our adapter and remix server into a single file that we'll deploy to Lambda. Let's install esbuild:
npm install esbuild
And create a build.cjs file to configure the build process:
const esbuild = require('esbuild');

esbuild
  .build({
    entryPoints: ['server.ts'],
    bundle: true, // Bundle all dependencies into one file
    platform: 'node',
    target: 'node20',
    external: ['node:stream'], // Keep Node.js built-ins external
    outfile: 'build/lambda/index.cjs',
    sourcemap: true,
    format: 'cjs',
  })
  .catch(() => process.exit(1));
Finally, we need to install architect dependencies for the build process to work:
npm install -D @aws-sdk/client-apigatewaymanagementapi @aws-sdk/client-dynamodb @aws-sdk/client-sns @aws-sdk/client-sqs @aws-sdk/client-ssm @aws-sdk/lib-dynamodb
Let's build our lambda function handler:
node build.cjs
The build directory now contains a lambda/index.cjs file, with the whole code of our server, ready to be deployed!
Declaring the infrastructure
Setting up Pulumi
Pulumi is an Infrastructure-as-Code (IaC) tool that enables us to write infrastructure code directly in typescript. It supports multiple cloud providers, and does not rely on CloudFormation templates, instead directly using the AWS CLI under the hood. If you wish to use a different IaC tool for this section, anything supporting AWS will work, you'll simply need to adapt the resource declarations.
First, we'll need to install the Pulumi CLI.
Once that is done, let's create an infrastructure directory, and initialize a Pulumi project:
mkdir infrastructure
cd infrastructure
pulumi new aws-typescript
We also need to configure our AWS credentials to be able to deploy our infrastructure:
pulumi config set aws:accessKey <your-access-key>
pulumi config set aws:secretKey <your-secret-key> --secret
Finally, we need to login to the Pulumi CLI so that we can deploy using the Pulumi engine:
pulumi login
With everything set up, we can proceed to write the infrastructure code.
Creating an S3 bucket for the static assets
The first thing we need is an S3 bucket for our static assets. It will need public ACLs and CORS rules to allow our CloudFront distribution to access the bucket.
We also need to install the @pulumi/synced-folder package to automatically sync the build/client directory and the S3 bucket.
Let's create all of this:
npm install @pulumi/synced-folder
// index.ts
import * as aws from '@pulumi/aws';
import * as synced from '@pulumi/synced-folder';

export const bucket = new aws.s3.Bucket('bucket', {
  corsRules: [
    {
      allowedOrigins: ['*'],
      allowedMethods: ['GET', 'HEAD'],
      allowedHeaders: [],
      exposeHeaders: [],
      maxAgeSeconds: 300,
    },
  ],
});

// Disable block all public access
const blockPublicAcls = new aws.s3.BucketPublicAccessBlock('public-access-block', {
  bucket: bucket.bucket,
  blockPublicAcls: false,
});

// Needed to allow public-read ACL on the objects
const ownershipControls = new aws.s3.BucketOwnershipControls('ownership-controls', {
  bucket: bucket.bucket,
  rule: {
    objectOwnership: 'ObjectWriter',
  },
});

// Automatically sync the client directory to the S3 bucket
new synced.S3BucketFolder(
  'synced-folder',
  {
    path: '../build/client',
    bucketName: bucket.bucket,
    acl: 'public-read',
  },
  { dependsOn: [ownershipControls, blockPublicAcls] },
);
Now, let's deploy our infrastructure:
pulumi up
Once the deployment is done, by logging into the AWS console, we can see the S3 bucket with all the build/client content.
Let's make our server now!
Creating a lambda function for the server
Let's continue editing our index.ts file to add a lambda function that will act as our server.
We will need:
- A role to give to the lambda function
- The managed Basic Execution Role policy
- The lambda function itself
// Add the import at the top of the file
import * as pulumi from '@pulumi/pulumi';

const lambdaRole = new aws.iam.Role('lambdaRole', {
  assumeRolePolicy: {
    Version: '2012-10-17',
    Statement: [
      {
        Action: 'sts:AssumeRole',
        Principal: {
          Service: 'lambda.amazonaws.com',
        },
        Effect: 'Allow',
        Sid: '',
      },
    ],
  },
});

new aws.iam.RolePolicyAttachment('lambdaRoleAttachment', {
  role: lambdaRole,
  policyArn: aws.iam.ManagedPolicy.AWSLambdaBasicExecutionRole,
});

const lambda = new aws.lambda.Function('lambdaFunction', {
  code: new pulumi.asset.AssetArchive({
    '.': new pulumi.asset.FileArchive('../build/lambda'),
  }),
  runtime: aws.lambda.Runtime.NodeJS20dX,
  role: lambdaRole.arn,
  handler: 'index.handler',
});

export const lambdaArn = lambda.arn;
If you want, you can deploy and test your lambda function to test it manually.
pulumi up
Once the deployment is done, you can test your lambda function by calling it from the AWS console with the following mock payload:
{
  "version": "2.0",
  "routeKey": "$default",
  "rawPath": "/dev",
  "rawQueryString": "",
  "headers": {
    "Header1": "value1",
    "Header2": "value2"
  },
  "queryStringParameters": {},
  "requestContext": {
    "accountId": "123456789012",
    "apiId": "api-id",
    "domainName": "id.execute-api.us-east-1.amazonaws.com",
    "domainPrefix": "id",
    "http": {
      "method": "GET",
      "path": "/dev",
      "protocol": "HTTP/1.1",
      "sourceIp": "IP",
      "userAgent": "agent"
    },
    "requestId": "id",
    "routeKey": "$default",
    "stage": "$default",
    "time": "12/Mar/2020:19:03:58 +0000",
    "timeEpoch": 1583348638390
  },
  "pathParameters": {
    "parameter1": "value1"
  },
  "isBase64Encoded": false,
  "stageVariables": {
    "stageVariable1": "value1",
    "stageVariable2": "value2"
  }
}
You should get a status 200 response with an html body.
Creating an API Gateway for the server
Only two more steps to go! For the API Gateway, we're going to need the following components:
- The API Gateway
- A resource policy that enables API Gateway to trigger the lambda function
- A lambda integration
- A route
- An API Stage
Let's write this, continuing to expand index.ts:
// It's preferable to move this const to the top of the file
// If you've decided to use something else than dev for the stack/stage name,
// make sure to update the server.ts code accordingly
const stack = pulumi.getStack();

const apigw = new aws.apigatewayv2.Api('httpApiGateway', {
  protocolType: 'HTTP',
});

new aws.lambda.Permission('lambdaPermission', {
  action: 'lambda:InvokeFunction',
  principal: 'apigateway.amazonaws.com',
  function: lambda,
  sourceArn: pulumi.interpolate`${apigw.executionArn}/*/*`,
});

const integration = new aws.apigatewayv2.Integration('lambdaIntegration', {
  apiId: apigw.id,
  integrationType: 'AWS_PROXY',
  integrationUri: lambda.arn,
  payloadFormatVersion: '2.0',
});

const route = new aws.apigatewayv2.Route('apiRoute', {
  apiId: apigw.id,
  routeKey: '$default',
  target: pulumi.interpolate`integrations/${integration.id}`,
});

const stage = new aws.apigatewayv2.Stage('apiStage', {
  apiId: apigw.id,
  name: stack,
  routeSettings: [
    {
      routeKey: route.routeKey,
      throttlingBurstLimit: 5000,
      throttlingRateLimit: 10000,
    },
  ],
  autoDeploy: true,
});

export const httpApiEndpoint = pulumi.interpolate`${apigw.apiEndpoint}/${stage.name}`;
Once again, we can deploy our infrastructure:
pulumi up
And simply open the endpoint in our browser to test it.
Hurray, it works!

However, our static assets are not yet being loaded:

Let's fix that by moving to the last step: creating a CloudFront distribution.
Creating a CloudFront distribution
CloudFront distributions are made of two main components: origins, and behaviors.
Origins are the sources of content served by the distribution. In our case, it's going to be the S3 bucket that we configure previously, and the API Gateway that links to our lambda function.
Behaviors define the rules that apply to the requests coming to the distribution, including routing between origins, and caching behavior.
To recap, we're going to need:
- A CloudFront distribution
- An S3 origin
- A custom origin for API Gateway
- A behavior for the default route
- A behavior for the /favicon.ico route
- A behavior for the /assets/* route
- An origin access control to allow CloudFront to access the S3 bucket
- A resource policy on the S3 bucket to allow CloudFront to access the S3 bucket
Let's create all of this:
// Add the import at the top of the file
import * as url from 'url';

// These uuids are defined by AWS, you can find them in the CloudFormation documentation
const cachingDisabledPolicyId = '4135ea2d-6df8-44a3-9df3-4b5a84be39ad';
const cachingOptimizedPolicyId = '658327ea-f89d-4fab-a63d-7e88639e58f6';
const allVieverExceptHostHeaderPolicyId = 'b689b0a8-53d0-40ab-baf2-68738e2966ac';

const cloudfrontOAC = new aws.cloudfront.OriginAccessControl('cloudfrontOAC', {
  originAccessControlOriginType: 's3',
  signingBehavior: 'always',
  signingProtocol: 'sigv4',
});

const distribution = new aws.cloudfront.Distribution('distribution', {
  enabled: true,
  httpVersion: 'http2',
  origins: [
    {
      originId: 'S3Origin',
      domainName: bucket.bucketDomainName,
      originAccessControlId: cloudfrontOAC.id,
    },
    {
      originId: 'APIGatewayOrigin',
      domainName: pulumi.interpolate`${httpApiEndpoint.apply((endpoint) => url.parse(endpoint).hostname)}`,
      originPath: pulumi.interpolate`/${stack}`,
      customOriginConfig: {
        httpPort: 80,
        httpsPort: 443,
        originProtocolPolicy: 'https-only',
        originSslProtocols: ['TLSv1.2'],
      },
    },
  ],
  defaultRootObject: '',
  defaultCacheBehavior: {
    allowedMethods: ['DELETE', 'GET', 'HEAD', 'OPTIONS', 'PATCH', 'POST', 'PUT'],
    cachedMethods: ['GET', 'HEAD', 'OPTIONS'],
    compress: false,
    cachePolicyId: cachingDisabledPolicyId,
    originRequestPolicyId: allVieverExceptHostHeaderPolicyId,
    targetOriginId: 'APIGatewayOrigin',
    viewerProtocolPolicy: 'redirect-to-https',
  },
  orderedCacheBehaviors: [
    {
      pathPattern: '/favicon.ico',
      allowedMethods: ['GET', 'HEAD'],
      cachedMethods: ['GET', 'HEAD'],
      compress: true,
      cachePolicyId: cachingOptimizedPolicyId,
      targetOriginId: 'S3Origin',
      viewerProtocolPolicy: 'redirect-to-https',
    },
    {
      pathPattern: '/assets/*',
      allowedMethods: ['GET', 'HEAD'],
      cachedMethods: ['GET', 'HEAD'],
      compress: true,
      cachePolicyId: cachingOptimizedPolicyId,
      targetOriginId: 'S3Origin',
      viewerProtocolPolicy: 'redirect-to-https',
    },
  ],
  restrictions: {
    geoRestriction: {
      restrictionType: 'none',
    },
  },
  viewerCertificate: {
    cloudfrontDefaultCertificate: true,
  },
});

new aws.s3.BucketPolicy('allowCloudFrontBucketPolicy', {
  bucket: bucket.bucket,
  policy: {
    Version: '2012-10-17',
    Statement: [
      {
        Sid: 'AllowCloudFrontServicePrincipalRead',
        Effect: 'Allow',
        Principal: {
          Service: 'cloudfront.amazonaws.com',
        },
        Action: ['s3:GetObject'],
        Resource: pulumi.interpolate`${bucket.arn}/*`,
        Condition: {
          StringEquals: {
            'AWS:SourceArn': distribution.arn,
          },
        },
      },
    ],
  },
});

export const distributionAddress = pulumi.interpolate`https://${distribution.domainName}`;
Let's do our final deploy! It may take a few minutes for the CloudFront distribution to be created.
pulumi up
We can now visit the distribution address to see the result.
Nothing spectacular has been added compared to the http endpoint version as we haven't configured any styling or dynamic behavior yet, but everything does load this time around!

We now have a working Remix application hosted on AWS. If we update anything, we have a simple, three-steps deploy process:
-
Build the Remix application:
npx remix vite:build -
Bundle it using esbuild:
node build.cjs -
Deploy the infrastructure:
pulumi up
I recommend encapsulating this in a single build-deploy script:
"scripts": {
    "build-deploy": "remix vite:build && node build.cjs && cd infrastructure && pulumi up"
}
Recap and next steps
In this article, we've learned how to:
- Build Remix into a working server bundle
- Architecture a simple serverless application
- Deploy it to AWS using Pulumi
So, what's next ?
- Add some styling to the application. I recommend using Tailwind, which is very easy to install on Remix.
- Add a custom domain using Route53
- Create a prod stage in Pulumi
- Build an app you'll be proud of!
The full code that results from this article is available at https://github.com/gautierblandin/remix-lambda-starter.
Further improvements
When bundling the server, we've had to use esbuild. I have tried for a few hours to make it work using Vite directly, but no amount of tinkering with rollup plugins made it work. If you manage to make it work using Vite, please let me know! I'm reachable at gautier.blandin.dev@gmail.com

Top comments (4)
Hi, Is it possible to serve the assets js file from the lambda instead of an S3 bucket?
Yes, but I don't see a good justification for doing this rather than serving them from your bucket.
Serving assets from your lambda is going to be much more expensive and increase the latency. Unless you have an extremely good justification for this, you should not do this.
Hi,
Sorry for such a late reply.
I had issues which I don't remember making it work with esm, which is why I went with cjs.
If you manage to make it work with esm, it's obviously better.