
Building on the fundamentals covered in my previous article on AWS Elastic Beanstalk, let's now explore the deployment of a highly-available, Dockerized e-commerce application in a custom VPC using AWS Elastic Beanstalk. [https://www.linkedin.com/posts/samuel-ojo-oluwagbenga_unlock-the-power-of-seamless-deployment-with-activity-7144041312550387712-lc8p?utm_source=share&utm_medium=member_desktop]
My Custom VPC will be deployed using terraform (IaC tool) with 2 public and private subnets, an internet gateway and one Nat gateway ( to keep the cost low) in the public subnet.
Focus is not on Terraform deployment, however, you can access the terraform configuration codes and the Dockerfile in the link below.
https://github.com/7hundredtech/Terraform-_-ElasticBeanstalk_Project/tree/main
So lets get started!!!
Step1: Custom VPC deployed through terraform.


See below from the AWS Management console.
VPC

Internet Gateway

Subnets

Nat-Gateway

Security Group

Step 2: Elastic Beanstalk Configuration using the AWS Management Console
- Navigate to Elastic Beanstalk console and click on create application

Configure Environment.
- Environment tier: Choose Web server environment
- Application Name: Choose application name. I will be using e-commerce-web
- Environment Name: It will be generate with automatically with your application name, but this can be changed to suit your purpose.
- Domain: Leave as default.
- Environment description: You can provide any description as required.
- Platform type: Select Managed Platform
- Platform: Select the platform for running your codes. i will be using Docker.
- Platform branch and version will be generated automatically.
- Application code: Select upload your code. I will be uploading the code for my application from my local machine. Note that it must be a zip file.
- Version label: Give your code a version. i will be using Ver01
- Preset: Choose high availability because we will be deploying in 2 availability zones.
Click Next


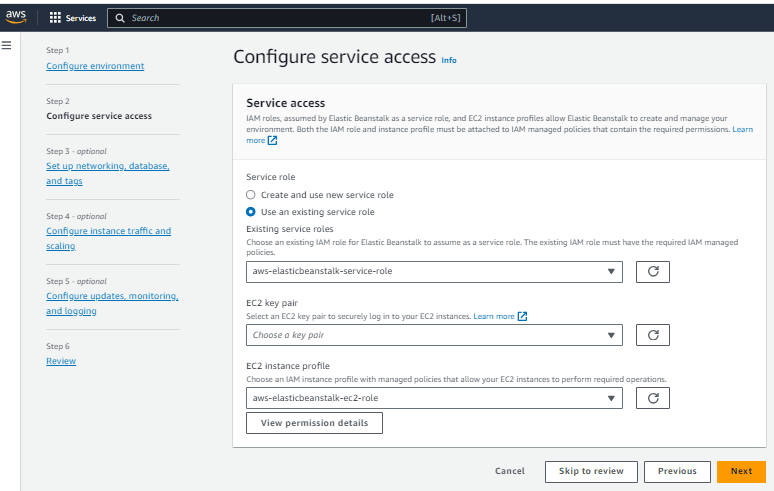
** Configure service access**
- Service Role: Create a new role or use an existing role. I will be using an existing role.
- Ec2-Key pair: I wont be using any key pair since i have no intention of logging into the EC2 instances. But if you intend to access the instances, you can create a key pair.
- Ec2 instance Profile:I will be using IAM instance profile with managed policies that allow your EC2 instances to perform required operations.
Click Next
- Virtual Private Cloud (vpc): Select the custom vpc deployed using the terraform code.** dev-vpc**
- Public IP Address: Do not activate. we will access our website through the load balancer
- Instance Subnets: Select the 2 private subnets from our custom vpc.
- Database: We are not connecting to a DB. So do not enable Leave other options as default and click on Next


Configure instance traffic and scaling
- Root Volume (Boot Device): Leave as default
- Amazon cloud Monitoring: Leave as default
- EC2 Security Group: Select the security group created with the terraform code.
- Autoscaling group: Choose your desired Min and Max number of instances and leave others as options as default
- Instance type:Am using t2.micro to keep within the free tier limit.


Load Balancer Network Settings
- Visibility: Select Public
- Load Balancer Subnets: Select the 2 public subnets from our custom vpc
- Load Balancer Type: Select Application Load Balancer . Leave other options as default and click on Next

Configure updates, monitoring, and logging
- Leave all options as default and click Next
- Review your configuration and Click on Submit
- Environment is been launched by Elastic Beanstalk

*View events as underlying infrastructure are been deployed using cloud formation *

Environment deployed successfully

So lets check what Elastic Beanstalk deployed for us.
EC2 instance for our E-commerce website

Autoscaling group

Application Load Balancer

Target Group

*Step 3: Accessing our E-commerce website *
Copy and paste the DNS endpoint of the Load balancer in your browser.

The website should display as shown below.

Congratulations!!! We have deployed a highly available e-commerce website using AWS Elastic Beanstalk.
Don't forget to clean up to avoid unexpected bills on your account.
Thanks for Reading.

Top comments (0)