
We have outlined the steps below to integrate with Microsoft Dynamics 365 Business Central below. Following these steps should save you immense time that would have otherwise been spent on unnecessary research and navigation.
If you are looking to natively integrate with all leading accounting applications such as QuickBooks Online, Wave, FreshBooks, Sage, and Xero? Use Truto.one’s Unified API for Accounting for free. It’s built for developers by developers to natively integrate all accounting applications in one go.
⚠️ This post is not an in-depth tutorial on how to build OAuth apps in general, some prior knowledge of how OAuth apps work is required.
Integrating with Microsoft Dynamics 365 Business Central REST API can be a great way to automate your business processes and improve your overall efficiency. In this blog post, we'll walk you through the steps to integrate with the Microsoft Dynamics 365 Business Central API by creating an Azure AD OAuth App and show you how it can benefit your business.
Sign up for a Microsoft Dynamics 365 Business Central account
Before you can start integrating with the Microsoft Dynamics 365 Business Central API, you'll need to sign up for a Microsoft Dynamics 365 Business Central account. You can sign up for a trial account or upgrade to a paid plan.
Create an application on Azure AD
- Visit the App registration page on Azure AD
- Click "New Registration"

Click New registration to start creating new OAuth app
Enter in the details of the app, with the redirect URI.
Select the account type based on whether you want to make this OAuth app available to others (Multitenant) or if you want to use it only in your organization (Single tenant).
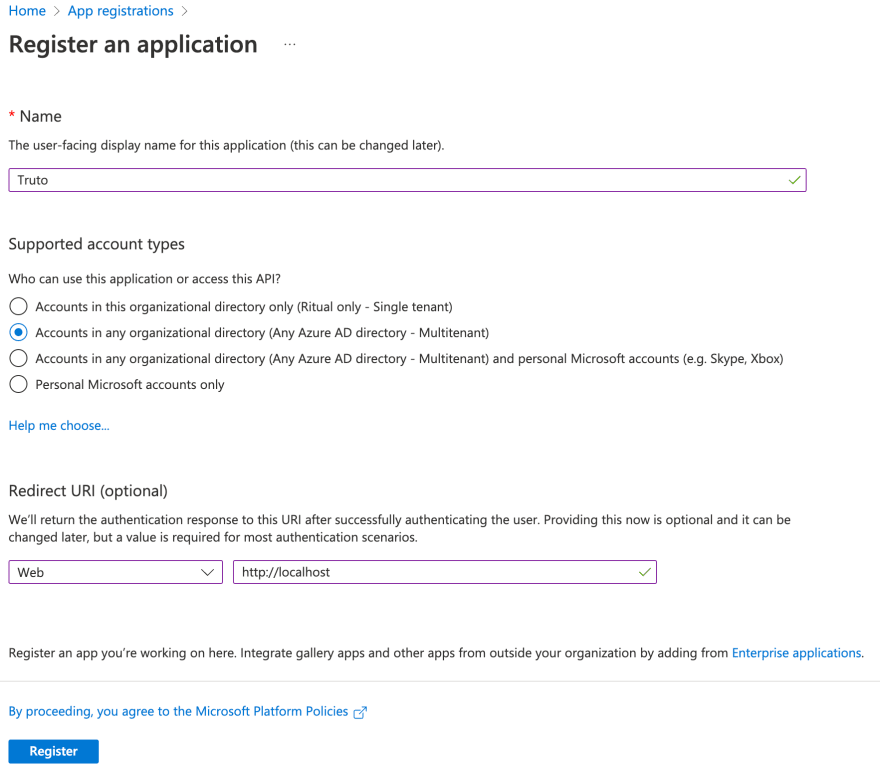
Confirm the details before submitting
Submit the form by clicking "Register"
You can get your OAuth Client ID in the Overview tab, copy and store it somewhere.
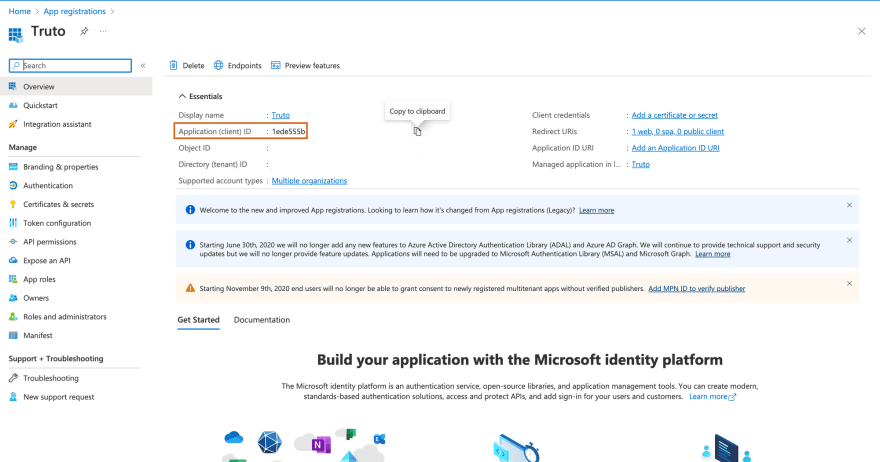
OAuth Client ID is present in the Overview tab
- On the app details page, click "Manifest" on the sidebar and change the value of
allowPublicClientin the JSON editor totrue

Update the manifest to allow public clients
- Click "API permissions" and click "Add a permission"

Click Add a permission to add Dynamics CRM permission
- Select "Dynamics 365 Business Central"
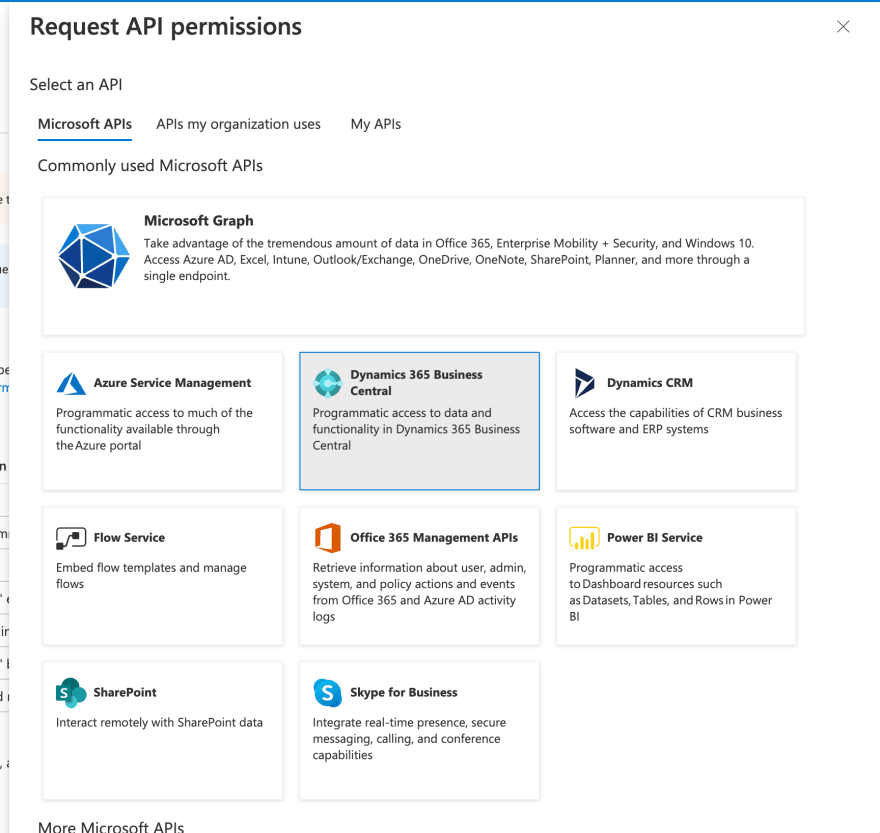
Select Dynamics 365 Business Central or search for it in the "APIs my organization uses" tab
- Check "user_impersonation" permission and "Financials.ReadWrite.All" and click "Add permissions" at the bottom.

Select user_impersonation permission and Financials.ReadWrite.All, and save by clicking Add permissions
You can also grant admin consent for your organization by clicking, "Grant admin consent for ..."
Click "Certificates & secrets" and click "New client secret"

Create an OAuth Client Secret
- Enter a friendly name for the secret and click "Add"

Enter a name and select the expiry duration
- You will be shown the Client Secret for the OAuth app, copy it and store it somewhere safe.

Copy over the Client Secret
Post creating an OAuth application, you can either use Microsoft's Authentication libraries to add OAuth flow into your web application or any other OAuth client library, you can find the OAuth URLs and flows here.
IMPORTANT : When doing OAuth flow using a non-Microsoft library, add the Web API endpoint (which you'll find in the next section) as part of the scope. Add the following to the scope parameter -> https://api.businesscentral.dynamics.com/.default
Integrate with Microsoft Dynamics 365 Business Central API
Once you have your OAuth credentials and have granted the necessary permissions to your Azure AD OAuth App, you can start integrating with Microsoft Dynamics 365 Business Central API. The Microsoft Dynamics 365 Business Central API documentation provides detailed instructions on how to perform various actions, such as creating a customer, updating an invoice, and more. You can use any programming language that supports HTTP requests to communicate with the API.
Following these steps will you put on the right path to integrating Microsoft Dynamics 365 Business Central
If you have any questions or run into a roadblock, feel free to reach out to us at support@truto.one, we’ll be happy to help
Are you looking to natively integrate with all leading Accounting applications such as QuickBooks Online, Wave, FreshBooks, Sage, and Xero? Use Truto.one’s Unified API for Accounting for free. It’s built for developers by developers to natively integrate all accounting applications in one go.
Build +200 native integrations
Use Truto's Unified API for CRM, Unified API for ATS, Unified API for HRIS, Unified API for Accounting, and 26 other categories
Get started for free

Oldest comments (0)