
Imagine this: I’m sitting in front of my computer screen, connected to a virtual Zoom classroom filled with enthusiastic students. Each of their faces is displayed on my monitor, their eyes focused attentively, eagerly waiting to uncover the mysteries of React.
As a front-end technical mentor at Learning Lions, my goal is to make the seemingly complex concepts of web development accessible and engaging. Little did I know that one particular topic would prove to be a tough nut to crack — state management in React.
Just like me when I first started my journey with React, my students were initially perplexed by the idea of managing state. How could something so fundamental be so bewildering?
That’s when it hit me — I needed to find a way to demystify state management, to transform it from an intimidating monster into a loyal ally.
And what better way to learn than by rolling up our sleeves and building something real? That’s precisely what I aim to share with you in this article.
So, fasten your seatbelts as we embark on a journey to master state management in React. We’ll go beyond mere theory and dive headfirst into practicality.
Together, we’ll build a simple yet powerful task manager application from scratch, while unraveling the secrets of state management along the way.
But before we dive in, let’s ensure everyone is on the same page. If you’re new to React, don’t fret!
I’ll guide you to the official React documentation to get you started. And for the seasoned Reactors, we’ll quickly set up our local environments and be ready to rock.
State — it’s the beating heart of any dynamic web application. It holds the key to managing and manipulating data, ensuring our apps are as lively as a salsa dance floor.
Are you ready to learn the ropes of state management in React? Let’s do this!
**
Getting Started with React
**
Now that we’re ready to dive into the exciting world of React, let’s take a moment to familiarize ourselves with this powerful JavaScript library. React allows us to build dynamic and interactive user interfaces with ease.
If you want to learn more about React and its capabilities, I highly recommend visiting the official React documentation. It’s a treasure trove of knowledge that will serve as an invaluable resource throughout your journey.
Before we start building our task manager app, we need to set up our local environment. Don’t worry; it’s a straightforward process.
First, we need to ensure that we have Node.js and Node Package Manager (npm) installed on our machines. If you don’t have them installed yet, head over to the official Node.js website and follow the instructions for your operating system.
Once Node.js is up and running, you’ll have access to the npm command-line tool. We’ll be using npm to create a new React project. Open up your terminal or command prompt and type the following command:
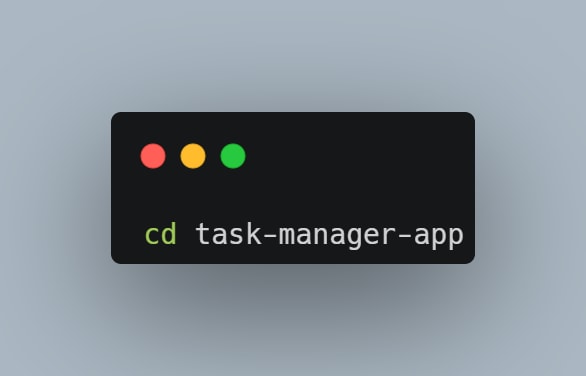
This command will create a new directory called task-manager-app and set up a fresh React project inside it. It might take a moment, so feel free to grab a cup of coffee while npm does its magic.
Once the command completes, navigate to the project directory by running:

Congratulations! You’ve just set up your React project. Now it’s time to unleash your creativity and dive into the world of state management.
We’ll now explore different techniques to manage state in React, starting with the local component state. Get ready to witness the power of React as we bring our task manager app to life!
**
State Management Techniques in React
**
Now that we have our React environment setup, let’s delve into the exciting world of state management in React.
State is a crucial concept in React that allows us to manage and update data within our components. It’s like a memory box where we can store and access dynamic information.
One of the fundamental techniques for state management in React is local component state. Local component state refers to the state that is specific to a particular component.
It allows us to store and manipulate data within that component without affecting other components.
A beginner-friendly approach to managing state in functional components is through the useState hook.
The useState hook is part of React’s built-in hooks API and provides a simple and intuitive way to manage state in functional components. It allows us to initialize a state, update its value, and access the current state whenever we need it.
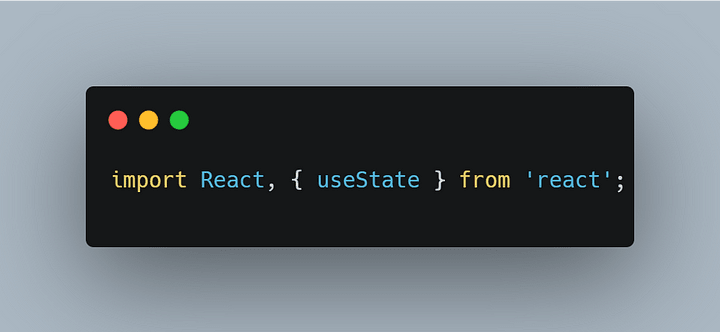
To get started with useState, we first import it from the ‘react’ package:
Next, we can use the useState hook inside our functional component. We declare a state variable and a function to update that variable, like this:
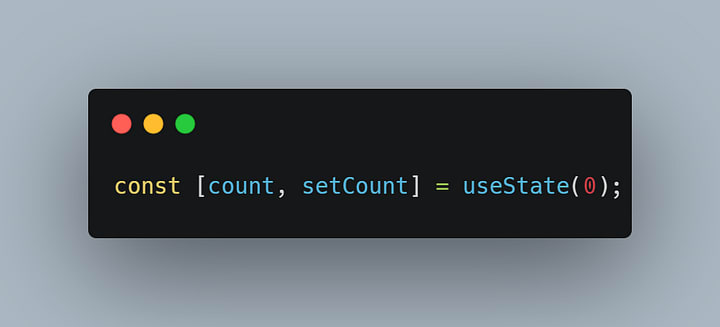
In this example, we initialize our state variable count with an initial value of 0. The setCount function is used to update the value of count later.
To access the current value of the state variable, we can simply use count in our component’s JSX code. For example:

Whenever we want to update the state, we call the setCount function and pass it the new value. React will then re-render the component and update the displayed value.
One crucial concept to understand when working with React state is immutability.
In React, state updates should be immutable, meaning we should create a new copy of the state rather than modifying the existing one directly. This ensures predictable and efficient rendering of components.
To visually demonstrate these concepts, let’s take a look at a code snippet:
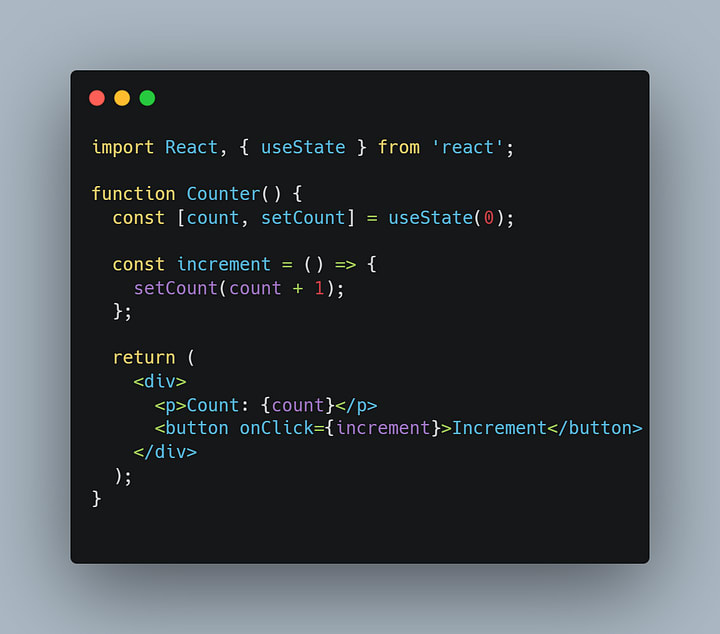
In this example, we have a simple counter component that increments the count when the button is clicked. The useState hook manages the count state, and the setCount function updates it by creating a new copy of the state with the incremented value.
By using local component state and the useState hook, we can easily manage and update state within our React components.
Next, we explore more advanced state management solutions like Redux and MobX.
But before that, take some time to experiment with local component state using useState and see the magic of React state management in action.
**
Advanced State Management Solutions
**
While local component state and the useState hook are excellent for managing state within individual components, as our React applications grow larger and more complex, we may encounter the need for more advanced state management solutions. That’s where libraries like Redux and MobX come into play.
Redux is a popular state management library for React applications. It follows the principles of Flux architecture and provides a centralized state container that can be accessed by any component in the application.
Redux’s core concept revolves around storing the application state in a single JavaScript object called the “store.” This makes it easier to manage state across different components and allows for predictable and consistent updates.
Some of the key features and benefits of Redux include:
- Single Source of Truth: Redux stores the entire application state in a single store, making it easy to track and manage state changes.
- Predictable State Updates: Redux uses pure functions called “reducers” to update the state. These reducers take the current state and an action as inputs and return a new state. This ensures that state updates are predictable and can be easily traced.
- Time Travel Debugging: Redux provides a powerful debugging tool called the Redux DevTools, which allows you to trace and inspect the state changes that occurred over time. This can be immensely helpful when diagnosing and fixing issues in your application.
- Middleware Support: Redux has a middleware architecture that enables the integration of additional functionality, such as asynchronous actions and side effects, into the state management flow. Now, why do I prefer Redux as a state management tool?
Well, Redux’s unidirectional data flow and its clear separation of concerns make it an excellent choice for managing complex state in large-scale applications.
It promotes a structured approach to state management, making it easier to reason about and maintain the application’s state.
Let’s take a look at a code example to showcase the usage of Redux:
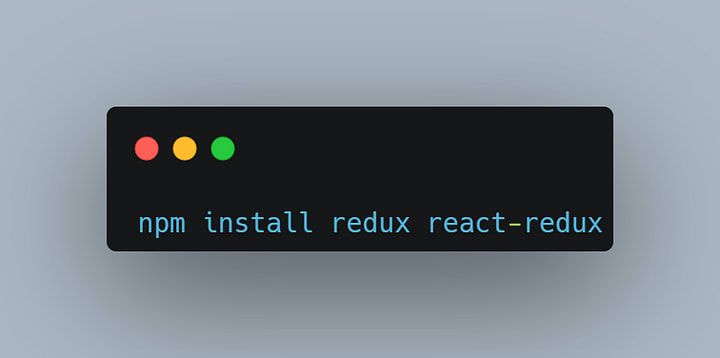
- Installation: Start by installing Redux and React Redux, the official Redux bindings for React:
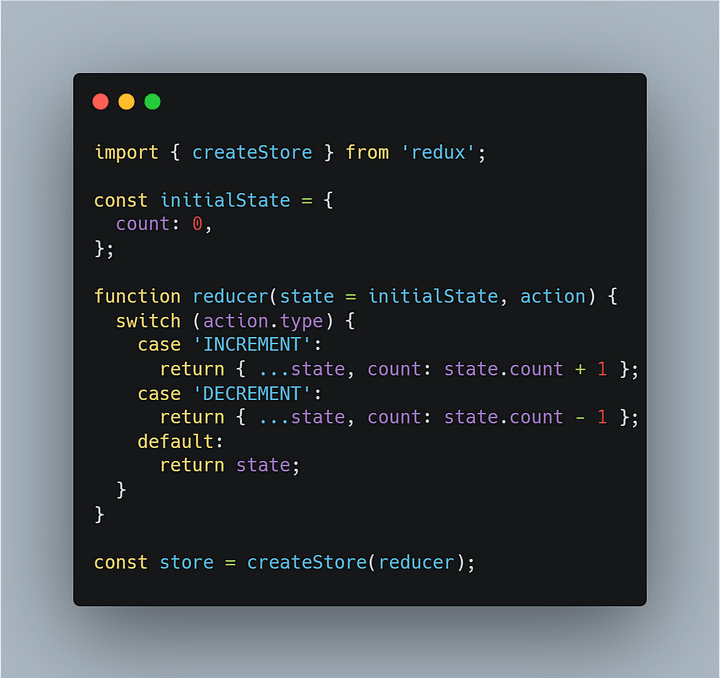
- Creating a Store: Define the initial state and create a Redux store using the createStore function:
- Accessing State: Connect your components to the Redux store using the connect function from React Redux. This allows the components to access and update the state:
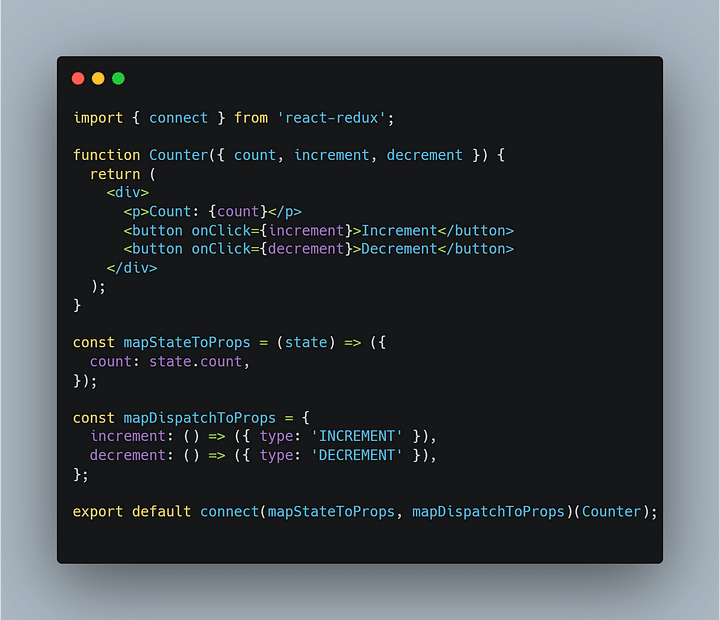
In the example above, we define a simple counter component connected to the Redux store. The component receives the count state as a prop and dispatches actions to increment or decrement the count.
By using Redux, we can effectively manage state in larger and more complex React applications.
It provides a structured and scalable approach to state management, making it easier to collaborate with other developers and maintain a robust codebase.
In the next section, we will explore best practices and tips for state management in React, helping you further optimize your application’s performance and maintainability.
**
Best Practices and Tips for State Management
**
State management is a crucial aspect of developing React applications, and employing best practices can greatly enhance the efficiency and maintainability of your code.
The following are some valuable tips and insights to help you master state management in React.
Localize State: It’s good practice to keep your state localized to the components that truly need it. This helps in maintaining a clear separation of concerns and prevents unnecessary sharing of state across unrelated components. By minimizing the scope of state, you reduce the chances of conflicts and make your code more modular and reusable.
Minimize Unnecessary Re-renders: React re-renders components whenever their state or props change. To optimize performance, identify components that don’t require frequent re-renders and make use of the React.memo higher-order component or the useMemo hook to memoize their outputs. This can prevent unnecessary rendering and improve your application’s responsiveness.
Organize and Structure State: As your application grows, maintaining a well-structured state becomes vital. Consider using nested objects or data structures like maps or sets to organize related state properties. This helps in keeping your state manageable and promotes code readability. Additionally, utilizing state normalization techniques can enhance data consistency and simplify state updates.
Addressing Common Pitfalls: State management can sometimes pose challenges. One common pitfall is overusing global state, which can lead to unnecessary complexity. Evaluate whether a particular piece of state truly needs to be globally accessible or if it can be localized. Additionally, beware of over-complicating your state structure with excessive nesting or redundant properties. Strive for simplicity and clarity.
Error Handling and Validation: Implementing proper error handling and validation mechanisms for your state can save you from potential issues down the road. Utilize tools like PropTypes or TypeScript to enforce type checking and validate the shape of your state objects. Additionally, consider incorporating error boundaries to gracefully handle and display errors to users.
By following these best practices and being mindful of potential challenges, you can significantly improve your state management skills in React.
Remember, mastering state management is an ongoing process that requires practice and continuous learning.
To further enhance your understanding, I recommend exploring the React documentation’s section on state and lifecycle. It provides comprehensive insights into managing state and offers additional tips and examples.
As we approach the final section, I will guide you through building the task manager app using React.
This practical implementation will solidify your understanding of state management and enable you to apply the concepts discussed throughout the article. Let’s dive in!
**
Building a Simple Task Manager App
**
Now that we have covered the fundamentals of state management in React, let’s put our knowledge into practice by building a task manager app.
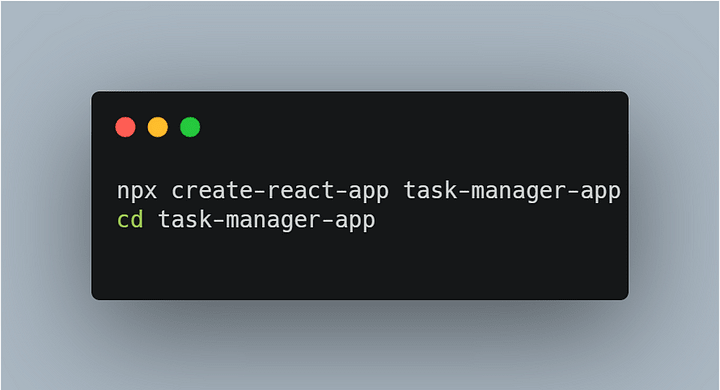
Step 1: Project Setup
First, let’s set up our React project. Open your terminal and run the following commands:
Step 2: Component Structure
In our task manager app, we’ll have two main components: TaskForm and TaskList.
The TaskForm component will handle adding new tasks, while the TaskList component will display the list of tasks.
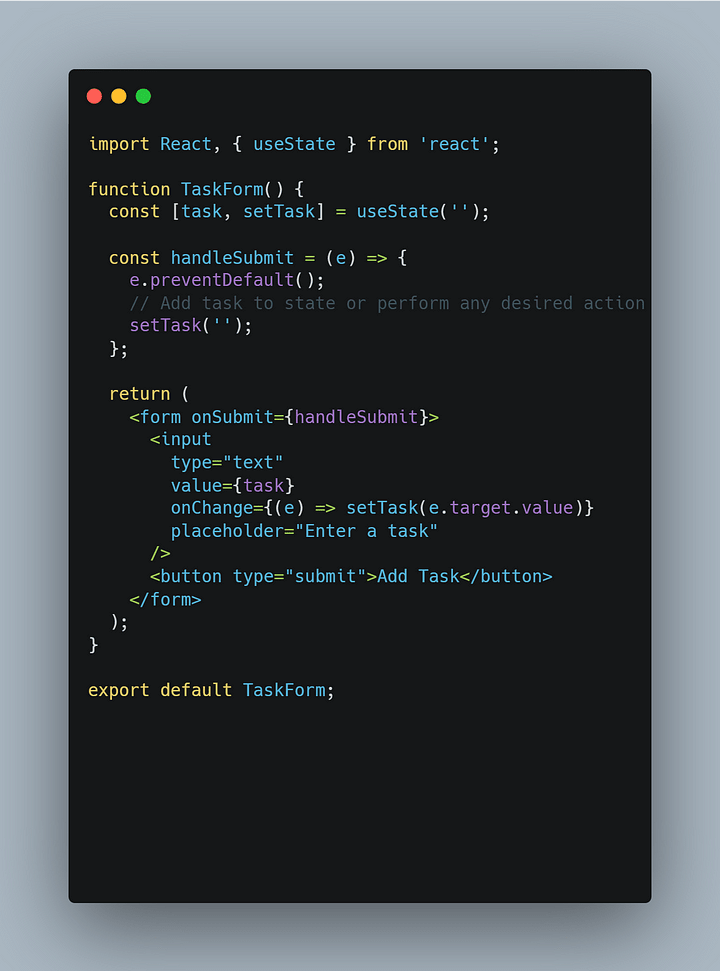
Create a new file TaskForm.js in the src directory and add the following code:
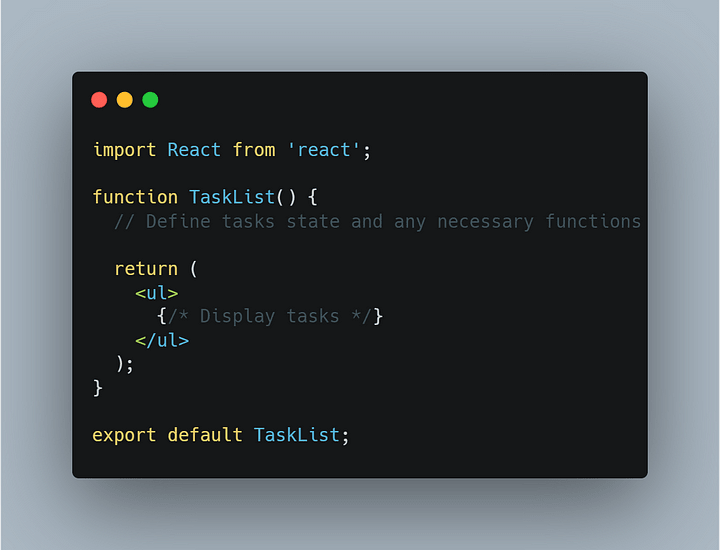
Next, create a new file TaskList.js in the src directory and add the following code:
Step 3: App Component
In the src directory, open App.js and update it with the following code:

Step 4: Styling the App
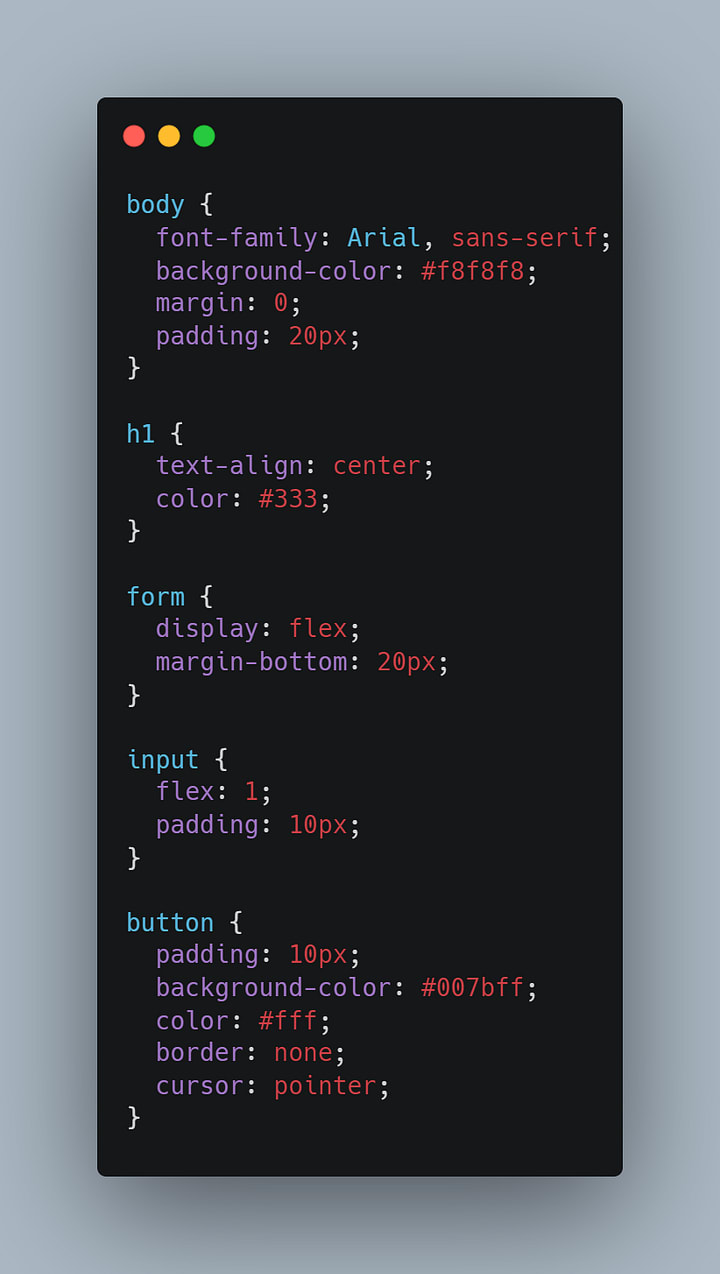
Let’s make our task manager app visually appealing. Open the src/App.css file and add the following CSS rules:
Step 5: Testing the App
To see our task manager app in action, run the following command in the terminal:

Open your browser and visit http://localhost:3000. You should now see the task manager app with an input field and a button.
Congratulations! You’ve built a simple task manager app using React and implemented state management throughout.
Feel free to enhance the app’s functionality and style according to your creativity and requirements.
**
Conclusion
**
In this journey of mastering state management in React, we have covered the essentials of handling dynamic data within our applications. We explored the concept of state, its significance, and various techniques to manage it effectively.
By building a simple task manager app, we experienced firsthand how React state management can bring our applications to life. We leveraged the useState hook to initialize, update, and access state, ensuring a seamless user experience.
Remember, state management is crucial in developing robust and interactive React applications. It allows us to efficiently handle data changes and maintain a consistent UI.
Whether you choose to stick with local component state or explore advanced libraries like Redux or MobX, understanding state management is key to mastering React.
I encourage you to share your thoughts and feedback in the comments section. Let’s continue this learning journey together!
As you embark on your own projects, don’t hesitate to experiment, practice, and further explore the world of state management in React. By doing so, you’ll unlock new possibilities and elevate your skills as a React developer.
Keep coding, keep innovating, and enjoy the incredible journey of building powerful and dynamic React applications.

Top comments (0)