![Cover image for [Slack API Tutorial] Hello World, Bolt ⚡️ - Building Your Very first App with Bolt Framework](https://media2.dev.to/dynamic/image/width=1000,height=420,fit=cover,gravity=auto,format=auto/https%3A%2F%2Fthepracticaldev.s3.amazonaws.com%2Fi%2Fzirq9eqebpnjj8wbvzi8.png)
Creating a simple bot on Slack shouldn't be too complicated, but navigating the process can be a bit complex, especially when coding from scratch! You can easily get lost in the API docs to figure out why your code failed and what argument you missed, or even to execute a small task, such as which method to use to just send a plain text message.
We definitely recognize getting started with a Slack app has some challenges, which is why we built Bolt, our official JavaScript framework to build Slack apps more intuitively! 🎉
This step-by-step tutorial will walk you through building a small Slack app (Hello World bot) that just sends a welcome message when a user opens the bot's App home space, where users can interact with bots directly.

Source Code
The source code you'll need is on Glitch, which is a web-based IDE, where you can “remix” (similar to GitHub's fork) the original code, and run it on a browser without deploying.
- Source code: https://glitch.com/edit/#!/slack-bolt-hello-world
- Remix: https://glitch.com/edit/#!/remix/slack-bolt-hello-world
To continue the tutorial, go ahead and click the Remix link above. Now you have your own code project that you can play with. Notice your remixed project has a new name, likely consisting of two random words, such as elegant-fox or thin-coin.
Creating an App Using the Events API
Setting Up an App
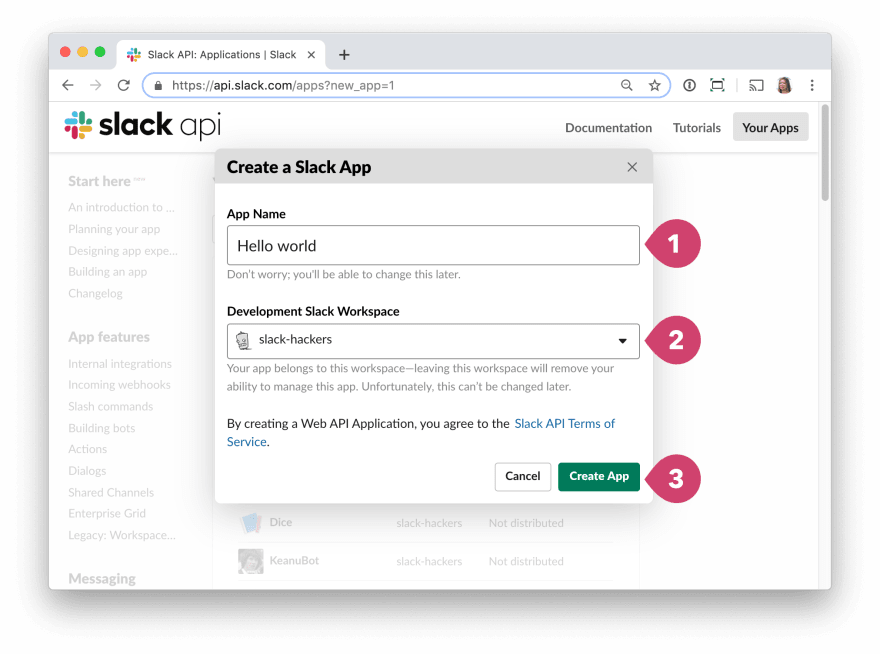
In another browser tab or window, go to the Slack App Config page to create an app. You should see a dialog pops up. (Click the green button that says Create new app if you don't see a popup).
In the dialog box:
- give your new app a name
- choose a workspace you want to install the app. We recommend using a workspace where you won't disrupt real work getting done — you can create a new one for free
- click Create App
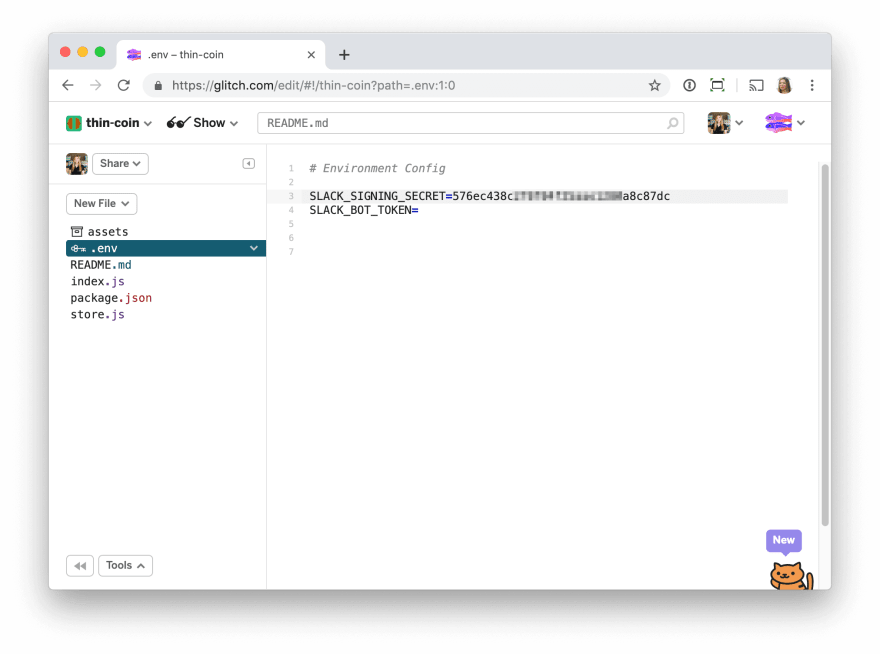
Once you create, at Basic Information screen, scroll down to App Credentials, and find your Signing secret by clicking Show to reveal it, then copy the string. You'll store it in an .env file at the next step.

Go to your Glitch project. Open your .env file, where you store all of your secrets, and paste your signing secret code. This is only visible to you, and when you share the Glitch project with somebody else, they won't see the values in the file.
Next, go back to your Slack config page and go to Bot Users from the left-hand menu, and click the Add a Bot User button.
On the next screen, just go ahead and click Add Bot User green button at the end. You can change the display name and default username anytime later if you want.

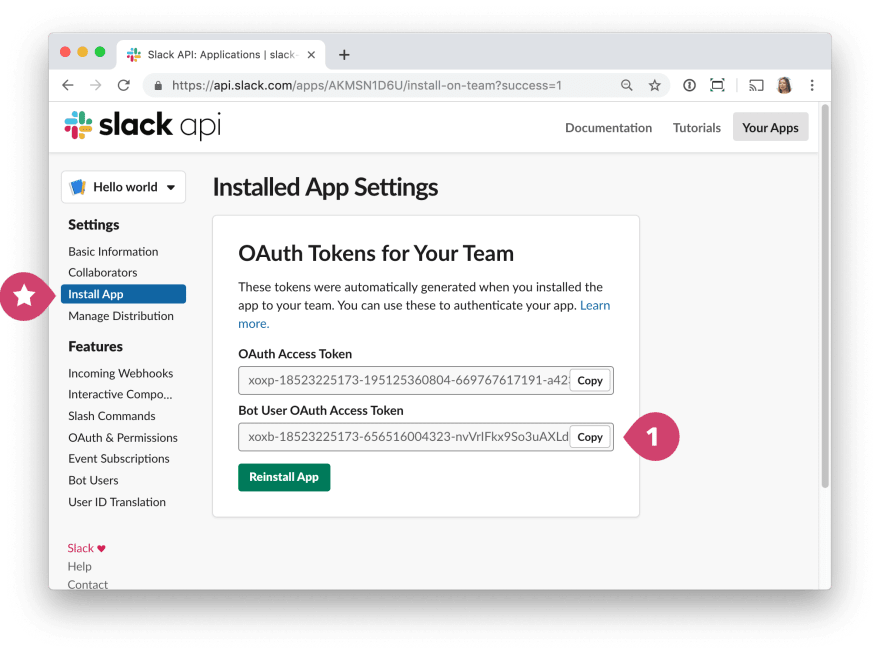
Next, install the app to your workspace once to obtain your OAuth token. Go to Install App from the left-hand menu and click the green Install App to Workspace button. Follow the screen and install it.
Once you finish installing, you should see this screen showing two tokens. For this tutorial, you only need the bot token, begins with xoxb- (1).
Now you need to store the bot token in your .env file in your Glitch project.
Setting Up an Event
For this part, you'll need to subscribe to events, so that when a Slack event happens (like a user opening App Home), your app server will receive an event payload.
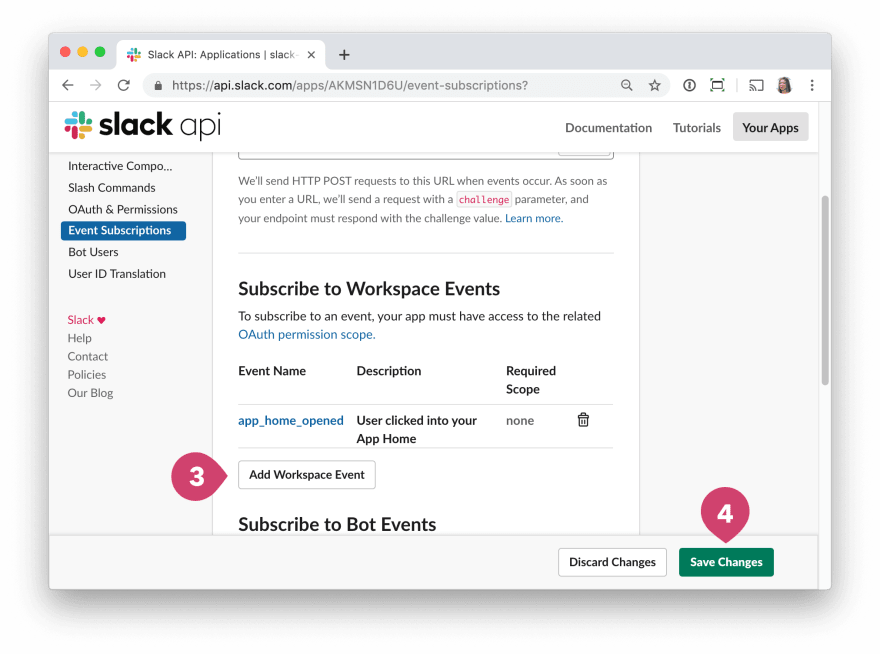
Go to Event Subscriptions from the left-hand menu, and (1) turn the toggle switch on to enable events.
Then (2) enter your Request URL. When you're coding with Bolt, your Request URL should look like https://your-server/slack/events. In this tutorial we're using Glitch, so your server URL should be project-name.glitch.me. This means the Request URL will look like, https://thin-coin.glitch.me/slack/events.
Note: You need to replace thin-coin with the project name Glitch assigned you! Copy and pasting this URL will not work.
When your request URL is correct, you should see a green checkmark.

Scroll down to Subscribe to Workspace Events. Click the Add Workspace Event button to (3) add app_home_opened event.
(4) Click Save Changes.
Coding with Bolt
Since you've remixed the completed Glitch project, your app should be up and running already. But wait, there's more! Let's get into the nitty-gritty of that code before you try the app on Slack.
Go back to your Glitch project, and click package.json. This is where the app is defined, and notice the Bolt package is already included as a dependency, so you don't need to install the package. Glitch runs the npm command for you in the background.
If you're creating a brand-new Bolt project from scratch outside of Glitch, you will need to run the npm command to install it. The first step is to create a blank project and install Bolt:
$ npm i @slack/bolt
In your index.js file, require the Bolt package, and initialize an app with your credentials:
const { App } = require('@slack/bolt');

const app = new App({
  token: process.env.SLACK_BOT_TOKEN,
  signingSecret: process.env.SLACK_SIGNING_SECRET
});

(async () => {
  await app.start(process.env.PORT || 3000);
})();
Once you run your node code (this is automatic on Glitch), your app server is up and running.
Handling Events with Bolt
To listen to any Events API events from Slack, use the Bolt event() method. This allows your app to take action when something happens in Slack. In this scenario, it's triggered when a user opens App Home.
The event() method requires an eventType of type string, and in this case it is app_home_opened.
app.event('app_home_opened', ({ event, say }) => {
    say(`Hello world, <@${event.user}>!`);
});
With the snippet, the app sends a message, “Hello world” followed by the sender's username, using the say() method.
In the Glitch sample code, it uses a pseudo database to see if the user opens the App Home for the first time or not, and send the “Hello world” message only for the first time. Send “Hi again!” after the second time. Alternatively, call another API, conversations.history to see if there is any previous messages in the chat history may be the easier.
Okay, let's try your app!
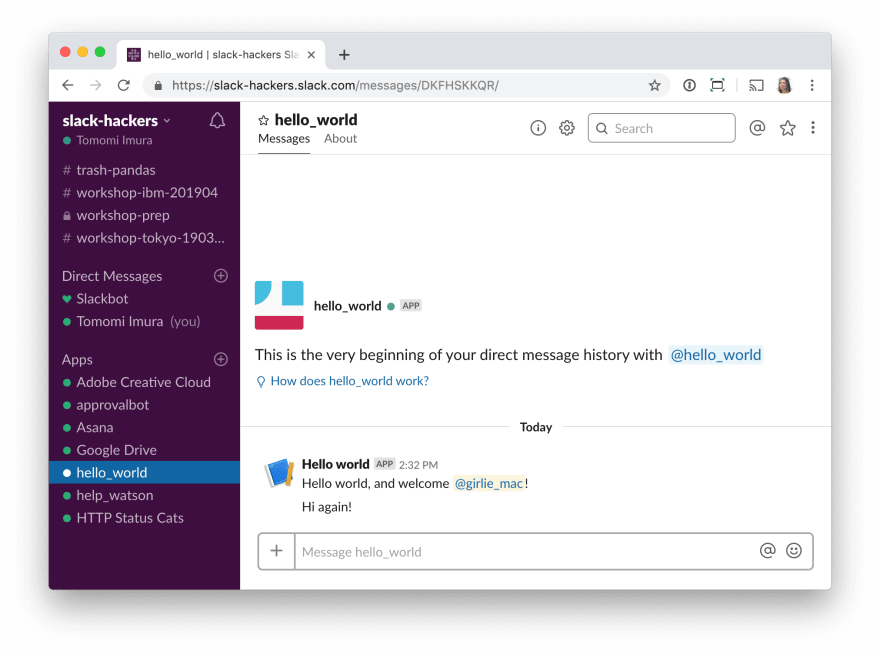
Open your workspace and click on your bot's App Home. You can find it under Apps below all channel list and Direct Messages list.
Once you open the App Home, you should receive the “Hello world” message!
Congrats, your first Bolt app is completed! ⚡
You've learned how to initialize Bolt and to use events, so that when you build a full-fledged app in the near future, you can use the App Home sample to create an onboarding process for the app!

Latest comments (0)