![Cover image for Using GitGuardian Honeytoken [cheat sheet included]](https://media2.dev.to/dynamic/image/width=1000,height=420,fit=cover,gravity=auto,format=auto/https%3A%2F%2Fdev-to-uploads.s3.amazonaws.com%2Fuploads%2Farticles%2F3aul3zuwj60zvq9jnr0z.png)
GitGuardian is dedicated to making code security and intrusion detection as simple and scalable as possible. That is why we are proud to introduce GitGuardian Honeytoken.
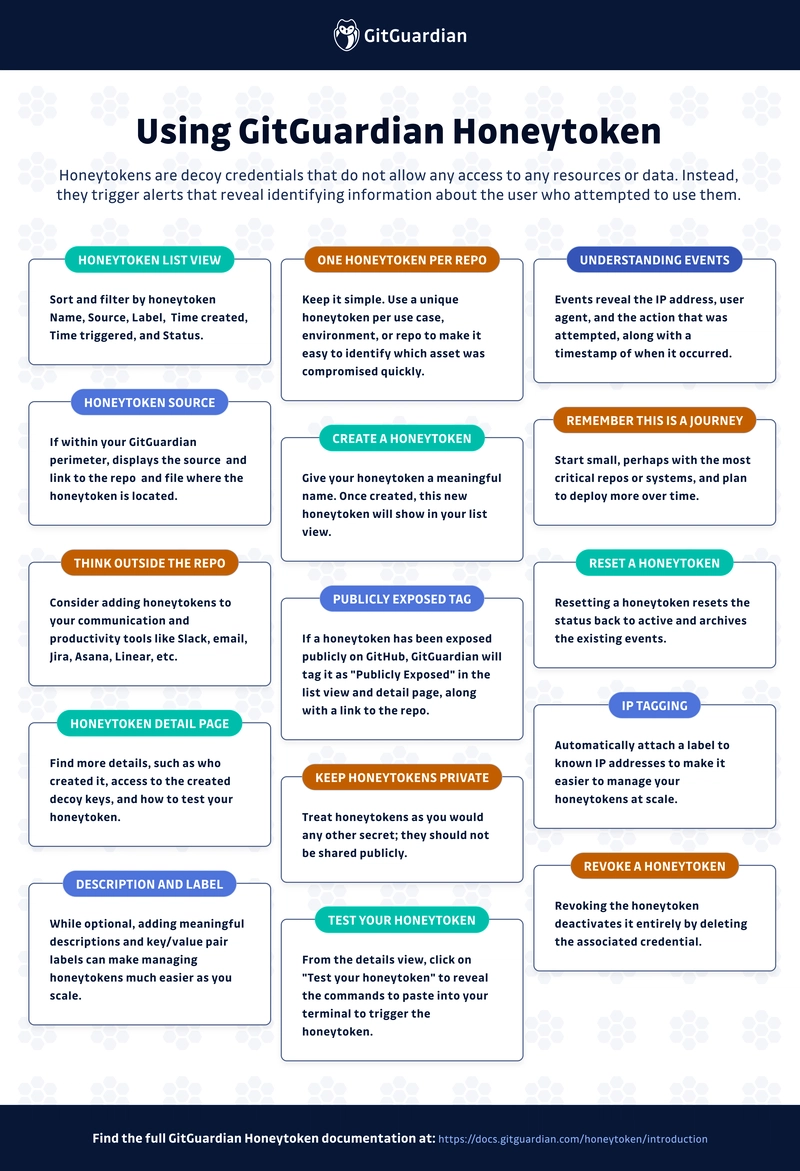
Honeytokens are decoy credentials that do not allow access to any resources or data but instead trigger alerts that reveal identifying information about who attempted to use the honeytoken. Honeytokens look identical to real credentials to an attacker, which is essential, as they don't know they are sounding an alert and won't know they should avoid them. When they attempt to use one, you will get an alert to let you know it was triggered.
This guide will walk you through understanding the GitGuardian Honeytoken dashboard and provide a handy cheat sheet for quick reference.

Understanding The GitGuardian Honeytoken Dashboard
List view
When you first open the GitGuardian dashboard and click on Honeytoken in the left-hand sidebar, you will see a list of all existing honeytokens associated with your workspace. They are, by default, listed by most recently created first.
From the list view, you can filter and sort by:
- Honeytoken name.
- Source.
- Labels.
- Time created.
- Time triggered.
- Status - Active, Triggered, or Revoked, as well as if the honeytoken is publicly exposed.

Source
If a honeytoken is deployed in a git repository already within your GitGuardian perimeter, then the source field will display its location, specifically the repository and file name. Inside the honeytoken detail page, the dashboard will also provide the number of open secrets detected in that repository and a link to the repo and file.

Publicly exposed honeytokens
One of the most powerful features of GitGuardian Honeytokens is that they can detect a code leak within minutes. Whenever a honeytoken ends up in a public GitHub repository, it will be detected by GitGuardian Public Monitoring. You will immediately be alerted to these events, and these honeytokens are then tagged as "Publicly Exposed" in both the list and detail view. Our goal is to help you triage any incidents and focus on keeping the rest of your secrets safe.

Honeytoken Detail Page
From the list view, clicking on any honeytoken's name will take you to a finer-grain honeytoken detail page that provides some additional details and shows all the events where that honeytoken has been triggered. In addition to the info shown in the list view, you will also see:
- Created by - Both the user name and user email are shown.
- Key - The decoy credentials you will insert into your project or environment. These can easily be copied with one click.
- The "Test your honeytoken" link.

Testing a honeytoken
Like with any other technology, testing honeytokens gives you confidence that it will work as expected when someone else tries to use it. Clicking the "Test your honeytoken" link in the details view opens a modal to provide you with the commands you can paste into your terminal to trigger the honeytoken. While not the only way to test your honeytoken, this is a very convenient and quick way to ensure the trigger will work.

Using GitGuardian Honeytoken
Create a honeytoken
From the list view, click on the "+ Create honeytoken" button on the right-hand side of the screen. From here, you must give your new honeytoken a name. It is a good idea to name it for the use case you intend it for, such as the project name or environment where you will place it.
You can also write a description to provide further details about the intended use and any other notes you think would be helpful. There is also the option to create your own labels. We give you total flexibility to create as many labels, comprised of key/value pairs, as you need to align with your project management methods. Both the description and label fields are optional, though we recommend them. You can also edit these fields and the name once the honeytoken has been created.
Once created, your new honeytoken will appear in the list view.

Reset a honeytoken
Resetting a honeytoken does two things, resets the status and archives the existing events. When a honeytoken is triggered, the status is updated from Active to Triggered. Resetting a honeytoken means setting the status back to Active. This makes it easy to actively track honeytokens at scale without the need to replace your decoy credentials.
Resetting a honeytoken also archives the previously reported events. By default, the Events section of the GitGuardian Honeytoken dashboard only shows open events. You can easily toggle the status filter to show all events or archived ones.
Revoke a honeytoken
Revoking a honeytoken means taking that honeytoken out of service. Revoking the honeytoken deactivates it entirely by deleting the associated credential and means events will no longer be logged for this honeytoken. If a honeytoken has been involved in an incident, you can assume it is compromised and thus useless. Revoke any and all honeytokens associated with verified security incidents once the situation has been resolved.

Understanding events
In the GitGuardian Honeytoken dashboard, an event is defined as any specific incident when a honeytoken is triggered. Every event provides valuable information about the incident, which you can use to investigate and react to intrusions or code leaks. This information includes:
- A timestamp of exactly when the event was triggered.
- The IP address of the person or entity that set off your honeytoken.
- A country flag corresponding to the IP address.
- Tags.
- The user agent a description of the operating system, device type, and software/browser where the request originated.
- The specific action they were attempting while using the honeytoken.

IP Tagging
It is very common for specific, known IP addresses to show up in honeytoken events. With IP event tags, you can automatically attach a label to those IP addresses to make it easier to manage your honeytokens. We recommend adding your network's IP range to make it easy to spot tests and internally triggered events.
GitGuardian automatically tags both GitGuardian Public Monitoring IP, the addresses used by GitGuardian to monitor public GitHub, and AWS internal IP, for events that originate inside AWS. Both of these typically appear when the honeytoken leaks publicly on GitHub.
Best Practices
There are a lot of ways to deploy and leverage honeytokens. We have several articles that go in-depth explaining how to use GitGuardian Honeytoken for your SCM repositories, your IaC and Configuration Management Tools, your CI/CD pipelines, and even your Container Registries, with more "how to" posts planned. No matter which particular use cases you have in mind for your honeytokens, here are some general best practices to consider.
Keep honeytokens in private environments
The internet is constantly being scanned for both good and nefarious reasons. Just like with any other secret, you do not want to intentionally share your honeytokens publicly. If you do, they will be triggered very quickly, most likely by service scanning and attempting to validate the credential.
Remember: The value of honeytokens is to detect when a private repository or artifact has been leaked or when a private environment has been infiltrated by error or by a bad actor.
Think beyond the repository
While adding honeytokens to a private repository is a great use case, it is far from the only way you can leverage GitGuardian Honeytoken. Any tool, service, or channel intended to be closed off from the public or from people outside your team is a great place to use a honeytoken. Consider your communication and productivity tools like Slack, email, Jira, Asana, Linear, etc. If it is meant to be private, then you should be sure it stays private, and honeytokens can help you stay on top of the situation.
Use a new honeytoken per repo or environment
Keep things simple. If an event occurs, it should be clear and obvious where the honeytoken was located. If you put the same honeytoken in multiple repos or environments, then when an event occurs, you need to sort out which exact property is affected. Is it all of them? Using one honeytoken per use case will make it much easier to identify where the breach or intrusion is happening.
Remember this is a journey, not a race
One of the common pitfalls of any new technology is trying to apply it everywhere, all at once. While the end goal is total coverage, know that it is OK to start small and gradually expand. Starting by adding honeytokens just to the most critical systems or new repositories is an excellent way to start. With the ease of creating and deploying honeytokens, especially with our API, you can get near total coverage in much less time than you think. Every honeytoken you deploy is a step closer to better security.
Honeytokens and your processes
We hope this simple guide will help as you adopt GitGuardian Honeytoken for more advanced intrusion and leak detection, in your repos and in your private environments. No matter how large or small your operation, we are positive GitGuardain Honeytoken can help you improve your security posture. Download the cheat sheet to keep nearby; once you deploy your first honeytoken, you will likely start discovering a lot more potential use cases. We are happy to help you on your security journey.

Top comments (0)