
In the Typescript 101 we have talked a lot about advantages of Typescript, discussed some use-cases, practices and tricks. Therefore, today I would like to show how you can start a new Typescript project from scratch. If you are using a front-end framework, everything happens inside of the black box, where webpack performs its magic. In this post, I would like to expose webpack configuration and demonstrate how you can spin up your next Typescript project in a couple of simple steps.
So what is the webpack? Webpack is a module bundler, a tool that gives you freedom of structuring your code however you like and takes an overhead of producing static assets, that you will be serving over the web. Webpack comes with a developed ecosystem of plugins that allow extending webpack with any additional utilities.
Table of content
Project setup
To get started, let's initialize an empty npm project: npm init.
Here are some minimal dependencies we will need:
npm i webpack webpack-cli typescript ts-loader -D
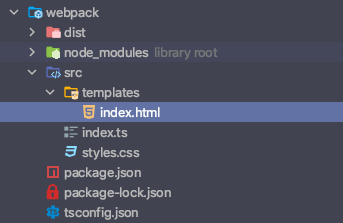
At the end of this part, you must end up with the following directory structure:

We will start by configuring Typescript for that project. All you need to do is to include tsconfig.json in the project root with the following properties:
{
  "compilerOptions": {
    "outDir": "./dist/",
    "noImplicitAny": true,
    "module": "es6",
    "target": "es5",
    "allowJs": false,
    "sourceMap": true
  }
}
Now let's continue with setting up webpack. We will place webpack.config.js in the project root and add minimal configurations to get started:
const path = require('path');

module.exports = {
  mode: "production",
  entry: path.resolve(__dirname, './src/index.ts'),
  module: {
    rules: [
      {
        test: /\.tsx?$/,
        use: 'ts-loader',
        exclude: /node_modules/,
      },
    ],
  },
  resolve: {
    extensions: ['.tsx', '.ts', '.js'],
  },
  output: {
    filename: 'bundle.js',
    path: path.resolve(__dirname, 'dist'),
  },
};
Some remarks here:
- Default webpack mode is
production, but it's always good to be explicit. Inproductionmode webpack will minify your code -
entryallows to configure entry points for your project, it can be a powerful tool should you decide to have code-splitting - The array of
rulesdefines what actions bundler should undertake when it encounters a file of a specific type. For now, we only expect typescript files in the project, so we add only one rule, which will make use ofts-loader, a plugin, capable of parsingtsfiles. - In the
outputobject one might provide a resulting file name and the directory where bundle assets will be added
That's it. Let's add an npm script to the package.json
...
  "scripts": {
    "build": "webpack"
  },
...
write some code to /src/index.ts
window.addEventListener("load", () => {
  const header = document.createElement("h1");
  header.innerText = "Webpack❤️TS"

  const body = document.querySelector("body");
  body.appendChild(header);
})
and build the project with: npm run build.
You will see that once your code is compiled, a new dist folder is added to the project root.

Congrats! You've built your first Typescript project! 🚀🚀
HTML templates
It's great to have a compiled script, now you can reference it in your html file, and you are good to go, right? No! 😀 Luckily webpack offers a better way to deal with that setup.
Firstly, we will install some additional dependencies: npm i html-webpack-plugin clean-webpack-plugin -D. We will also need a new templates folder where we will place our html template:
/src/templates/index.html:
<!doctype html>
<html lang="en">
<head>
    <meta charset="UTF-8">
    <meta name="viewport"
          content="width=device-width, user-scalable=no, initial-scale=1.0, maximum-scale=1.0, minimum-scale=1.0">
    <meta http-equiv="X-UA-Compatible" content="ie=edge">
    <title>Webpack❤️TS</title>
</head>
<body>

</body>
</html>
In the webpack.config.js we will use newly installed plugins:
-
html-webpack-plugintakes care of including your bundle to the html template -
clean-webpack-pluginis a simple plugin which cleans up output folder on every build.
...
const HtmlWebpackPlugin = require('html-webpack-plugin');
const {CleanWebpackPlugin} = require("clean-webpack-plugin");

module.exports = {
  ...
  output: {
    filename: 'bundle.[hash].js', // <- ensure unique bundle name
    path: path.resolve(__dirname, 'dist'),
  },
  plugins: [
    new CleanWebpackPlugin(),
    new HtmlWebpackPlugin({
      template: path.resolve(__dirname, "./src/templates/index.html")
    })
  ]
};
You might notice that besides adding the plugins, we have changed the output file name. [hash] is a webpack keyword, that will add a hash to your bundle name. A unique name is essential to ensure that you always see up to date version in your browser window and not something cached.
Let's build again: npm run build. If you check out the dist folder now, you will see that webpack has produced a bundle with a hash in the file name as well as index.html which already includes you bundle in the script tag src.

/dist/index.html:
<!doctype html>
<html lang="en">
<head>
    <meta charset="UTF-8">
    <meta name="viewport" content="width=device-width,user-scalable=no,initial-scale=1,maximum-scale=1,minimum-scale=1">
    <meta http-equiv="X-UA-Compatible" content="ie=edge">
    <title>Webpack❤️TS</title></head>
<body>
<script src="bundle.ff6beaa8d270fd22434a.js"></script>
</body>
</html>
That should be already sufficient for opening the html file in the browser, but can we do even better? 🤔
Sure we can!
Webpack development server
Webpack development server allows us to serve assets (such a surprise!) and enables live reload, whenever you change something in your code.
npm i webpack-development-server -D
While using webpack, it is common to split your configurations into several parts:
-
webpack.common.js- will include configurations that are shared between multiple setups. In our casedevvsprod -
webpack.dev.jswill include dev-specific configs such as webpack dev server, source map, etc -
webpack.prod.jsis responsible for configuring production build. It usually includes some optimization settings and ensures that the output is "production-ready".

// webpack.common.js
const path = require('path');
const HtmlWebpackPlugin = require('html-webpack-plugin');
const {CleanWebpackPlugin} = require("clean-webpack-plugin");

module.exports = {
  entry: path.resolve(__dirname, './src/index.ts'),
  module: {
    rules: [
      {
        test: /\.tsx?$/,
        use: 'ts-loader',
        exclude: /node_modules/,
      },
    ],
  },
  resolve: {
    extensions: ['.tsx', '.ts', '.js'],
  },
  output: {
    filename: 'bundle.[hash].js',
    path: path.resolve(__dirname, 'dist'),
  },
  plugins: [
    new CleanWebpackPlugin(),
    new HtmlWebpackPlugin({
      template: path.resolve(__dirname, "./src/templates/index.html")
    })
  ]
};
// webpack.dev.js
const webpackCommon = require('./webpack.common');
const path = require('path');

module.exports = {
  ...webpackCommon,
  devtool: "inline-source-map",
  mode: "development",
  devServer: {
    contentBase: path.join(__dirname, 'dist'),
    port: 3000
  }
};
// webpack.prod.js
const webpackCommon = require('./webpack.common');

module.exports = {
  ...webpackCommon,
  mode: "production",
};
We should also update npm script, to make sure, that a proper configuration file is used.
// package.json
...
  "scripts": {
    "start": "webpack-dev-server --config webpack.dev.js",
    "build": "webpack --config webpack.prod.js"
  },
...
Run npm start - your project will be available on http://localhost:3000
Using JS libraries
Now, as we have all set up, using a third-party library is very straightforward.
Let's include lodash as a dependency:
npm i lodash -S && npm i @types/lodash -D
And use it in the code:
import * as _ from "lodash";

window.addEventListener("load", () => {
    const header = document.createElement("h1");
    header.innerText = "Webpack❤️TS"

    const body = document.querySelector("body");
    body.appendChild(header);

    const food = [{id: 0, name: "pizza"}, {id: 1, name: "sushi"}]

    const foodElement = document.createElement("h2")
    foodElement.innerText = _.find(food, {id: 0})?.name;

    body.appendChild(foodElement);
})
Easy, right? 😇
Project styles
Probably the only missing piece now is the styles which we might want to include to our project. With webpack, you can use any style processor, but for the sake of the example, I will stick to the plain CSS.
As always, we will need some webpack plugins to handle the styles:
npm i css-loader mini-css-extract-plugin -D
Let's add them to the webpack.common.js:
// webpack.common.js
...
const MiniCssExtractPlugin = require('mini-css-extract-plugin');

module.exports = {
  ...
  module: {
    rules: [
      ...
      {
        test: /\.css$/i,
        use: [
          MiniCssExtractPlugin.loader,
          'css-loader'
        ],
      },
    ],
  },
  plugins: [
    ...
    new MiniCssExtractPlugin({filename: "styles.[hash].css"})
  ]
};
As webpack is a js-centric library, everything that we want to be included in the final bundle needs to be import in the .ts file:
// /src/styles.css
h2 {
    color: #1976d2;
}

// /src/index.ts
import "./styles.css";
import * as _ from "lodash";
...
Styles will be automatically included in the html file.
Run npm start for development and npm run build to create a production build! Good luck!
You can check out full code in my github repository!
If you liked my post, please spread a word and follow me on Twitter 🚀 for more exciting content about web development.

Top comments (6)
Thank you so much! It was a life saver.
btw, you've got another typo in your article, you mistakenly wrote
npm i html-webpack-plugin clean-webpack-plugin -Dwhen you mean to wrotenpm i -D webpack-development-server.👍 thanks
Hi Gleb! Thanks for this article!
Looks like you have a typo in your instructions here:
npm i webpack-html-plugin clean-webpack-plugin -DI believe you meant
html-webpack-plugin:)Best,
Alex
Hey Alex!
Thanks for spotting a typo! I fixed that 👍
No, you didn't! check again... :))
That was embarrassing, thanks for pointing it out! 👍