
According to Intelligent Investment, e-commerce sales make up 14% - 20% of retail sales. Understanding that a relatively large chunk of our sales is made online, it is important to find ways to make it as efficient as humanely possible, thus the creation of product catalogs.
Product catalogs display products currently on sale with the necessary information a user needs to make a purchase. Product catalogs are convenient and increasingly popular.
What we will be building
This post discusses uploading product information using the Cloudinary upload widget and then storing this product data in a serverless database called Xata.
At the end of this article, we will use these products to build an e-commerce product catalog.
GitHub URL
https://github.com/Iheanacho-ai/Xata-Ecommerce-Catalog
Prerequisites
To get the most out of this article, we require the following:
- A basic understanding of CSS, JavaScript, and React.js
- Cloudinary account, we can create a free one here
- A Xata account. Create a free one here
Setting up our Next.js app
Next.js is an open-source React framework that enables us to build server-side rendered static web applications.
To create our Next.js app, we navigate to our preferred directory and run the terminal command below:
    npx create-next-app@latest
    # or
    yarn create next-app
After creating our app, we change the directory to the project and start a development server with this terminal code:
    cd <name of our project>
    npm run dev
To see our app, we go to http://localhost:3000.
Installing Tailwind CSS
Tailwind CSS is a "utility-first" CSS framework that allows us to create user interfaces for web applications rapidly.
To install Tailwind CSS in our project, we run these terminal commands.
    npm install -D tailwindcss postcss autoprefixer
    npx tailwindcss init -p
These commands create two files in the root directory of our project, tailwind.config.js and postcss.config.js.
In our tailwind.config.js, we add the paths to all our template files with the code below.
    module.exports = {
      content: [
        "./pages/**/*.{js,ts,jsx,tsx}",
        "./components/**/*.{js,ts,jsx,tsx}",
      ],
      theme: {
        extend: {},
      },
      plugins: [],
    }
Next, we add the tailwind directives in our styles/global.css file.
    @tailwind base;
    @tailwind components;
    @tailwind utilities;
Installing the Cloudinary Dependencies
Cloudinary is a cloud-based service that provides an end-to-end image and video management solution, including uploads, storage, manipulations, optimizations, and delivery.
We run this terminal command to install the Cloudinary dependencies in our project.
npm i @cloudinary/url-gen @cloudinary/react
Setting up a Xata Workspace
Xata is a serverless data platform that offers developers a serverless relational database, search engine, and analytics engine, all behind the consistent API.
Xata allows developers to build applications easier and faster.
To start using Xata, we need to create a workspace. Xata workspaces represent our organizations and help to secure our data.
Next, we click on 'Add a database' to create a database.


After creating our database, we click on 'Start from Scratch' to create tables.

We add tables by clicking the '+' icon on the table header. These tables can represent data attributes, and we will create three more tables which are:
- productName, which holds strings
- productPrice, which has integers ****
- productURL, which contains links

Installing Xata
After we created our Xata database, we need to install the Xata CLI globally with this terminal command:
npm i -g @xata.io/cli
Next, we authenticate ourselves by logging in with this terminal command:
xata auth login
When executing this command, we have two options: to create a new API key or use an existing one. We will create a new API key because this is a new project. To know more about Xata API keys, check out the Xata documentation.
Next, we initialize our project by running this terminal command:
xata init
Running this command will prompt a questionnaire. We should answer these questions as follow:

After answering the questions, Xata adds our API key to our .env file and sets up our project.
We then restart our development server to read the contents in our .env file.
Creating our Product Catalog
We create our product catalog page in our index.js file. This page will be divided into two sections, one to collect product data and the other to display the product data.
In this section, we are going to work on the form for the collection of product data. To create the Tailwind CSS-styled form, we paste this code into our index.js file.
[https://gist.github.com/Iheanacho-ai/998c7ba832c21a36ff7226e03ee4a4a0]
Next, we add these styles to center and re-size our form in our global.css file.
    .product-container{
      margin-left: 37%;
      width: 30%;
    }
Here is how our product catalog form looks:

Embedding the Cloudinary Upload Widget
To upload images to our Xata database, we will use the Cloudinary upload widget. The Cloudinary upload widget is an interactive user interface that allows users to upload media from various sources.
We need to include the Cloudinary widget JavaScript file in the Head section of our index.js file to use the widget.
    <div className= 'product-catalog'>
        <Head>
          <script src="https://upload-widget.cloudinary.com/global/all.js" type="text/javascript"/>
        </Head>
     ...
Creating an upload preset
With Cloudinary's upload presets, we can define actions or a set of actions that we want to occur when we upload a piece of media.
It is important to define upload presets with the Cloudinary widget.
To create an upload preset, we go to our Cloudinary Console and click on the Settings tab.

Next, we click on the Upload tab and scroll down to the Upload presets section of the page.


We then click on Add upload preset. We can use the upload preset name given to us by Cloudinary, or we can rename the upload preset.
Then we change the Signing Mode to 'Unsigned' and click the Save button to save our upload preset.

We then copy the upload preset name as we need it when creating our upload widget.
Next, we create an openupWidget() function to embed and open up our widget. In our index.js file, we write this piece of code:
    const openupWidget = () => {
      window.cloudinary.openUploadWidget(
        { cloud_name: ***, //we add our cloud name hwe
          upload_preset: 'xoskczw2'
        },
        (error, result) => {
          if (!error && result && result.event === "success") {
            console.log(result.info.url)
          }else{
            console.log(error)
          }
        }
      ).open();
    }
In the code block above, we do the following:
Use the
openUploadWidget()method that receives two parameters, thecloud_nameand our upload preset. To get ourcloud_name, we go to our Cloudinary DashboardLogs the image URL or the error encountered to the console depending on if the upload was successful or not
Next, we pass the openupWidget() function to an onClick event listener on our "Upload files" button. The onClick event listener calls our openupWidget() function each time we click our button
    <button className="bg-blue-500 hover:bg-blue-700 text-white font-bold py-2 px-4 rounded" type="button" onClick= {openupWidget}>
        Upload files
    </button>
Adding Interaction with our Xata Database
To efficiently store, retrieve and delete data from our Xata database, we need to create three variables, productName, productPrice, productURL. To create the variables we need, we start by importing the useState hook in our index.js file.
import { useState } from 'react';
Next, we create the variables with this piece of code:
    const [productName, setProductName] = useState();
    const [productPrice, setProductPrice] = useState();
    const [productURL, setProductURL] = useState()
The variables hold the following information:
- The
productNamevariable holds the name of our product - The
productPricevariable holds the price of a product - The
productURLvariable holds the image URL of the product
We update our productURL variable through the openUpWidget() function.
     const openupWidget = () => {
        window.cloudinary.openUploadWidget(
          { cloud_name: 'amarachi-2812',
            upload_preset: 'xoskczw2'
          },
          (error, result) => {
            if (!error && result && result.event === "success") {
              //we save the image URL in the productURL variable
              setproductImage(result.info.url)
            }
          }
        ).open();
      }
Next, we put the productName and productPrice variables in their respective input fields to store the input values.
    {/* productName variable goes here */}

    <div className="mt-1">
        <textarea
            id="about"
            name="about"
            rows={1}
            value= {productName}
            onChange = {(e)=> setProductName(e.target.value)}
            className="shadow-sm focus:ring-indigo-500 focus:border-indigo-500 mt-1 block w-full sm:text-sm border border-gray-300 rounded-md"
          />
    </div>
    {/* productPrice variable goes here */}

    <input
      type="text"
      name="price"
      id="price"
      value= {productPrice}
      onChange = {(e)=> setProductPrice(e.target.value)}
      className="focus:ring-indigo-500 focus:border-indigo-500 block w-full pl-7 pr-12 sm:text-sm border-gray-300 rounded-md"
      placeholder="0.00"
    />
Adding data to our database
In our api/pages folder, we add a add-product.js file to allow us safely interact with our database without exposing our Xata API key.
Next, we add this code in our /api/add-product.js file.
    //pages/api/add-product.js
    import { getXataClient } from '../../src/xata';

    const xata = getXataClient();
    const handler = async (req, res) => {
      const {productName, productPrice, productURL} = req.body;
      const result = await xata.db.product.create({productName, productPrice, productURL});
      res.send({result});
    };
    export default handler;
In the code block above, we do the following:
- Import the
getXataClientfrom thexatafile that was automatically created for us during initialization. We then create a new instance with thegetXataClientobject - We pull out the
productName,productPrice,productURLvariables from the body of our request to add to the database - Pass the variables in the Xata
createmethod to create data on our database. When passing the variables in as a parameter, it is important to note these things:- The
create()is on theproductobject because our database's name is 'product' - The variables are the same as the tables on our database
- The
- Finally, we send the resulting data to the client side after saving the data in our database
To query the api/add-product endpoint, we create a submitProduct() in our index.js file.
    const submitProduct = () => {
      fetch('/api/add-product', {
        method: 'POST',
        headers: {
          'Content-Type': 'application/json'
        },
        body: JSON.stringify({
          productName,
          productPrice,
          productURL
        })
      }).then(() => {
          window.location.reload()
        }).catch((error)=> {
          console.log(error)
        });
    }
In the code block above, we query the /api/add-product endpoint that will safely connect to Xata. We then pass the productName, productPrice, and productURL variables in the request's body so that the /api/add-product API can access them.
Next, we pass the submitProduct function to the onClick event listener on our 'Save' button.
    <button
        type="submit"
        onClick={submitProduct}
        className="cursor inline-flex justify-center py-2 px-4 border border-transparent shadow-sm text-sm font-medium rounded-md text-white bg-indigo-600 hover:bg-indigo-700 focus:outline-none focus:ring-2 focus:ring-offset-2 focus:ring-indigo-500"
        >
          Save
    </button>
Deleting data from our database
In our pages/api folder, we create a delete-product.js file. The delete-product.js file will contain this code.
    //api/delete-product

    import { getXataClient } from '../../src/xata';

    const xata = getXataClient();
    const handler = async (req, res) => {
      const { id } = req.body;
      await xata.db.product.delete(id);
      res.end();
    };
    export default handler;
In the code block above, we delete a product from our database using a id that we get from the request body.
In our index.js file, we create a deleteProduct() function to query our /api/delete-product endpoint.
    const deleteProduct = (id) => {
      fetch("/api/delete-product", {
        method: "POST",
        headers: {
          "Content-Type": "application/json",
        },
        body: JSON.stringify({ id }),
      }).then(() => {
        window.location.reload();
      }).catch((error)=> {
          console.log(error)
      });
    }
In the code block above, pass in the id of the product we want to delete. The /api/delete-product handler needs the id to find and successfully delete a product. After deleting the product, we reload the window to reflect the changes in our application.
Collecting Data from our database
After writing the logic for creating and deleting data, we want to collect it in our database and render it in our application.
In our ìndex.js file, we write this code:
    export const getServerSideProps = async () => {
      const xata = getXataClient();
      const products = await xata.db.product.getAll()
      return { props: { products } }
    }
Querying our data in getServerSideProps collects our data before we render the page and, more importantly, runs on the backend, as it is safer.
We collect all the products on our database and pass them as props to the Home function that houses our home page.
    const Home = ({products}) => {
        return(
          ...
        )
    }

    export const getServerSideProps = async () => {
      const xata = getXataClient();
      const products = await xata.db.product.getAll()
      return { props: { products } }
    }
After this section, here is how our index.js file looks:
https://gist.github.com/Iheanacho-ai/2b838d9d4d30b548c4a82edfb0d733e8
Creating our Product Display Section
After a product has been created and stored on our database, we want to render it on our home page.
In our index.js file, we write this piece of code.
    <div className="bg-white">
      <div className="max-w-2xl mx-auto py-16 px-4 sm:py-24 sm:px-6 lg:max-w-7xl lg:px-8">
          <h2 className="sr-only">Products</h2>
          <div className="grid grid-cols-1 gap-y-10 sm:grid-cols-2 gap-x-6 lg:grid-cols-3 xl:grid-cols-4 xl:gap-x-8">
              {
                 products.map(({productName, productURL, productPrice, id}) => (
                    <a href="#" className="group" id={id}>
                        <div className="w-full aspect-w-1 aspect-h-1 bg-gray-200 rounded-lg overflow-hidden xl:aspect-w-7 xl:aspect-h-8">
                          <img src={productURL} alt="Tall slender porcelain bottle with natural clay textured body and cork stopper." className="w-full h-full object-center object-cover group-hover:opacity-75" />
                        </div>
                      <h3 className="mt-4 text-sm text-gray-700">{productName}</h3>
                      <p className="mt-1 text-lg font-medium text-gray-900">${productPrice}</p>

                  {/* delete button goes here */}
                      <button
                        type="button"
                          className="cursor inline-flex justify-center py-2 px-4 border border-transparent shadow-sm text-sm font-medium rounded-md text-white bg-indigo-600 hover:bg-indigo-700 focus:outline-none focus:ring-2 focus:ring-offset-2 focus:ring-indigo-500"
                          onClick={()=> deleteProduct(id)}
                        >
                      Delete
                    </button>
                  </a>
                ))
              }
          </div>
      </div>
    </div>
In the code block above, we do the following:
- Loop through the products we get as props to render each product with its name, price, and image URL.
- Add the
deleteProductfunction to anonClickevent listener on our "Delete" button.
With this, we have created our product catalog. Here is how our index.js file looks:
https://gist.github.com/Iheanacho-ai/c21a816dc8170fff83c025953fb88a64
This is how our application looks:

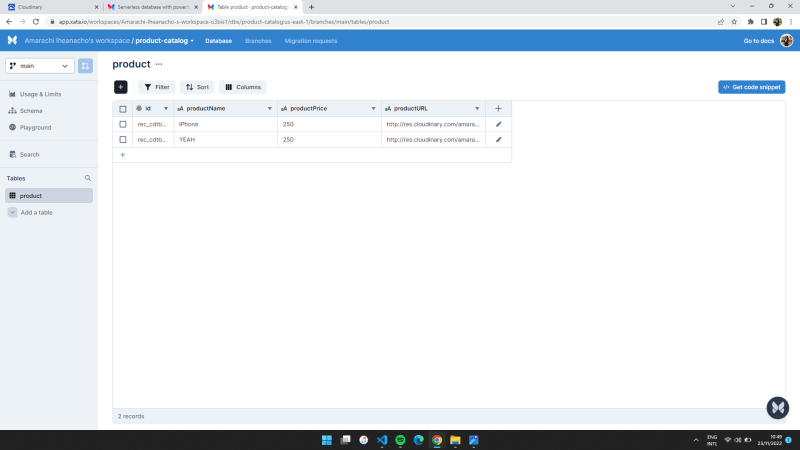
We open up our Xata workspace to see our created products.
Conclusion
This article discusses creating a product catalog with Cloudinary and Xata’s serverless database. Utilizing the Cloudinary upload widget, we collected data on products and stored them on our database in Xata.
Resources
These resources can be useful:

Top comments (0)