Quickstart
- Create a new account and application with Magic. Keep this tab open! You’ll need both the Publishable API and Secret Keys soon.
- Create a new project with Hasura
- Add a new environment variable called
HASURA_GRAPHQL_JWT_SECRETin your Hasura project’sSettings>Env varslike so:
{
  "key": "abcdefghijklmnopqrstuvwxyz1234567890",
  "type": "HS256"
}

Keep your Hasura project
Settings>Generaltab open, you’ll need the GraphQL API url soon as well.Run
npx make-magic --template hasura
Now that the app is running, you can sign up with an email address and username. However, since we haven’t set up the backend to store and retrieve the data we need, the app will look pretty empty! If you want to complete the app, continue reading.
Intro
Learn how to build a simple yet secure social media site where you can share photos of your kitties and see other people's kitten galleries!

Part 1: Build Heroku PostgreSQL Database
Step 0. Update Hasura Env
Remember how you ran npx make-magic --template hasura to create a template for this project? If you take a look at the .env file, you’ll find that we’ve generated a new JWT_SECRET for you.
Make sure to go back to your Hasura project’s Settings > Env var tab, and replace the key in HASURA_GRAPHQL_JWT_SECRET with the newly generated JWT Secret.
Step 1. Set up Heroku
First thing we’re going to do is set up a database. Thanks to Hasura, we can do this a lot quicker and easier than doing it from scratch. All we have to do is create an account and a new project with Hasura, launch their console, go into the Data tab and then create a Heroku PostgreSQL database.

Step 2. Create users table
Next we’ll create our first table where we’ll store the user’s information. Namely, their issuer, publicAddress, email and username. Set the issuer as the primary key so that we can create a relationship with another table in a bit.

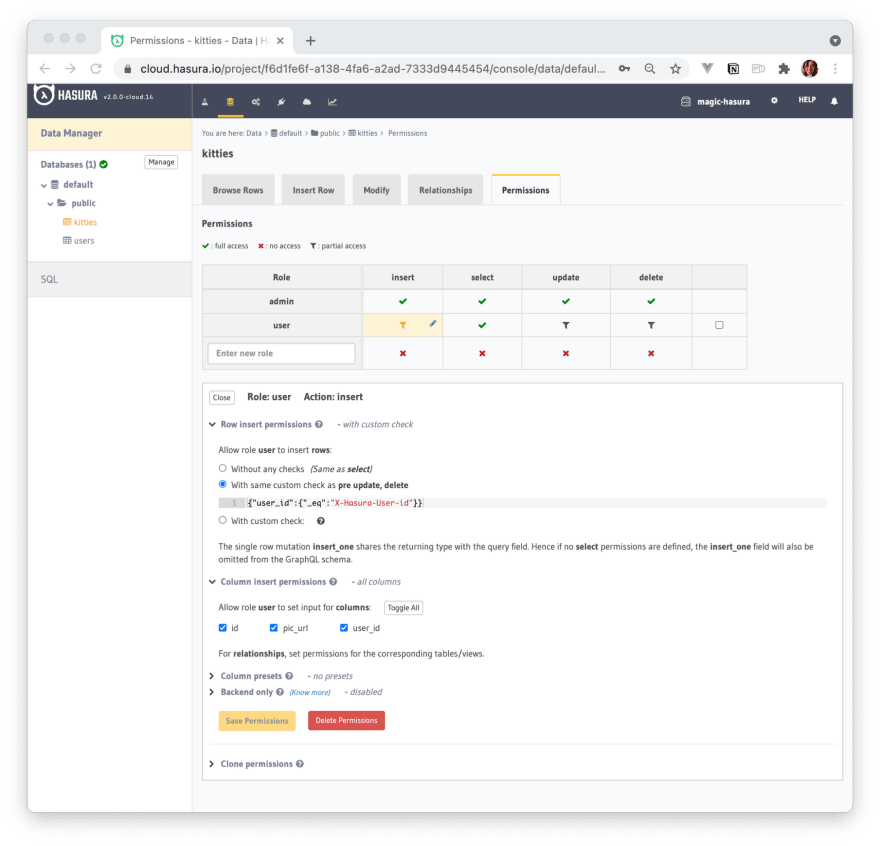
To control access to the users table, we’ll create a user role with a few limitations.

- Users should be able to see other profiles, so they have full access to
selectfrom theuserstable.

- Users are only able to create, update or remove their own profile. This means we need a rule that requires the request to the GraphQL API to include a session variable called
X-Hasura-User-Id.

X-Hasura-User-Id means the user is able to insert data if and only if it is an authenticated request. Later on in this guide you’ll see how to use the JWT token to meet this rule.
Step 3. Create kitties table
Let’s create another table and call it kitties. It’s where we’ll be storing all of the photos people submit of their kittens. The data each row will have is: id, pic_url and user_id.
We also want to control access to this table, so let’s set up a user role again. The rules are going to sound similar to the users table.
- Users should be able to see other people’s kittens.

- Users should only be able to upload or delete photos of their own kitten.
Because we’ll need to run nested queries on both the users and kitties tables, we first have to establish a relationship between them. We do this by setting the user_id as the foreign key that is mapped to the primary key of the users table (namely, the issuer).

Step 4. Create an array relationship
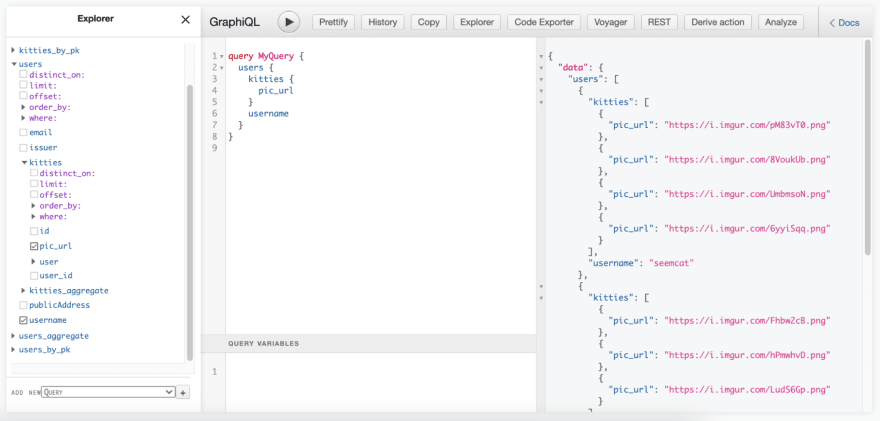
Since there is a relationship between these two tables, we can create an array relationship which lets us do a nested query on the users table. In our case, an array relationship means a user can have multiple photos of kittens.
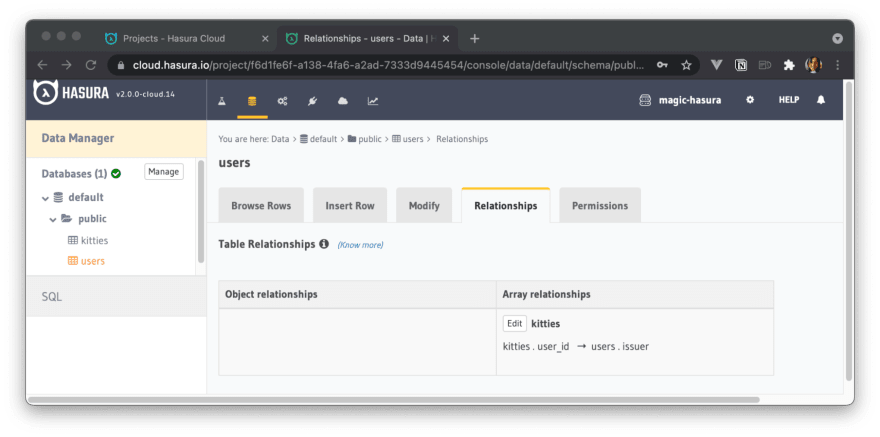
Now that we’ve set it up, we’re able to run a nested object query on the users table and are able to see all of the kitty pics every user has shared.
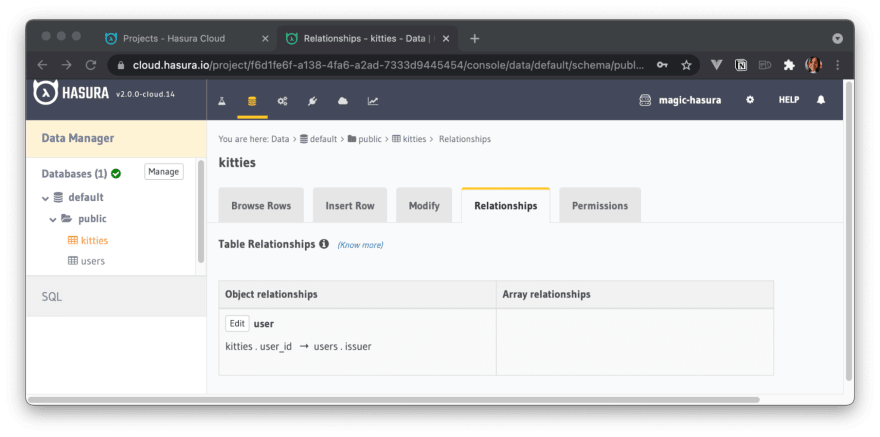
Step 5. Create an object relationship
Lastly, we’ll create an object relationship which lets us do a nested object query on the kitties table. This means every photo of a kitty has exactly one owner.
Here’s how a nested object query looks.

Part 2: Build Next.js Client
Now that we’ve got our database set up, let’s move onto the frontend and explain what our core UI components do!

This is where the user signs up with their email address. Because I want to display people’s usernames on their profile and dashboard, I’ve also added an extra field for it.
Note: The expected flow is for the user to 1) sign up, and if they ever log out, to get back into their account they’ll need to 2) log in. To keep the code simple, there is no logic in place to check whether or not the user is already registered.

Once the user logs in, they land on the dashboard. This is where they’ll be able to see all of the kitty pictures people have shared. It’s also where they can share photos of their kittens as well.
To create a profile for every user, we’ve implemented Next.js dynamic routes.

If we click into a person’s profile, we’ll be able to see their profile which includes a gallery of their kittens.
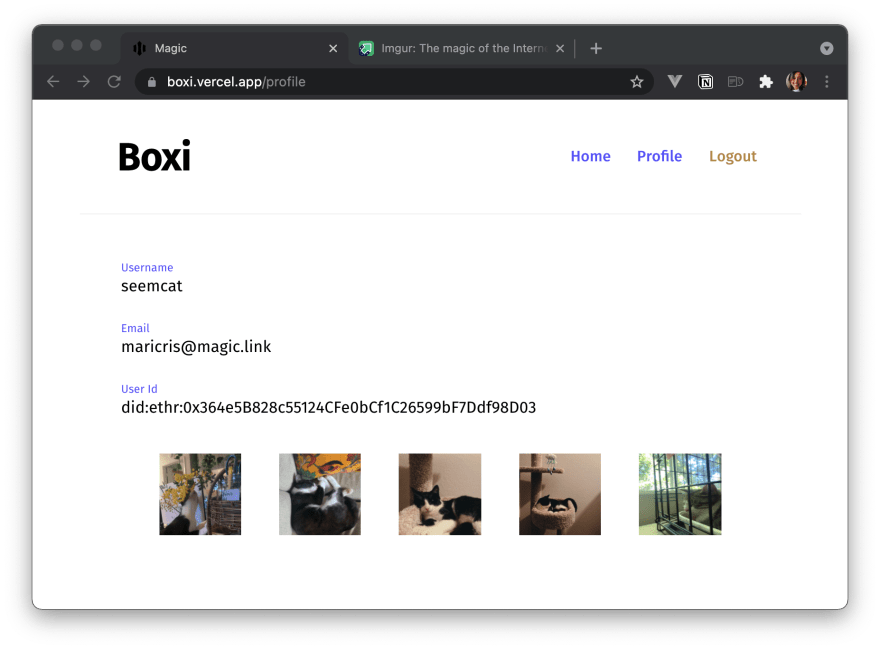
If we click into our own profile, we’ll also see a gallery along with our personal information.
Part 3: Plug in Magic Auth
Now let’s understand the core parts that make authentication with Magic possible.
Signing up or Logging in
<!--kg-card-begin: html--><!--kg-card-end: html-->
signup.js is the main file that handles the user onboarding flow. ../lib/magic.js is where import the Magic library and initialize the Magic SDK. When the user logs in, we call magic.auth.loginWithMagicLink which triggers the magic link to be emailed to the user.
<!--kg-card-begin: html--><!--kg-card-end: html-->
Once the user is authenticated by Magic, a Decentralized Identity (DID) token with a default 15-minute lifespan is generated. We send this token to our serverless function at /api/login to validate it, pull the authenticated user’s information to save in a JWT, and then store this JWT in a cookie to persist user sessions.
Ensure User is Logged in
If we take a closer look at signup.js we’ll see that we’re calling useuser(). This function checks whether or not the user is logged in, which helps us route the user to the appropriate page.
<!--kg-card-begin: html--><!--kg-card-end: html-->
Logging out
When the user logs out, our app calls a serverless function at /api/logout. This function clears the cookie that contains the JWT and then calls magic.users.logouByIssuer() to log the user out of their session with Magic.
<!--kg-card-begin: html--><!--kg-card-end: html-->
Part 4: Build GraphQL API
Now that we’ve got our database, client, and auth all set up, it’s time to create a GraphQL API.
When the user signs up, we want to create a new user in our users table. Here’s the query to make this happen:
<!--kg-card-begin: html--><!--kg-card-end: html-->
When a user shares a photo of their kitten, we’ll want to add a new row to the kitties table. The query for this is addKittyQuery:
<!--kg-card-begin: html--><!--kg-card-end: html-->
To display the kitty galleries owned by other users, we’ll need to fetch all of the photos for the specified user. Here is the query:
<!--kg-card-begin: html--><!--kg-card-end: html-->
Lastly, for the logged in user to see their own kitty gallery as well as their personal information, we’ll need to fetch these data as well. The query to get the user’s username is:
<!--kg-card-begin: html--><!--kg-card-end: html-->
And the query to get the kitty gallery is the same as in . The only difference is that we’re not passing userId as a prop into the component.
<!--kg-card-begin: html--><!--kg-card-end: html-->
Try Magic
There you have it. A simple, yet secure social media site where you can share and see photos of other people’s kitties! Here is the open source repo, and a link to the demo.
If you need an auth solution that’s easy to use, try Magic today. For a limited time, you’ll get your first 10,000 logins free. Sign up today at https://go.magic.link/hasura.

Top comments (0)