What Is HTML?
HTML stands for Hyper Text Markup Language which helps us to create structure and content for web pages. It was developed by Mr. Tim Berners-Lee in 1990 and he is also known as the founder of the World Wide Web. Then, in 1996, W3C (World Wide Web Consortium) was the official body that maintained and developed HTML. As of now we are using the HTML5 version which gives a faster and more powerful approach to web development!
HTML Code Editors
1) Visual Studio Code
Visual Studio Code is an open source and developed by Microsoft, so you can rest assured to use it because it is completely free and always updated with the latest versions. Not only that, it is also very suitable for developing large, complex projects and also supports Git integration. This tool also provides extensions to help us code faster, manage files efficiently...

Visual Studio Code
2) Atom
Atom is open source and is developed by github and is free. Provides utilities that make working with git and github easier. It also provides extensions, supported by the github community, so I see in later updates there are improvements in performance than before. Another special feature is that it allows us to customize the interface according to our preferences!

Atom
3) Notepad++
Notepad++ is a free and open source code licensed by the GPL. In my opinion this is a great and simple and easy to use editor for all levels of development especially beginners. It supports many different languages and is considered a specialized HTML text editor. Startup and performance are good, provide external widgets, automatically change colors depending on the tags we use in the HTML!

Notepad++
If you want to find more code editors, you can visit 25 Code Editor And IDE For Developer
Browsers Run HTML
1) Google Chrome

2) Mozilla Firefox

3) Microsoft Edge

How to Create an HTML File
To create an HTML file, you will just need to write the name you want + the extension of the .html file.
Structure Of HTML File
- !Doctype: Specifies to the browser which version of HTML you are using
- html: defines this as the HTML structure. Everything must be contained in this tag.
- head: The place contains information about the website and is not displayed in the website content. For example, metadata, title, css tags..
- body: Contains all the content that you want to display to the user such as text, images...

Syntax Tag In HTML
You can imagine the HTML structure as a house, the HTML tags act as the bricks that contribute to the house. So let's go together to learn the syntax of an HTML tag:

Most of the tags in HTML will have the same structure as the image above, but there are some special tags that do not follow this format such as the image tag (img)... and there are also tags that do not need to have content contained inside. it's like an input form...
The tag name is not case sensitive, so even if you write <img>, <Img>, <IMG>, the browser can understand it. But you should use lowercase for all tag names such as html, img, p... to create consistency for your website.
Heading Tag HTML
As I understand it, Heading are short words that help to generalize the meaning we want to talk about. When users read the title, they can understand what they are talking about. Search server like Google, it will use an algorithm to search, as far as I know, it also evaluates the relevance of the site title to the searches that the user enters. In the HTML 6 heading types go from large to small.
Paragraph Tag HTML
In HTML, I will use the p tag to identify it as a paragraph. If you notice, usually the name of an HTML tag will be an acronym related to its function. For example, the p tag stands for paragraph. When we use this tag, it will automatically return to the line.
Tag <br/> and <hr/>
It helps to format paragraphs better with br helping to create line breaks in the text and hr responsible for separating text by straight lines. Note it does not have a closing tag.
Bold, Italic, and Underline Tags in HTML
- The b tag has the effect of making the text bold.
- The i tag helps to italicize text.
- The s tag helps to strikethrough letters.
- The u tag helps to underline letters
- The small tag helps to make the text smaller
Adding Symbols In HTML
It is true that when coding HTML, we will encounter characters that cannot be written in the usual way. For example, if you use the < or > sign, the browser will automatically understand that it is a closing tag or an opening tag that often produces unexpected errors for the content of our website or not insert two or more spaces. at the same time in the content of the HTML tag. So in this section I will give you some commonly used characters and insert it into the HTML code:

Image In HTML
Images are considered as common content in the web, they appear on almost every web page. Imagine a web page full of text is not eye-catching and does not illustrate our content. As far as I know, nowadays web pages almost use images to make content and text will be as little as possible because today's life is busy, so most people viewing the web only pay attention to the main ideas and often don't read text much.
The image tag is generated by the img tag. This is a tag without a closing tag. To display the image, we must assign the src attribute and add the alt attribute to the tag.

As you can see, the image tag has an src attribute to specify where we will store the image (Be it on the web or maybe on our computer). The alt attribute defines more information about the image (If the image is not displayed, the text in this attribute will appear).
Some notes when using images in HTML:
- Most popular websites save images as jpeg, gif, png and svg. You can also choose other formats, but that will often make our image size large, affecting the page loading process.
- Using the alt attribute in the image tag will make your website easier to find by Google. But don't make it so long to write for better SEO. Images with such a description will be considered a bad review. Remember when using the img tag, always include the alt attribute with a concise description.
- When using images, you should consider copyright. Many images must have permission to use them, so I will introduce you to some sites to help you use high quality images for free such as:
- Pexels: offers free and high quality photo stock with Pexels license.
- Pixabay: Provides quality images in a variety of formats.
- Unsplash: Offers many good quality free images.
- Freepik: Provides high quality svg format images. (You can use it for free or for a fee)
Attribute HTML
Most tags have attributes, but there will be special attributes only for certain HTML tags. The attribute will always be in the opening tag with the attribute name which helps us to identify the type of information about the HTML tag's content and the attribute value as the attribute's information. The attribute value depends on the attribute name, which can be letters, numbers, urls... And remember that there is always an = sign between the attribute name and the attribute value!

HTML Link
We can write links to other web pages or parts of a web page with the a tag. The href attribute with the attribute value is used to specify the path we want to navigate. The text in the middle of the a tag is where the user clicks to go to another website.

HTML List Tag
For everyone, the list seems too familiar, like the table of contents of a book, the list of students, the list of vegetables, etc. In HTML, we have 3 types of tags that describe the things. The different list types are:
1) Unordered list tag:
This unordered list tag is used by the ul tag. Once we have created the list, we need a li tag to create the indexes in the list. In a list, we can have one or more indexes. And you absolutely remember that when there is a ul tag, it always comes with a li tag.
As you can see, before each list index, we have symbols to help us identify each index in the list. We can change the symbols we want like circles, squares... by using the style attribute. Its attribute values are mostly in CSS, so if you follow them later, I will go deeper. We will use the property value of list-style-type to change:
- style="list-style-type:disc": Use for default
- style="list-style-type:circle": Used for circular notation
- style="list-style-type:quare": Sử dụng cho kí hiệu hình vuông
- style="list-style-type:none": No symbols used for indexes
2)List Order:
Just like the elements of the unordered list tag but the ordered list tag are generated by the ol tag.
Table In HTML
Tables are created by arranging data in rows and columns to help us quickly look up values or compare values of many different data types... Tables are created by HTML table tags with data. line data generated by tr tag, cell data generated by td tag, and header cell generated by th tag. Here, I note the English abbreviations in the card names of the table to make it easier for you to remember:
-
<tr>tag: This is an acronym for table row which means row in the table -
<td>tag: This is an acronym for table data which means data in a table -
<th>tag: This is an acronym for table headers which means table headers
As you can see, inside the table tag, there will be a child tag that is tr to display the number of rows in the table and td to display the number of cells in a row. To make it easier to understand, let's go into the details of a table structure:
Such attributes in the HTML table are not recommended as it is now not supported in HTML5. So we have to use the CSS property value to determine the border for the table. There are also other properties that are also not used in the table anymore are align, bgcolor, cellpadding, cellspacing, width...
Form HTML
The purpose of the form is to help us create interaction between the user and the website. It allows users to enter and send data to the web server (as I understand it, this is where it stores the web page and processes information). The form is used a lot in websites such as member registration, search, user login... For easy understanding, please see a form below!

As you can see when the user enters the information and clicks register, the data will be sent to the Web Server to process with the information as the user's registration request. After processing, it will return an HTML message to let the user know that he has successfully registered and depending on different purposes, we will have corresponding forms.
The method="POST" attribute is a method of sending secure data to the Web server that is used mainly in forms. There is another method but less secure and safe is the GET method because it will display data information on the URL page. When programming, I encourage you to use POST to be safe!
Input Text:
This is a tag used with one or more words on a line to help you enter words such as name, username, interests... and is most often used in the form.

Now let's get into the example!
Some other attributes for the input tag:
- type="text": An attribute that identifies user input as always a string.
- name="": This attribute helps to specify the name of the input field when submitting form data to the Web Server.
- maxlength="": This attribute restricts the user to enter characters in the text input box. (In the example, the limit is 10 characters!)
-
<label>tag: Used to describe the text input box to help users know what data they need to enter into each cell correctly.
Input Password:
To protect your account, people create an attribute value named password in the type attribute to help you when entering your password or confidential and private information in public, it will only display **** or ••••, people around even if you look at your phone, they cannot know the password or private information in it.
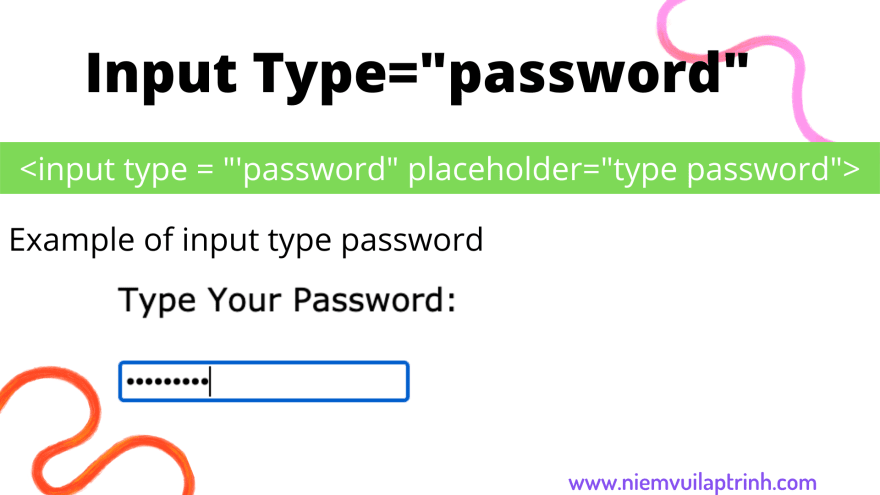
Now let's get into the example!
Textarea Tag:
This card helps users to enter as much information as they want such as comments on Facebook, description of products, comments...

The adjustment of the size of this tag will be according to the number of columns and the number of rows. For example, for you to understand, I set the attribute value as follows: cols="40" rows="5", then the number 5 is the number of lines. (determines the height of the tag) and 40 is the number of columns equivalent to the length of the tag which will be 40 characters per line. To understand better, see the following example!
Now let's get into the example!
Radio:
This tag helps us to choose one of many options such as gender, interest ... Going with this box, we have two required attributes name and value to specify the name and value to send from the form to server. And Usually you will see that these boxes will go together in a group (ul, ol...)

Now let's get into the example!
You can see that here I set the attribute to style="list-style-type: none;" preventing HTML from generating default symbols in the list tag makes our form more visible and simple. The checked attribute sets an option as the default so that the information from the form submitted to the server will not be missing, affecting the processing of information if the user does not select it. And I can add as many options as I want, but you can only choose one!
Input Checkbox HTML:
There are also data we need to collect a lot of information from the user such as favorite color, type of music you like to listen to, Hobbies... It's like a radio box that needs two required attributes, name and value. .

Now let's get into the example!
Select HTML:
It is similar to the one of many options that I learned above, but the difference here is that it is not displayed directly, but only when we click on it, it shows a list for us to choose. In the select tag, we have sub-tags that are options used to display the options that we want the user to select. And it must have the required attribute value.
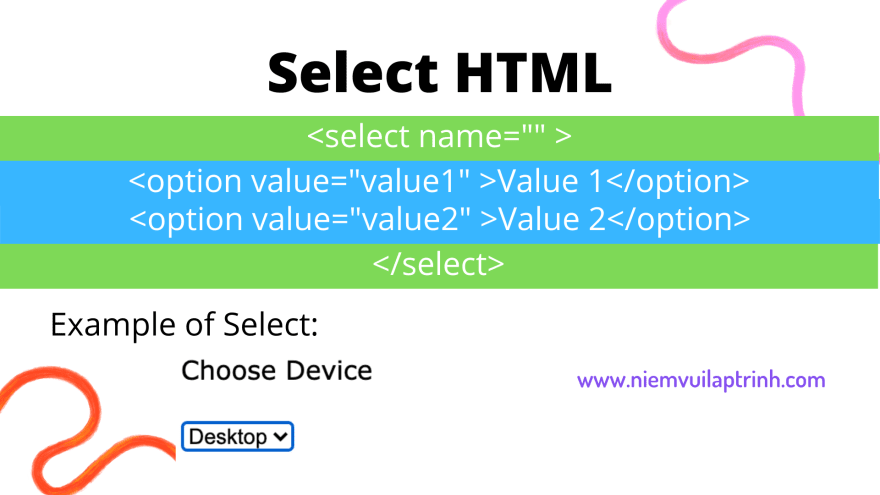
Now let's get into the example!
Input Type Submit HTML:
This is the cell that when the user has finished entering all the data in the form, this button is used to submit the form to the Web Server for information processing. Most forms must also have this button and the required attribute in the tag is value. And this tag is usually placed at the bottom of the form to make it easy for users to click.

Now let's get into the example!
How to Insert CSS Into HTML
In this section, I will show you how you can set CSS properties in an HTML page by adding a style tag in the head tag.

Now let's get into the example!


Top comments (0)