
In a recent blog article, we demonstrated how to Create a Virtual Machine in Less Than a Minute with ARM Template and Azure Quick Start. However, there are other ways of creating an Azure virtual machine, and in this blog article, we will show you how to achieve this using PowerShell.
Creating an Azure virtual machine using PowerShell
PowerShell is a task automation and configuration management framework from Microsoft, consisting of a command-line shell and associated scripting language. It allows you to perform various tasks and automate processes, including creating and managing virtual machines in the cloud. Let's get started with the steps to create an Azure virtual machine using PowerShell.
Step 1:
Log in to the Azure Portal using this link
Step 2:
Once you are logged in, you should see a search bar at the top of the page. To the right of the search bar, there should be an icon that looks like a >_ symbol as highlighted in the image below. This is the Cloud Shell icon.
Click on the Cloud Shell icon to open the Cloud Shell window.

Step 3:
Select the PowerShell option to open the PowerShell environment within the Cloud Shell.

Step 4:
Fill in the storage account and file sharing fields if requested to create storage.

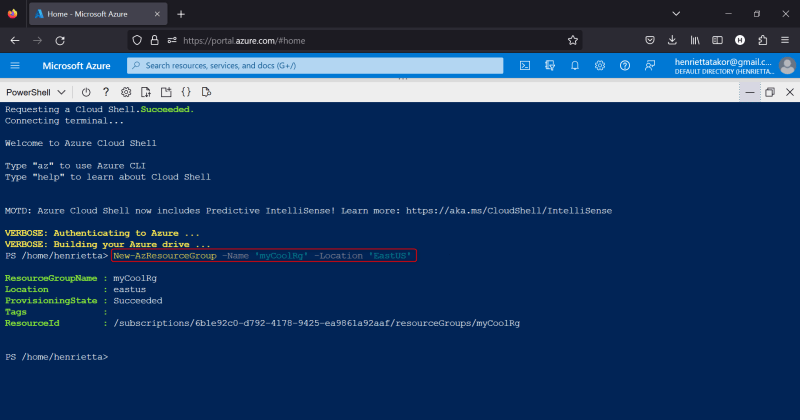
Step 5:
Create a Resource Group
To create a resource group, you can use the command below
New-AzResourceGroup -Name 'myCoolRg' -Location 'EastUS'
Note: Replace myCoolRg with the name of your resource group and EastUS with the location of your choice.
Step 6:
Once you have created a resource group, you can create a new virtual machine using the code below
New-AzVM -ResourceGroupName 'myCoolRg' -Name "myvMps" -Location "West US" -VirtualNetworkName "myVnetPS" -SubnetName "mySubnetPS"-SecurityGroupName "myNSGPS"-PublicIpAddressName "myPublicIpPs"
Once you hit enter, you will be prompted to supply a username and password

Step 7:
Verify the virtual machine creation
Once the virtual machine creation process is complete, you will see the screen below

Step 8:
Navigate to Azure Resource Group page in the portal and click con the Resource Group created to see the running Virtual Machine


Step 9:
The Virtual machine can be delete using this command
Remove-AzResourceGroup -Name 'myCoolRg'

Creating an Azure virtual machine using PowerShell is a straightforward processing you can create yours using the steps above.

Top comments (0)