
In the previous post, I setup and connected the database with the server, verified the email in the database, hashed the password, and saved the user to DB.
In this post, I'll be sending back a token once the user has been saved to DB. Also, create a login route.
5. Send back token
After a user has been signed up successfully, a token has to be sent back to give the user access to the application.
The token will be a jwt (json web token). This article gives a great explanation.
The token is a way of identifying who the user is on the frontend.
The token has to be created and sent to the client, and then the client will send back the token to the server with every single request made.
The token consists of 3 parts: the header, the payload, and the verify signature.
Create the token
I installed the package
npm install jsonwebtoken
Also, install the types
npm install @types/jsonwebtoken --save-dev

Code explanation:
- 64–70: create a const variable named
token - generates a JWT containing the user's email and sets its expiration to 1 hour.
- the
JWT_SECRETsecret key is crucial for signing the JWT and ensuring its integrity. - ln 73 - 83: send back token to the user with user information.
Testing the coding...

Signing up with a new email.
Yay! I got a token and the user data.
Create login route
The login steps will be:
- get user data from the client and find the user in the DB
- compare the hashed password
- send back a token
Get and find user
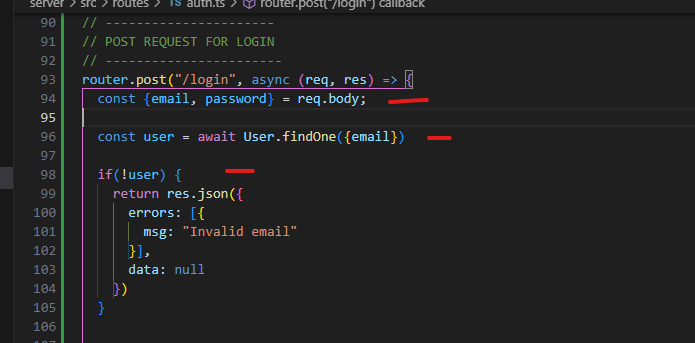
-ln 94: right here, I get user data from the request body
-ln 96: find user in DB
-ln 98 - 104: if there's no user, send this error
If there's no error from this step, go ahead to compare the passwords
Compare passwords

- ln 108: using
bcryptjsto compare the password from the request body with the hashed password from the database - ln 110-119: check if isMatch is false, send this error message
If there's no error from this step, send back a token
Send back a token

Just as it's done in the sign-up route.
Testing the API...

- create another post request named "login" (simply duplicate the sign-up request)
- put in the appropriate url
- in the body, put in the email and password of an existing user
Login was successful, and a token was returned.
Checking what happens if I use an incorrect password

In the next post, I'll create a check authentication middleware that extracts and verifies the token (gotten from the client) to get the user information.

Top comments (0)