
This article was originally written by Salem Olorundare on the Honeybadger Developer Blog.
In this article, we’ll take a look at how to handle errors in the Go programming language, along with examples and best practices when using Golang to handle errors. Error handling in Golang differs from other exception-handling methods in languages like JavaScript and Python.
The most common error-handling methods use the throw method to send exceptions to a try-catch block, where these exceptions are handled. However, Golang takes a different approach, which can be difficult for programmers from a JavaScript or Python background to learn.
In this article, we will make things simple and provide examples and best practices for exception handling in Golang. A basic understanding of Golang is required to follow this article.
Without further ado, let's get started.
What is exception handling?
Before diving into the different methods used to handle exceptions in Golang, we need to understand the concept of exception handling and why we need it when writing programs, not only in Golang but also in programming in general.
The term exception handling refers to the handling of unusual or unexpected behavior of programs when they are running without getting the application to crash without the user knowing the actual cause of the crash. It is a method of responding to invalid input or errors the program could not process well without a sudden crash on the application.
Why is exception handling needed?
Exceptions occur due to various types of errors, such as invalid user input, errors in the code, device failure, unstable or lost network connection, insufficient memory to run an application, conflict with another program, etc.
These errors need to be handled correctly by developers to prevent the application from behaving unexpectedly. Without proper error handling, a program could start misbehaving, possibly leading to data loss or something more costly.
When multiple blocks of code are running, errors from one block could potentially lead to the rest of the code stopping its execution. However, with the help of exception handling, we can handle these errors without halting the execution of the rest of the program.
This is a major reason error-handling methods are used when building programs, especially programs that depend on another program.
Handing exceptions in Golang
As stated earlier, handling errors in Golang is different from the conventional way of handling errors in other programming languages.
There is a lot to learn about Go's error-handling strategies, but let's first discuss the built-in error type in Golang. Errors in Golang are handled using the built-in interface error type.
The error interface syntax looks something like this:
  type error interface {
    Error() string
  }
The error interface contain a single method: Error() string.
When using this error method, returning an error mean a problem arose while executing the statement, while returning nil means there was no error.
  package main

  import (
    "fmt"
  )

  func main() {
    result, err := iterate(x, y)
    if err != nil {
    // handle the error here
    } else {
    // execute this if there is no error
    }
  }
The program above should handle the error properly when err is not equal to nil
Now, let us write a complete program to understand how to use the error interface to handle errors properly. Below is a program that sums up a range of numbers from start to end.
package main

import (
  "errors"
  "fmt"
)

func main() {
  total, err := sumOf(1, 10)

  if err != nil {
    fmt.Println("There was an error", err)
  } else {
    fmt.Println(total)
  }
}

func sumOf(start int, end int) (int, error) {
  total := 0

  if start > end {
    return 0, errors.New("start is greater than end")
  }

  for i := start; i <= end; i++ {
    total += 1
  }

  return total, nil
}
In the program above, we utilize the Golang multiple return value features to return errors. We have defined a function that takes two integers and returns the sum of all integers within the range of integers given.
We do not want the start value to be greater than the end value. If this happens, it returns a zero value, which is an error.
To properly handle this error, we have written a conditional statement to test if the start value is greater than the end value. If the start value is greater than the end value, the error message is returned; otherwise, it returns the total.
We have defined a new error using the New keyword and passed the error message into the argument.
We can also create custom errors by creating our error struct and using its method. Let’s consider a program that divides two given integers.
package main

import (
  "fmt"
)

type CustomError struct {
  error_msg string
}

func (err *CustomError) Error() string {
  return err.error_msg
}

func main() {
  result, err := divide(3, 6)
  if err != nil {
    fmt.Println(err)
  } else {
    fmt.Println(result)
  }
}

func divide(divisor int, divider int) (int, error) {
  if divisor < divider {
    return -1, &CustomError{error_msg: "Divisor cannot be less than the divider"}
  } else {
    return divisor / divider, nil
  }
}
The above program demonstrates how to create a custom error type without the Golang built-in Error() method.
We started by creating a struct of the type CustomError. Then, we created a function that takes in the CustomError struct as an argument and returns the error as an output.
The function divide() tests if the denominator is greater than the numerator and returns an error if there is one. This means that the return value cannot be less than 1.
Defer, panic, and recover
Go does not have the try, catch, and finally features used by other programming languages like Java, Python, JavaScript, etc. However, Go has a feature that can be compared to these features. Defer, Panic, and Recover are used in Golang programs for handling exceptions, although the use case might be slightly different.
Defer: The defer keyword is used to put statement execution in stacks. In this way, the statements in the stack will be executed in reverse order. Each deferred function is executed toward the end of the program execution. It is useful for cleanup process.
Panic: Similar to how the throw keyword is used to raise exceptions in the JavaScript language, the panic keyword is used to raise errors that the Golang program cannot resolve and therefore crashes the application. All defer statements executes once the panic statement is called, and the program crashes.
Recover: Not all panic cases should end the program terminated. There are some panic cases that can be recovered. The recover keyword is used to restore the program from recoverable panic errors.
Here is a simple program to demonstrate the use of the defer, panic, and recover keywords:
package main

import "fmt"

func main() {
  divide(2, 4)
}

func HandlePanic() {
  r := recover()

  if r != nil {
    fmt.Println("RECOVER", r)
  }
}

func divide(divisor int, divider int) {

  defer HandlePanic()

  if divisor < divider {
    panic("start is greater than end")
  } else {
    fmt.Println(divisor / divider)
  }
}
We have re-written the program from the custom error program, but in this case, we have made use of the three error-handling keywords from Go: defer, panic, and recover.
First, we defer the HandlePanic function using the defer keyword, after which we raise a panic using the panic keyword whenever the divisor is less than the divider. Finally, after raising a panic, the deferred HandlePanic executes, which recovers the application using the recover keyword.
This is the simple basics of how exceptions are handled in the Go language using the built-in Error() method, defer, panic, and recover keywords.
Error handling in Golang with Honeybadger
Honeybadger.io provides an error-monitoring tool that allows developers to easily track and debug errors arising from an application’s code.
Setting up and integrating the Honeybadger monitor tool into your Golang project is very easy. We will walk you through the steps involved in installing the tool in your project. Follow the steps below to get Honeybadger set up with your go application:
Step 1
After creating a free trial account with Honeybadger, create a Go project and give it a name that best suits you. Then, install the Honeybadger package using the command below.
go get github.com/honeybadger-io/honeybadger-go
Step 2
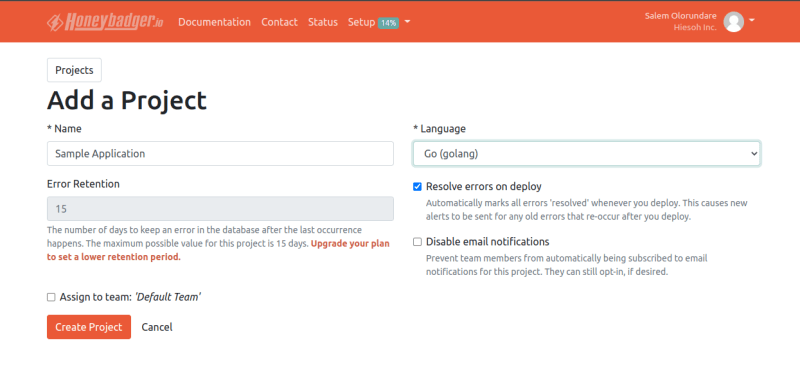
Head to honeybadger.io, and let’s create a sample application.
Step 3
Get your API configuration key. This will allow us to connect our application to the Honeybadger sample application we have created.

Step 4
Below is a program to demonstrate the use of the Honeybadger monitoring tool with Golang.
package main

import (
  "fmt"
  "github.com/honeybadger-io/honeybadger-go"
)

func main() {
  honeybadger.Configure(honeybadger.Configuration{APIKey: "hbp_XWeFYbXbh4luaTwzkXKbg3BNIUDBW02jAqca"})
  defer honeybadger.Monitor()
  divide(2, 4)
}

func divide(divisor int, divider int) {
  defer honeybadger.Monitor()

  if divisor < divider {
    panic(fmt.Errorf("start is greater than end"))
  } else {
    fmt.Println(divisor / divider)
  }
}
We have modified our existing program and integrated the Honeybadger error-monitoring tool. The program above declares a divide function and checks if the divisor is less than the divider. If so, it returns an error, which is then sent to Honeybadger to be handled.

The error tab on your Honeybadger account displays the full details of the error encountered in your project.
Honeybadger is useful in quickly and effectively debugging and resolving application errors .
Conclusion
In summary, we've covered the basics and some tips for handling errors in Golang. We have used the defer, panic, and recover features of Golang to handle exceptions without breaking the program.
I hope you have found this guide very useful. Please submit any suggestions or comments you may have in the comment section of this article.
Thank you.

Top comments (2)
Great article!
Thank you!