
Thanks to awesome contributions from the community and the hard work of our integrations team, the Honeycomb Rails integration comes with lots of great features out of the box. We’ve written about Rails-specific features of the Ruby Beeline before on the Honeycomb blog:
- New features for Ruby and Rails applications with a new version of the Honeycomb Beeline for Ruby
- HoneyByte: Make a Beeline Toward Observability Just Like DEV’s Molly Struve
- HoneyByte: Incremental Instrumentation Beyond the Beeline
This post is an end-to-end tutorial to show you exactly the steps involved, from creating a new Honeycomb team to getting your data in and observing your app in production.
Whether you’re starting a new Rails project and want to build observability in from the start, or you’re investing in better observability for your existing Rails service, this tutorial will help you get the most out of Honeycomb right away.
Create a free Honeycomb account
Go to ui.honeycomb.io/signup to create your account. We support SSO with Google, which means no new passwords to create or remember.

Provide your organization’s name when prompted. This is a unique ID, so you can either use your company's name, or if it's a large company you might go with company-team, e.g. huuli-research.
If you're prompted to name your first dataset, call it rails-app or give it the same name as your app. (If you change your mind about the name later, you can just create a new dataset.) Select the Ruby integration and click Create.
Once you’ve created your team, you’ll automatically receive an email inviting you to the Honeycomb Pollinators Slack community. This blog post from Customer Advocate Jenni Boyer details why you should join, definitely check it out when you get the chance!
Get your API key
The next page will give you your Honeycomb API key (also called the write key). If you chose the Ruby integration, this page will also list out instructions for setting up the Ruby Beeline, including Rails-specific instructions. Don’t worry about them, though—I‘ll break down each step for you here.
Copy your API key now, we’ll be using it in the next steps. (If you lose track of your API key, you can always copy it again from your Team Settings.)
Configure the Ruby Beeline SDK
Now you can open up your terminal and set up the Rails integration for your app. The Ruby Beeline SDK comes in the form of a gem, so we’ll add it to our Gemfile using Bundler:
$ bundle add honeycomb-beeline
Now we’re ready to generate the Honeycomb configuration. The Beeline has a Rails generator built-in, so we can use that with the API key you copied earlier (denoted abc123 here) along with your dataset’s name, rails-app:
$ rails generate honeycomb abc123 --dataset rails-app
This will create a new file: config/initializers/honeycomb.rb. The generator hard-codes your API key to start, but we’ll update this file later to store your key more safely.
Generate Your First Events
You’re ready to start sending data to Honeycomb! Start the Rails server and then navigate to localhost:3000 in your browser, or run curl localhost:3000 in your terminal if you prefer. This will hit the root path and send your first event to Honeycomb. Let’s return to ui.honeycomb.io to watch it arrive!

The home page shows us a single data point on the Total Requests graph and a single trace under Recent Traces. Success!
With just this one request sent from dev, there’s not enough data to make the home page very interesting. But we can still poke around a bit. Click the button on your trace under Recent Traces.

This takes us into the trace view for the request we just made:
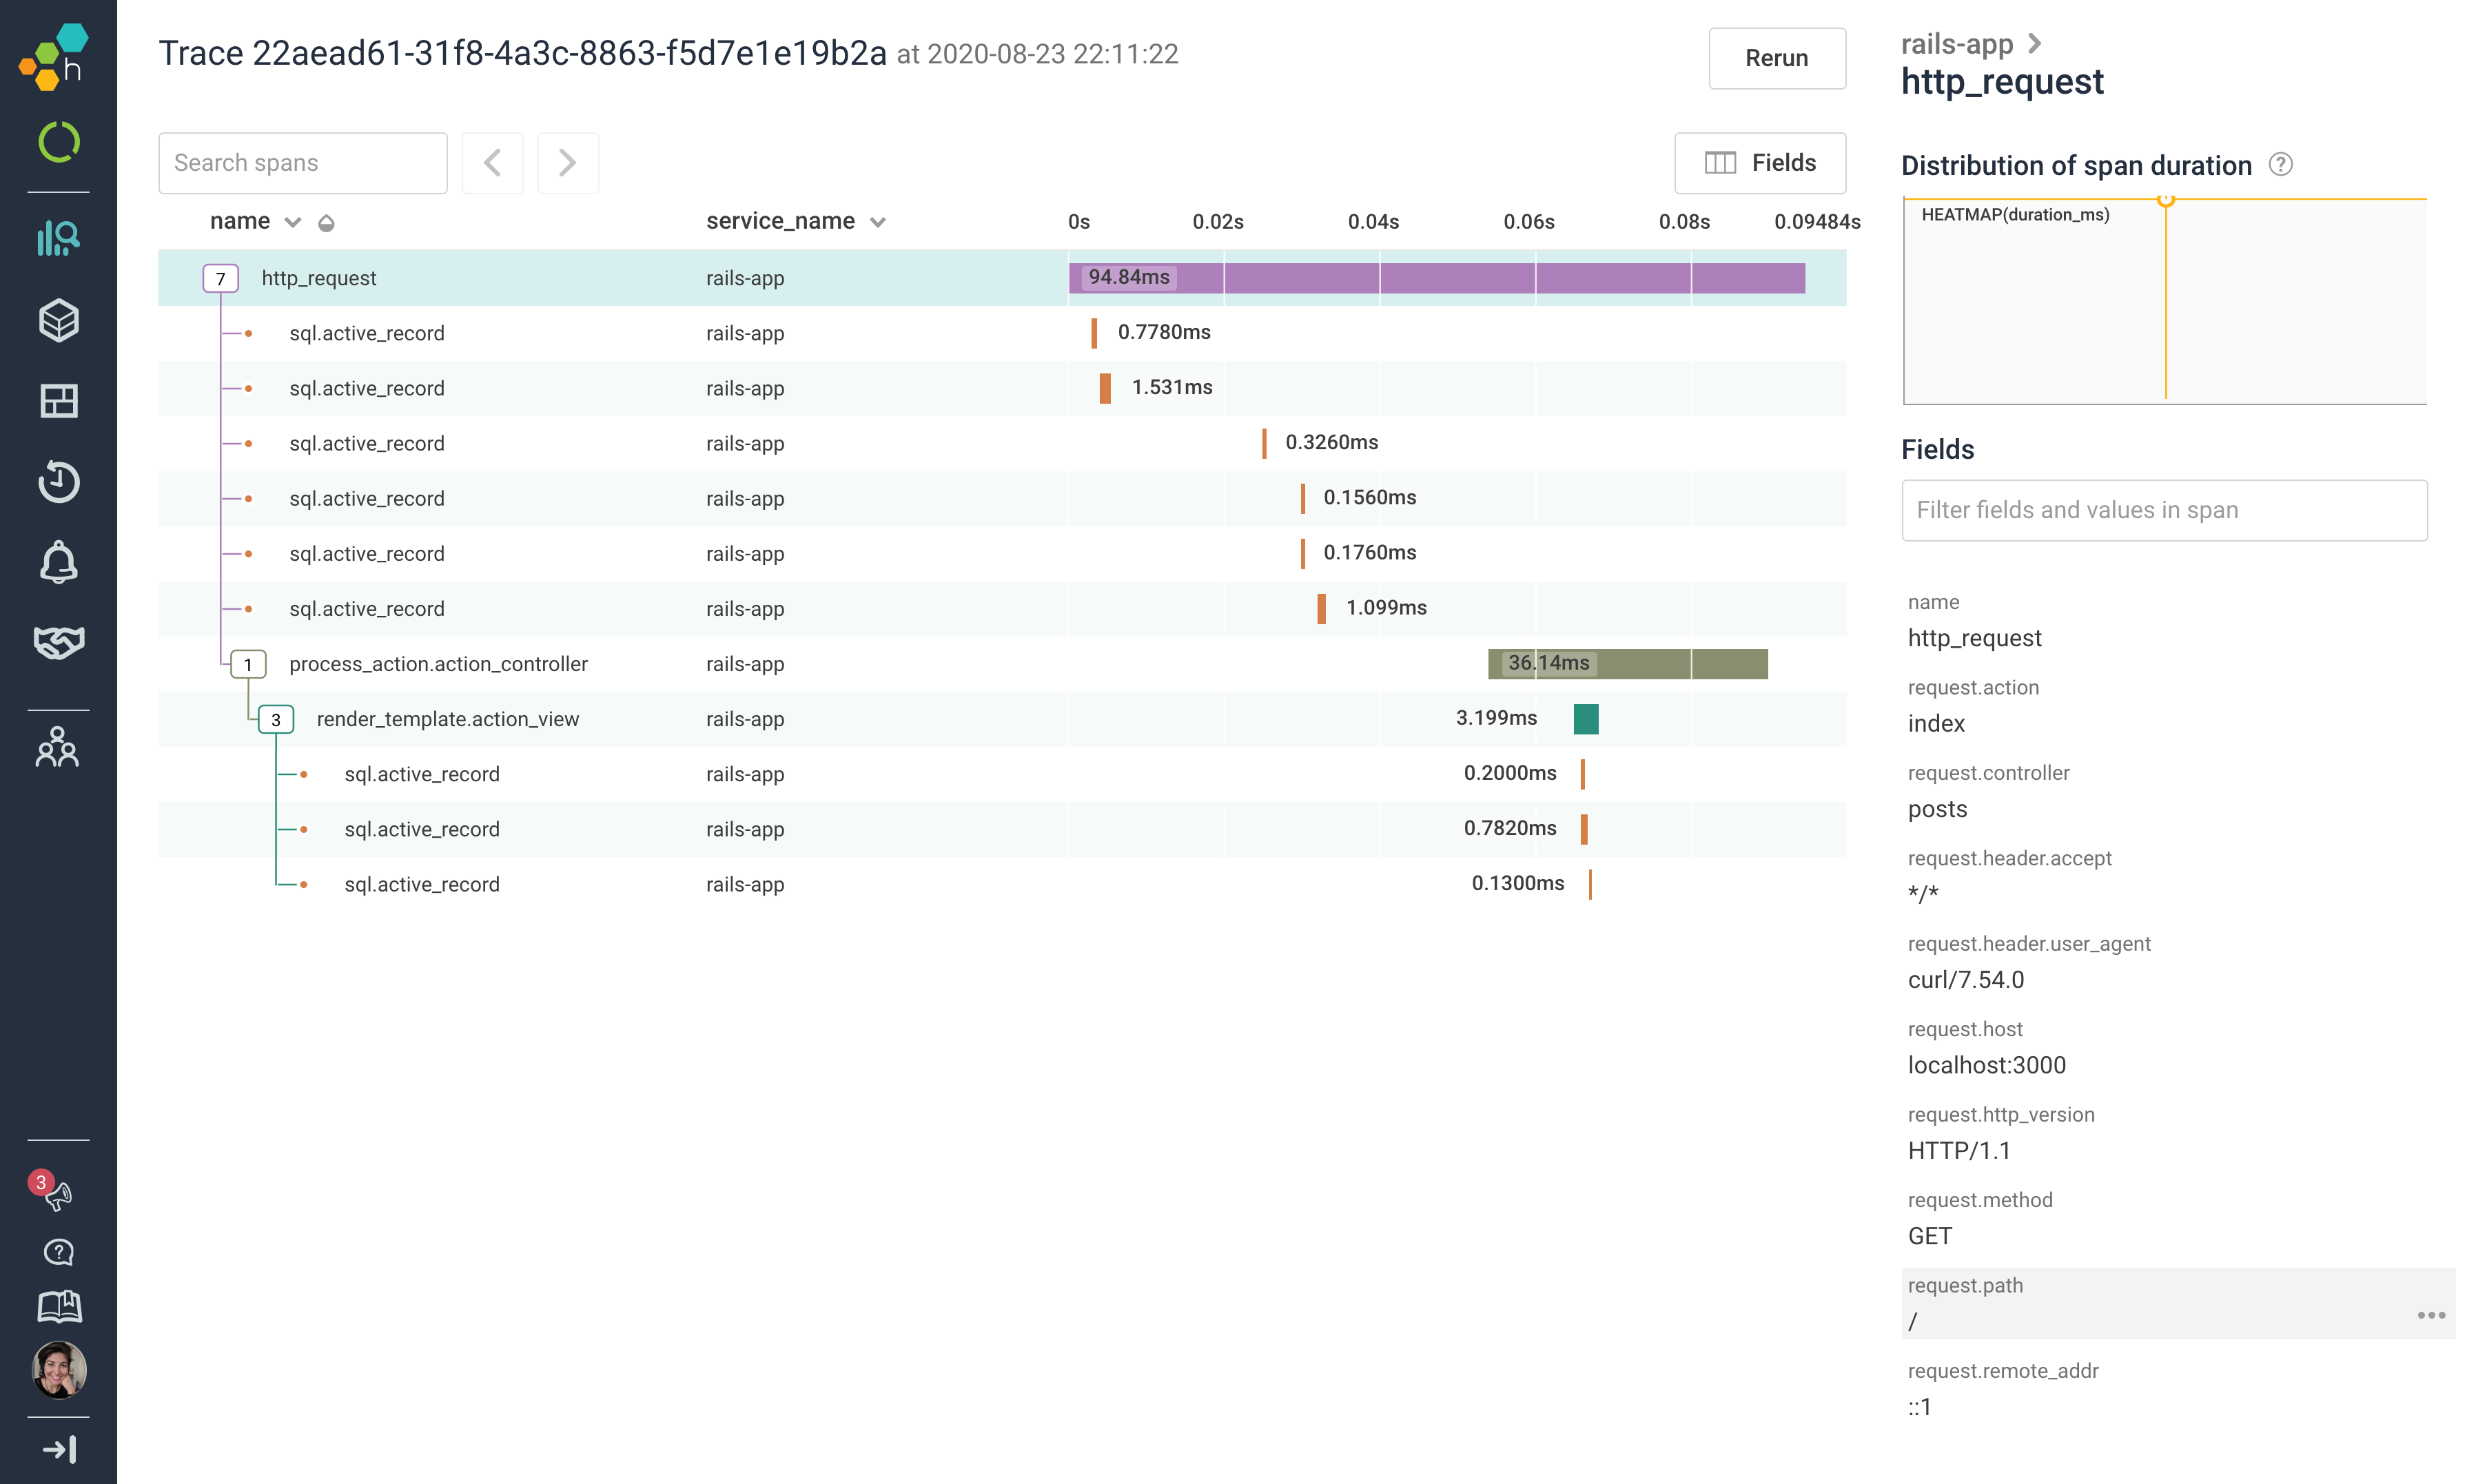
The tracing we see here comes built in with the Ruby Beeline! Not only do we automatically get spans wrapped around top-level HTTP requests, ActiveRecord calls, controller actions, and view rendering, we also get relevant context fields attached to all of those spans. Select the root span http_request and scroll through the Fields list in the right-hand sidebar to see what fields are attached to that span. Then choose another span, like process_action.action_controller, to see the fields that come included with that one.
You may already be thinking of additional context fields to instrument various parts of your app to send to Honeycomb, but this is a good stopping point. What are the next steps to get this MVP version into production?
Get Ready to Ship
Your app is now instrumented for Honeycomb! Let’s update a couple things so you can open a PR, push your new instrumentation to prod, and start unlocking more insights.
Earlier, you called the rails generate command with your API key directly, creating the config/initializers/honeycomb.rb file. Now’s the time to remove the hard-coded API key there and store it safely according to how your team manages secrets.
For example, if you’re using the Rails config/secrets.yml file to manage your secrets, you can add your API key there.
development:
  honeycomb_write_key: 'abc123'
production:
  honeycomb_write_key: 'abc123'
Then, update the Honeycomb initializer to safely use the API key straight from the secrets file:
- config.write_key = "abc123"
+ config.write_key = Rails.application.secrets.honeycomb_write_key
And you’re set! Open that PR 🚢 (and check out the Pollinators blog post I shared earlier while you're waiting for PR reviews 😉).
Observe Production Traffic
Why the rush? Honeycomb’s home page comes alive in production. We can see the Total requests, Latency, and Error rate using the Rails auto-instrumentation built into the Ruby Beeline.

Clicking over to the HTTP Status Code tab, we can also see the breakdown of response codes as well as the distribution of latencies for each one.
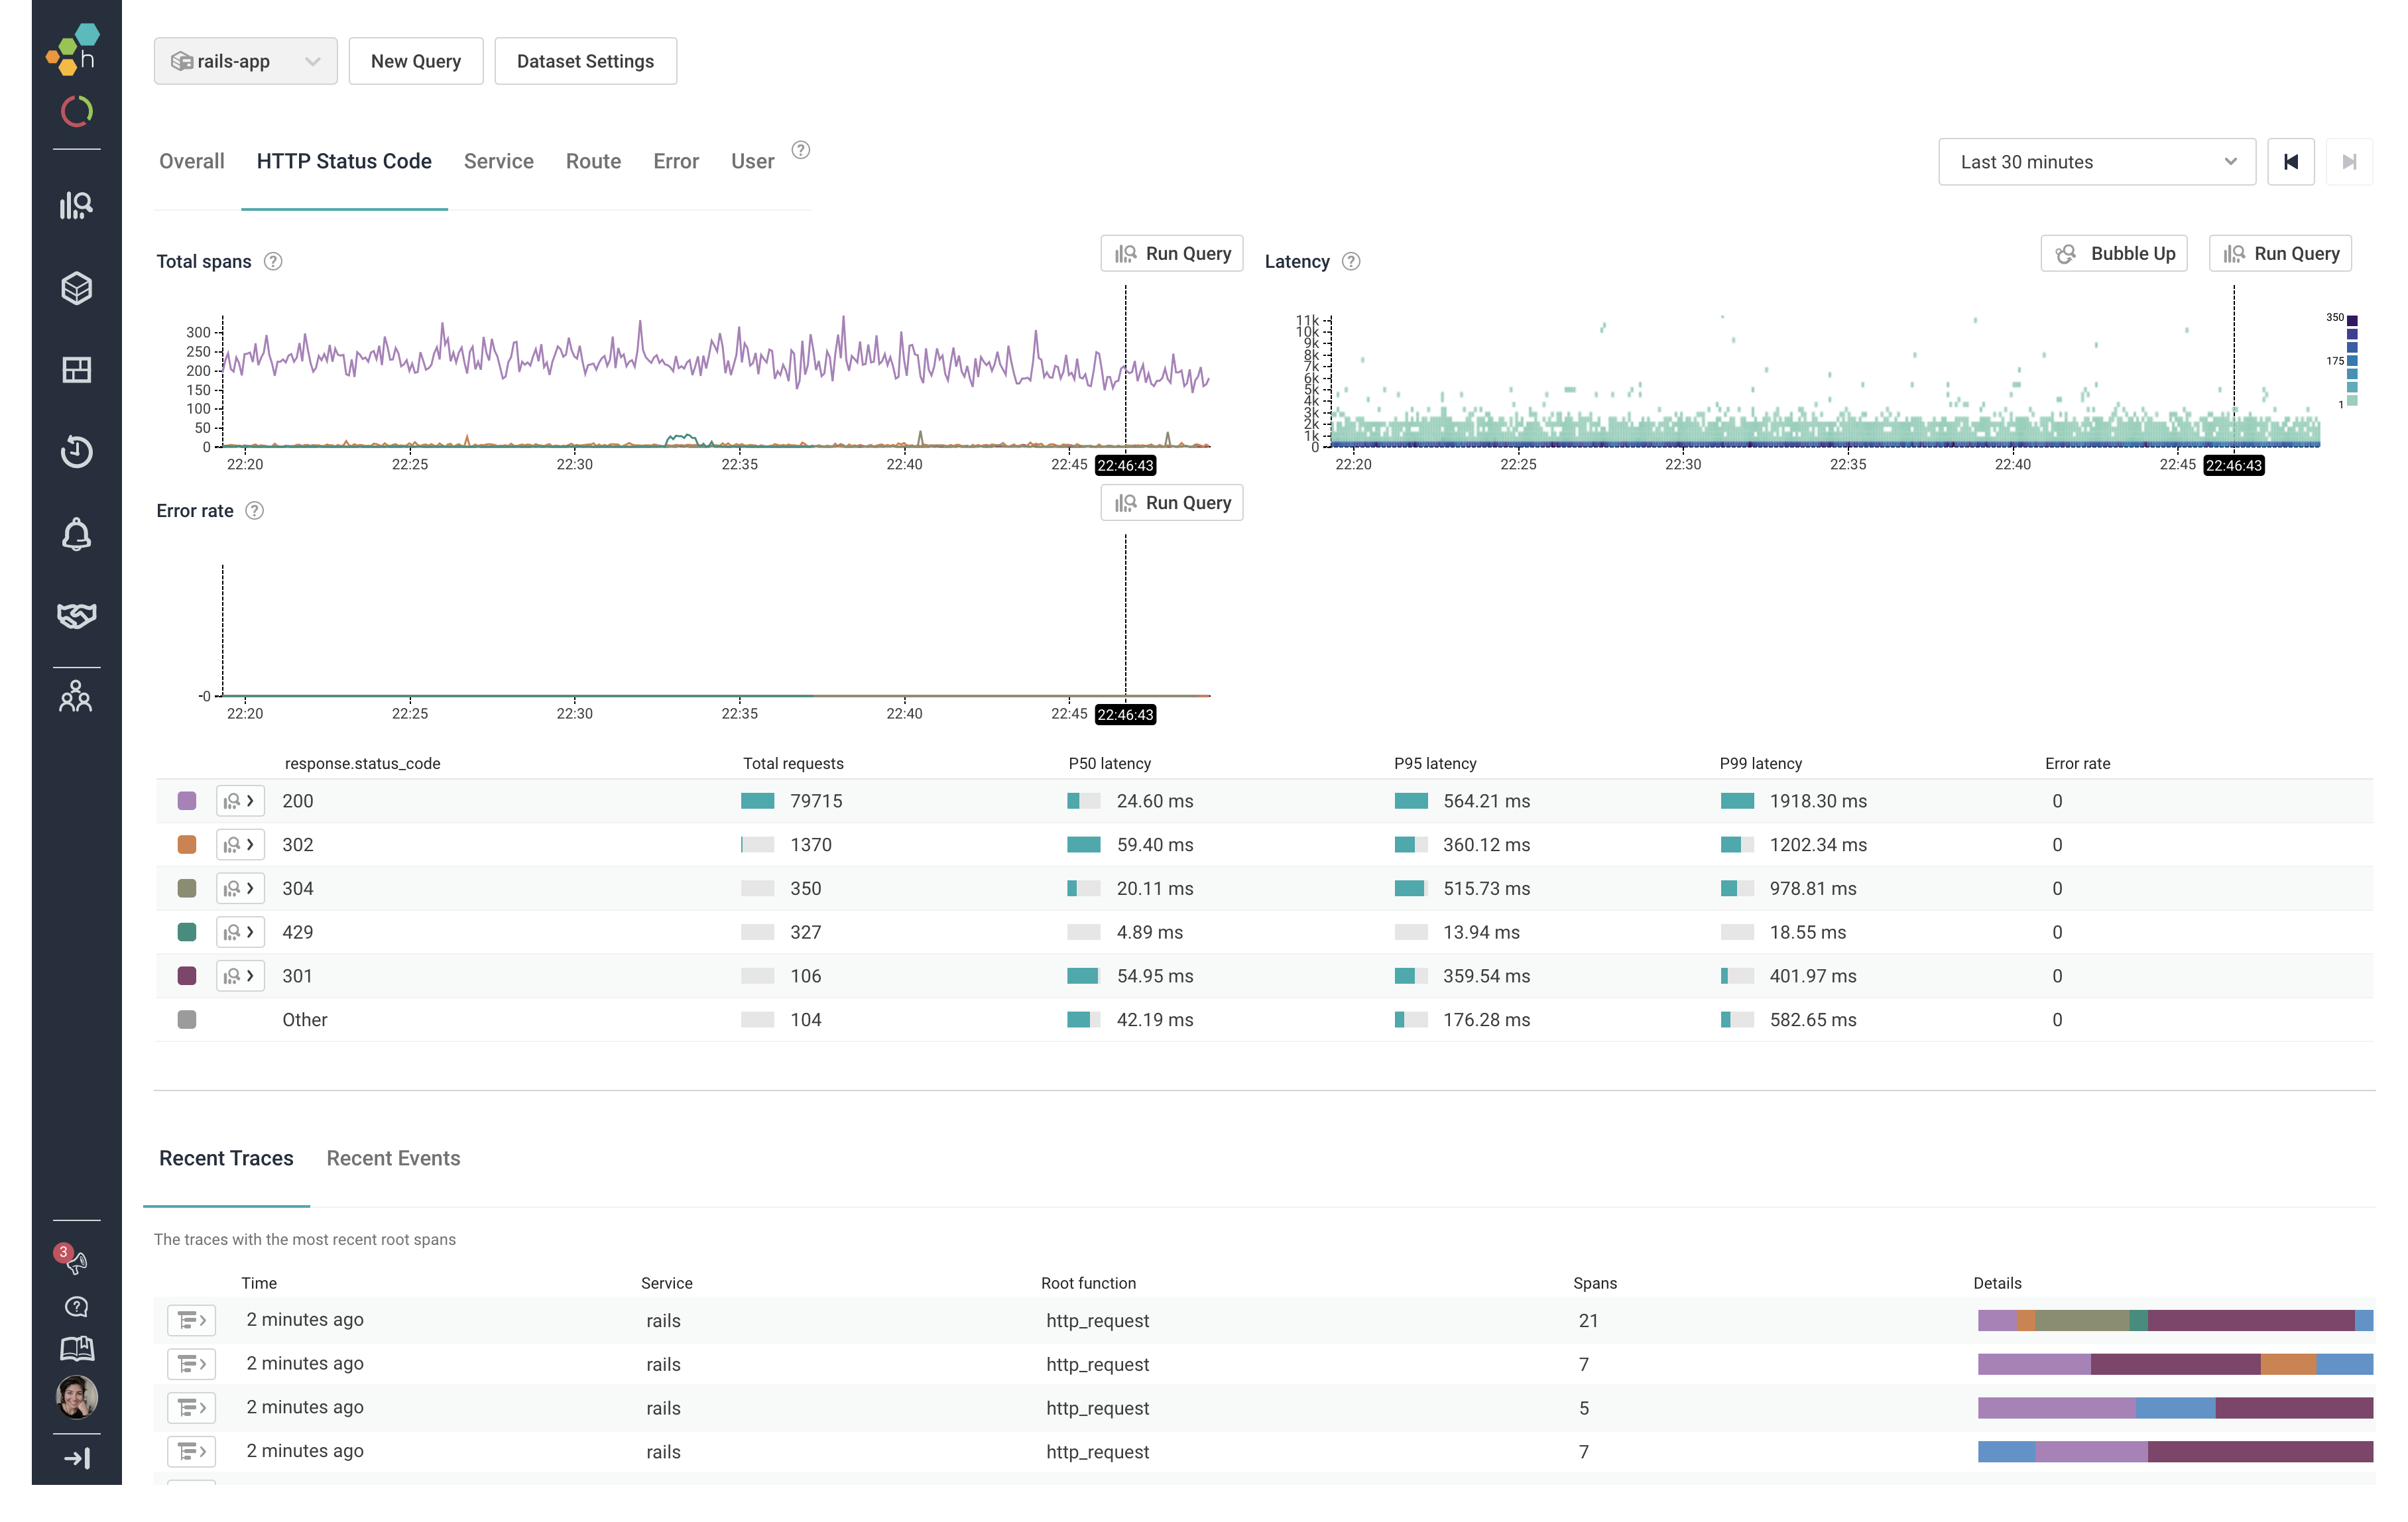
There’s a ton to explore here, just start clicking around. See how much you can learn from the auto-instrumentation by itself.
Add Custom Instrumentation
Now that you’ve explored Honeycomb with your app’s production traffic, it’s time to dig deeper. You have a handle on events and tracing for regular Rails HTTP requests, so let’s try adding custom spans and fields. What’s unique about your app that you’d like to learn more about?
You likely have some home-rolled lib/ code that’s not covered by the Beeline’s auto-instrumentation. For example, imagine that your app uses the twitter gem to get a user’s tweets in batches of 200 at a time:
def get_all_tweets(user)
  all = []
  options = { count: 200, include_rts: true }
  loop do
    tweets = client.user_timeline(user, options)
    return all if tweets.empty?
    all += tweets
    options[:max_id] = tweets.last.id - 1
  end
end
Here’s an updated version with some instrumentation:
def get_all_tweets(user)
  Honeycomb.start_span(name: 'get_all_tweets') do
    Honeycomb.add_field_to_trace('user', user)
    all = []
    options = { count: 200, include_rts: true }
    loop do
      Honeycomb.start_span(name: 'get_batch') do
        Honeycomb.add_field('options', options)
        tweets = client.user_timeline(user, options)
        return all if tweets.empty?
        all += tweets
        options[:max_id] = tweets.last.id - 1
      end
    end
  end
end
We start by wrapping the entire get_all_tweets method body in a span, and then we add the user field to the entire trace, since we’ll probably care about it across the entire request. We add a second span block around the body of the loop called get_batch, which creates a child span for each request where we get a 200-tweet batch. Inside of get_batch, we’re adding the request options as a field as well, so we can see the relevant arguments when hitting Twitter’s API.
(At this point I’d probably break out the loop body into a separate get_batch method, which is usually about the scope you want for a span.)
Our nested spans will be rendered as a trace in the Honeycomb UI:
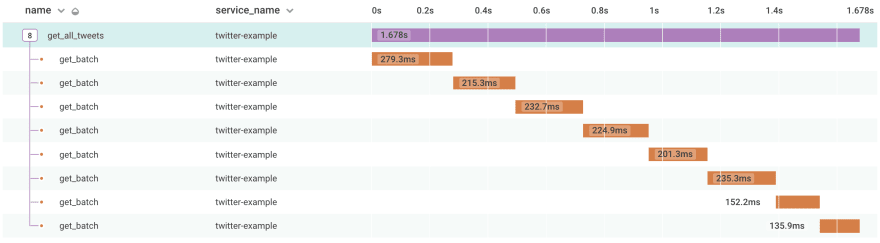
Each get_batch is making an API call to Twitter, so to get all of the tweets from this user we needed to make eight API calls.
Continue Your Journey!
The Ruby Beeline does a lot of the heavy lifting to get you sending rich data into Honeycomb quickly and without a lot of work. On top of that, it’s not a lot of code to start adding your own custom instrumentation beyond what the Beeline does automatically.
Now that you have data in, invite your team and see what insights you can learn together! Check out this blog post on helpful Honeycomb features for onboarding your teammates.

Top comments (0)