Hello friends, Today will show how to setup a password-less authentication without having to build an authentication feature into your application with Radius AuthX.
AuthX is an O-auth2 provider developed by Radius Africa, It is a service that allows engineers onboard users without having to setup the entire onboarding suite which includes; Authentication and KYC.
Getting Started
To get started, we will need the following.
- A Radius AuthX account, you can sign up here - https://dashboard.radius.africa/register.
Creating an AuthX app
Once an account is created and activated on Radius. what to do next is to create an AuthX app, an AuthX app is basically designing an authentication form, customizable to meet the requirements of our app's user onboarding process.
To do this you will have to login to our dashboard.

After supplying your login details, hit the login button and your will be presented to your dashboard, On the dashboard by the side menu you will locate the AuthX section, click on it to view start creating apps.

On the AuthX page, you will see a list of already created apps you can also find the Add New button, clicking on will present you a page with forms to start designing.
Provide the necessary data for the form such as Name, Description, Company Name and Color theme for app personalization.
The verification section of the form is where you specify a unique identifier for your app on-boarding, you can choose between Usernames or Email address.
For passwords, you can configure the validation strength of user input upon sign up.
Alternatively, you can activate social sign on with Gmail or Facebook by toggling the options.

Also, you can create additional fields of your choice depending on the onboarding requirement of your application.
In the Development section, you are to provide an hosted URL, AuthX will then make requests to the URL and also redirect to the URL supplied in the Redirect URL field upon user authentication success and or failures.
NOTE: The URL to supply in the above fields must be live/hosted valid URLs, you can setup a netlify or heroku app URLs if you don't have a domain for your app yet. However if your application is an SPA (Single Page Application) There is no need to provide a redirect URL, you only need to let AuthX know by toggling the SPA option.
For extra security and user data protection, you can also setup a 2FA for either signup or login scenarios, hit the save button to finish your customization.

AuthX will then generate necessary credentials for your form integration as well as a javascript embeddable code for you to copy and paste in your application.
Copy and save these keys in a safe place.
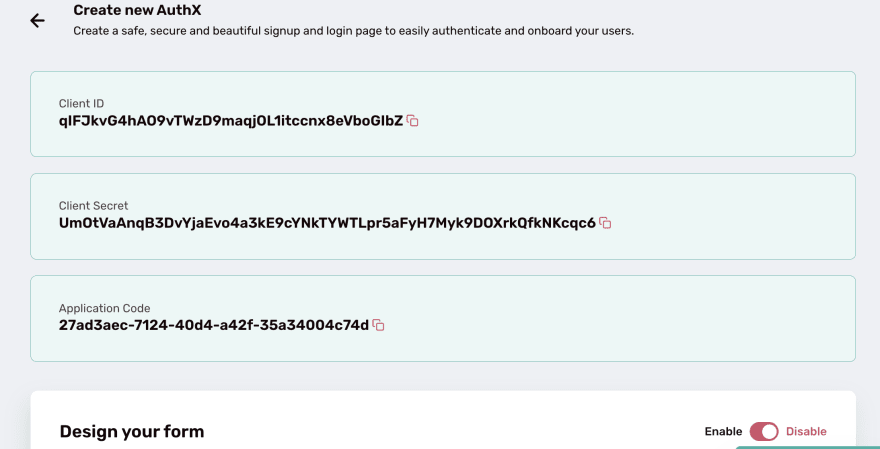
Once you have your configuration saved, an option for you to get embeddable code will be available click on it to see your code.

You also get a preview of the form before you integrate the customized form on your app.

There you have it, you have just AuthXed like a Pro!

You can explore more on AuthX by going through the API documentation here - https://documenter.getpostman.com/view/15324321/TzJoDLJB
Important to Note
- Additional Fields on forms can not be edited.
- URL supplied must be a live/hosted URL.
- You can not re-use the same URL in a different AuthX app.

Top comments (0)