
Let's get started.
About the App
RepoSearch App is simply a web App that Fetches Users' GitHub details and repository details. This is a project for my AltSchool Second Semester examination, and this is me sharing my process. .
I built the App using React, which is a JavaScript library for building user interfaces. The React App displays list of user's Repositories on GitHub, which routes to the details of each repository.
The Task
_
Implement an API fetch of your GitHub portfolio, show a page with a list of all your repositories on GitHub(the page should implement pagination for the repo list), and create another page showing data for a single repo clicked from the list of repos using nested routes while using all the necessary tools in react. Implement the proper SEO, Error Boundary (show a page to test the error boundary) and 404 pages. Good UI and Designs are important._
The Page was built using;
Semantic HTML5
CSS
ReactJs
The Process
- Setting up React
To work with React for any project, the first thing to do is to create react application boilerplate using create-react-app
npx create-react-app my-app
Installation of Some Dependencies Used
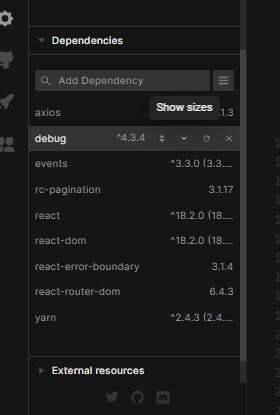
Before writing any line of codes in my App.js, i make sure to install Error Boundary to wrap all my codes in for easy readability of my code errors.
<ErrorBoundary FallbackComponent={ErrorFallback}>
       <App />

      </ErrorBoundary>
Then on to the next...
- Creating of Components
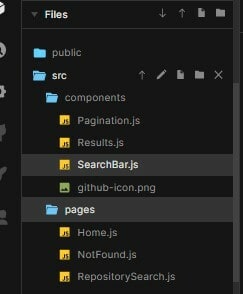
This gives a start to my project. The next thing i did was create a folder called "components" and another one called "pages" in the src folder.
Component is the base class for the React components defined as JavaScript classes. Then under Components i organized my work into different folders, for easy access, readability and reusability.
Also under my pages i organized the pages i'll be working with. See below ;
- Fetching API
Then i implemented an API fetch for my GitHub repos search in my SearchBar.js.
 const getRepos = async (val) => {
    // condition that made sure that the fetch will only happen if the searchInput field is not empty
    if (searchInput) {
      const repos = await fetch(
        `https://api.github.com/users/${searchInput}/repos?per_page=8&page=${val}`
      );
      const data = await repos.json();
      setRepos(data);
    }
    return;
  };
I also imported the necessary ReactHook i needed.
import React from "react";
import { useState } from "react";
Then I created state variables inside my SearchBar.js to store the responses from the API fetch. The state will update as soon as the server sends the response.
const SearchBar = () => {
  const [searchInput, setSearchInput] = useState("");
  // I moved the repos and setRepos here from Result.js file
  const [repos, setRepos] = useState([]);

  const handleChange = (e) => {
    setSearchInput(e.target.value);
  };
I created an async / await function called getRepos that made the API fetch request to the GitHub API.
 const getRepos = async (val) => {
    // condition that made sure that the fetch will only happen if the searchInput field is not empty
    if (searchInput) {
      const repos = await fetch(
        `https://api.github.com/users/${searchInput}/repos?per_page=8&page=${val}`
      );
      const data = await repos.json();
      setRepos(data);
    }
Then i went ahead to render it
return (
    <>
      <p className="paragraph">Enter your github username below:</p>
      <div className="search-bar" style={{ padding: "50px" }}>
        <input
          type="text"
          placeholder="search"
          value={searchInput}
          onChange={handleChange}
        />
        {/* Call your getRepo function here instead of using useEffect */}
        <button className="search-button" onClick={() => getRepos(1)}>
          Search
        </button>
      </div>
      <Results
        className="repos-list"
        name={searchInput}
        repos={repos}
        getRepos={getRepos}
      />
    </>
In Result.js file, i created a function called Results that getRepos once a particular GitHub username is being searched for in this format;
function Results({ repos, name, getRepos }) {
  return (
    <div className="repos">
      <h1 className="repo-header">Repositories</h1>
      <ul className="repo-container">
        {/* here, i added repos to the condition. so the map will only happen if all condition are true */}
        {repos &&
          repos[0] &&
          repos.map((repo, i) => (
            <a
              href={`https://github.com/${name}/${repo.name}`}
              key={i}
              target="_blank"
              rel="noreferrer"
            >
and then rendered it also.
Halfway there...
- Page Routing I then went ahead to route my pages using ReactRouter and i aslo created a 404 page for extra functionality.
<Routes>
          <Route path="/" element={<Home />} />
          <Route path="/RepositorySearch" element={<RepositorySearch />} />

          <Route path="*" element={<NotFound />} />
        </Routes>
Styled up my page using CSS
- Setting Up Pagination.
Pagination is a process that is used to divide large data into smaller discrete pages. Where a user can use links such as "next", "previous", and page numbers to navigate between pages, it enables a dynamic display of one page of results at a time.
Firstly, I started by creating the variable postPerPage, which specified the number of items that will be displayed on each page.
Then I created a state variable called pageNumbers which i set to totalPosts / postPerPage
const Pagination = ({ postsPerPage, totalPosts }) => {
  const pageNumbers = [];

  for (let i = 1; i <= Math.ceil(totalPosts / postsPerPage); i++) {
    pageNumbers.push(i);
  }
  return (
    <nav>
      <ul>
        {pageNumbers.map((number) => (
          <li key={number}>
            <a href="!#">{number}</a>
          </li>
        ))}
      </ul>
    </nav>
  );
};
The state property pageNumbers determines the page that will be displayed. As it changes the displayed page changes too.
Next, I needed buttons...
So i created a Next and Previous buttons in my Resuslt.js file to paginate through the lists of Repos being displayed
<div className="buttons">
        <button onClick={() => getRepos(1)} className="previous">
          Previous
        </button>
        <button onClick={() => getRepos(2)} className="next">
          Next
        </button>
      </div>
Then i styled it all using CSS.
CONCLUSION
This article is to just point out the process in which every implementation were made. Once agin, i was able to create my RepoSearch App with the help of React-Router, React-Error-Boundary, and GitHub API(for the API fetch) and all my styles were written in CSS(Cascading style sheet).
Here is the link to the source code https://github.com/iiphe/SearchRepos
And a link to the live code
https://search-reposapp.vercel.app/repositorySearch
Thank you for Reading

Top comments (0)