
so why do we use MQ
let say that you have 20000 customers and you want to send to each one email everyday
and the email is very importent
one option is make program that loop through the customers emails and send the mail by smtp or an api
but what will hapend if email service was unaviable for 1 minutes
a lot of customers does not get the email
and lets say that before sending the email we should do some working before
now we need to think how to manage few instances of the program
i sure we can think on creative ways to solve this but why ?!?!
in such cases we can use mq
what is a MQ(message queue)
its holds data until the program pull that data out
one program push an message on a queue
and second program pull message mrom the queue
so how it can help us ?!?!
the queue have a built in macanizem that help us
here a few feature that we get with when we working with a queue
- persistence - the massage saved in the queue even if your app will crash
- distribution - you can add 20,000 messages in a queue and have another 10 instances that each one pull messages from the queue
fail-safe - if your application crashed the the middle of the process , the message return to the queue and be picked by another instance
and there is more reasons
ok lets start do some coding
in this tutorial we will work with rabbitmq
its open source and very popular
the easiest way to geting start is to register to this site
cloudamqp.com
and create a new instance of mq
alternatively you can install mq in your computer from this link
link
Program one this program responsible for pushing messages into the queue
first you sould get the url of the mq
if you registerd to the site above you can find the connection string in here
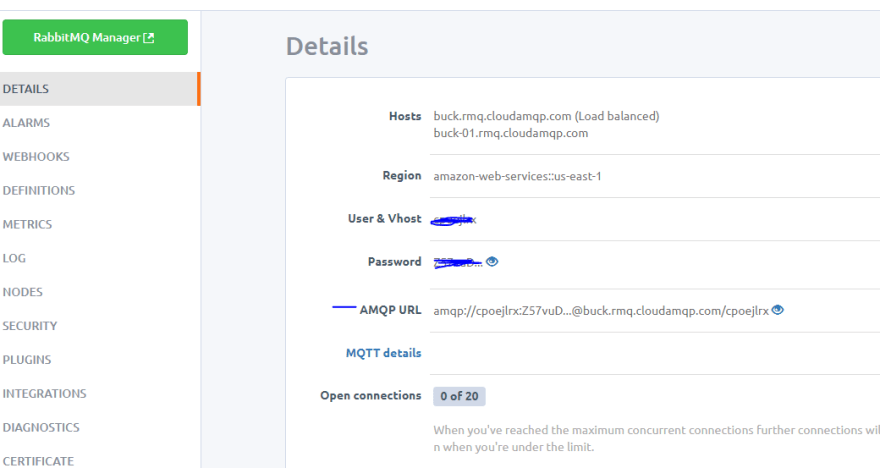
and if you installed the mq locally you can just put "localhost" in the connection string
few thing about the code below
- amqp.connect - creating connection with the mq server
- connection.createConfirmChannel -tell the mq to make sure that each message saved on the mq
- channel.assertQueue - checks for the queue, if it doesn't exist then it will create one.
- channel.sendToQueue - send message to the queue
- the first argument is the queue name (you decide whats the name of the queue)
- the second argument is the message that we send to the queue you can see that the messages sended in binary to the queue in this case i sended the index i but you can replaced the i with json object or anything else
- the object
{ durable: true }and{persistent: true}
responsible for the message persistent
that in case that the mq server restarted
the messages that was in the queue will stay
in this code we pushed 20 messages to the queue
var amqp = require('amqplib/callback_api');

amqp.connect(`amqp://localhost`, function (error0, connection) {
    if (error0) {
        throw error0;
    }
    connection.createConfirmChannel(function (error1, channel) {
        if (error1) {
            throw error1;
        }
        channel.assertQueue(queue, {
            durable: true
        });
        var queue = 'task_queue1';
        for (i = 0; i < 20; i++)
            channel.sendToQueue(queue, Buffer.from(i.toString()),{
                persistent: true
            }, (err, ok) => {
                if (err) {
                    console.log(err)
                } else {
                    console.log(ok)
                }
            });
        console.log(" [x] Sent %s", msg);
    });
});
Program two - The Worker - this program responsible for pulling messages fromthe queue
few thing about the code below
- channel.prefetch - the number of messages that the queue can handle every given time
- channel.consume -this operation pulling the messages from the queue
- the first argument is the queue name (should be the same name as the queue name in program one)
- channel.ack - after that we read the message from the queue and we finished the processing of this message we send to the mq acknowledge that he could remove this message from the queue
- in the callback we get the message in object msg.content
- noAck: false - set it to false otherwise the mq will remove the message from the queue before you send the acknowledge
**the setTimeout simulate heavy processing
its wait 7 seconds before sending the a acknowledge
var amqp = require('amqplib/callback_api');
amqp.connect(`amqp://localhost`, function (error0, connection) {
    if (error0) {
        throw error0
    }
    connection.createChannel(function (error1, channel) {
        if (error1) {
            throw error1;
        }
        var queue = 'task_queue1';
        channel.assertQueue(queue, {
            durable: true
        });
        channel.prefetch(10)
        channel.consume(queue, function (msg) {
            console.log(" [x] Received %s",
            msg.content.toString());
            setTimeout(function () {
                console.log(" [x] Done");
                channel.ack(msg);
            }, 7000);

        }, {
            noAck: false
        });
    });
});
thats it
i hope that this article will help you to get started with rabbitmq
and understand when its should be in use

Top comments (0)