

Demo ⏯️ Code 👨💻 Video Walkthrough 🎦
Machine Learning is a super cool way to build AI apps - but I won't lie, it is a lot of math. Luckily, thanks to ml5.js - we don't need to spend months understanding ML, we can apply it and develop some cool uses in our app within just a few hours 😄
This is a guide to build a feature extractor - something that can get a video stream from your webcam and predict what it sees, once it is trained with a little bit of data - just like in the video above!
🍴 Forking the frontend
I don't want to waste too much of your time with the frontend I used for this app - I think it'd be much better if I skipped right to the JavaScript, and logic.
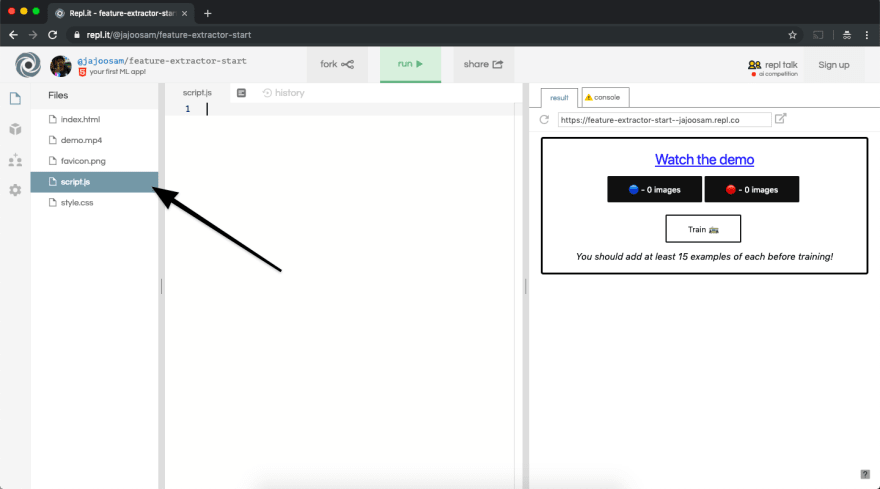
You should fork this repl - https://repl.it/@jajoosam/feature-extractor-start - so that you have the HTML already there! It's essentially just a few divs for holding the video and some other text, along with some buttons to control our app!
I've commented everything (except the CSS 😛) - so you should be able to go through the frontend and understand the basic layout of the app in a few minutes. Once you're done, head over to script.js
✏️ Declaring the variables
We're going to have quite a few variables to declare, so the first thing we're going to do is create them.
Our app is going to have a lot of functions, and it's important that all of them can access the variables - which is why we shall declare right at the start of our code
var featureExtractor, classifier, video, loss, redCount, blueCount;

redCount = blueCount = 0;
I'll give you an overview of what these are for, but you'll understand them much better as we continue building our app.
featureExtractor and classifier are variables we're going to store and initialize machine learning models in.
video is where we're storing the webcam stream, while loss lets us know the progress of how far our on feature extractor has been trained.
Finally, blueCount and redCount are counters for how many images there are in each category - and we initalize both of them with a value of 0, in the next line.
🛠️ The setup()
setup() is a function which shall fire up as soon as our code is ready to run. Bacause of using p5.js, our code is pretty readable and easy to understand here.
function setup() {
    // Tells p5 to not automatically create a canvas element.
  noCanvas();

    // Starts capturing a video feed from the webcam
  video = createCapture(VIDEO);

    // Puts the video stream into the div in our html, with ID `video`
  video.parent('video');

    // Initializes a feature extractor, yet to be trained - from ml5.js
  featureExtractor = ml5.featureExtractor('MobileNet');
  classifier = featureExtractor.classification(video);

    // What we're doing next - setting up buttons!
  setupButtons();
}
This code goes in your script.js file right after you declare variables - essentially, it gets a video stream and displays it on our page, inside a div with the ID video. We also make some functions using the ml5.js library here, and pass the captured video as a parameter - you'll see what we do with these soon, but there's still a little more setup left!
As you can see, at the end of setup(), we call setupButtons() - the function we're going to make next. Here, we're adding event listeners to buttons in our HTML - so we can run functions when they're clicked.
Here's all the code we write for the setupButtons() function 👇
// A function to create the buttons
function setupButtons() {
buttonA = select('#red');
buttonB = select('#blue');

buttonA.mousePressed(function() {
    redCount++;
    classifier.addImage('red');
    select('#redCount').html(redCount);
});

buttonB.mousePressed(function() {
    blueCount++;
    classifier.addImage('blue');
    select('#blueCount').html(blueCount);
});
train = select('#train');
  train.mousePressed(function() {
    classifier.train(function(lossValue) {

            // This is where we're actually training our model

      if (lossValue) {
        loss = lossValue;
        select('#info').html('Loss: ' + loss);
      } else {
        select('#info').html('Done Training! Final Loss: ' + loss);
                select('#train').style("display", "none");
                select('#predict').style("display", "inline");
      }
    });
  });
// Predict Button
buttonPredict = select('#predict');
buttonPredict.mousePressed(classify);
}
That's the largest art of our app, and I'm going to break it up into several parts to make it easier to explain!
🧙♂️bUt wHaT Do tHeSe bUtToNs dO?!?!?!
DON'T PANIC.
Let's start off with this block:
buttonA = select('#red');
buttonB = select('#blue');
buttonA.mousePressed(function() {
redCount++;
classifier.addImage('red');
select('#redCount').html(redCount);
});
buttonB.mousePressed(function() {
blueCount++;
classifier.addImage('blue');
select('#blueCount').html(blueCount);
});
buttonA and buttonB are nothing but the two different buttons we have in our app!

With .mousePressed() we're defining what happens when any of these buttons are pressed - which is:
- Increase the count by 1, using the
++operator - Capture the current frame from the webcam videom and add it to the classifier, with
classifier.addImage() - Update the count on our app by changing the button's text, with
.html()
Next up, we have this whole block - where we train the classifer itself:
train = select('#train');
train.mousePressed(function() {
classifier.train(function(lossValue) {
// This is where we're actually training our model
if (lossValue) {
loss = lossValue;
select('#info').html('Loss: ' + loss);
} else {
select('#info').html('Done Training! Final Loss: ' + loss);
select('#train').style("display", "none");
select('#predict').style("display", "inline");
}
});
});
When the Train 🚋 button on our app is pressed, we call classifier.train() - and with each iteration, the function we supply there is called - which is why we see the Loss value keep changing.

When the Loss value is 0, then we hid the Train 🚋 button, and show the previously hidden Predict 🔮 button!
The last 2 lines of the setupButtons() function are about the predict button:
buttonPredict = select('#predict');
buttonPredict.mousePressed(classify);
It seems like we're calling this classify function - which is what we're going to build next!
Keep going, we're almost done 💯
🔮 Predictions, and showing results
Our classifier() function is pretty straightforward - this is all we do:
function classify() {
  classifier.classify(gotResults);
}
We're just telling the ml5 classifier to classify the current frame in either of the categories (🔴 or 🔵), and send the results to the gotResults function - which brings us to the final part of our app!
As long as the classifier doesn't send us an error, we change the entire page's background color to either red or blue - and then call classify() again, which keeps our code running forever, and the predictions keep coming!
function gotResults(err, result) {
  if (err) {
    console.log(err);
  }
    select("body").style("background", result);
  classify();
}
That's all the code we have to write to build the example feature extractor. I highly recommend going through the final code so that you can see how everything fits together well - I know there are quite a few functions too keep track of, but I've commented everything to make it easier 😅
Now go ahead, try it out! Here are some things I did to see if the feature extractor would work (it did!) 👇
- Keep my head in the left in 🔴, and right in 🔵
- Make a ✌️ in 🔴, and a ✋ in 🔵
- Wear different colored 👕s in 🔴 and 🔵
Let me know other cool things it worked with 👀
✨ okay, but what do I MAKE with this?
There are SOOOOO MANY THINGS you could do! A feature extractor gives you the ability to add this whole other, mysterious way of controlling, and getting input in your app!
Here are a few ideas 💡
- A gesture controlled game, right in the browser 🎮
- A mood tracker - leave the tab open all day, and train it with different face expressions 🤔
- Build your own hotdog or not app 🌭
- Build an app which only lets you message others with gestures 💬
👨🏫 what else is there?
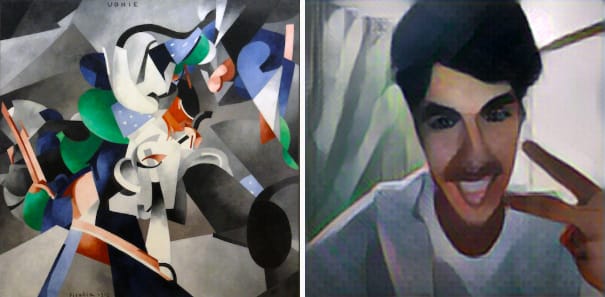
ml5.js can do crazy things! You can integrate image classification into your own app like I did, find similar words which fit into a text, get a precise skeleton of human bodies and even transfer the styles in images - look at what my picture looks like, when composed with the style of a cool painting 🖌️
You should take a look at the many examples on the ml5.js website - or take a look at Dan Shiffman's videos on ml5.js, he covers loads of things you can do with it - and explains everything with a ton of energy. I highly recommend watching his videos on the Coding Train YouTube!
If you have any questions, feel free to ping me on twitter, or leave something in the comments :)

Top comments (1)
Is there a python version of ml5.js?