
Recently a good colleague and friend of mine, showed me how to create AI Art using a Tensor Flow Neural style Transfer algorithm in Google Colab.
Unlike other uses of Machine Learning that require a developer, it turns out that creating art using AI is super duper easy and doesn’t need you to be a ‘coder’!
In this tutorial, I will go step by step on how to create your own AI Art, so that you can do the same 
Instructions to create AI Art
Step 1
Visit this Tensorflow Style Transfer Machine learning model and click ‘Run in Google Colab’ button.

A screenshot of the Tensorflow ‘Style Transfer’ page, see the ‘Run in Google Colab’ button – which you need to click on.
Step 2
Once loaded, scroll down the page to the ‘Setup’ section and replace the following:
- ‘ content_path ‘ replace the url + file with an image you’d like to transfer a style onto
- ‘ style_path ‘ replace the url + file of the image you’d like to transfer the style from

This is what the page will look like once you’ve clicked to run the algorithm in Google Colab, from here you need to scroll down to the ‘Setup’ section.
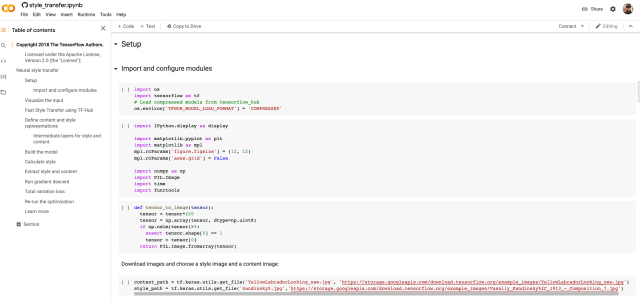
The Setup section of the page, be sure to update the content_path with the image you’d like to change the style of and style_path with the image whose style you’d like to apply to the content.

Here is an example of what the content_path and style_path lines look like when editted.
Step 3
Scroll back up to the top and press the arrow button next to the ‘Neural style transfer’ header and then click the play button to run the algorithm

Scroll back up to the top of the page and click on the arrow to the left of the title ‘Neural style transfer’ to collapse the content and reveal the play button. Click on that play button to start the algorithm.
Results
If you click the arrow to the left of ‘Neural style transfer’ to uncollapse the content and scroll down the page, you will see the result of the algorithm.
In my case, I used my profile photo as the content image and tried two experiments where I swapped the style image.
Experiment 1

In experiment 1, I used Vassily Kandinsky’s ‘Composition, VII, 1913’ as the style image.

The result here is good, the patterns from the style image were successfully found and replicated onto the content image.
Experiment 2

In experiment 2, I googled a water colour texture as the style image (I couldn’t find the exact one I found for this experiment)

The result here was less exciting, this is probably because the patterns that the algorithm found were not as clear as the Kandinsky art piece, and therefore the result is more of a blue blur.
Hopefully this post helps you in understanding how to practically create AI Art, I might create a post about the theory of it another time.
In the meantime, have a happy christmas and new years 

Top comments (0)