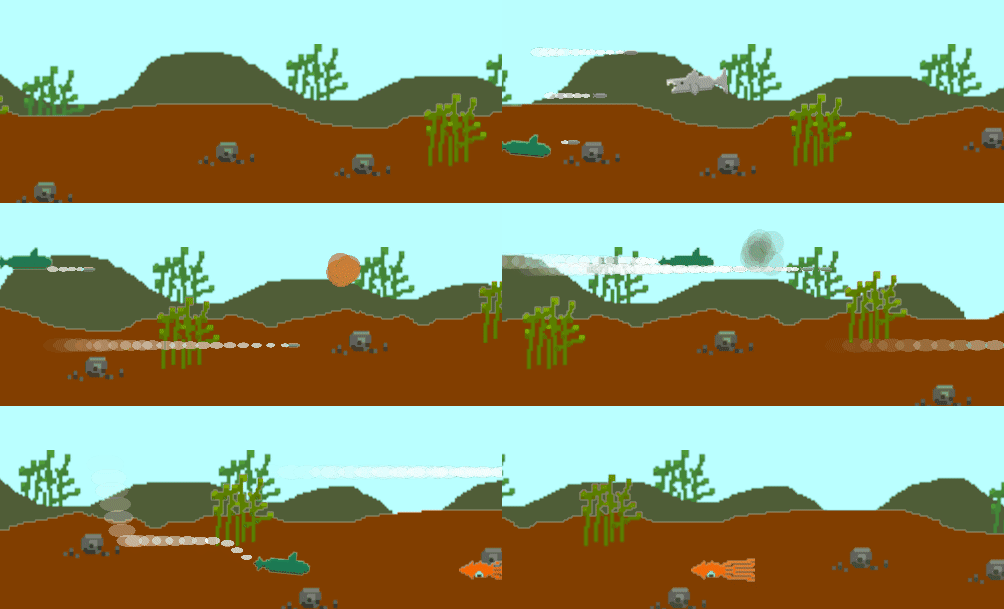
In the first three parts of this tutorial, we implemented movement, shooting, and enemies, which means we now have a working, if basic, shoot 'em up. Now it's time to add some flair! In this post, I will go through animations, particle effects and scrolling backgrounds.
Animations
At this point, the player and enemies are not animated. Their images are simply moved across the screen. To make them a tiny bit more lifelike, we will introduce a tilting animation for when they're moving vertically.
if down and player.yPos<love.graphics.getHeight()-player.height then
  player.yPos = player.yPos + dt * speed
  player.angle = 0.1
  player.pSystem:setLinearAcceleration(-75, -15, -150, -15)
elseif up and player.yPos>0 then
  player.yPos = player.yPos - dt * speed
  player.angle = -0.1
  player.pSystem:setLinearAcceleration(-75, 15, -150, 15)
else
  player.angle = 0
  player.pSystem:setLinearAcceleration(-75, 0, -150, 0)
end
We add an "angle" key to the player table, which we modify in the updatePlayer() function. We then pass player.angle as the "orientation" argument to the draw() function. Note that the angle is given in radians and not degrees, which is why the numbers are so small.
love.graphics.draw(player.img, player.xPos, player.yPos, player.angle, 2, 2)
We add similar code to the enemy behavior functions and the updateEnemies() function.
I was thinking about adding some swimming animations to the enemies, but decided that's not in the scope of this tutorial. To read more about animations in Love2D you can check out something like this.
Particle effects
Particle systems are used in order to create effects like dust, smoke and explosions in games. Particle systems emit a stream of particles that move according to a set of variables. The particles are rendered using either a basic shape or an image. We're going to use the particle system functionality built into Love2D to create trails for the player and torpedoes as well as explosions for player and enemy destruction.
Trails
We start by drawing an ellipse shape to get something looking like a bubble, which will be used for our submarine and torpedo trails. Since we want different sized particles we create a function that takes a size parameter.
function getBubble(size)
  local bubble = love.graphics.newCanvas(size, size)
  love.graphics.setCanvas(bubble)
  love.graphics.setColor(255, 255, 255, 255)
  love.graphics.ellipse("fill", size/2, size/2, size/2, size/4)
  love.graphics.setCanvas()
  return bubble
end
We create a new "canvas" object, which is Love2D's way of letting you draw something "off-screen" for later use. We then draw a white ellipse shape to the canvas and return it.
function getBubbleTrail(image)
  pSystem = love.graphics.newParticleSystem(image, 50)
  pSystem:setParticleLifetime(1, 1)
  pSystem:setSpeed(-50)
  pSystem:setColors(255, 255, 255, 200, 255, 255, 255, 100, 255, 255, 255, 0)
  pSystem:setSizes(0.2, 0.8)
  return pSystem
end
The next step is to create a function that returns the actual particle system. As arguments, we pass in an image and a limit for the number of particles to be kept alive at the same time. We then set the lifetime of the particles to one second and their speed to -50 since we want them to spray toward the left of the screen. We set the color to draw the particles - we pass in three color arguments in RGBA pairs, which will make the opacity decrease to zero as the particle ages. Finally, we set the size to vary between 0.2 and 0.8 and return the particle system.
if(left) then
  player.pSystem:setEmissionRate(10)
elseif(right) then
  player.pSystem:setEmissionRate(20)
else
  player.pSystem:setEmissionRate(15)
end

player.pSystem:setPosition(player.xPos, player.yPos + player.height / 2)
player.pSystem:update(dt)
In the updatePlayer() function, we add some code to control the particle emission rate in order to create more particles when the player accelerates. We also set the position of the particle system to the rear of the player. Then we call update on it, passing in the delta time.
love.graphics.draw(player.pSystem, 0, 0)
Make sure to add the drawing code for the particle system as well, or we won't see anything! We are drawing the system in the top left corner, since it uses the value from setPosition() as an offset for the actual particles.
If you look at the source code, you will see that the code for torpedo trails is very similar.
Explosions
For the explosions, we create another function to return a circle shape instead of an ellipse. We add a size parameter here as well, since we want two different sizes.
function getBlast(size)
  local blast = love.graphics.newCanvas(size, size)
  love.graphics.setCanvas(blast)
  love.graphics.setColor(255, 255, 255, 255)
  love.graphics.circle("fill", size/2, size/2, size/2)
  love.graphics.setCanvas()
  return blast
end
The function that returns the explosions particle system is also very similar to the one returning the bubble trail system.
function getExplosion(image)
  pSystem = love.graphics.newParticleSystem(image, 30)
  pSystem:setParticleLifetime(0.5, 0.5)
  pSystem:setLinearAcceleration(-100, -100, 100, 100)
  pSystem:setColors(255, 255, 0, 255, 255, 153, 51, 255, 64, 64, 64, 0)
  pSystem:setSizes(0.5, 0.5)
  return pSystem
end
Instead of just setting the speed of the particles, we use setLinearAcceleration() to cause the explosion particles to randomly go in different directions. We also set the color to go from yellow to orange and then fade away to dark grey.
Then it's just a simple matter of adding new explosion particle systems to an explosion table whenever an enemy or the player is destroyed. Note that we're calling the emit() function now in order to create a single burst of particles and not a continuous stream.
local explosion = getExplosion(smallBlast)
explosion:setPosition(enemy.xPos + enemy.width/2, enemy.yPos + enemy.height/2)
explosion:emit(10)
table.insert(explosions, explosion)
local explosion = getExplosion(blast)
explosion:setPosition(enemy.xPos + enemy.width/2, enemy.yPos + enemy.height/2)
explosion:emit(20)
table.insert(explosions, explosion)
We also add a function to update our explosions and remove them after all the particles have been destroyed.
function updateExplosions(dt)
  for i = table.getn(explosions), 1, -1 do
    local explosion = explosions[i]
    explosion:update(dt)
    if explosion:getCount() == 0 then
      table.remove(explosions, i)
    end
  end
end
In the last part, we made the game restart as soon as the player was destroyed. I modified this behavior by adding a "playerAlive" flag and a short timer. Otherwise the player explosion wouldn't have time to animate.
Scrolling backgrounds
In order to make the background look more lively, I decided to draw a sea floor and have that scroll along the bottom of the screen. I drew a foreground image and a background image and loaded them up in the load() function.
if groundPosition > -800 then
  groundPosition = groundPosition - dt * 100
else
  groundPosition = 0
end
if backgroundPosition > -800 then
  backgroundPosition = backgroundPosition - dt * 50
else
  backgroundPosition = 0
end
Since we know the screen width is 800 pixels, we make the groundPosition tick down from 0 to -800 and restart. The background image will be moving slower, in order to add the illusion of depth. This is called Parallax scrolling.
love.graphics.setColor(100, 200, 200, 200)
love.graphics.draw(backgroundImage, backgroundPosition, 380, 0, 2, 2)
love.graphics.draw(backgroundImage, backgroundPosition + 800, 380, 0, 2, 2)
love.graphics.setColor(255, 255, 255, 255)
love.graphics.draw(groundImage, groundPosition, 400, 0, 2, 2)
love.graphics.draw(groundImage, groundPosition + 800, 400, 0, 2, 2)
In the draw() method, we need to draw both images twice with an 800 pixel offset to get them to scroll seamlessly. We modify the drawing color before drawing the background image in order to make it a bit dimmer and darker. Then we reset the color and draw the foreground image like normal and there we go!

I have decided to make one final post dealing with sound effects and music, so stay tuned and thank you for reading!


Oldest comments (0)