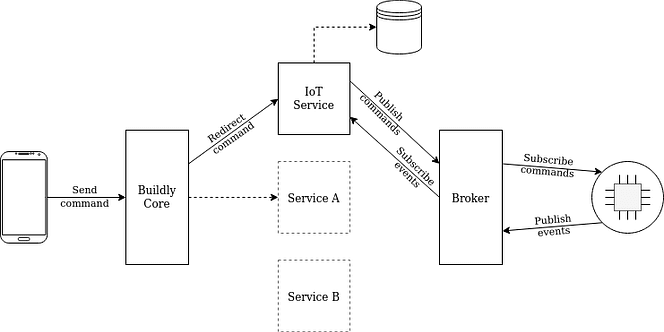
As we have talked in one of our previous blog posts, most applications on the internet work synchronously but this has been changing in the last few years, especially because of IoT. In this post, we’re going to show you how to create a “micro”service responsible for publishing messages to an MQTT broker and connect it to Buildly Core. This service will receive command specifications from Buildly Core and send it to the broker, so IoT devices can subscribe to them. The main idea is that we have an event producer, a message broker, and a consumer. If you want to know more about this type of architecture, have a look at the Event-driven Architecture post.
Before starting
First of all, we need to have a Buildly Core instance up and running, so we can safely expose our IoT service and possibly connect other services to publish commands to other brokers our trigger different actions, processes, etc. To know how to quickly have an instance of Buildly Core, go through the Quickstart documentation.
In our example, we’re using Mosquitto as the MQTT broker, so we also need an instance of it up and running. There are a couple of tutorials on the internet of how to start a Mosquitto server, so we’re not going to explain how to do it here. Eclipse Mosquitto is an open-source (EPL/EDL licensed) message broker that implements the MQTT protocol versions 5.0, 3.1.1 and 3.1. Mosquitto is lightweight and is suitable for use on all devices from low power single board computers to full servers. [1]
You can find the code of the service we’re going to create in this tutorial on GitHub. https://github.com/Buildly-Marketplace/iot_service
Create the IoT Service
Now, the fun part will start. We need to know which programming languages have an official Mosquitto client, so we can choose which one we’ll pick to build our service. In our case, we chose Python because we have a Buildly CLI tool that generates a simple and configured Django application ready to be used with Buildly Core.

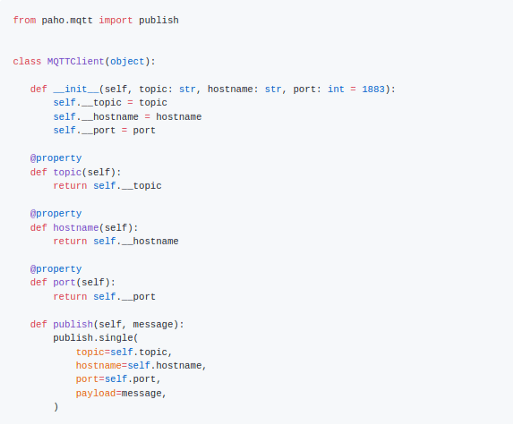
To connect to the Mosquitto server we need to install the Python library called paho-mqtt, so we added it to the application requirements. The Eclipse Paho project provides open-source client implementations of MQTT and MQTT-SN messaging protocols aimed at new, existing, and emerging applications for the Internet of Things (IoT). [2]
Connect to a Mosquitto server
After running the service and verifying that everything is working we need to implement the logic that will connect our IoT service to the broker and publish commands sent to it. We have to define a topic in the broker, so messages(commands) can be published. Therefore, we decided to call our topic: hello/world.
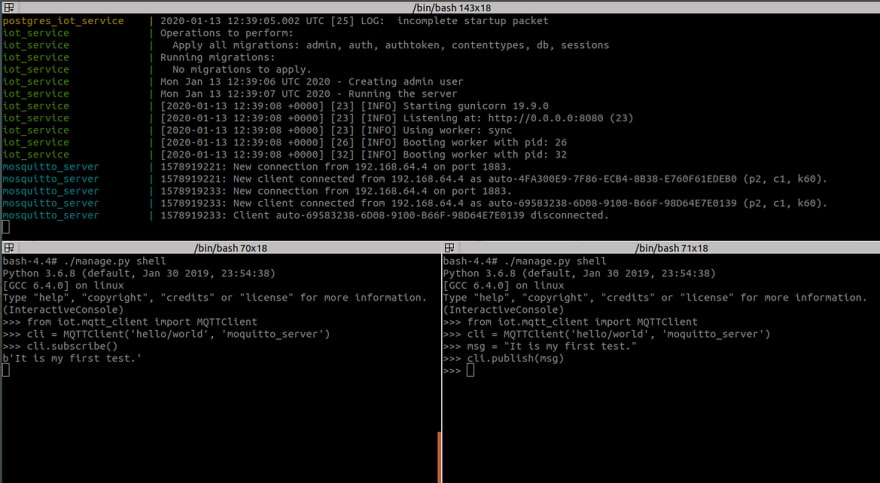
To test our implementation above we need to have a Mosquitto server running and subscribe to the same topic that we’re going to publish messages. Therefore, we added another function to the MQTTClient class to perform the topic subscription.

Now, we have the IoT service and a broker running, we need to test the connection and see if we can send and receive messages via our Mosquitto server.
Implement an endpoint
Last but not least, we need to implement an endpoint to receive command specifications in HTTP requests and send them to the broker. Our implementation will be super simple, so we aren’t going to process the body of incoming requests but just send them directly to the Mosquitto server. But you can add more logic to your service, e.g, structure messages before publishing them, define a list of commands that can be published to the broker, etc.

Connect the new service to Buildly Core
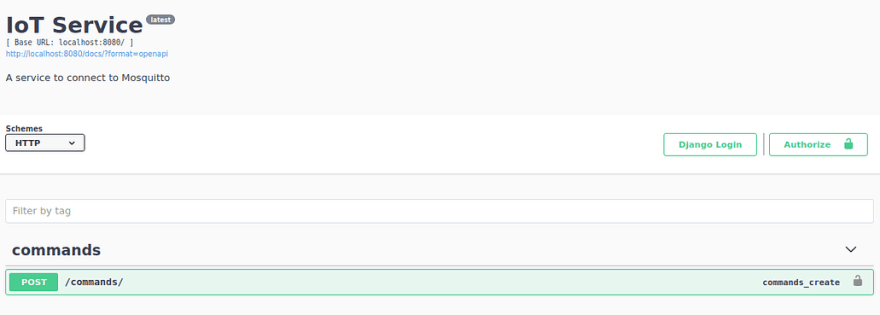
Now that we have our IoT Service connected to a Mosquitto server and ready to be connected to Buildly Core, we’re going to it then. First, we need to have an instance of Buildly Core and our IoT service, then we send the following POST request to Buildly Core with our Admin credentials, so the service is registered to it.

Now, let’s check the Buildly Core Swagger specification, so we can see if the IoT service is accessible via Buildly Core.

Testing everything together
We connected all the pieces and everything is running, so we need to test it now. We are going to send a request to Buildly Core with a command specification to be redirected to our IoT service. Therefore, the Mosquitto server should have the specified command queued. To retrieve the message from the Mosquitto server we are using the Mosquitto Client to subscribe to the hello/world topic.
Awesome! Everything is working and we can send command specifications to Buildly and they will be published to a Mosquitto server.
And now what?
Now, we can create consumers and connect them to the Mosquito server to consume messages(commands), in other words, we can send HTTP requests to Buildly Core specifying which command should be performed by an IoT device and these requests will be redirected to a service responsible for handling and publishing them to a broker using MQTT protocol.
There’s a diagram at the beginning of the post showing a database connected to and an event subscription done by the IoT Service. It means that the IoT Service could also subscribe to the broker to receive information from IoT devices, and use a database to store this kind of data.
Resource
- Eclipse Mosquitto — https://mosquitto.org/
- Eclipse Paho — https://www.eclipse.org/paho/
- Buildly Core Documentation — https://buildly-core.readthedocs.io/en/latest/

Oldest comments (0)