I have been working with Amazon API Gateway to build APIs for several years now. What has always beem common is that the APIs need to be secured and callers need to be authorized. I have been using many different ways of authorizing the users. I have been usinhg AWS Iam and short lived tokens using Cognito Identity Provider, built in authorization with Cognito User Pools, and Custom Authorizers or Lambda Authorizers that it's called now days. Yes! I'm that API Gateway Old.
In this post we are going to take a step away and not use Cognito at all for authorization. Instead we will use one of the major third party providers out there, Auth0.
I will use the console to do the entire setup. As normal everything exists as CloudFormation and is available on GitHub
Create, Setup, and Configure Auth0
First of all we need to sign up for a Auth0 subscription. The free plan is more than enough for this test, the free plan include 7000 monthly active users and unlimited logins. There is no need to supply a credit card when signing up. This must be one of the more generous free plans I have accountered in the Cloud business. Well done Auth0!
Configure Single Page Application
First of all we need to create a Single Page Application that we can use to Authenticate the user and to interact with the API.
Navigate to Applications, in the management console, and hit "Create Application" button. When the application is created you should end up with Basic settings looking like this.

Now we need to update and set Application URIs, scroll down to the section and update.
- Allowed Callback URLs: http://localhost:3000, http://localhost:3000/callback
- Allowed Logout URLs: http://localhost:3000
- Allowed Web Origins: http://localhost:3000
I needed to add http://localhost:3000/callback to the callback section. We will later use the Auth0 sample application as base and it will use this for callbacks.
Your settings should look similiar this:

Configure API
Next up we need to create the API that we'll use in API Gateway for authorization. Navigate to Applications, select APIs, and create a new API. The Identifier is important, we'll use that later in the JWT Authorizer in API Gateway. After the setup you should have a configuration that looks like this:

Now we start to have most of the moving parts in place.
Create user
We need a user to test our Application and API with, so navigate to users and create a new user. We will get back to permissions and so on later, so to start just create a plain old user.
Setup API Gateway & Lambda
Time to get down to API Gateway and Lambda. We are going to create two Lambda functions as integrations with two different methods in an API Gateway HTTP API.
Create the functions
Let's start by creating the Lambda functions, navigate to the Lambda part of the AWS console and start creating a Pyhton 3.8 based function, name it get-unicorn.

Keep all settings for the function as default for now. Update the code for the function and paste the following.
import json


def lambda_handler(event, context):

    if 'queryStringParameters' in event and 'name' in event['queryStringParameters']:
        unicorn = {
            "name": event['queryStringParameters']['name'],
            "gift": "Flight"
        }

        return {
            'statusCode': 200,
            'body': json.dumps(unicorn)
        }

    return {
        'statusCode': 400,
        'body': json.dumps('Missing Unicorn Name')
    }
Repeat the process and create a function named list-all-unicorns and paste the following code.
import json

def lambda_handler(event, context):

    unicorns = [
        {
            "name": "Gaia",
            "gift": "Speed"
        },
        {
            "name": "Magestic",
            "gift": "Magic"
        },
        {
            "name": "Sparkles",
            "gift": "Glitter"
        }
    ]

    return {
        'statusCode': 200,
        'body': json.dumps(unicorns)
    }
Create API Gateway
Time to start setting up API Gateway. Navigate to API gateway part of the console and click Create API.
In the selection screen click Build for the HTTP API.

Add two integrations, for the two Lambda functions we created previously, name the API, I call mine Unicorns.

Click next to come to the next step, to start configure routes. Here we create two routes for the integrations we created before. Set the method to GET and add a resource path, point each route to the corresponding integration.

Move to the next part of the configuration, to setup the stages. You can leave this with default settings with a $default stage with auto-deploy on.

Final step is to review and create the API. Your configuration should look something like this. Click Create to create the API.

Now let's test it all out before moving to the next part of the configuration. Select you newly created API and find the Invoke URL. Copy and paste the URL into a browser and don't forget to add the resources path, e.g. /unicorns if everything is working you should now see result in the browser window.
Add Authorization
Now let's create and add the Auth0 JWT Authorizer and attach it to the routes we have created. Navigate to Authorization under Develop in the menu for the API we have created. Click Manage authorizers tab and hit Create button
Select the type to be JWT, give the Authorizer a name. Issuer URL is your Auth0 tenant URL e.g. https://[tenant].eu.auth0.com/ It's important that you don't forget or leave out the / in the end. Also you should NOT add the full url to the openid configuration, API Gateway will automatically append .well-known/openid-configuration to the Issuer URL. You can test to paste the full URL in a browser window to see the configuration https://[tenant].eu.auth0.com/.well-known/openid-configuration
Click the Add audience button and paste the Identifier from the Auth0 configuration, I told you this was important.

Time to attach the Authorizer to each of the routes. Go back to the Authorization menu and select the Attach authorizers to routes tab. For each of the routes and methods select the Authorizer we just created and click Attach authorizer

When the Authorizer has been attached you should see a blue badge JWT Auth next to the method.

Once again paste your invoke URL with a resource path in the browser window. If the Authorizer has been setup correctly you should now get a Unauthorized message.
Configure CORS
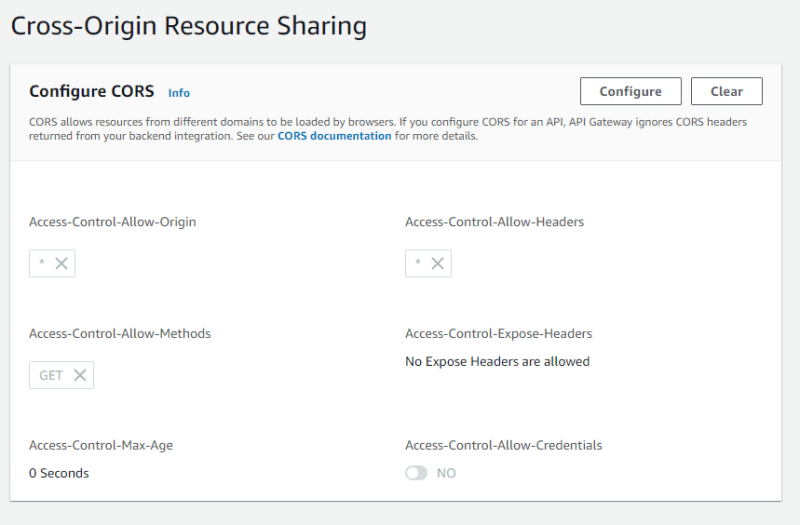
Since we will be calling our API from our local machine during testing we must configure CORS on the API. So navigate to CORS under Develop. During development we will just allow everything so set Access-Control-Allow-Origin to * and Access-Control-Allow-Headers to * also for Access-Control-Allow-Methods add GET.

Test it with the sample app
We use the Sample application from Auth0, with some modifications, to test everything. You can fetch the application from GitHub.
To start with we must update the auth_config.json file to include information about or tenant. If audience is not present you must add it and set it to the API Identifier.
{
  "domain": "<tenant>.eu.auth0.com",
  "clientId": "<secret>",
  "audience": "<API Identifier>"
}
Next up we update the app.js file and the function callApi Update it so it calls your API in API Gateway.
const callApi = async () => {
  try {
    const token = await auth0.getTokenSilently();

    const response = await fetch("https://api-gateway.example.com/resource-path", {
      headers: {
        Authorization: `Bearer ${token}`
      }
    });

    const responseData = await response.json();
    const responseElement = document.getElementById("api-call-result");

    responseElement.innerText = JSON.stringify(responseData, {}, 2);

    document.querySelectorAll("pre code").forEach(hljs.highlightBlock);

    eachElement(".result-block", (c) => c.classList.add("show"));
  } catch (e) {
    console.error(e);
  }
};
Now it should just be to install dependencies and run the app. Do a login with the user you created during Auth0 setup then navigate to the API call part of the app and click the Ping API button. You should now see some nice response from your API in the application, showing that the Auth0 JWT Authorizer is working as expected.
Limit access with RBAC
But what if not all users should have access to all APIs how can we handle that in an easy way? For this use case we can use RBAC (Role Based Access Control).
Auth0 RBAC Setup
To start using it we must return to Auth0 to create some roles and permissions.
Firt of all we need to create some permissions for our API. Navigate to the APIs part in the Application menu. Select your API and the select the Permissions tab. Here we add two permissions, read:unicorn and list:unicorns

Next navigate to Roles in the user menu in Auth0, and click on Create Role

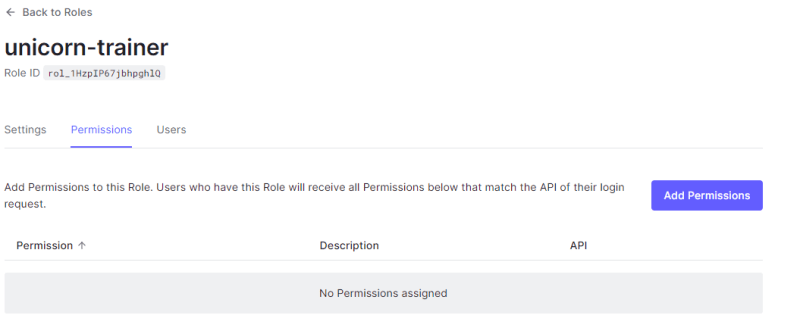
Firt we create a new role called unicorn-trainer and we assign permissions list:unicorns and read:unicorn navigate to the settings tab

here select the permissions

Repeat the role creation process and create a role unicorn-rider but only assign that role the read:unicorn permission.
Now we need to return to app.js in the sample application. We must now modify the fetchAuthConfig function to request the additional scope. We MUST add ALL of the scopes, if a user doesn't have that permission the scope will not be added. But permissions that are not in the scope list will NOT be added either. So add both list:unicorns read:unicorn
/**
 * Retrieves the auth configuration from the server
 */
const fetchAuthConfig = () => fetch("/auth_config.json");

/**
 * Initializes the Auth0 client
 */
const configureClient = async () => {
  const response = await fetchAuthConfig();
  const config = await response.json();

  auth0 = await createAuth0Client({
    domain: config.domain,
    client_id: config.clientId,
    audience: config.audience,
    scope: 'openid profile email list:unicorns read:unicorn'
  });
};
API Gateway RBAC Setup
Navigate to Authorization in the menu and select the route to add scope for. Add read:unicorn to the /unicorn route and add list:unicorns to the /unicorns route, and click save. The API should be auto-deploying

Test RBAC setup
Make sure your user has the scope list:unicorns and navigate back to test the API. You should see a success message again.

Now move back to Auth0 and change the role of your user so it doesn't have the permission list:unicorns.
If you now test the API again from the sample app you will get an access denied like

Final wrapup
We have now created and configured AWS API Gateway with a JWT Authorizer using Auth0 to authenticate our users. We have turned on RBAC and created different roles that gave different permissions to call the API using scopes. This is a very powerful solution to manage your users and access to API.
Gotchas
There was a couple of Gothas along the way. First was that for Auth0 to generate a proper JWT based access token you must specify audience when creating the Auth0 client. If you don't do this the access token will not be a proper JWT token, it will be in Auth0 specifik format.
Second Gotcha was that you must request all scopes during login, when you create the Auth0 client. If you don't specify all scopes your user will not get the scope even if the user has that permission. Instead specify all scopes and if the user doesn't have the permission the scopr will not be in the list.


Top comments (1)
Just stumbled upon your blog about this topic while I was fighting with an
Unauthorizedresponse from API Gateway.In the end, this part saved me:
Big thanks for that!
P.S.: I'm a newly AWS Community Builder myself from Germany. Unfortunately, I missed your talk at AWS Community DACH in September. Maybe next time! :)