5 ways to get your Dataverse Data into Microsoft Fabric / OneLake

Introduction
Microsoft Fabric is top of mind everywhere, and its promises for improving the analytic capabilities of Power BI users are huge. However, integrations and compatibility between Fabric and the wider Power Platform (e.g. Dataverse, Power Apps) is not seeing the focus it warrants.
For starters:* How can I leverage data currently stored in Dataverse, in my Microsoft Fabric setup?***
When Fabric released in 2023, in terms of automatically syncing data, the existing ‘Azure Synapse Link’ was our only solution for this challenge. Later in 2023 however, came the simpler ‘Dataverse Link to Fabric’. and most recently in 2024, it was made possible to create ‘Shortcuts to Dataverse’ from Lakehouses in Fabric.
In addition, we have approaches such as using Dataflow Gen2 to do scheduled loads of data from Dataverse to a Fabric Destination. And finally the Semantic Model Integration to OneLake which I covered last week on this blog, also allows for a scheduled load from Dataverse to OneLake.
But what are the strengths and weaknesses of each approach?
This article shares and compares the step-by-step process for each of the five approaches to, hopefully aiding you in selecting the right method for your case.
Note, that each section pretty lengthy and full of screenshots. Feel free to jump to the final section for a quick comparison between all five.
Solution 1: Azure Synapse Link
Dataverse has long supported Azure Synapse Link for Dataverse. However, by leveraging the new Fabric OneLake Shortcuts, we can use the old Synapse Link for Dataverse to transport data into an Azure Data Lake Gen2, and subsequently the OneLake shortcut for ADLS Gen2 to make said data available in OneLake / Fabric.
The steps we need to take to make this happen are as follow:
Setup the necessary Azure Resources for the Synapse Link (Subscription, Resource Group, Storage Account/ADLS Gen2)
Prepare Dataverse Tables and establish Azure Synapse Link between the Tables and ADLS Gen2
Create Shortcut in your Fabric/OneLake Data Lakehouse to the Dataverse Tables
The following sections will take you through each step.
Step 1: Azure Resources
In this step we will create the following Azure Resources, and note down a couple of important links and values:
A Subscription
A Resource Group
A Storage Account (ADLS Gen2) including its URL Endpoint.
An App Registration with correct roles and permissions on the Storage Account (+ a Client ID & Secret for authentication).
Follow the steps below to create the resources:
First head to portal.azure.com, and if you do not have a subscription already, create one and connect to a billing account.
Second, create a Resource Group, linking it to your Subscription.
Third, create a Storage Account, linking this to your Subscription and Storage Account. Also make sure to find the Advanced Options, and toggle on ‘Enable Hierarchical Namespace’. This ensure that the Data Lake being created is Gen 2!

- Fourth, go to your Azure Active Directory, open App Registrations, and create a new registration, making sure “Accounts in this organizational directory only” is selected as supported account type.

- After creating the App Registration, open it, and from the Overview Page, write down the Directory (tenant) ID and the Application (client) ID for later use.

Then go to Certificates & Secrets of the App Registration to create a new Secret for authentication. Write down the Secret Value, for use later on.
Now go back to your Storage Account, and into ‘Access Control (IAM)’. Here, add a new Role Assignment for your newly created App Registration, giving it the Roles “Storage Blob Data Contributor” and “Storage Blob Data Owner”.
And finally, open up the “Endpoints” menu of your Storage Account, and write down the Primary Endpoint for later use.

Step 2: Prepare Dataverse Tables and Create Azure Synapse Link
After creating all the necessary Azure Resources, we can prepare our Dataverse tables and setup the Azure Synapse Link.
First go to make.powerapps.com and identify the Tables which you want to sync to your Data Lake.
For each table, open up the table settings, go to properties, expand the Advanced Options, and make sure “Track Changes” has been enabled. If you do not do this, your table will not show up in the Synapse Link.

Now go to the Azure Synapse Link page, by selecting it from the navigation panel on the left hand side. If the option is not there, select More > Discover All and find the option in the bottom right side of the page under Data Management.

Create a New Link, and select the Subscription, Resource Group and Storage Account that you created during Step 1.

Next, Add the Tables which you want to sync to your Data Lake. Note that only tables which have “Track Changes” enabled will show up here.
Also pay attention to the “Advanced” tab, in which you can customize the frequency of refresh taking place, down to a minimum of 15 minutes.

And you should now be able to see an overview of your Synapse Link and the tables being synced to the Data Lake:

Similarly, you should be able to go to your Storage Account in Azure, find the Storage Browser, and see that the tables are now being synced and are available within your Data Lake.

As a final act in Step 2, please write down the string of the subfolder in which your Dataverse Tables have been uploaded. In my case, it is the “dataverse-60xtthdefault-unq…….” string.

Step 3: Create Shortcut in your Fabric/OneLake Data Lakehouse to the Dataverse files in the Data Lake
Our final step on the journey, is to create a shortcut from our OneLake Data Lakehouse to the ADLS Gen2 folder containing our Dataverse data.
First, go to app.powerbi.com, and if you haven’t already, create a Fabric-Enabled workspace, and create a Data Lakehouse within the Workspace. Microsoft has published an excellent guide to get you started on this.
Now open up the Data Lakehouse and click Files > New Shortcut

From here, choose Azure Data Lake Storage Gen2

In the Connection Settings, point the URL to the ADLS Gen2 ‘Primary Endpoint’, which you wrote down as part of step 1.
For Connection Credentials, you may, depending on your settings, be able to connect with your Organizational Account, but otherwise select Service Principal as ‘Authentication Kind’, and fill in Tenant ID, Client ID and then your Secret Value as the Service Principal Key, all of which are values you wrote down during Step 1.

Finally, give the Shortcut an appropriate name, and then provide it with the Subfolder string which you wrote down as the very last thing in Step 2.

You should now be able to use the Shortcut from the navigation menu of your Lakehouse, and query the copies of your Dataverse data directly from within your Notebooks.

Solution 2: Dataverse Link to Fabric
Prerequisites
The first thing you need to do, is to check the following off your list:
You must have the System Administrator security role in the Dataverse environment.
You must have a Fabric Capacity, Fabric Trial Capacity or a Power BI Premium Capacity available.
You must be an administrator of the Power BI workspace you want to link to, and the workspace should be allocated to one of the capacity types mentioned above.
Then, in addition, you may or may not need to be aware of some Azure Region details regarding your Fabric and Dataverse Envronments.
Up until a few weeks ago, it was a hard requirement that the regions of your Fabric Workspace and Dataverse environments were the same, else the integration would not work. However, rumour has it that this restriction has been lifted:

If for some reason the feature has not yet been rolled out for your region yet, I would be patient and wait a few weeks.
Setting up Dataverse Link for Fabric
With the prerequisites out of the way, it is time to setup the actual Dataverse Link for Fabric.
First, go to the Tables area of your Dataverse environment, click Analyze at the top, and Link to Microsoft Fabric:

Set up your Connection by inputting your credentials, and also choose the workspace (or create a new) that you wish to use as destination for the Lakehouse which will be created.

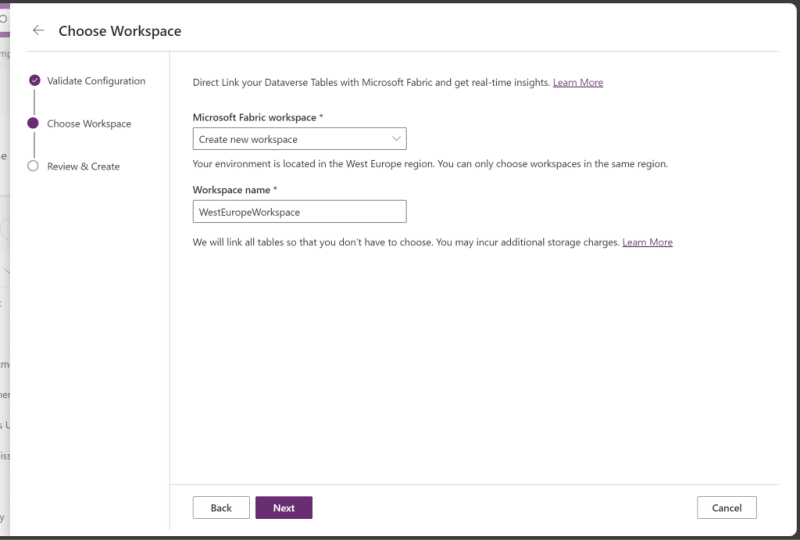
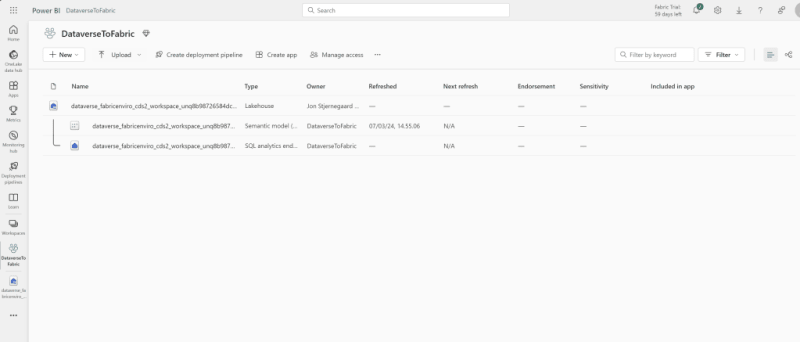
After finalizing the setup, your Lakehouse and/or Workspace will be created and opened for you:
And the Dataverse Link for Fabric will be accessible from the Azure Synapse Link page in your Dataverse Environment:

At first the Lakehouse will have to perform an initial load:

If even after the initial load, some or all of your tables end up in a weird “Unidentified” folder, you may open the Dataverse Link for Fabric in the Azure Synapse Link page, and click “Refresh Fabric Tables”, which will refresh the metadata in the Link. On this page, you can also monitor the status of the tables being synced:

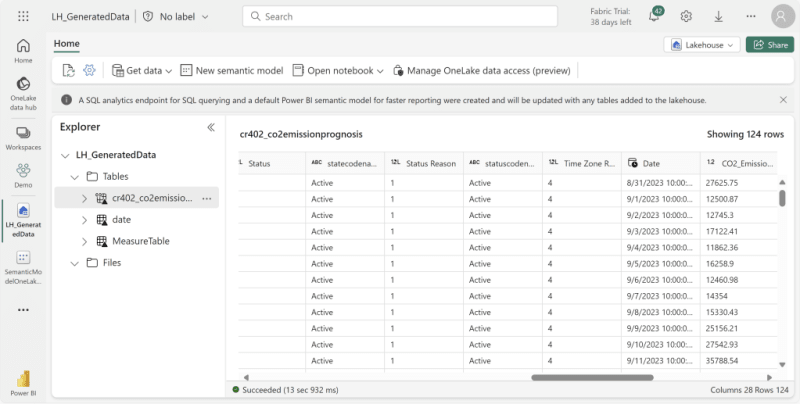
Finally, with a bit of wait time, you should be able to see actual delta tables appear in your Lakehouse, which you can then use in Fabric as you would any other Lakehouse table. Use it in a Semantic Model. Shortcut it into other Lakehouses. Run a notebook. Whatever you please!:

Note that what ahs happened under the hood, is that new Delta Tables have been created in a Dataverse Managed Lake, which reference the original Dataverse data. That means that this solution consumes Dataverse Storage as well!
Solution 3: Shortcut to Dataverse
The Mad March of 2024 brought the announcement that Lakehouses in Fabric would be able to create shortcuts directly to Dataverse: Analyze Dataverse tables from Microsoft Fabric | Microsoft Fabric Blog | Microsoft Fabric
However, to my disappointment, this seems to be more or less a small additional functionality that builds on top of Solution 2, more so than offering a true alternative.
What is new, is that from the Lakehouse, once selecting Shortcut, you are now able to select Dataverse as an option:


However, as described in the documentation, in order for you to create Shortcuts to Dataverse from a Lakehouse in Fabric, you need to:
Have System Administrator privileges on a Dataverse Environment that resides in the same Azure geographic region as your Fabric Capacity Workspace
Enable Link to Fabric from said Dataverse Environment
But wait… Wasn’t that essentially the same as Solution 2? Yes, indeed.
And won’t that process already automatically populate a Lakehouse in Fabric with all my Dataverse tables, making them available for me to Shortcut into other Fabric Lakehouses? Yes. Indeed.
The new thing here is really, that after setting up the Link to Fabric on an environment, we can now access the tables from the underlying Dataverse Managed Lake directly through the Shortcut wizard in the Lakehouse, and we can do that freely from any Lakehouse in any Workspace.
Instead of having to work with that auto generated Lakehouse from the ‘Link to Fabric’ functionality, we can consider that setup as only an administrative task. After the initial setup is done, any new Shortcuts you make to Dataverse can be made much cleaner than previously possible. You can pick and choose which column to select from your environments:

And you can even Shortcut multiple tables from separate environments into the same Lakehouse:

AND you can even cross-query between these shortcutted tables with ease:

In short, Shortcuts to Dataverse doesn’t make the initial setup any easier than before, but after setting up, it’s smooth sailing from there, and very easy to perform cross Dataverse environment analysis in Fabric.
Solution 4: Dataflow Gen2
Dataflow Gen2 is the low-code tool of choice for Data Ingestion in Microsoft Fabric. The process for ingesting Dataverse data with Dataflows is straightforward:
You first create a new dataflow, and use the Dataverse Connector to load data from your Environment, selecting which tables to load:

If you wish, you may transform the data, before selecting a data destination to output the data to, with both Fabric Lakehouses and Warehouses being among the options. You are able to both Append and Overwrite destination tables, which are persisted as Delta Tables in OneLake:

Finally, you may setup a refresh schedule on the Dataflow to automate the process:

Solution 5: Semantic Model Integration to Fabric
The process below is the same that I walked through in my blog from last week. You first need to enable two Tenant Settings in your Fabric Admin Portal:

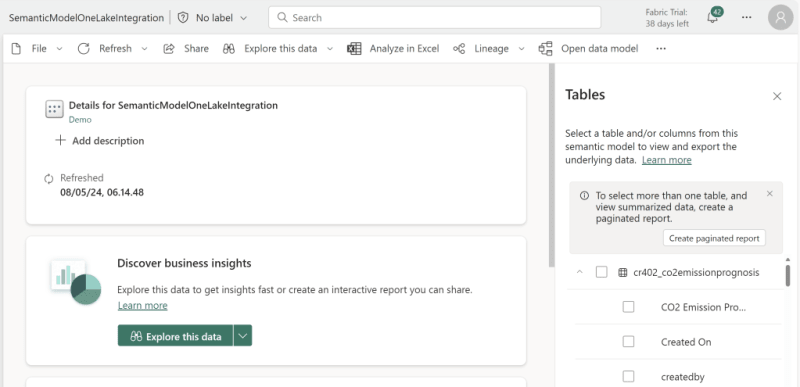
Next, you can connect to a Dataverse table from Power BI desktop, and if you wish, you can use the Power Query Editor to transform the incoming data. After you are done, you publish the model to your Fabric Enabled workspace:


Opening the Model from the Workspace, you go into the settings, and enable the OneLake Integration setting:
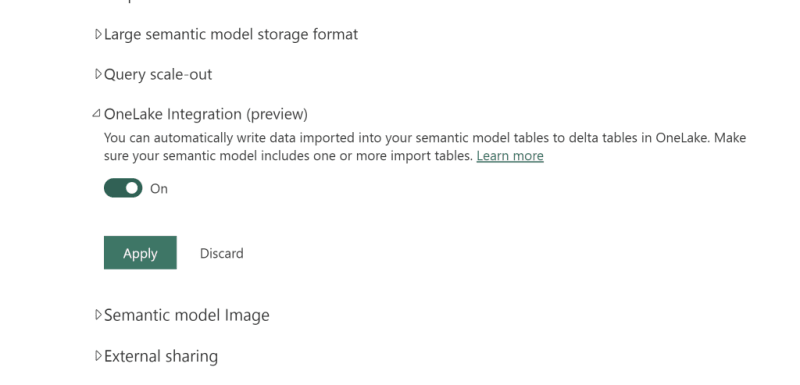
After applying the new setting, data will be automatically ingested into your OneLake when your Semantic Model is either refreshed manually or by a schedule.
The data can subsequently be accessed by creating a Shortcut within a Lakehouse:


Or even by browsing the files using the OneLake explorer on your desktop:

If I go ahead and alter a few values in the table in Dataverse (in this case, deleting a value, and editing a value):
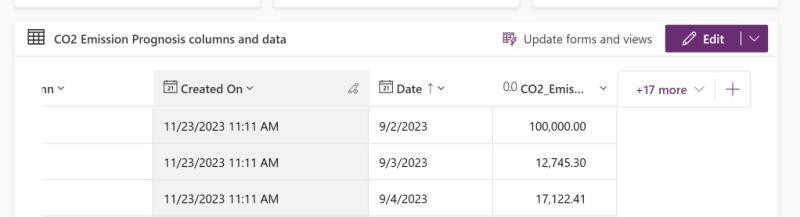
The updated values show when I query the shortcutted Lakehouse Table, but only after a refresh of the Semantic Model has occurred:

Under the hood, the update is simply performed by creating new Delta Tables, and deleting the old ones. There is no time traveling and retention of old files with this integration:

The last thing you need to do to automate the process, is to schedule the automatic refresh of your Semantic Model, which is done from the Semantic Model settings, after which your OneLake data will be overwritten each time the model is refreshed.
A super simple and clean setup for those who are used to working with Power BI and Semantic Models.
Comparison remarks and considerations
Storage and Cost:
Solution 2 and 3 does not move any data from Dataverse into Microsoft Fabric. Instead what happens, is that Delta Tables are created *in *a Dataverse Managed Lake, which counts towards Dataverse Storage.
This also means that you will pay Dataverse Storage costs for these additional Delta Tables, which can be a costly affair. If this is a concern (e.g. you wish to move large quantities of data), you should consider the Azure Synapse Link for Dataverse approach instead, which instead moves your data to a Data Lake Gen 2 in Azure that you have to manage yourself. Here you have more control over all costs incurred during the process.
For the Dataflow and Semantic Model, you will “pay” in terms of Capacity Units for your consumption, which I dive into the details of in last weeks blog. In general though, with my limited testing, Dataflows seem more expensive than Semantic Models in terms of Capacity Units.
Flexibility of process:
With regards to how flexible the process is, Azure Synapse Link, Dataflow Gen2 and Semantic Model Integration provides the greatest amount of flexibility. You can choose for yourself which data to sync, and even perform transformations along the way if you desire.
On the opposite side, you are not able to have any say in which tables to Sync from Dataverse to Fabric in Solution 2 and 3.
Update Frequency:
The Dataverse Link for Fabric has no option for customizing refresh frequency, and instead seems to run on a fixed 1 hour schedule, meaning that you will only achieve near real time data sync to Fabric/OneLake with Solution 2 and 3. For Dataflows and Semantic Models, you can schedule a refresh up to 48 times a day, bringing that down to a delay of 30 minutes.
Now this is obviously enough for many reporting scenarios, but it will not work as a way to push data Live from Power Apps / Automate to Fabric. In these cases, you will need to write data directly to Fabric instead.
If you need even more frequent refreshes than every hour, again consider the Azure Synapse Link for Dataverse in Solution 1, which through advanced options may be scheduled to run every 15 minutes.
Complexity:
Not all of these approaches are equally straight forward.
The high Flexibility of Azure Synapse Link come at the expense of a complex setup, if you want full control over your sync. You’ll need to dive into the world of Azure — and that can be a complex place to be. To a lesser extent the same is true of Dataflows and Semantic Models, which require some set up, maintenance and administration, and familiarity with Power BI/Query and the Service.
Conversely, the Dataverse Link and Shortcut to Dataverse is painless, after you get the few requirements out of the way. You click, click, click and you’re done, and able to see data being synced hourly.
Summary
And with that overview, I would like to close this way too long blog post, which has been a long time in the making, as the Fabric team kept inventing new ways to integrate Dataverse and OneLake. Let’s see how long it takes before this blogpost is outdated.
Did you like the tutorial & comparison? Do you have any other cool ideas for integrating Power Platform and Fabric? Please reach out in the comments, or directly to me.

Top comments (0)