
My home office desk setup has changed a lot since I started working from home full-time due to COVID-19. This post explains what goes into the setup that I've got, along with ample photographs.
The transition to full remote both left me with more time on my hands and inspired me to tidy up and optimize my setup for comfort and improved AV. I've also started streaming programming on Twitch, which has added a few requirements. I'm planning to write a blog post about my experience doing live coding thus far as well, which will have some more details about how the equipment in this post hooks up to the stream.
Hat tip to stapelberg and Matt Layher, whose posts inspired me to make one of my own.
(FYI: none of the product links in this post are referral links.)
Furniture
I have a Ikea table top and desk legs that I got off of Craigslist a few years ago. Nothing fancy, but it's a large surface with ample room for my things (and clutter). I have a motorized standing desk at work, which I appreciate, but realistically I don't stand up often enough to work to justify buying one at home.
Chair: Used Aeron

I have an Aeron chair that I also bought on Craiglist soon after my employer asked everyone to work from home given COVID. I got it at a pretty good discount. Never buy an Aeron chair new! There are always people trying to unload them on Craigslist and elsewhere.
Laptop Stand: Custom Vawter Stand

On top of my desk, I'm fortunate to have a laptop stand that was created to my specifications by my talented colleague Bob Vawter, who has a passion not only for programming but also for all manner of CAD, 3D-printing and other physical hackery. Its special property is that, unlike most laptop stands, it has a negative tilt for the bottom (the bottom of the laptop keyboard is higher than the laptop's hinge). This is important for my setup because I prefer to arrange my laptop in a vertical stack with my external monitor to avoid having to turn my head left and right too much, and because of this my laptop tends to come quite close to where my keyboard will sit. So, it's nice to have a little bit of room under the laptop to tuck my keyboard. This is more of a problem at my office, which has a shallower desk: there, the laptop stand overhangs my keyboard by a significant amount.
Easter Egg
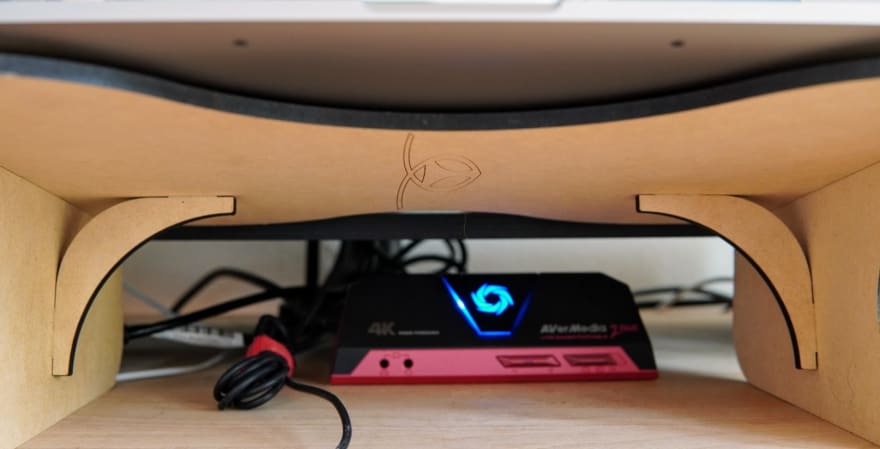
Bob also added a very neat easter egg to the laptop stand. When viewed at the right angle, an etched pattern on the bottom surface of the stand appears as the lovable logo of our employer, Cockroach Labs. The red abomination is my capture card, placed out of sight so as not to offend my sensitive eyeballs.
Behind my laptop stand, I have a couple of small desk organizer shelves and a box for hiding cables and accessories. This helps the desk stay clear of clutter, though it's still easy for clutter to accumulate if I'm not careful. I find that a more organized desk makes me feel happier, but I only realize that over time: it's somewhat subconscious.
Computer equipment
Laptop: MacBook Pro
It's your garden variety 2018 15-inch MacBook Pro. I'm a simple Mac pleb, and for better or for worse haven't entered into the PCPartPicker world of building your own, yet, though I am tempted when I read about people's awesome setups. I spent a lot of time in highschool and college tweaking Gentoo and Arch installs, and to be honest I don't miss the experience of having to frequently unbreak things. MacOS mostly just works, despite recent egregious regressions in Catalina.
Monitor: HP Z-27n
I have an HP Z-27n monitor, which is a pretty basic 27-inch QHD (1440p) monitor. It's pretty good. I don't have any major complaints, though I wish it had more than 1 HDMI input to make it easier to switch between laptop and game console input.
By default, the Z-27n's stand is pretty bulky, so I bought a Jarvis Monitor Arm which has a reduced footprint. I don't use the arm movement as much as I was expecting to, though, so I'm not sure it was a worthy investment.
USB Hubs
The MacBook Pro doesn't have any HDMI outputs, so I use this USB-C Hub to connect to my monitor. It also has some USB inputs, but I only use one of them to connect to my monitor, since the monitor itself has some more USB ports that are less in the way on my desk. Unfortunately, the monitor doesn't have enough USB slots on its own, though, so I bought another basic USB Hub and attached it to the back of my monitor with some sticky tack to keep it out of the way.
Keyboard: Iris Rev2
I can't use a standard, un-split keyboard without getting wrist pain, so I've needed to use some variety of ergonomic keyboard since my first job. I started with the Microsoft Natural Ergonomic 4000, which is an incredibly affordable and effective solution for wrist pain that I recommend to everyone who is beginning to have symptoms.
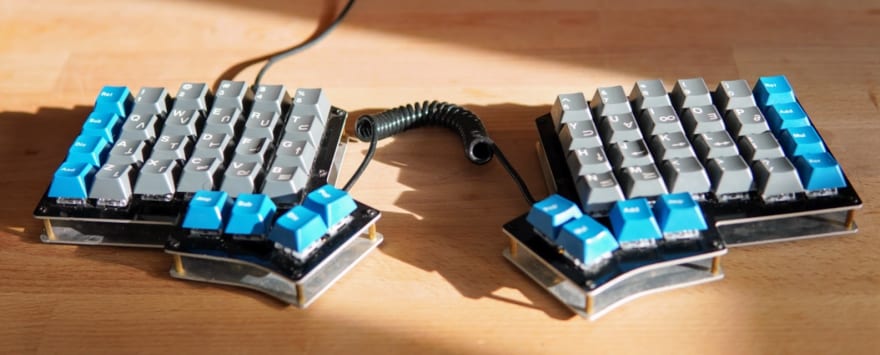
I eventually got bitten with the mechanical keyboard bug, which is a great way to waste a lot of money. My current daily driver is an Iris Rev 2 that I bought from a Redditor on /r/mechmarket. It has Kailh Sage clicky keyswitches, which are satisfyingly heavy at 75g of actuation force. They're probably a bit too loud overall. The keycaps are Space Cadet GMK, which I also bought from someone on Reddit. I really like the color scheme and Lisp machine stylings of these keycaps.
The Iris's layout is far and away my favorite layout that I've tried so far. Its split nature means that I can adjust the angles of the keyboard to perfectly match the angles of my arms, so that no matter where my hands are on the desk, I never have to deviate my wrists away from alignment with my arms. I also like how compact the keyboard is, because it means that I can place my mouse pretty close to where my right hand sits on the home row. The only thing I'd like to try tweaking here is adding some tenting, so that my hands can sit at a more natural level of pronation.
I use a customized variant of a QWERTY keyboard layout. You can see the layout on GitHub if you're curious. The Iris demands that you spend a little bit of time thinking about where some keys go, because it is missing the one of the standard columns on the right side of the keyboard. Most of the changes just have to do with placing keys like [ and ] in logical spots, which I won't bore you with.
Navigation layer
The Iris's firmware, QMK, allows you to make custom layers, which are keyboard mappings accessible after holding (or toggling) a keyswitch. Normally, we're all used to the Shift layer (capitalizes letters when Shift is held) and others (option, command, etc), but QMK gives you the flexibility of defining your own.
I've defined a navigation layer that gives me the arrow keys on IJKL, so I can hold a thumb modifier on my left hand and arrow-key navitage with my right hand without having to leave the home row. This is pretty nice. The navigation layer is also used to access F keys in my layout.
My favorite customization is probably mapping the Caps Lock key to control when held and escape when tapped. Thanks to Steve Losh and his classic 2012 blog post A Modern Space Cadet for teaching me this trick.
Mouse: Logitech M500

I use a Logitech M500 corded mouse. It's nothing special, but I love the scroll wheel clutch, when lets you disable the scroll wheel's clickiness and scroll at hyper speed if you need to.
The mouse pad is from "TECKNET", I'm not sure where I got this but it's just a basic mouse pad with a gel wrist rest.
A/V equipment
I started my live coding stream a little bit before COVID started, so I was lucky enough to grab the following equipment without difficulty. I've heard a lot of this stuff is sold out now due to supply chain issues, so YMMV if you're looking to purchase it as of this writing.
Microphone: Blue Yeti

I have a Blue Yeti USB condenser microphone. I'm happy with this microphone, and it provided an easy way to get started with high quality audio without having to think about getting an XLR audio interface or mixer.
The Blue Yeti is very sensitive, as a condenser microphone, which is both a good and bad thing. On the positive side, it picks up my voice beautifully without having to be directly in front of my mouth. On the negative side, it also picks up just about every background noise inside and outside my apartment, including my laptop's fan, keyboard, girlfriend's video calls in the next room, chirping birds, neighborhood children playing, and car radios boomping.
I got dissatisfied with how much noise it was picking up from my typing specifically, so I bought a RØDE PSA1 boom arm to elevate the microphone from the desk, as well as this Blue Radios II shock mount, which is designed to isolate the microphone from vibrations caused by movement on the boom arm's mounting surface. I also bought a pop filter to try to tame the sibiliants from my speech.
With the boom arm, I can move the microphone directly in front of my face without getting in the way of my keyboard or monitor, which lets me turn the gain of the microphone all the way down while still having a good output volume for my audience. Even with the gain at minimum, though, the microphone is still sensitive to pick up a lot of background noise.
Overall, I'm happy with this setup. I ever decide to change it, I would probably try a less sensitive dynamic microphone to avoid more background noise. Since I have this boom setup already, it won't be a challenge to get the microphone close enough to my face to make a dynamic microphone viable.
Headphones: Oppo PM-3
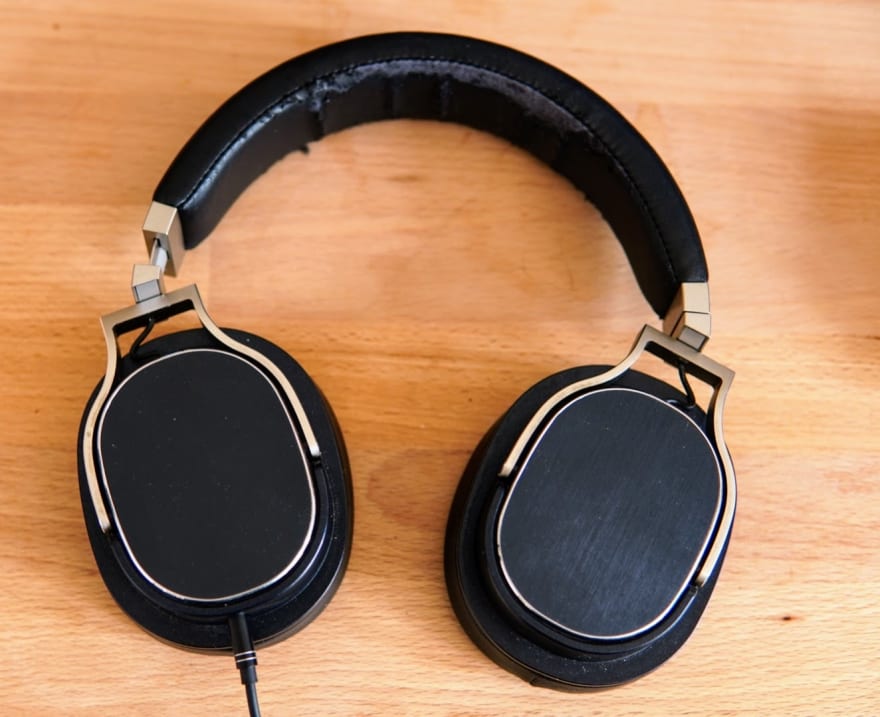
I bought a pair of Oppo PM-3 headphones in 2015 based on a Wirecutter recommendation. I like them a lot, but they're no longer made by Oppo. I plug the headphones directly into the Blue Yeti, which has a built-in mixer that combines the sound that the microphone is picking up from the environment with the sound that's coming from your computer. This is a convenient way of monitoring your levels.
Despite the audio monitoring, I've gotten some reports from my girlfriend that I talk too loudly on my phone calls. I think this is because the closed back nature of the PM-3's makes it so that I can't accurately judge the volume of my own voice when I have them on. Because of this, I'm interested in investing in a pair of open-back headphones that let in more environmental noise - and presumably my own voice as well. My colleague Keith McClellan recommended the Sennheiser HD 6XX headphones for this purpose, but I haven't tried them.
Camera setup, v1: Logitech C922
I bought a Logitech C922 webcam when I started streaming. At first, I mounted it to the top of my monitor, but I found that I didn't like the angle of the picture very much: the webcam was too high above my head. So I bought a goose neck mount for the webcam and placed it to the right of my monitor at closer to eye height.
This is a great webcam, and realistically I had no reason to change my setup. I made a couple of YouTube videos with it (for example, see my post on column families in CockroachDB, which turned out find, but I didn't like the quality of the picture when I was doing a full frame of my face for the intro: the C922 just doesn't produce an image of the quality that people expect from YouTube videos these days.
Camera setup, v2: Sony a6400

After consulting my colleagues and photography experts Ron, Nick and Dan, I purchased a Sony a6400 mirrorless camera and a Sigma 30mm f/1.4 lens. The picture quality on this combination is extremely good, and elevates video recordings to the quality that you'd expect from a YouTube video. Of course, the camera is also fantastic for hobby photography. Most of the images in this post were captured with the A6400.
Capture Card: AVerMedia Live Gamer Portable 2 Plus (ugh)
In order to connect the camera to my computer as a video input, I use the AVerMedia Live Gamer Portable 2 Plus capture card, a hideous and hideously named piece of gear that can convert an HDMI input into a USB video output. It's not necessary for the camera, but it also sports an HDMI passthrough output. I bought this previously to be able to stream gameplay from a PS4 or Nintendo Switch, but I haven't done too much of that because I'm pretty bad at video games and talking about them while playing. This capture card is pretty good, but it's slightly laggier than ideal. I haven't measured it, but I'd guess there's 50-100ms of lag between the video from the camera and the video input to the computer. This isn't enough to be distracting, though, in my experience.
The worst part of the capture card is probably its looks.
Once connected to my computer via the capture card, the camera is visible as an ordinary video input, which allows me to use it as a webcam. The picture quality is definitely overkill for work calls, but it's fun to appear extra HD in a meeting - colleagues will immediately notice.
Overall, the A6400 probably wasn't a necessary addition to my setup. but it's certainly awesome and will hopefully lend itself to some more video content in the future.
Lighting

I have a window behind my desk, so to try to improve the lighting on my face and prevent unpleasant backlighting, I use a basic goose-neck desk lamp with a bright daylight LED bulb. Instead of pointing it directly at my face, which would blind me and also probably look horrible, I point it at the wall behind my camera. The wall is painted bright white, so the light reflects nicely and provides a really cheap softbox style lighting setup. I think it works okay, but since it's just one point of light, it's not completely ideal.
This picture also shows off how the A6400 attaches to the gooseneck webcam mount I mentioned earlier.
Virtual Whiteboard: iPad, Apple Pencil, Concepts

When you're not in an office, you can't practically use a whiteboard to explain concepts to or collaborate with a coworker. I use an iPad Mini and Apple Pencil, along with the awesome Concepts app, as a whiteboard that I can use over Google Hangouts with my coworkers or on my Twitch stream.
To broadcast the drawing, I plug the iPad into my computer with its Lightning cable, which will behave like another webcam. From there, I can open it in a Quicktime Player recording window and screenshare that window over Hangouts, so my coworkers can see what I'm drawing. This has been really effective.
The downside to this setup is that it doesn't provide collaboration, only explanation, because only I can edit the image. I'm still searching for a program that lets both sides of the call edit the picture, while still allowing me to use the Apple Pencil for drawing.
Future improvements
I'm happy with where this setup ended up. The biggest improvement I have my eye on is probably a more powerful, non-portable computer that I can use for my Twitch stream. My laptop struggles when trying to compile big Go programs and run OBS at the same time, which leads to a laggy and sad experience for both me (slow compile times) and my viewers (choppy video).
This is a pretty big change, though, and I feel that I've already spent way too much money on this setup, so I doubt I'm going to get to it any time soon.
If you have any questions or comments, I'd love to hear them on Twitter!

Latest comments (0)