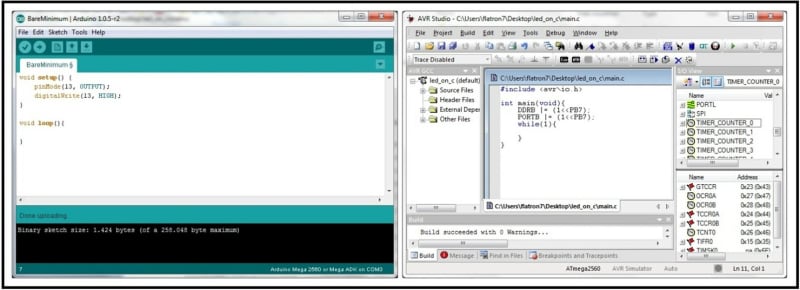
I am starting to write a new text about programming, but something is slowing me down terribly. I have written a lot of text in which I cannot find satisfaction. I miss the registers, the cruel c/c++, I miss the vectors, counters, peripherals, I miss the structure of the program, I miss the imagination. It's like someone has taken away the beauty of programming, hidden the truth about hardware, and given me the Arduino IDE. And I ask myself the same question several times: "How can I teach you the AVR architecture using the Arduino IDE?" And somewhere between truth and lies, I find the answer: "You can't". Fortunately, I can go back to the beginning of the idea, to what I want to achieve with the programming text, and everything becomes clearer to me. I don't want to give you libraries, take away hardware, and hide the truth, no matter how complicated it may be. The Arduino IDE has very cleverly bypassed the MCU hardware and given you ready-made functions written by professionals. It's not all black, we can always write programs in a professional tool like AVR Studio and use the Arduino development board and its bootloader. Let's remind ourselves, the bootloader allows us to change the FLASH memory without using a programmer. Arduino IDE (left) and AVR Studio (right) are two different development environments, and you don't have to be a genius to conclude which one is more powerful.
Before starting to learn programming, we need to ensure the necessary hardware on which we can test all of our programs. Currently, Arduino offers around 20 different development boards, and we will be using the "Arduino MEGA 2560". This development board is characterized by one of the most powerful 8-bit AVR microcontrollers, the "ATmega2560". It is much easier to learn programming on a "smaller" microcontroller, but we do not want to be limited by the microcontroller's pins, memory, and peripherals.

I am trying in vain to connect different perspectives of writing programming code and I am unable to find the right words to describe the reasons for my previous failures. Arduino IDE is the best tool for beginners and offers an easy adoption of the basics of programming in c/c++ language. You can download it from the website www.arduino.cc and test a large number of programming examples implemented in the development environment within a few minutes.
In all attempts to choose Arduino IDE as a development environment, I can't ignore the most important detail: "It's almost impossible to learn how to program microcontrollers in Arduino IDE!". It's not easy to support every "stupidity" I write with indisputable evidence, so accordingly, I will ask all Arudino c/c++ programmers the following question:
Generate a 50% duty cycle PWM signal with a frequency of 62.5 kHz using "Timer/Counter 1" in "Fast PWM" mode provided that the "TOP" value of the counter is defined by the "ICR" register, and call the shortest possible "ISR" on each counter overflow. The question is: Which assembler instruction, other than "SEI", sets the I-bit of the SREG from logical "0" to logical "1" in the written program?
I hear someone in the background, some genius AVR who doesn't even think about starting to program this. He just smiles and with knowledge of the AVR architecture, he answers "RETI" in a few seconds. Genius, sit down, you're right! We can't and shouldn't look at the microcontroller as a black box, and Arduino IDE constantly forces us to do so. However, freedom of choice still allows us to use both development environments, Arduino IDE and AVR Studio, and in the future, we will have to conclude what Arduino IDE hides, and I eagerly want to show you.
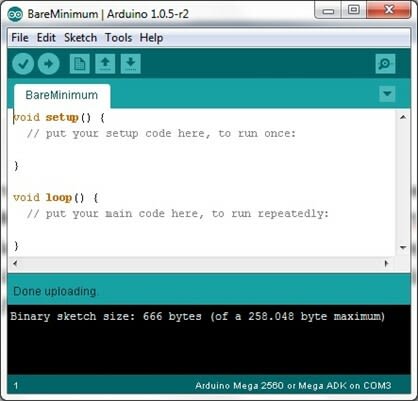
Let's write the simplest program using the Arduino IDE. Connect the "Arduino MEGA 2560" development board to your USB computer, open the example located at "File/Examples/01.Basics/BareMinimum". If you have properly set the "Board" and "COM port", after clicking on the "Upload" button, the Arduino IDE will write a new program to the FLASH memory of the AVR microcontroller and confirm the write with the message "Done uploading". This is the simplest program we can write in the Arduino IDE.
The important rule of the c/c++ language states that a written program must contain at least one function and it must be called "main()". As you can see in the example, we have functions named "setup()" and "loop()", but the "main()" function seems to be missing. By looking at the two functions in the Arduino IDE, we can conclude that something is hidden from us, and that is primarily the "main()" function. What is the truth when, on the other hand, it is a lie? Here is the "main()" function located at: "C:\Program Files (x86)\Arduino\hardware\arduino\cores\arduino\main.cpp".
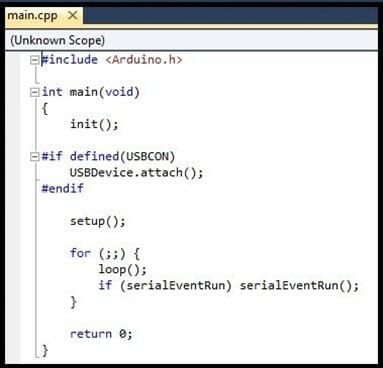
It is not possible to write a program in the C/C++ programming language without having a function called "main()". The shortest C/C++ program looks like this: "int main() { }" and consists of the only required function main(). Yes, Arduino IDE wrote the most important function "main()" without our knowledge, and gave us the functions "setup()" and "loop()". In the main() function, you can find a call to a completely new function called init();, which sets up the AVR architecture, its registers, counters, analog-to-digital converter... How did Arduino programmers know how to set up the microcontroller? They didn't know, they set it up as best they could and ignored 90% of the microcontroller's capabilities. I am appalled by the fact that they set 16-bit counters in an 8-bit mode and ran them at low frequencies. It's like driving a car at 2 km/h, and no one can dispute that you're still moving. I know you expect an explanation of terms such as counter, function, register, setup(), loop(), main(), and many other things I've written, but you'll have to be patient.
Why doesn't Arduino IDE show you the main() function, all the details of the init() function, or to be more precise, all the details of any Arduino function? We would have to reveal a big secret: "Programming microcontrollers is extremely complicated." Instead of the truth, they give you functions with names like pinMode(), digitalWrite(), analogWrite(), analogRead(), tone(), shiftIn(), millis(), micros()... They give you libraries for Servo, GSM, Ethernet, WiFi, I2C, UART... They open up the possibility of connecting the development board to all sensors labeled "Arduino compatible." With such wonderful gifts, they take away 90% of the real capabilities of the microcontroller, leave 10%, and convince you that Arduino IDE is unquestionably the best. It's not the best, but it's certainly the easiest. That's why Arduino IDE is so popular, because nobody wants to learn too much, we all expect fast results. If I wrote only about Arduino IDE, I would save a lot of my and your nerves, show an example of turning on an LED, explain 2 functions, and finish this story in a few hours. There is one thing I wouldn't forgive myself for. Arduino IDE is a village, AVR architecture is a city, and ARM architecture is the whole world for now.
If I wrote about Arduino IDE development environment and programming in it, I wouldn't be allowed to mention any of the terms from the following collection: "SREG, STACK, SP, PC, SEI, TCCR0A, OCR1B, R0, DDRC, PORTA, PINB, ADMUX, ADCSRA, EEAR, EICRA, EIMSK, CS00, TOIE2, COM2A, TOV2, UDR0, RET..." Over time, I would write many Arduino IDE examples, make dozens of devices and robots, fulfill all your assumptions about programming, and throw away many years of my own struggle and learning. For Arduino IDE, you can find all program examples and detailed descriptions on the internet, the whole world writes about them. I see no reason to explain identical programs again.
The biggest sin of a programmer is understanding tools such as Arduino IDE, AVR Studio, Bascom, Assembler, Notepad, and ultimately the HEX file. Ignorance is bliss. If we gather all the types of programmers mentioned, they will all talk and think about the same thing, they will all be right, they will achieve the desired result, yet they will write completely different commands. Where else to look for the truth but in the FLASH memory of the microcontroller. No one can forbid us to turn on the LED in both Arduino IDE and Assembler. All programmers know that to turn on the LED, which is called "L" on the Arduino MEGA 2560, it only takes three things.
- Configure the port as an output of the microcontroller
- Set the port to the logical state "1" (5V on the port turns on the LED)
- Stop further program execution.
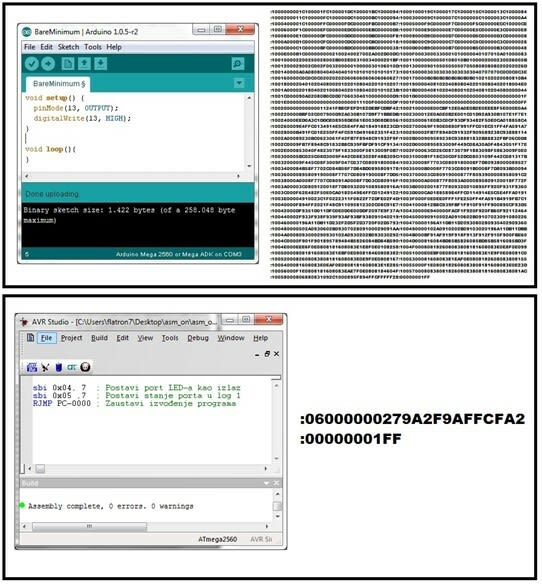
In the Arduino IDE, we can achieve this task by calling just two Arduino functions named "pinMode(13, OUTPUT);" and "digitalWrite(13, HIGH);" as shown in the picture. pinMode() sets the LED port as an output, and digitalWrite() sets the output to a logical "1" state. The third item of "stopping the program" has already been done, but we don't see it because the Arduino IDE once again limits us to exact information. Don't worry, in main.cpp file and main() function, you can find the program line "for(;;)", which is an infinite loop from which the microcontroller never exits, and we can say that we stopped the program execution with an infinite loop. Well, not us, the Arduino IDE did it for us. All dreams have come true, at least until we look at what is written in the FLASH memory of the AVR microcontroller. Instead of explaining programming, I am futilely looking for a small enough font to display the FLASH memory of this simple program written in the ARDUINO IDE.
As opposed to the Arduino IDE, we can include an identical LED in the purest and most powerful assembler and write just 3 instructions to the microcontroller's FLASH memory. This is not a joke; this is the real difference between the ARDUINO IDE and assembler. How is it possible that both programmers are thinking about the same three things that they need to do, they both need approximately the same number of commands, and as a result, they get such a different program size recorded in the FLASH memory? Since we are already fragmenting the program, let's take a closer look at the "hex" file written in assembler.
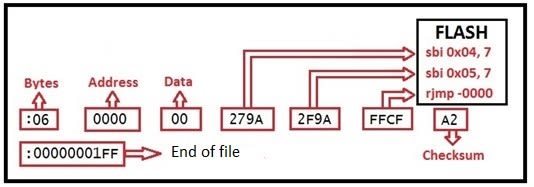
• Bytes: 06 - Number of bytes for the FLASH memory. As expected, we need 3 instructions of 2 bytes each. In the hardware and memory section, it is explained how AVR executes instructions of 2 or 4 bytes. In this case, the instructions "279A", "2F9A", and "FFCF" are each 2 bytes in size.
• Address: 0000 - logically, the first instruction is located at the beginning of the FLASH memory, at address 0000.
• Data: 00 - the HEX row contains information for the FLASH memory.
• Instruction: 279A - The first instruction for the AVR CPU sets the LED port as an output.
• Instruction: 2F9A - The second instruction for the AVR CPU sets the LED port to a HIGH state.
• Instruction: FFCF - The third instruction for the AVR CPU stops further program execution.
• Checksum: A2 - A control byte that proves the correctness of the HEX row record.
• End: 00000001FF - Indicates the end of the HEX file.
Someone is laughing again in the back row because they know that only instructions for the AVR CPU are written to the FLASH memory of the microcontroller, not a HEX file: 279A, 1F9A, FFCF. To understand these differences in programming, in the following text we will arrange higher-level and lower-level programming languages and introduce a new concept called "Compiler".

Top comments (0)