
1. Overview
Supabase is a backend as a service(BaaS) platform, which is an open source alternative to firebase, but it has better services interms of cost and setup. there are many services including, but not limited to, authentication, postgres database, storage and more.
For this guide, i will guide you step by step from creating and configuring a fully automated auth + db, including syncing user data, i am using nextjs but you can use any frameworks of your choice.
2. Prerequisite
nextjs 14 or 15 (app router)
3. Supabase setup
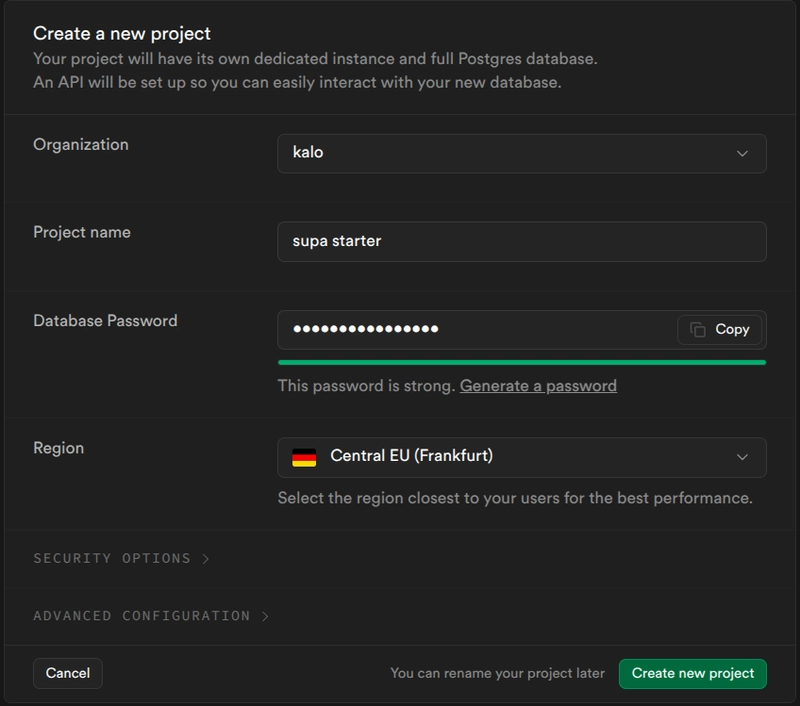
Step 1: Go to supabase and signup, then create a new project by selecting your organization.
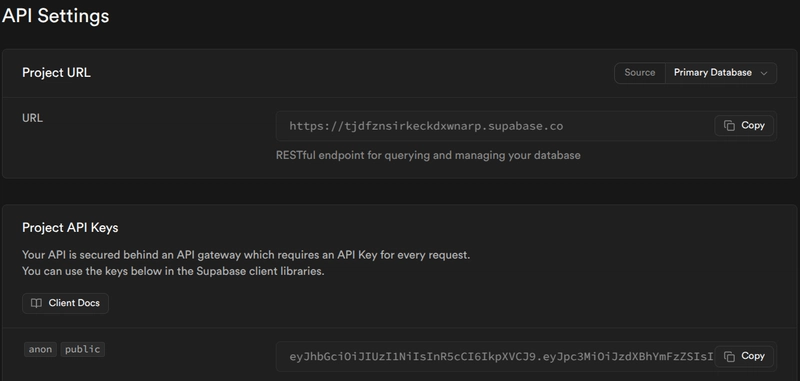
Step 2 : Once you created, go to APIs page and copy your url and anon key and store them in .env.local, name them like this: NEXT_PUBLIC_SUPABASE_URL, NEXT_PUBLIC_SUPABASE_ANON_KEY.
Step 3: Now, i am going to use Google as a provider so you need to create a project in Google cloud platform and get your Oauth credentials(client_id and client_secret).
Follow this guide on how to obtain them.
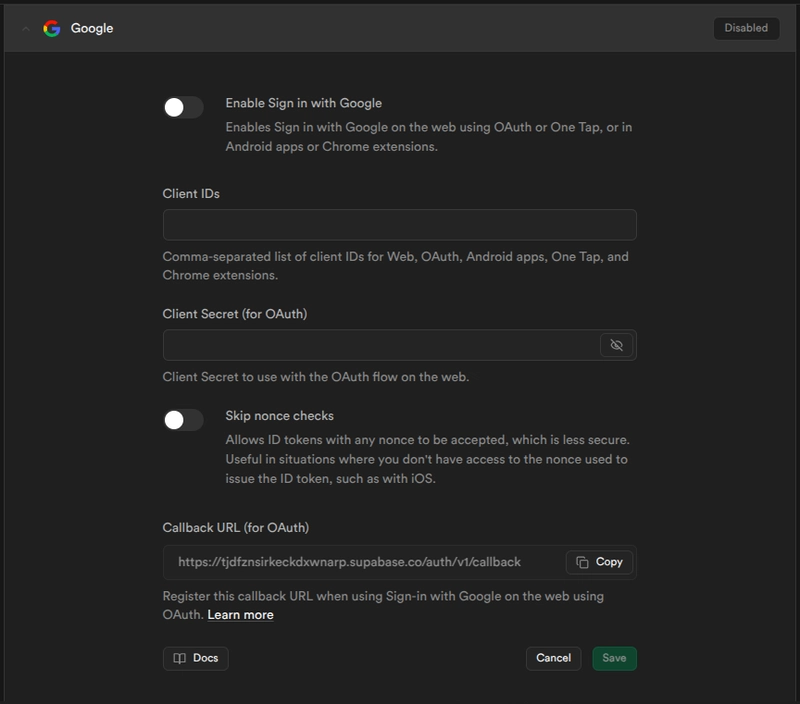
Step 4 : Great, you came all this way, go to Authentication => Providers => Google, insert your client_id and client_secret and copy callback url, go back to Google cloud and peste it in Authorized redirect URLs section in Credentials page of your project.
Now enable the provider and save it. we’ve finished the basic setup for auth now.
Step 5 : Go to database section, click connect button on top, get your connection string so that you can push the table schema from your local repo. after pushing your schema, it will create a table for you.
So what we want is when a new user signs up using google, he will be added to the auth and synced to the database automatically. there are no webhooks to do this, but you can use triggers and functions to call the db and insert user data.
Go to Sql editor section and create a function, this will be called by the trigger when a user signs up, which in turn inserts user data to the table. make sure to change fields as your need:
create or replace function public.sync_user()
returns trigger as $$
begin
  insert into public."User" (
    "supabaseUserId",
    email,
    "fullName",
    "avatarUrl"
  )
  values (
    new.id,  -- maps to supabaseUserId
    new.email,
    coalesce(new.raw_user_meta_data->>'full_name', null),
    coalesce(new.raw_user_meta_data->>'avatar_url', null)
  )
  on conflict ("supabaseUserId") do nothing;

  return new;
end;
$$ language plpgsql security definer;
Now, create a trigger, which will be called on a new user sign ups:
create trigger on_auth_user_created
after insert on auth.users
for each row
execute function public.sync_user();
execute both of queries and now you have a fully automated user data sync with supabase 🎉.
4. Implementation in Next.js
Step 1 : create a new nextjs app using: npx create-next-app@latest
Step 2 : once installed, open it up in your favorite editor and install supabase package using: npm install @supabase/supabase-js
Step 3 : create a file named supabase.ts, and peste the following code:
import { createClient } from "@supabase/supabase-js";

const supabaseUrl = process.env.NEXT_PUBLIC_SUPABASE_URL!;
const supabaseKey = process.env.NEXT_PUBLIC_SUPABASE_ANON_KEY!;
export const supabase = createClient(supabaseUrl, supabaseKey);
Step 4 : create a global store for managing auth state, in my case i am using zustand but you can use your own state manager and implement like mine:
import { create } from "zustand";
import { supabase } from "@/lib/supabase";
type AuthState = {
  user: any | null;
  isLoading: boolean;

  setUser: (user: any | null) => void;
  setLoading: (loading: boolean) => void;
  signOut: () => Promise<void>;
};

export const useAuthStore = create<AuthState>((set) => ({
  user: null,
  isLoading: true,
  setUser: (user) => set({ user }),
  setLoading: (loading) => set({ isLoading: loading }),
  signOut: async () => {
    await supabase.auth.signOut();
    set({ user: null });
  },
}));
Step 5 : create a sign in page, app/(auth)/signin:
"use client"
import { Button } from "@/components/ui/button";
import { supabase } from "@/lib/supabase"

export default function GoogleSignIn() {
  const handleSignIn = async () => {
    const { data, error } = await supabase.auth.signInWithOAuth({
      provider: 'google',
      options: {
        redirectTo: `${window.location.origin}`
      }
    })

    console.log("Supadata", data);

    if (error) console.error(error)
  }

  return (
    <Button onClick={handleSignIn}>
      Sign in with Google
    </Button>
  )
}
Step 6 : create a sign out page: app/(auth)/signout:
"use client"
import { useAuthStore } from "@/store/authStore";
import { useRouter } from "next/navigation";

export default function SignOutButton() {
  const { signOut } = useAuthStore();
  const router = useRouter();

  const handleSignOut = async () => {
    await signOut();
    router.push("/signin");
  };

  return <button onClick={handleSignOut}>Sign Out</button>;
}
Step 7 : create AuthProvider.ts file to manage auth state globally:
"use client";

import { useEffect } from "react";
import { supabase } from "@/lib/supabase";
import { useAuthStore } from "@/store/authStore";

export default function AuthProvider({ children }: { children: React.ReactNode }) {
  const setUser = useAuthStore((state) => state.setUser);
  const setLoading = useAuthStore((state) => state.setLoading);

  useEffect(() => {
    const initializeAuth = async () => {
      setLoading(true);
      const { data: { session }, error } = await supabase.auth.getSession();

      if (error) {
        console.error("Error fetching session:", error);
        setUser(null);
      } else if (session) {
        setUser(session.user);
      } else {
        setUser(null);
      }
      setLoading(false);
    };

    initializeAuth();

    // Listen for authentication changes
    const { data: authListener } = supabase.auth.onAuthStateChange((_, session) => {
      setUser(session?.user || null);
    });

    return () => {
      authListener.subscription.unsubscribe();
    };
  }, [setUser, setLoading]);

  return <>{children}</>;
}
Step 8 : create Authenticated.ts file which controls access to pages:
"use client";

import { useEffect } from "react";
import { useRouter } from "next/navigation";
import { useAuthStore } from "@/store/authStore";
export default function Authenticated({ children }: { children: React.ReactNode }) {
  const user = useAuthStore((state) => state.user);
  const isLoading = useAuthStore((state) => state.isLoading);
  const router = useRouter();

  useEffect(() => {
    if (!isLoading && !user) {
      router.replace("/signin");
    }
  }, [user, isLoading, router]);


  return <>{children}</>;
}
Step 9 : Now wrap root layout.ts using AuthProvider and Authenticated (optional, you can use on specific pages):
import "./globals.css";
import AuthProvider from "@/components/AuthProvider";
import Authenticated from "@/components/Authenticated";

export default function RootLayout({
  children,
}: Readonly<{
  children: React.ReactNode;
}>) {
  return (
    <AuthProvider>
      <Authenticated><html lang="en">
        <body
        >
          <link rel="icon" href="/favicon.ico" sizes="any" />
          {children}
        </body>
      </html></Authenticated>
    </AuthProvider>

  );
}
5. Conclusion
In this article, you learned how to:
✅ Set up Supabase authentication in a Next.js app.
✅ Use Google as an authentication provider.
✅ Automatically sync user data to the PostgreSQL database.
If you found this guide helpful, follow me and hit the 👏 clap button!
You can find me on GitHub, or email me at kalisha123k@gmail.com. 🚀

Top comments (0)