
Node.js is a popular JavaScript engine for executing JavaScript on the server side. Due to years of efficient and effective software development with JavaScript using Node.js on the server by top tech companies, it has become the de facto server-side development in JavaScript.
In software engineering, software testing is a crucial phase, and it helps eliminate defects and ensure the software under test conforms with the requirements.
Over the years, using Mocha to implement software testing has shown an increasing advantage over other tools because you can easily switch between the assertion libraries for Test-Driven Development (TDD) and Behavior-Driven Development (BDD).
In this NodeJS unit testing tutorial, we will explore the intricacies of performing effective software testing with Node.js while writing efficient test cases using Mocha and Chai. In addition, you will learn how combining Chai and Mocha helps you write better-quality code by running your automated tests in Node.
What is NodeJS Unit Testing?
NodeJS unit testing refers to testing individual units or components of a Node.js application using specialized automation testing frameworks and libraries.
These tests can include testing the functionality of individual functions, modules, or classes and the interactions between different parts of the application.
Some popular NodeJS unit testing frameworks include Jest, Mocha, and AVA. However, this NodeJS unit testing tutorial will explore NodeJS unit testing using Mocha and Chai.
NodeJS Unit Testing with Mocha and Chai
Mocha.js is a popular JavaScript testing framework that runs on Node.js and in the browser. It provides a simple and flexible way to structure and run tests in various environments.
Chai is an assertion library that can be paired with Mocha to provide a more natural and expressive way to write test assertions. Mocha and Chai make it easy to write and run unit tests for Node.js applications. You can learn more about testing NodeJS modules with Mocha through this Mocha NodeJS tutorial.
As of the time of writing, Chai and Mocha have gained significant popularity based on usage and monthly downloads, according to Github and npmtrends.com, respectively.

In the next section of this NodeJS unit testing tutorial, we will explore how to write unit tests using Mocha and Chai.
How to write Unit Tests with Mocha and Chai?
In this section, we will learn to use the Mocha testing library with the Chai assertion library to implement unit testing.
Before we jump into installing and configuring Mocha and Chai to write NodeJS unit testing, let’s explore some of the frequently used methods in Mocha and Chai.
Describe:
The describe() method is a block of grouped test suites. It is a suite of test scripts that are grouped for testing. It takes two parameters; a string as the suite’s name and a callback function to group test cases.
describe('Test Helpers', function () {
 /**
  * Add all your related test cases here
  *
  */
});
It():
The it() method is the smallest test case that is to be executed. It takes two parameters; a string as the suite’s name and a callback function to execute the test case.
describe('Test Helpers', function () {
 it('should calculate Fibonacci series', function () {
   /*...*/
 });
});
Expect:
The expect() method is used in Behavioral-Driven Development (BDD) style libraries to chain assertions together. It is mostly used for topics that resolve to booleans or numbers, etc.
it('should calculate Fibonacci series', function () {
   const fib = fibonacci(4);
   expect(fib).toEqual(5);
 });
Should:
The should() method is also used in BDD-style libraries to chain assertions together. However, it extends each object with a should property to start the chain.
it('partially update challenge - not found', async () => {
 const response = await chai.request(app)
 should.equal(response.status, 404)
 should.equal(response.body.message, 'Challenge with id: ${notFoundId} doesn't exist')
})
Assert:
The assert() method is used in Test Driven Development (TDD) style libraries to chain assertions together.
it('partially update challenge - not found', async () => {
 assert('foo' !== 'bar', 'foo is not bar');
 assert(Array.isArray([]), 'empty arrays are arrays');
})
Accelerate JavaScript Automation with Mocha. Try LambdaTest Now!
How to install Mocha and Chai?
To get started with Mocha and Chai, you’ll first need to install them in your project. You can do this by running the following commands in your terminal:
You can create a new project or clone this repository for this project:
npm install --save-dev mocha
npm install --save-dev chai
You can download the repository here.
Once you have Mocha and Chai installed, you can start creating test files.

Next, your project folder structure should look like the one in this sample having the tests folder.

Mocha looks for test files in a directory called test by default, but you can also specify a different directory or pattern to search for test files. Each test file should have a .test.js or .spec.js file extension.
Next, If you created a new project, open the package.json file and change the “scripts” block to “mocha” as seen in the code below:
"scripts": {
   "test": "mocha",
   "start": "node app.js"
 },
Before the tests are run, please set the following environment variables in your .env file. You can find the username and access key on your LambdaTest Profile page.
Here we are running the NodeJS unit tests on the LambdaTest — a continuous quality cloud testing platform that lets you perform manual and automation testing for web and mobile across 3000+ real browsers, devices, and operating system combinations.
LT_USERNAME=
LT_ACCESS_KEY=
GRID_HOST=hub.lambdatest.com/wd/hub
After installing the libraries and setting the environment variables, below is the implementation of the web calculator:
How to create a simple NodeJS app?
Let us start by creating a simple NodeJS application that calculates the inputs passed as param to the Node application and returns the result as a response.
In the application below, we have created a simple calculator application using Node.js and deployed it to a production server. You can preview the application here. It takes two inputs and returns the calculated result.

Since the application is already deployed to a live server, we will calculate and return the result. Below is the code to perform the calculations using LambdaTest cloud Selenium Grid
const { Builder, By } = require('selenium-webdriver');
let driver;
const USERNAME = process.env.LT_USERNAME ?? '';
const KEY = process.env.LT_ACCESS_KEY ?? '';
const GRID_HOST = 'hub.lambdatest.com/wd/hub';

const searchCapabilities = {
  browserName: 'Chrome',
  browserVersion: '110.0',
  'LT:Options': {
    username: USERNAME,
    accessKey: KEY,
    geoLocation: 'US',
    platformName: 'Windows 10',
    build: 'calculate',
    project: 'Calculate',
    w3c: true,
    plugin: 'node_js-node_js',
  },
};

const searchGridUrl = 'https://' + USERNAME + ':' + KEY + '@' + GRID_HOST;

async function calculateWithLambdaTest(num1 = 5, num2 = 5) {
  try {
    driver = await new Builder()
      .usingServer(searchGridUrl)
      .withCapabilities(searchCapabilities)
      .build();

    await driver.get(
      'https://www.lambdatest.com/selenium-playground/simple-form-demo'
    );

    const inputSum1 = await driver.findElement(By.id('sum1'));
    const inputSum2 = await driver.findElement(By.id('sum2'));
    const button = await driver.findElement(
      By.xpath(
        '/html/body/div[1]/div/section[3]/div/div/div[2]/div[2]/div[2]/div/div[1]/form/button'
      )
    );

    inputSum1.sendKeys(num1);
    inputSum2.sendKeys(num2);

    button.click();

    const result = await driver.findElement(By.id('addmessage'));

    return await result.getText();
  } catch (error) {
    throw new Error(error);
  } finally {
    await driver.quit();
  }
}

module.exports = {
  calculate: calculateWithLambdaTest,
};
Walkthrough:
Let’s walk through the code together and understand the nitty-gritty of it.
Step 1: Add required packages and create Selenium capabilities
First, we need the selenium-webdriver packages. Before running the operation, we initialized the required.
Next, generate your Selenium configuration using the LambdaTest Capabilities Generator. Set your configuration and copy the JavaScript object to your code, as shown below.

Step 2: Performing Operation.
Next, we created a driver using the configuration and capacity before performing the calculation with the LambdaTest grid using the calculateWithLambdaTest() function.
Inside the function, we create an instance of the driver using the configurations above.

Next, we open the webpage where the calculator is located using the driver.get() function.

Lastly, we find elements on the page using the Selenium findElement function.

The image below shows how you can retrieve the full XPath of any element on your HTML page. You can copy it by right-clicking on the HTML tag of the element and clicking on copy full XPath or just Copy XPath.

Furthermore, inside the calculateWithLambdaTest function, we used the sendKeys() function to pass number input to the input element we retrieved using the findElement function, as shown below:
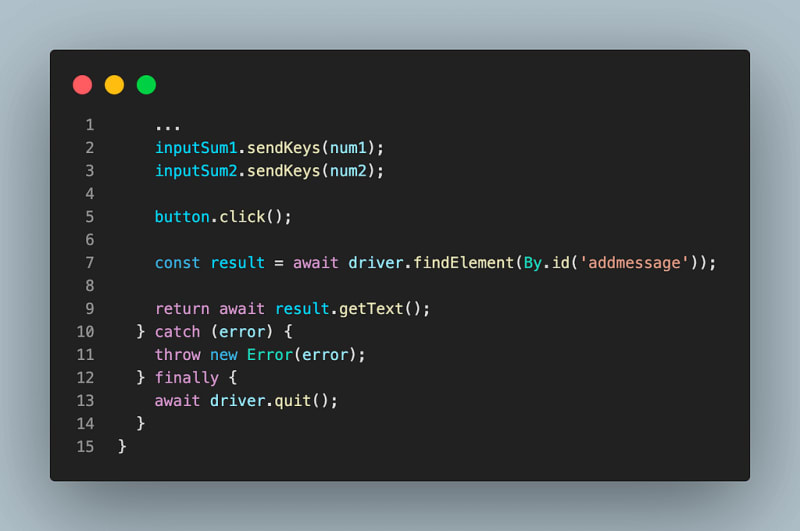
Lastly, we used the click() function to submit the form and perform the calculation. To get the result of the calculation, we use the findElement(By.id(‘addmessage’)) to retrieve the result and the getText() function to retrieve the text value of the result element. You can refer to this blog to learn more about getting the text of an element in Selenium.
Create Node Server with Express
We create a simple Node.js server Express to test the implementation manually before running the test using the Mocha framework.
First, install ExpressJS using the command below:
npm install express
Here is the output of the command:

Create a file in the root directory called app.js and paste the following snippet inside the app.js file:
const express = require('express');

const Calculator = require('./calculate');
const app = express();
const port = 3002;

app.use(express.json());
app.use(express.urlencoded({ extended: false }));

app.get('/calculate', async (request, response) => {
try {
const num1 = request.query?.num1 ?? 4;
const num2 = request.query?.num2 ?? 6;
const data = await Calculator.calculate(num1, num2);
console.log(num1, num2, data);
response.status(200).json(data);
} catch (error) {
response.status(500).json({
message: 'Server error occurred',
});
}
});

app.listen(port, () => {
console.log('Example app listening at http://localhost:${port}');
});
In the next section of this NodeJS testing tutorial, we’re going to explore how to test the Node.js applications using Mocha and Node.js. However, if you manually test out the project, you should see the results depending on the number of inputs provided.
How to perform NodeJS Unit Testing with Mocha?
To write for the Node application, create a file inside the tests directory tests/chai-calculate.spec.js and add the following code snippets. Here is the code snippet:
const chai = require('chai').expect;
const request = require('request');
let url;

beforeEach(async () => {
url = 'http://localhost:3002/calculate';
});

describe('Calculate', () => {

it('calculate the sum of two values', async () => {
request(url, function (error, response, body) {
expect(response.statusCode).to.equal(200);
expect(body[0]).to.equal(9);
done();
});
});

it('calculate the wrong sum of two values', async () => {
request(url + '?num1=5&num2=6', function (error, response, body) {
expect(response.statusCode).to.equal(200);
expect(body[0]).to.not.equal(9);
done();
});

});

});
Lastly, we included all the other test cases inside the Describe block, each test case tests a particular behavior or implementation of a feature.
Running the Test
To run your test, type the following command into your root terminal.
yarn start

yarn test
After successfully running the test, you should be greeted with green passes for your test, like the screenshot below:

So far, we have manually run the test with the command above to ensure that our test is passing before we move ahead to deploy.
We can also automate this process with the LambdaTest Grid, enabling the implementation of a test strategy during the deployment process.
This certification provides the comprehensive knowledge and necessary skills required for success as a JavaScript developer in automation testing, enabling you to excel in any JavaScript automation role.
Software testing is a way to ensure that the software under test (SUT) conforms with the requirements during or after development. It is a very important aspect of software engineering as it reduces bugs and deployment of defective software products.
Mocha, combined with Chai, is a powerful tool for performing NodeJS unit testing using either the BDD or TDD approach. It’s a flexible JavaScript testing framework that makes testing simple and more flexible.
In this NodeJS unit testing, we explored how to perform NodeJS unit testing with Mocha and Chai.
Originally published at https://www.lambdatest.com.

Top comments (0)