
1. Introduction
In software development, tests are very important. Tests help detect bugs before they occur in production environments. They reduce the risk of regression when the software is updated. They are a great tool to secure the delivery and deployment processes. Today, we cannot dissociate continuous deployment or continuous delivery from tests.
Testing locally is good, but testing in an environment as similar to production as possible is even better. Having a staging environment seems like a minimum to have. However, what if you want to test several versions of the same application at the same time?
Also, add to that, many companies want to reduce IT costs, and they see in digital sobriety a way to achieve this goal. So, having one or more staging environments running when we don't need them is not acceptable.
This is why we will see how we can provision ephemeral Kubernetes clusters on AWS EKS using Terraform and Gitlab CI/CD.
2. Provision Kubernetes clusters on AWS EKS with Terraform
Terraform is described by its creators as a tool for building, changing, and versioning infrastructure safely and efficiently. It is very simple to learn and use. This is why I choose it t to manage our infrastructure.
The infrastructure in this example consists of:
- A VPC (Virtual Private Cloud);
- An Amazon EKS cluster;
- An Amazon Elastic Container Registry (ECR) to store Docker images;
- A DNS record that routes traffic to the deployed application.
You can find the source code here: https://gitlab.com/ephemeral-aws-eks-clusters/terraform-ephemeral-aws-eks-clusters
And, if you want to learn more about Terraform, you can begin with the official documentation: https://www.terraform.io/docs/index.html
3. Build the application example
We will build a custom Nginx docker image with an index.html file. This application will display the name of the git branch from which it was built. We need to define the index.html and the Dockerfile.
Content of index.html file
<!doctype html>
<html lang=en>
  <head>
    <title>Hello from BRANCH_NAME</title>
  </head>
  <body>
    Hello, <br><br>
    The version of this app is: BRANCH_NAME
  </body>
</html>
Content of Dockerfile
FROM nginx:1.19.0-alpine

ARG BRANCH_NAME=master

COPY index.html /usr/share/nginx/html/

RUN sed -i "s/BRANCH_NAME/$BRANCH_NAME/g" /usr/share/nginx/html/index.html
The complete source code is here: https://gitlab.com/ephemeral-aws-eks-clusters/example-app-for-ephemeral-eks-clusters
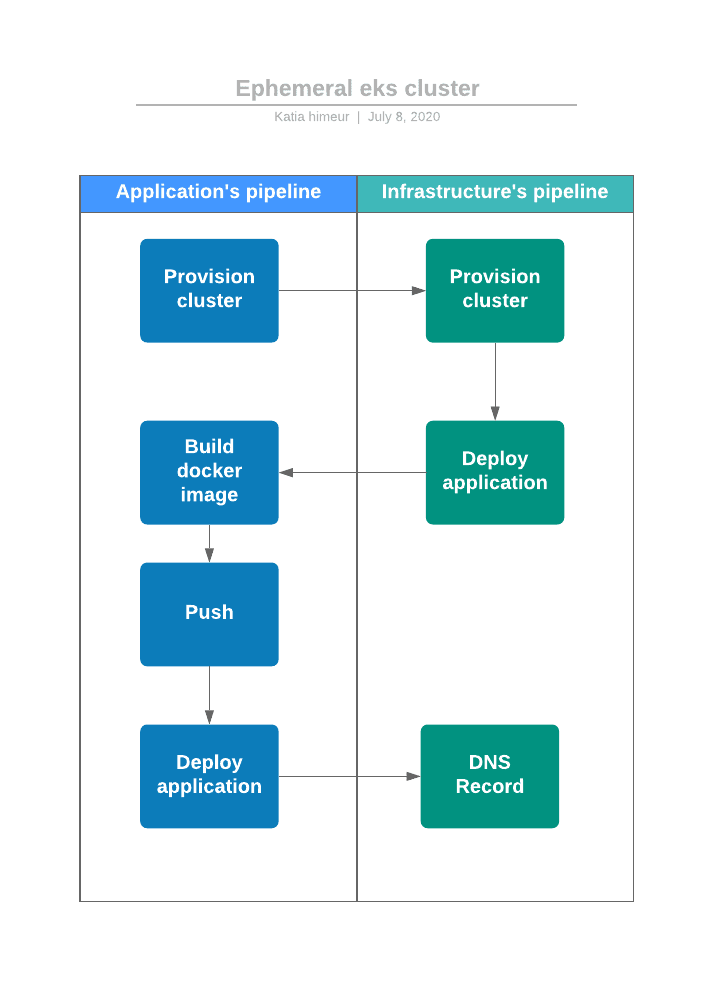
4. Deployment workflow
We develop a web application with a single index.html file. We will package this application in a Docker image. For every new feature, we create a new git branch. Every time we create a merge request, we want to be able to test this new version of the application in an Amazon EKS Cluster. When the request is merged, we want to be able to destroy this cluster. Below the deployment workflow described above:
- The Amazon EKS cluster is created;
- The Docker image’s application is built;
- The new Docker image is pushed in Amazon Elastic Container Registry (ECR);
- The new version of our application is deployed in the Kubernetes cluster with a “kubectl” command.
- A record DNS is created or updated with the load balancer hostname that routes traffic to our application
5. Continuous Delivery with Gitlab CI/CD
Now, after we define the deployment workflow, we need to automate it. Gitlab CI/CD is an open-source project integrated to Gitlab. It allows us to configure CI/CD pipelines with a “.gitlab-ci.yml” file located at the repository’s root directory.
We will define two “.gitlab-ci.yml” files: one in application repository and another in the Terraform repository. We will use triggers.
.gitlab-ci.yml file of Terraform's repository
image:
  name: hashicorp/terraform:0.12.28
  entrypoint:
    - '/usr/bin/env'
    - 'PATH=/usr/local/sbin:/usr/local/bin:/usr/sbin:/usr/bin:/sbin:/bin'

stages:
  - provision
  - deploy
  - clean

cluster:provision:
  stage: provision
  rules:
  - if: '$CI_PIPELINE_SOURCE == "trigger" && $AWS_ELB_HOSTNAME == null && $CLEAN_ENV == null'
  script:
  - echo "Cluster name $CLUSTER_PREFIX_NAME"
  - terraform init -var=cluster_prefix_name=$CLUSTER_PREFIX_NAME
  - terraform workspace new "$CLUSTER_PREFIX_NAME" || terraform workspace select "$CLUSTER_PREFIX_NAME"
  - terraform apply -var=cluster_prefix_name=$CLUSTER_PREFIX_NAME -auto-approve

elb:provision:
  stage: provision
  rules:
  - if: '$CI_PIPELINE_SOURCE == "trigger" && $AWS_ELB_HOSTNAME != null && $CLEAN_ENV == null'
  script:
  - echo "Cluster name $CLUSTER_PREFIX_NAME"
  - terraform init -var=cluster_prefix_name=$CLUSTER_PREFIX_NAME
  - terraform workspace new "$CLUSTER_PREFIX_NAME" || terraform workspace select "$CLUSTER_PREFIX_NAME"
  - terraform apply -var=cluster_prefix_name=$CLUSTER_PREFIX_NAME
    -var cluster_prefix_name="${CI_COMMIT_REF_SLUG}"
    -var aws_elb_hostname=${AWS_ELB_HOSTNAME}
    -var aws_zone_id=${AWS_ZONE_ID}
    -var route53_record_name=${ROUTE53_RECORD_NAME}
    -target=aws_route53_record.www -auto-approve

deploy:app:
  stage: deploy
  rules:
  - if: '$CI_PIPELINE_SOURCE == "trigger" && $AWS_ELB_HOSTNAME == null && $CLEAN_ENV == null '
  before_script:
    - apk add -U curl
  script:
  - curl -X POST -F token="${PIPELINE_TRIGGER_TOKEN}"
    -F ref=${BRANCH_NAME}
    "${PIPELINE_TRIGGER_URL}"

cluster:clean:
  stage: clean
  rules:
  - if: '$CI_PIPELINE_SOURCE == "trigger" && $CLEAN_ENV != null && $CLUSTER_PREFIX_NAME != null'
  script:
    - terraform init -var=cluster_prefix_name=${CLUSTER_PREFIX_NAME}
    - terraform workspace new ${CLUSTER_PREFIX_NAME} || terraform workspace select "$CLUSTER_PREFIX_NAME"
    - terraform destroy -auto-approve -var=cluster_prefix_name=${CLUSTER_PREFIX_NAME}
.gitlab-ci.yml file of the application's repository
stages:
  - provision
  - build
  - release
  - deploy
  - clean

variables:
  CLUSTER_NAME: ephemeral-eks
  AWS_REGION: eu-west-1
  DOCKER_IMAGE_NAME: ${AWS_ACCOUNT_ID}.dkr.ecr.${AWS_REGION}.amazonaws.com/my-app
  DOCKER_IMAGE_TAG: ${CI_COMMIT_REF_SLUG}

provision:cluster:
  stage: provision
  rules:
    - if: '$CI_PIPELINE_SOURCE == "merge_request_event"'
  before_script:
    - apk add -U curl
  script:
    - curl -X POST
      -F token="${PIPELINE_TRIGGER_TOKEN}"
      -F variables[CLUSTER_PREFIX_NAME]="${CI_COMMIT_REF_SLUG}"
      -F variables[BRANCH_NAME]="$CI_COMMIT_REF_NAME"
      -F ref=master "${PIPELINE_TRIGGER_URL}"

build:
  stage: build
  rules:
    - if: '$CI_PIPELINE_SOURCE == "trigger"'
  script:
  - docker build --build-arg BRANCH_NAME="${DOCKER_IMAGE_TAG}" -t ${DOCKER_IMAGE_NAME}:${DOCKER_IMAGE_TAG} .

release:
  stage: release
  rules:
    - if: '$CI_PIPELINE_SOURCE == "trigger"'
  before_script:
    - apk add -U --no-cache python3 py-pip
    - pip3 install awscli --upgrade
    - aws ecr get-login-password --region ${AWS_REGION} | docker login --username AWS --password-stdin ${AWS_ACCOUNT_ID}.dkr.ecr.${AWS_REGION}.amazonaws.com
  script:
    - docker push ${DOCKER_IMAGE_NAME}:${DOCKER_IMAGE_TAG}

deploy:
  stage: deploy
  variables:
    ROUTE53_RECORD_NAME: ${CI_COMMIT_REF_SLUG}.${DOMAIN_NAME}
  rules:
    - if: '$CI_PIPELINE_SOURCE == "trigger"'
  before_script:
    - apk add --no-cache -U curl jq python3 py-pip gettext
    - pip3 install awscli --upgrade
    - curl -LO https://storage.googleapis.com/kubernetes-release/release/$(curl -s https://storage.googleapis.com/kubernetes-release/release/stable.txt)/bin/linux/amd64/kubectl
    - chmod +x ./kubectl && mv ./kubectl /usr/local/bin/kubectl
    - mkdir -p $HOME/.kube
    - echo -n $KUBE_CONFIG | base64 -d > $HOME/.kube/config
    - aws eks --region ${AWS_REGION} update-kubeconfig --name ${CLUSTER_NAME}-${CI_COMMIT_REF_SLUG}
  script:
    - cat myapp-service.yaml | envsubst | kubectl apply -f -
    - export AWS_ELB_HOSTNAME=$(kubectl get svc my-service -n my-namespace --template="{{range .status.loadBalancer.ingress}}{{.hostname}}{{end}}")
    - curl -X POST -F token="${PIPELINE_TRIGGER_TOKEN}"
      -F variables[CLUSTER_PREFIX_NAME]=${CI_COMMIT_REF_SLUG}
      -F variables[AWS_ELB_HOSTNAME]=${AWS_ELB_HOSTNAME}
      -F variables[AWS_ZONE_ID]=${AWS_ROUTE53_ZONE_ID}
      -F variables[ROUTE53_RECORD_NAME]=${ROUTE53_RECORD_NAME}
      -F ref=master
      "${PIPELINE_TRIGGER_URL}"

destroy:cluster:
  stage: clean
  rules:
    - if: '$CI_PIPELINE_SOURCE == "merge_request_event"'
      when: manual
  before_script:
    - apk add --no-cache -U curl jq python3 py-pip gettext
    - pip3 install awscli --upgrade
    - curl -LO https://storage.googleapis.com/kubernetes-release/release/$(curl -s https://storage.googleapis.com/kubernetes-release/release/stable.txt)/bin/linux/amd64/kubectl
    - chmod +x ./kubectl && mv ./kubectl /usr/local/bin/kubectl
    - mkdir -p $HOME/.kube
    - echo -n $KUBE_CONFIG | base64 -d > $HOME/.kube/config
    - aws eks --region ${AWS_REGION} update-kubeconfig --name ${CLUSTER_NAME}-${CI_COMMIT_REF_SLUG}
  script:
    - cat myapp-service.yaml | envsubst | kubectl delete -f -
    - curl -X POST
      -F token="${PIPELINE_TRIGGER_TOKEN}"
      -F variables[CLUSTER_PREFIX_NAME]="${CI_COMMIT_REF_SLUG}"
      -F variables[CLEAN_ENV]=true
      -F ref=master "${PIPELINE_TRIGGER_URL}"
6. Deploy a new staging environment
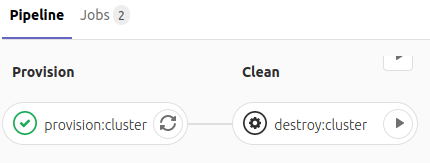
We pushed a new git branch “feature/one” and we create a merge request. A new pipeline is automatically created. The first job running trigger another pipeline in the infrastructure repository’s code. The first step is to provision a new Amazon EKS Cluster. A clean job is created. We will need it only in the end when we will want to destroy this staging environment. It will be run manually.
It takes about fifteen minutes to have an active Kubernetes cluster on AWS.
After the Kubernetes cluster is active and the Amazon ECR is created, a second pipeline is triggered. Three new jobs are created for building, release, and deploy the new Docker image app.

At last, A record DNS is created or updated if already exists with the load balancer hostname that routes traffic to our application.

The web application is now accessible to other users from a custom DNS name:

7. Spot instances
To go further, we can use spot instances to reduce costs. However, keep in mind that with spot instances, there is a risk to have no instance available if Amazon EC2 doesn't have the capacity in the Spot Instance pool.

Top comments (0)